How-To

How to Outline Text in Google Slides

Making bold presentations featured

Want the text in your Google Slides presentation to stand out? A good option for this is to outline your text. This guide explains how.

Presenting to an audience using Google Slides? Your text should stand out. Otherwise, the impact it has might be less than you hoped.

One way to ensure your text stands out is by outlining it. Outlining the text adds emphasis and makes it easier for viewers to read, increasing their engagement with the presentation.

If you want to outline text in Google Slides, here’s what you need to do.

How to Outline Text Using Word Art

A good way to make your text stand out and outline it is to use Word Art. Word Art text in Google Slides has a border around each letter. You can also apply other effects to the text, such as border effects, drop shadows, and reflections.

To use Word Art in Google Slides:

  1. Open your Google Slides presentation.
  2. Select the slide you wish to add text to on the left.
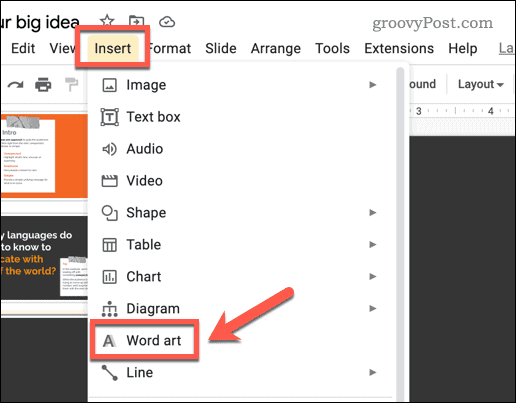
  3. Click Insert at the top of the screen, then select Word Art from the drop-down menu.
    Insert WordArt in Google Slides
  4. You’ll be prompted to insert text—write this into the box provided.
  5. A Word Art text box will appear on your slide. You can double-click it to make changes to your text or type in additional text.
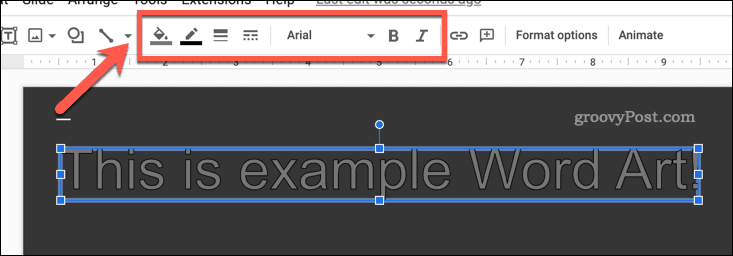
  6. With the Word Art object selected, use the formatting options on the toolbar at the top of the screen to change the font color, border color, and border weight of the text.
    Formatting Word Art in Google Slides
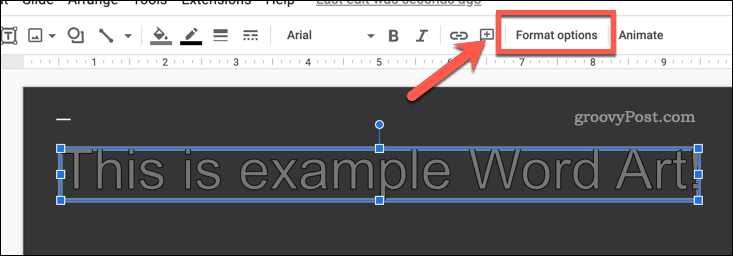
  7. To add a drop shadow or reflection to the text, select the Word Art object and click Format options on the toolbar. Alternatively, right-click the text and select Format options from the pop-up menu.
    Open Format Options in Google Slides
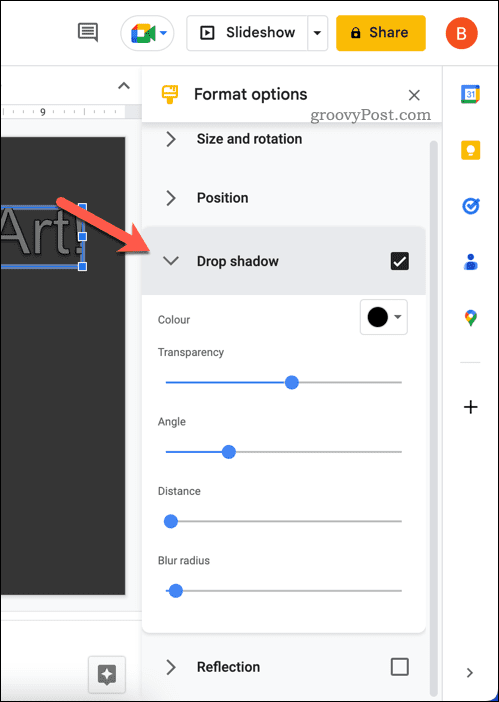
  8. In the Format options menu on the right side of the screen, select the Drop shadow or Reflection checkboxes to add these effects to your word part. You can customize the effect and style of these settings underneath.
    Google Slides Format Options menu for Word Art

Once you’ve formatted your text, make any other adjustments using the other options provided in the menu. For example, you can use the Format options menu to set the specific position for your Word Art text on your slide. You could also rotate and resize your text using this menu.

How to Outline Text Using a Text Box

If you’d prefer to use a normal text box, you can still add outline effects to your text as a whole. For instance, you could add a border, drop shadow, or reflection to the text box.

Free Newsletter

Thanks for visiting my site, groovyPost.com!

Enter your email address below and I'll send you the latest in Tech News, Tips and Reviews.

    100% Spam Free - Unsubscribe at any time.

    To insert a text box in Google Slides:

    1. Open your Google Slides presentation.
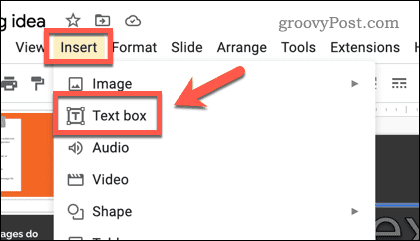
    2. Click the Insert menu at the top of the screen and then select Text box.
      Inserting a text box in Google Slides
    3. Use your mouse to draw a text box on the slide.
    4. Next, type or paste your text into the box.
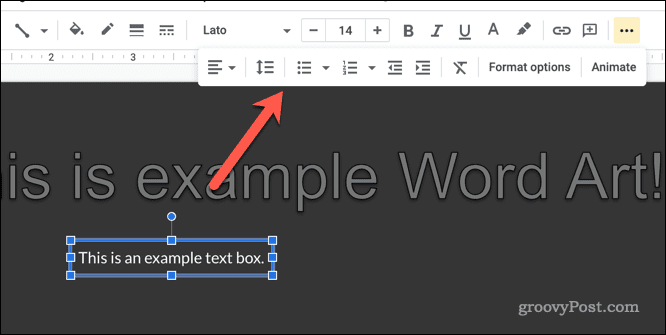
      Use the formatting options on the toolbar (such as font color, border color, and border weight) to customize the appearance of the border and text.
      Formatting Google Slides text boxes
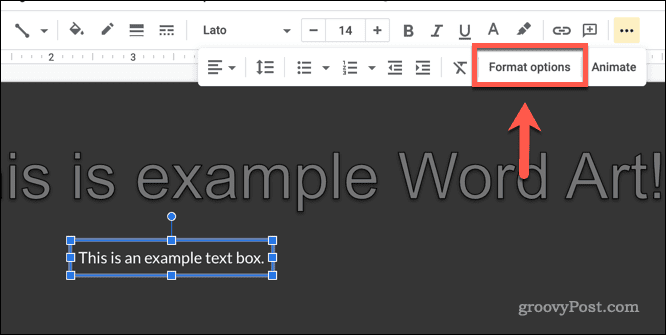
    5. To add other formatting to your text box, select the text box, then click Format options on the top menu. Alternatively, right-click the text box and select Format options.
      Open Format Options for a text box in Google Slides
    6. In the Format options menu on the right, you can set options such as a drop shadow or reflection for the text box.
      Adding effects to text boxes in Google Slides

    Make any additional changes or adjustments in the Format Options menu as desired.

    Editing in Google Slides

    As we’ve explained above, there are a number of reasons why you might want to outline text in Google Slides, but most users will find that it helps to give emphasis to points you’re making in your presentation.

    Google Slides has a number of useful features you can try next. For instance, you could consider adding GIFs to your slides to make them more engaging and help bring the content alive.

    You can also try creating a Google Slides template, allowing you to share your favorite slide styles and use them in other presentations.

    Click to comment

    Leave a Reply

    Your email address will not be published. Required fields are marked *


    How-To

    How to Hide a Slide in Google Slides

    How to Fix the Google Slides Error Image Could Not Be Loaded - Featured

    If you’re drafting a presentation in Google Slides, you might want to hide some of your slides from view temporarily. This guide explains how.

    Editing your Google Slides presentation should be an easy process, as it has many of the tools you’ll need in the app itself. One thing that can be tricky, however, is picking which slides to keep—and which slides to cut.

    If you find yourself in a situation where you need to hide certain slides from your presentation, Google Slides makes it easy enough to do. There are a few ways you can skip slides in your presentation, depending on what you’re trying to do. In addition to hiding slides, you might be interested in learning how to lock objects in Google Slides.

    How to Hide a Slide Using the Menu Bar

    Google Slides will allow you to hide slides directly. Hidden slides won’t appear when you present your presentation, but you’ll still be able to see them when you’re editing the file.

    1. Open your Google Slides presentation.
    2. Select the slide that you want to hide on the left.
    3. To hide the slide, open the Slide menu at the top and select Skip Slide. An icon with a crossed-out eye will appear on the slide in the left toolbar, indicating that the slide is hidden.
      Skip a slide in Google Slides
    4. To unhide the slide, go to Slide > Unskip Slide. This will remove the crossed-out eye icon from the slide in the left toolbar. The slide will become visible again.
      Unskipping a slide in Google Slides

    How to Hide a Slide Using the Slides Navigation Pane

    There’s another (potentially quicker) way to hide slides in Google Slides using the slides navigation pane. This is the menu pane that appears on the left.

    1. Open your Google Slides presentation.
    2. Select the slide that you want to hide from the menu on the left.
    3. Right-click on the selected slide and select Skip Slide. An icon with a crossed-out eye will appear on the slide, indicating that it is hidden.
      Skipping slides in Google Slides
    4. To unhide the slide, right-click on it again and select Unskip slide. The cross-out eye icon will disappear, indicating that the slide is now visible again.
      Unskipping slides in Google Slides

    How to Hide a Slide by Moving it to Another Presentation

    The methods above hide your presentation from view, but they don’t hide them completely. A workaround is to temporarily move the slides you want to hide into a separate presentation.

    You can then use this second presentation as a holding area, hidden from view completely. If you want to share your presentation, for instance, this would be a good way to stop others from viewing those hidden slides until you’re ready to insert them back into your presentation.

    Free Newsletter

    Thanks for visiting my site, groovyPost.com!

    Enter your email address below and I'll send you the latest in Tech News, Tips and Reviews.

      100% Spam Free - Unsubscribe at any time.

      1. First, open the Google Slides document.
      2. Select the slide that you want to copy from the list of slides on the left.
      3. Right-click on the selected slide and choose Copy.
        Copying a Google Slides slide
      4. Next, open a new Google Slides presentation by going to File > New > Presentation. This new presentation will act as a holding area for any slides you want to hide.
        New presentation in Google Slides
      5. In the new presentation, right-click on the white space in the slides bar on the left and select Paste.
        Pasting slides in Google Slides
      6. The Import Slides pop-up box will appear. Choose Keep original styles to ensure the slide formatting isn’t altered.
        Importing slides in Google Slides
      7. Alternatively, go to Make a Copy > Selected Slides to import a copy of your selected slide (or slides) into a new presentation. This will still maintain the slides in your original presentation.
        Copying slides in Google Slides
      8. Return to your previous presentation and delete the slide you copied by right-clicking the slide and selecting Delete.
        Deleting slides in Google Slides
      9. Repeat these steps for any further slides that you want to hide. 

      If you’ve followed these instructions successfully, the slides you want to hide will be moved to a new presentation.

      Editing Your Google Slides Presentations

      The steps above should allow you to quickly hide a slide in Google Slides. This will increase the clarity of your presentation.

      Want to try other Google Slides techniques? Try adding transitions and animations to your slides. These can help make your presentations more dynamic and visually appealing.

      Perhaps you’re experiencing difficulty knowing what to customize on your slides. If so, try using GIFs to add some visual sparkle to any presentation you’re giving.

      Click to comment

      Leave a Reply

      Your email address will not be published. Required fields are marked *


      How-To

      How to Change Text Case in Google Docs

      Examples of text formatting in a document featured

      Bad text capitalization can ruin your document. To change the text case for text in Google Docs, follow this guide.

      We’ve all had to deal with poorly formatted text. Bad punctuation, missing phrases, and even badly capitalized words.

      Sometimes, it might be necessary to change the text case for words in a document. Fortunately, this can be easily done in Google Docs using some of its powerful features, such as Find and Replace. This feature allows you to find specific words or phrases in your document and replace them with different ones.

      To successfully capitalize or uncapitalize text in Google Docs, follow the instructions below.

      How to Capitalize and Uncapitalize Text in Google Docs

      Google Docs will allow you to quickly change the text case in your document. You can capitalize and uncapitalize any text.

      To capitalize and uncapitalize text in Google Docs:

      1. Open your Google Docs document.
      2. Highlight the text that you want to change the capitalization of. You can do this by clicking and dragging your mouse over the text or by using the keyboard shortcut Ctrl + A to select all of the text.
        Selected text in Google Docs
      3. After selecting the text, click the Format menu at the top of the screen.
        Format menu in Google Docs
      4. Click Text.
      5. A sub-menu will appear with options for changing the capitalization of the selected text. To change the selected text to lowercase, select lower case.
      6. To change the selected text to all uppercase, select UPPER CASE.
      7. If you want to capitalize the first letter of each word in the selected text, select Title Case.
        Change capitalization in Google Docs

      How to Capitalize and Uncapitalize Text Using a Google Docs Add-On

      You can also use an add-on to change the text case for words in Google Docs. These add-ons provide additional options to change the capitalization of words in your document.

      A good add-on to use is called Doc Tools, but you can use any suitable add-on for this purpose.

      Free Newsletter

      Thanks for visiting my site, groovyPost.com!

      Enter your email address below and I'll send you the latest in Tech News, Tips and Reviews.

        100% Spam Free - Unsubscribe at any time.

         To use a Google Docs add-on to change text capitalization:

        1. Open the Google Docs document.
        2. Next, go to Extensions > Add-ons at the top and select Get add-ons.
          Open Add-ons menu in Google Docs
        3. In the search bar, type in the name of the add-on you would like to use (e.g., change case).
        4. Once you’ve found the right add-on, select it from the search results.
          Installing a text change case add-on in google docs
        5. Next, click Install.
          Installing the Doc Tools add-on in Google Docs
        6. You might be prompted to allow certain permissions for the add-on to function properly—follow any on-screen instructions to continue.
        7. Once you’ve done this, refresh the document page to load the add-on.
        8. Next, select the text that you want to change the case of in your document.
        9. Go back to Extensions > Add-ons and choose Doc Tools (or whatever your chosen add-on is called).
        10. From the options provided, select the desired case (such as ALL UPPERCASE or Sentence case). Your text will change to the selected case.
          Changing text case using the Doc Tools add-on in Google Docs

        How to Capitalize and Uncapitalize Text Using a Third-Party Website

        Third-party tools exist online that will automatically change the text case for you. You can use these to convert your text and then paste it back into your document.

        To use a third-party website to change text capitalization:

        1. Begin by opening up a website that offers a title case changer tool. If you’re unsure which tool to use, use the Capitalize My Title website.
        2. Paste the text that you want to change the case of into the input field on the website.
          Using the CapitalizeMyTitle website
        3. Select your preferred option for changing the case of the text (such as making all of the text lowercase or uppercase).
        4. If you’re using Capitalize My Title, the text will be converted automatically.
        5. Click the Copy button to copy the converted text to your clipboard.
          Changing text case using Capitalize My Title
        6. Open your Google Docs document (or open a new document).
        7. Remove any of the old text and paste the converted text in to replace it.
          Example capitalized text in Google Docs

        Formatting Your Google Docs Document

        There are a number of reasons why you might want to change the text case in Google Docs. For example, changing rogue text like this will help make you quickly solve your document formatting errors. Want to try another method to improve your documents? Try setting the background color in Google Docs, which can add an extra layer of aesthetic appeal.

        Having trouble with formatting problems? Exporting Google Docs to Microsoft Office is another way you could solve capitalization errors—just make sure all words and phrases appear correctly when they’re transferred over. Plus, it’ll save time from having to manually fix any errors that occur during the transfer.

        Google Docs offers a number of features for improved formatting. You can try rotating text in Google Docs documents next, letting you change its orientation on the page easily and quickly for a better visual effect.

        Click to comment

        Leave a Reply

        Your email address will not be published. Required fields are marked *


        How-To

        How to Make a QR Code in Google Docs

        scan qr code laptop

        QR codes a great way to quickly share documents with others using their smartphone. To create a QR code for Google Docs, follow this guide.

        Google Docs is built for collaborating and sharing your work with others, but there’s a problem. The sharing URLs are far too long—and certainly aren’t memorable.

        Fortunately, you can create QR codes for your shared document—if you know how. In just a few clicks, you’ll be able to share the link in an easily scannable format.

        To get started, here’s our guide to help you make a QR code in Google Docs.

        How to Use Google Chrome to Make QR Codes in Google Docs

        The easiest way to make a QR code for a Google Docs document is to use Google Chrome. Chrome has a built-in tool for creating QR codes for any website—including Google Docs documents.

        To make a QR code for Google Docs in Chrome:

        1. Open Google Chrome.
        2. Next, open the Google Docs document you want to create a QR code for.
        3. Look for the Share icon next to the URL of the document. To be clear, this isn’t the Share button in Google Docs itself, but the icon that usually appears on the address bar in Google Chrome. The icon is shaped like a square with an arrow pointing out of it.
        4. Click the Share icon to proceed.
          Create a QR code in Google Chrome
        5. In the Share menu, select Create QR code. This will generate a QR code for the Google Docs document.
        6. Take a picture of the QR code using another device (such as your phone) or click Download to download it as an image to share elsewhere.
          Example QR code in Google Chrome
        7. Alternatively, right-click on the white space next to (or above) the Google Docs menu and select Create QR Code for this page. This will generate a QR code for the Google Docs document.
          Creating a QR code in Google Chrome

        Once the QR code has been generated, you can then print the QR code or share it with others.

        How to Make a QR Code for Your Google Docs Document Using a Third-Party Tool

        You can also use third-party tools to create QR codes using your shareable Google Docs link. Plenty of these tools are available, but Adobe offers a good, trustworthy (and free) option.

        Free Newsletter

        Thanks for visiting my site, groovyPost.com!

        Enter your email address below and I'll send you the latest in Tech News, Tips and Reviews.

          100% Spam Free - Unsubscribe at any time.

          To use Adobe Express to create a QR code for Google Docs:

          1. Open your Google Docs document.
          2. Click Share in the top-right corner. This is the Share button in Google Docs itself.
            Configuring your Google Docs sharing settings
          3. In the Share settings dialog, change the access level to Anyone with the link can edit or Anyone with the link can view.
          4. Press Copy Link to copy the sharing link to your clipboard.
            Copying a Google Docs share link
          5. Open a new browser tab or window and go to the Adobe Express QR code generator page.
          6. Click Create your QR code now.
            Using Adobe Express to create a QR code
          7. In the text box provided, paste the sharing link that you copied earlier.
          8. Click Create QR code.
            Create QR code in Adobe Express
          9. You can set your preferred QR code style, color, and file type in the side panel for the image download.
          10. Once you’ve set your desired settings, click Download to download the QR code image.
            Download a QR code in Adobe Express

          Save the file to your computer and share it elsewhere, as required.

          Sharing Your Google Docs Documents

          As we’ve shown above, creating a QR code in Google Docs is easy, allowing you to share documents quickly.

          Want to make the document creation process even easier? Using the document outline in Google Docs can help streamline your workflow. You can also add a table of contents if you want to navigate through larger documents easily.

          Enabling dark mode in Google Docs is another way to improve readability and reduce eye strain.

          Click to comment

          Leave a Reply

          Your email address will not be published. Required fields are marked *


          How-To

          How to View Two Pages Side-by-Side in Google Docs

          If you’re creating a document with different types of formatting, it might be helpful to see your pages side-by-side. Here’s how to do it in Google Docs.

          Google Docs is great for creating long, complicated documents. The problem is—what happens when you want to view multiple pages at once?

          Google Docs doesn’t offer any built-in methods for viewing pages together, but there are some workarounds, whether it’s creating a new document or using add-ons. You’ll then be able to view both pages (or both documents) on one screen for easy comparison or editing.

          If you want to view two pages side-by-side in Google Docs, check out the steps to follow below.

          How to View Two Pages Side-by-Side in Google Docs

          As there isn’t a built-in way to view two pages side-by-side in Google Docs and edit the document, you’ll need to re-arrange your browser windows to help you do it instead.

          To view two pages side-by-side in Google Docs:

          1. Open the same document in Google Docs twice in two separate browser windows.
          2. Resize one browser window to fill one-half of your screen. To do this, you can click and drag the window to the left or right side of your screen, or you can use the window management keys on your keyboard (e.g., using the Windows key + Left arrow keys to snap the window to the left side of the screen).
          3. Repeat step 2 for the other browser window or tab, positioning it on the other half of the screen.
          4. In both windows, scroll to the same page and position it within the document. Alternatively, you can navigate to different pages or positions in the document if that is what you need to do.

          Once you’ve done this, you’ll see changes made in one window in real-time in the other window. This is useful for comparing or editing different parts of the document simultaneously.

          How to View Two Pages Side-by-Side Using Print Preview

          You can also use the print preview tool to see how two pages will look side-by-side in Google Docs. However, this will only allow you to see what the document looks like after you’ve finished editing it—you can’t edit the document in print preview mode.

          Free Newsletter

          Thanks for visiting my site, groovyPost.com!

          Enter your email address below and I'll send you the latest in Tech News, Tips and Reviews.

            100% Spam Free - Unsubscribe at any time.

            To use print preview to see two pages side-by-side in Google Docs:

            1. Open the document you want to print in Google Docs.
            2. Go to File > Print. This will open the Print pane.
              Print in Google Docs
            3. Click the Pages per sheet drop-down menu on the right. In the drop-down menu, select the option to print 2 pages per sheet from the list of available options. This will update the preview to show how the document will look when printed with two pages per sheet.
            4. Review the preview to ensure that the pages are arranged as desired and that the font size and other formatting are preserved.
              Printing two pages per sheet in Google Docs
            5. If everything looks good, click the Print button to print the document using the selected settings.
              Google Docs print button

            There’s one thing to remember about this method—this will technically show you two document pages on a single piece of paper. This is a good way to see how the two pages look together, but you may want to switch back to only printing on one page per sheet before you click Print.

            This’ll allow you to view how the pages look, but when you print, the document pages will each have a separate sheet of paper.

            Editing Your Google Docs Documents

            Viewing two pages side-by-side in Google Docs is a great way to compare documents easily. If you’re new to using Google Docs, consider changing the default font next. It will help improve readability and make your document look more professional.

            Google Docs has many powerful features. For instance, adding page numbers allows you to quickly reference specific sections of a document.

            2 Comments

            2 Comments

            1. James

              April 12, 2023 at 8:51 am

              Where is the left arrow to snap to the left

              • Jeff Butts

                October 20, 2023 at 10:04 am

                Hi James, and thanks for reading. We’re sorry for the late reply, and realize you may have already figured this out. In case you haven’t, Ben’s referring to the left arrow key on your keyboard.

            Leave a Reply

            Your email address will not be published. Required fields are marked *


            How-To

            How to Merge Tables in Google Docs

            Too many tables can ruin a document. If you want to merge your data together, you can merge tables in Google Docs. This guide explains how.

            Too much data in your document? You might think that multiple tables are the answer, but that isn’t necessarily the case.

            Multiple tables can be a great way to organize and display data, but they can also be confusing for readers. Merging tables can help cut down on clutter and make your document more streamlined and easier to read.

            If you’re looking to merge tables in Google Docs, here’s what you need to do.

            How to Merge Tables in Google Docs Manually

            There isn’t a built-in table merging feature in Google Docs. If you want to merge two or more tables, you’ll need to do it manually.

            To merge tables in Google Docs:

            1. Open your Google Docs document.
            2. In the document containing the table you want to remove data from, select the data you want to cut. You can select individual cells, rows, or columns by clicking and dragging your mouse over them. Alternatively, you can use the keyboard shortcuts to select specific elements (e.g., Shift + arrow keys to select a row).
            3. Right-click the selected data and select Cut from the context menu. This will remove the data from the original table.
              Cut table data in Google Docs
            4. In the document containing the table you want to save the data, insert a new row where you want to paste the data. To do this, place your cursor in the row above or below where you want the new row to be inserted, right-click, and select Insert row below or Insert row above.Inserting a new row in a Google Docs table
            5. Repeat this step to ensure that you insert the same number of rows as the previous table. For example, if you have three rows in the previous table, insert three new rows.
            6. Select the new rows you’ve inserted.
            7. With the new rows selected, right-click and select Paste from the context menu. This will paste the data you cut in step 3 into the new table.
              Paste Google Docs table data

            Repeat steps 2-5 for any other tables you want to merge.

            How to Use Google Sheets to Merge Google Docs Tables

            Do you want to create a table using Google Sheets data? If so, you can use Google Sheets as a way to merge two or more tables.

            Free Newsletter

            Thanks for visiting my site, groovyPost.com!

            Enter your email address below and I'll send you the latest in Tech News, Tips and Reviews.

              100% Spam Free - Unsubscribe at any time.

              To use Google Sheets to merge tables in Google Docs:

              1. Open Google Docs in one browser tab and Google Sheets in another.
              2. In Google Docs, select the first table you want to copy. You can do this by clicking and dragging your mouse over the table to select it.
              3. Right-click the selected table and select Copy. This will copy the table to your clipboard.
                Copy a table in Google Docs
              4. In Google Sheets, place your cursor in the cell where you want the top-left corner of the table to be pasted, then right-click and select Paste. This will paste the table into the sheet.
                Paste values in Google Sheets
              5. Return to Google Docs and repeat steps 2-4 for any additional tables you want to merge.
              6. In Google Sheets, select the complete set of data you want to copy (e.g., all the tables you pasted in steps 4 and 5).
              7. Right-click the selected data and select Copy from the context menu. This will copy the data to your clipboard.
                Copy values in Google Sheets
              8. Return to Google Docs and delete the previous tables. To do this, select the tables you want to delete, then press the delete key on your keyboard.
              9. Right-click where you want to paste the merged table and select Paste from the context menu.
                Paste values in Google Docs
              10. Google Docs will ask you how you want to handle the data. If you want to create a link to the existing data in Google Sheets, select Link to spreadsheet.
              11. If you want to paste a static copy of the data (which will not be affected by updates to the original data in Google Sheets), select Paste unlinked instead.
                Paste Google Sheets data in Google Docs

              Your merged table will now be ready in Google Docs. If you chose to link to your Google Sheets spreadsheet, any changes you make to the data in Google Sheets will be reflected in Google Docs when you open the document.

              Creating Better Documents in Google Docs

              Learning how to merge tables in Google Docs will benefit you, allowing you to combine multiple data sets into one.

              You may want to consider displaying the word count in Google Docs next. This will allow you to track your document’s length quickly and accurately. You can even set the background color in Google Docs if you’re looking to customize the appearance of your documents.

              Want to add fonts to Google Docs? You can access hundreds of additional typefaces, giving your documents an extra level of style and professionalism.

              Click to comment

              Leave a Reply

              Your email address will not be published. Required fields are marked *


              How-To

              How to Save an Image From a Google Slides Presentation

              Presentation image featured

              If you want to extract an image from a Google Slides presentation that you’ve created, you’ll need to use a few workarounds. This guide explains how.

              You’ve created an amazing Google Slides presentation—but there’s a problem. You want to reuse one of the pictures you’ve inserted, but, for the life of you, you can’t remember where you got it from.

              If you want to reuse a picture inserted into your Google Slides presentation, the best way is to save it directly from your slides. You’ll then be able to access this saved image to use in other documents or presentations.

              To save an image from Google Slides, follow the steps below.

              How to Save an Image Using the Download Tool in Google Slides

              One of the best ways to save an image from a Google Slides presentation is to use the built-in downloading tool for slides.

              To use the download tool to download images from Google sides:

              1. First, open your Google Slides presentation.
              2. Go to Insert > New slide from the top menu. This will create a new slide for you to work with.
                Create a new slide in Google Slides
              3. Select the slide that contains the image you want to download. 
              4. Next, select the image, right-click it, and select Cut or Copy.
                Copy an image in Google Slides
              5. Move to the new slide and right-click > Paste to paste the image into the slide.
              6. Once the image is on your new slide, resize it to fill the entire slide’s canvas area by dragging the corners of the image. One thing to remember, however, is that if the image isn’t the same aspect ratio as the slide, it’ll look stretched. One alternative is to leave white space around the image and place it in the center (or create white shapes to achieve a similar effect).
                Example Google Slides image
              7. If there are other objects on the slide, such as text or shapes, select them and press the Delete key to remove them.
              8. To download the slide (and, therefore, the image), go to FileDownload. From the dropdown menu, choose the image type you want to download (e.g., JPG or PNG).
                Download a Google Slides slide as an image

              The image should now be saved to your PC or Mac, allowing you to use it elsewhere.

              How to Save an Image by Sending it to Google Notes

              Unfortunately, Google Slides doesn’t allow you to right-click an image and download it. A workaround is to import the image from Google Slides into your Google Keep notes storage, which is accessible in Slides.

              From there, you can right-click the image and download it directly.

              Free Newsletter

              Thanks for visiting my site, groovyPost.com!

              Enter your email address below and I'll send you the latest in Tech News, Tips and Reviews.

                100% Spam Free - Unsubscribe at any time.

                To download an image from Google Slides using Google Notes:

                1. Open your Google Slides presentation.
                2. Select the slide with the image you want to save from the menu on the left.
                3. Right-click on the image.
                4. From the pop-up context menu, select Send to Keep. This will open a new menu tab on the right, showing your saved Google Keep notes.
                  Send Google Slides image to Google Keep
                5. If it doesn’t, click on the Keep icon in the menu options on the right.
                6. The image will be added to the Keep menu. Right-click on the image and select Save image as, then save the image to your PC or Mac.
                  Saving a Google Slides image to PC

                How to Save an Image by Copying it to Google Docs and Exporting

                Another way to save images from Google Slides is to import them into Google Docs. You can export your Docs file and extract the images on your PC.

                To extract Google Slides images using Google Docs:

                1. Open your Google Slides presentation.
                2. Find the image you want to copy and right-click it.
                3. Select Copy.
                  Copy an image in Google Slides
                4. Next, open a new Google Docs document.
                5. Right-click in the document and select Paste from the options that appear. This will insert the image into the document.
                  Paste image in Google Docs
                6. To download the document as a web page, go to File > Download.
                7. Select Web page (.html, zipped) from the options that appear.
                  Downloading images from Google Docs

                The file will be downloaded to your device. Extract the zipped file to access the document and the image. The image will be saved as a separate file alongside your document text (in another separate file).

                Creating Powerful Google Slides Presentations

                Now that you’ve learned how to save images from Google Slides, you can share content you’ve created in Slides and use it elsewhere. If you want to make the most of Google Slides, try using comments in Google Slides to give feedback and collaborate with others on your presentations.

                Templates in Google Slides can also help you create a custom look for your presentations and store them for future use.

                1 Comment

                1 Comment

                1. Steinarr

                  April 1, 2023 at 2:40 pm

                  Another option is do download copy as .pptx and rename it to be .zip. You can then simply unzip and all the images can be found under /ppt/media

                Leave a Reply

                Your email address will not be published. Required fields are marked *


                How-To

                How to Fix Indentation in Google Docs

                Creating advanced documents featured

                Is your text all over the page in Google Docs? You might need to look at fixing indentation in your document. This guide explains how.

                A badly formatted document is enough to ruin it. For example, if your text is indented poorly, it’ll be tricky to read what you’re trying to say.

                Good formatting, on the other hand, can really make a document pop. One way to improve how your document looks is to use consistent indentation. This will make your text easier to read and give it a professional look.

                If you want to fix indentation in Google Docs, follow the steps below.

                How to Fix Indentation Using Your Keyboard

                The quickest way to fix text indentation in Google Docs is to use a keyboard shortcut. This’ll allow you to quickly change the indentation for the text that you’ve selected. It will also change the indentation for the line that your blinking cursor is currently on (as long as it is at the start of the line).

                Once the text is selected (or once you’ve moved your blinking cursor to the right position), use the Tab key to move the text further to the right—indenting it in the process. Alternatively, use the Shift + Tab keys to move the text back to the left.

                You can repeat this for any other parts of your text.

                How to Fix Indentation Using the Toolbar

                Google Docs has several formatting tools on the toolbar that you can use to change your document, including tools to change text indentation. These tools will allow you to move the text left or right, depending on your preference.

                To use the toolbar to change text indentation in Google Docs:

                1. Open your Google Docs document.
                2. Select the text that you want to adjust the indentation for. Alternatively, place your blinking cursor at the start of the line.
                3. Locate the Increase Indent and Decrease Indent icons on the toolbar. These buttons are usually located on the right side of the toolbar. They’ll appear as a right-facing arrow (to increase the indentation) and a left-facing arrow (to decrease the indentation).
                4. To indent the selected text, press the Increase Indent button once for each increment of text indentation you want to apply.
                5. To remove indentation, click the Decrease Indent button once for each level of indentation you want to remove.
                  Increase or decrease indent in Google Docs

                As required, you can repeat these steps in other areas of your document.

                How to Fix Indentation Using the Guide Rulers

                The guide rulers in Google Docs are a visual tool that allows you to align and measure elements within your document. The horizontal ruler is at the top of the document, and the vertical ruler is on the left side.

                You can use the guide rulers to change text indentation in Google Docs.

                Free Newsletter

                Thanks for visiting my site, groovyPost.com!

                Enter your email address below and I'll send you the latest in Tech News, Tips and Reviews.

                  100% Spam Free - Unsubscribe at any time.

                  To use the Guide Rulers in Google Docs to fix text indentation:

                  1. Open your Google Docs document and select the text that you want to indent.
                  2. Go to View > Show Ruler. This will display the horizontal and vertical rulers at the top and side of your document (if it isn’t visible already).
                    Show ruler in Google Docs
                  3. Next, drag the blue tab at the top of the horizontal ruler to the desired indentation point—this should be in the same position (horizontally) as the start of your text. This will indent the first line of your paragraph.
                    Indent the top line in Google Docs
                  4. If you want to indent every line, move the blue arrow to your preferred indentation point instead.
                    Indent a full paragraph in Google Docs

                  Moving the blue tab will move the text to a new indentation point. This may disrupt other formatting in your document, so repeat these steps to resolve any issues.

                  Changing Indentation Settings in Google Docs

                  Using the Indentation Settings menu, you can change the default indentation settings in your Google Docs document.

                  To change text indentation settings in Google Docs:

                  1. Open your Google Docs document.
                  2. Go to Format > Align and Indent > Indentation Options.
                    Change indentation options in Google Docs
                  3. On the Indentation Options dialog, change the default text indentation for both left and right.
                  4. Using the Special indent section, you can also set default indentation rules (for example, for the first line of every page).
                  5. Click Apply to save the changes.
                    Set indentation options for Google Docs

                  Test out your changes to the text indentation settings in your document at this point. If you’re unhappy, repeat the process and reset the changes to restore your previous settings.

                  These settings only apply to your current document. If you want to change indentation settings for other documents, you’ll need to open those documents first and repeat these steps.

                  Cleaning Up in Google Docs

                  We’ve shown you how to fix indentation in Google Docs above in just a few easy steps. Want to make the most of your Google Docs experience? One way to do so is by inserting a video, which can help bring your documents to life.

                  Google Docs has amazing capabilities. For instance, displaying the word count lets you keep track of progress on long pieces of work.

                  Suppose you’re looking at optimizing your use of Google Docs. In that case, you can try using the document outline to organize and structure content—this’ll make it easier for readers or editors reviewing your text.

                  Click to comment

                  Leave a Reply

                  Your email address will not be published. Required fields are marked *


                  How-To

                  How to Turn a Google Slides Presentation Into a Video

                  Example presentation featured

                  While it doesn’t support it, you can save a Google Slides presentation as a video using a few different tools. This guide explains how.

                  No internet connection to present in Google Slides? No problem. You can convert your presentation into a video to use it offline instead.

                  Exporting a Google Slides presentation as a video allows you to choose the resolution and frame rate and any additional audio or video tracks to include. You can then share and use the file on devices that don’t support Google Slides, whether it’s an offline PC or even a DVD player.

                  You can start turning a Google Slides presentation into a video by following our guide below.

                  How to Export to PowerPoint to Save as a Video

                  Unfortunately, Google Slides doesn’t offer built-in methods for exporting presentations as videos.

                  A way around this is to export the Google Slides presentation to Microsoft PowerPoint and then save it as a video using that tool instead. This method is particularly useful if you want to include other multimedia elements or features in your presentation, as PowerPoint has more options for adding these elements than Google Slides.

                  To export a Google Slides presentation to PowerPoint and use it to save it as a video:

                  1. Open the Google Slides presentation that you want to convert to a video.
                  2. Go to File > Download > Microsoft PowerPoint (.pptx).
                    Download Google Slides to PPTX
                  3. Save the PowerPoint file to your computer.
                  4. Once it’s downloaded, open the new PowerPoint file and select File on the ribbon bar.
                  5. Click Export and then click Create a Video.
                    Exporting PowerPoint to video
                  6. Follow the on-screen prompts to choose your video settings, such as the quality and resolution of the final file.
                  7. Click Create Video to save the video to your computer.
                    PowerPoint export as video options

                  At this point, your exported Google Slides presentation will be available as a video file. You can then play it on your current device or share it to use elsewhere.

                  How to Convert Your Google Slides Presentation to a Video Using Third-Party Tools

                  You can use a third-party alternative if you’d prefer to avoid using PowerPoint to convert your Google Slides presentation to a video. For instance, you could use screen recording tools to record it. This can then be saved as a video to share or use elsewhere.

                  If you’re on Windows, you could use the built-in Xbox Game Bar to record your screen. You can use the built-in screenshot tool on Mac to record your screen instead. You can also use any alternative screen-recording application, including Screencast-O-Matic, OBS, Snagit, and others.

                  Free Newsletter

                  Thanks for visiting my site, groovyPost.com!

                  Enter your email address below and I'll send you the latest in Tech News, Tips and Reviews.

                    100% Spam Free - Unsubscribe at any time.

                    To save Google Slides as a video using a third-party tool:

                    1. Prepare your chosen screen recording tool.
                    2. Open your Google Slides presentation.
                    3. Go to Slideshow > Start from beginning to play your presentation on full screen.
                      Starting a presentation in Google Slides
                    4. To automate each slide, hover over your full-screen presentation.
                    5. In the bottom-left, select the three-dots menu icon on the slide controls.
                    6. In the pop-up menu, select Auto-play and choose a period for each slide to appear (e.g., Every 10 seconds).
                    7. Choose Loop instead to have the presentation continue indefinitely.
                      Automate a Google Slides presentation
                    8. When you’ve recorded the presentation, stop your screen recording tool and save the file.

                    How to Publish Google Slides Online

                    Google Slides doesn’t include built-in options for exporting a presentation as a video. However, it does allow you to publish presentations online. You could use this as an alternative to videos, allowing you to share the presentation to any internet-capable device.

                    To publish a Google Slides presentation online:

                    1. Open your presentation in Google Slides.
                    2. Go to File > Share > Publish to web.
                      Publish Google Slides to the web
                    3. In the pop-up window, select the Link tab.
                    4. Choose the desired settings for your presentation. This includes which slides to include, whether to start the slide show automatically, and whether to restart the presentation once it finishes.
                    5. Click Publish to publish the presentation online.
                      Publish to web option
                    6. Copy the link provided and share it with your desired audience.
                      At this point, your presentation is live and accessible using the link provided.
                    7. If you want to remove it at any point, press File > Share > Publish to web. In the pop-up window, press Published content and settings > Stop publishing and confirm your choice. This will remove it from the web.
                      Stop publishing a Google Slides presentation

                    Presenting in Google Slides

                    Thanks to the methods we’ve outlined above, you can easily turn a Google Slides presentation into a video. If you want to take your presentation to the next level, you can try a few other techniques.

                    One option is to make your Google Slides vertical instead of horizontal. If you’re looking to share your presentations on a mobile device, this is a great way to fully use the screen space.

                    Another option is to add audio to your Google Slides presentation. This can help make your presentation more engaging and immersive for your audience by using different media content.

                    With the same idea in mind, you might consider adding GIFs to your Google Slides presentation. This can be a fun and effective way to illustrate your points and add some personality to your presentation.

                    1 Comment

                    1 Comment

                    1. Talha

                      July 10, 2023 at 12:57 pm

                      Thanks for the tutorial! I was able to convert my Google Slides into a video via Powerpoint.

                    Leave a Reply

                    Your email address will not be published. Required fields are marked *


                    How-To

                    How to Remove Dollar Signs in Google Sheets

                    Dollar currency featured

                    If you want to remove dollar signs from a data set in Google Sheets, there are a few methods you can try. This guide explains how.

                    If you’re working in Google Sheets, you might use dollar signs to indicate currency. Unfortunately, these dollar signs might cause formatting and calculation issues further down the line.

                    Thankfully, Google Sheets has several methods for removing dollar signs from cells in a spreadsheet. These methods include applying different cell formatting, using functions to remove the dollar signs, or manually removing them using the Find and Replace tool to help you.

                    To use these methods to remove dollar signs in Google Sheets, follow the steps we’ve outlined below.

                    How to Remove Dollar Signs by Applying Custom Number Formatting to Cells

                    Google Sheets treats the data in your spreadsheet in different ways. A number, for instance, might contain a date, a time, a currency price, or more. It’s able to do this by using number formatting options.

                    If there’s a dollar sign in the cell, then you may be able to use custom number formatting to remove it.

                    To apply custom number formatting to cells in Google Sheets:

                    1. Open the Google Sheets spreadsheet.
                    2. Select any cells that contain a dollar sign.
                    3. To apply standard number formatting rules, go to Format > Number > Number.
                      Set number format in Google Sheets
                    4. Otherwise, go to Format > Number > Custom Number Formatting.
                      Set custom number format in Google Sheets
                    5. On the Custom number formats dialog, type: 0.00 to ensure only integers (and no currency signs like dollar signs) are inserted.
                    6. Click Apply.
                      Set custom number format in Google Sheets

                    At this point, dollar signs should be removed from your cells—but only if they’re applied by formatting in the first place. If they aren’t and are part of a text string, you’ll need to remove them using the steps below.

                    How to Remove Dollar Signs Using the Find and Replace Tool

                    The Find and Replace tool in Google Sheets allows users to quickly search for and replace specific text within a range of cells. If you’re trying to remove dollar signs from cells in Google Sheets, you can use this tool to locate each occurrence and remove it.

                    Free Newsletter

                    Thanks for visiting my site, groovyPost.com!

                    Enter your email address below and I'll send you the latest in Tech News, Tips and Reviews.

                      100% Spam Free - Unsubscribe at any time.

                      To remove dollar signs from cells in Google Sheets using the Find and Replace tool:

                      1. Open your Google Sheets spreadsheet.
                      2. Go to Edit > Find and Replace.
                        Find and replace in Google Sheets
                      3. On the Find and Replace dialog, enter the dollar sign symbol ($) in the Find field and leave the Replace with field blank.
                      4. In the Search field, insert the range for the cells you want to remove.
                      5. Alternatively, select All Sheets to search your entire spreadsheet or This Sheet to search your currently active sheet.
                      6. Click Replace All to search for and remove all dollar signs within your chosen search range.
                        Find and replace menu in Google Sheets
                      7. Review the results to ensure that all dollar signs have been removed as expected.
                      8. If necessary, you can use the Find Next and Replace buttons to make any further changes manually.

                      How to Remove Dollar Signs Using the SUBSTITUTE Function

                      The SUBSTITUTE function in Google Sheets allows you to replace specific characters or words within a cell or range of cells with a different character or word. This can be useful if you have a large dataset with dollar signs or other unwanted characters you want to remove.

                      You can use the SUBSTITUTE function to replace these characters with nothing easily. You can also replace the dollar sign or any other character with another character or word you choose.

                      To use the SUBSTITUTE function in Google Sheets to remove dollar signs:

                      1. Open your Google Sheets spreadsheet.
                      2. Select an empty cell.
                      3. Type: =SUBSTITUTE( into the formula bar.
                      4. Next, type your cell reference (e.g., =SUBSTITUTE(A1 or =SUBSTITUTE(A1 as the formula), followed by a comma.
                      5. Type a dollar sign or another search criteria, surrounded by quotation marks (e.g., =SUBSTITUTE(A1,”$” as the formula).
                      6. Type another comma, and then type the character or word you want to replace it with, surrounded by quotation marks. If you want to replace it with nothing, use an empty text string. (e.g., =SUBSTITUTE(A1,”$”,”” as the formula)
                      7. Close the formula with a closing parenthesis. For example, the formula =SUBSTITUTE(A1,”$”,””) will work to remove dollar signs from cells A1 to A10 and replace it with nothing.
                      8. Press Enter to apply the formula and see the results.
                        Substitute function in Google sheets

                      Adjusting Data in Google Sheets

                      If it’s time to remove the dollars from your spreadsheet, you can follow the steps above to remove dollar signs in Google Sheets quickly.

                      If you’re having trouble with formatting in Google Sheets, you might want to try sorting by date to organize your data. You can also create custom number formats to make your data more presentable.

                      Unfortunately, not every formula you use is going to work with your data. If you encounter a formula parse error in Google Sheets, you’ll need to troubleshoot the problem.

                      Click to comment

                      Leave a Reply

                      Your email address will not be published. Required fields are marked *


                      How-To

                      How to Make Labels in Google Docs

                      You can use Google Docs to make labels for any purpose, whether address labels or important product labels. This guide explains how.

                      You’ll probably need a label if you want to organize or identify items. You can use them to label boxes in a storage unit, identify products in a warehouse, or label envelopes for mailing.

                      Google Docs provides a convenient way to create custom labels. Whether you need a simple address label or a more complex product label, you can design and print labels directly from Google Docs.

                      If you want to know how to make labels in Google Docs, follow our guide below.

                      How to Make Labels Using Tables in Google Docs

                      Using a table is the easiest, built-in method for creating labels in Google Docs. You can create a table that fills your entire document page and fill each segment with the labels you want to make.

                      It might be a bit time-consuming, but it’s the simplest method for making labels in your Google Docs document.

                      To make labels using tables in Google Docs:

                      1. Open your Google Docs document (or create a new one).
                      2. From the Insert menu, select Table and choose the number of rows and columns you want for your table.
                        Inserting a table in Google Docs
                      3. In the new table, type the text for each label into the corresponding cell of the table. You can also add images and shapes.
                      4. Use the options in the Table menu to customize the appearance of your table, such as changing the border style, cell background color, or text alignment.
                        Google Docs table options
                      5. If needed, you can resize the table by dragging the handles on the corners and edges.
                        Resizing a table in Google Docs
                      6. To add more labels, you can insert additional rows or columns into the table as needed.

                      When you are finished, your table should contain a series of labels you can use for your document. You can then print your document and use the labels elsewhere.

                      How to Make Labels Using a Google Docs Add-On

                      The method above is the quickest way to make labels in Google Docs. If you want to create more complex labels or use mail-merge to create them, you’ll need to use a Google Docs add-on to help you.

                      Free Newsletter

                      Thanks for visiting my site, groovyPost.com!

                      Enter your email address below and I'll send you the latest in Tech News, Tips and Reviews.

                        100% Spam Free - Unsubscribe at any time.

                        Various add-ons exist for this, but a good option is to use the Create & Print Labels add-on by Labelmaker. While it isn’t free, it does offer a free 7-day trial, so you should be able to use it for free for one-off label making.

                        To use a Google Docs add-on to make labels:

                        1. Open your web browser.
                        2. Visit the Create & Print Labels add-on page.
                        3. Click Install.
                          Install label add-on in Google Docs
                        4. When prompted, sign in using your Google account details and allow the permissions for the app to work.
                        5. Once the app is installed, open your Google Docs document (or create a new one).
                        6. In Google Docs, go to Extensions > Add-ons > Create & Print Labels – Label Maker for Avery & Co > Create Labels.
                          Create a label in Google Docs
                        7. In the Labelmaker pop-up menu on the right, click Select a Template and find a suitable template for your labels. These are available by size and design—use the search tool to help you.
                        8. Click Use to select the label.
                        9. If you want to use mail merge from a Google Sheets spreadsheet, press Select a spreadsheet under the Mailing list section.
                        10. Choose a spreadsheet to import from, then press Select.
                        11. With the data imported, make changes to your labels in Google Docs. With Use first cell as a model, you can make changes to the first label cell and apply the changes to all the labels.
                        12. To create the labels, click Create labels.
                          Creating a label using Labelmaker in Google Docs

                        With the labels created, you can then print the labels by going to File > Print.

                        Creating Custom Documents in Google Docs

                        Thanks to the methods we’ve outlined above, you should now be able to make labels in Google Docs. Labels aren’t the only thing you can create in Google Docs to improve your document-making experience, however.

                        For instance, did you know that you can use Google Docs offline? This is useful if you need to work on a document but don’t have access to the internet.

                        Another useful feature is creating a table of contents in Google Docs. This can help your readers navigate your document more easily and find the information they need.

                        Are your eyes burning as you type? Before you get your eyes tested, you might prefer to switch to a darker interface and enable dark mode in Google Docs. This can help reduce strain on your eyes when you’re working for long periods.

                        Click to comment

                        Leave a Reply

                        Your email address will not be published. Required fields are marked *


                        To Top