How-To

How to Outline Text in Google Slides

Making bold presentations featured

Want the text in your Google Slides presentation to stand out? A good option for this is to outline your text. This guide explains how.

Presenting to an audience using Google Slides? Your text should stand out. Otherwise, the impact it has might be less than you hoped.

One way to ensure your text stands out is by outlining it. Outlining the text adds emphasis and makes it easier for viewers to read, increasing their engagement with the presentation.

If you want to outline text in Google Slides, here’s what you need to do.

How to Outline Text Using Word Art

A good way to make your text stand out and outline it is to use Word Art. Word Art text in Google Slides has a border around each letter. You can also apply other effects to the text, such as border effects, drop shadows, and reflections.

To use Word Art in Google Slides:

  1. Open your Google Slides presentation.
  2. Select the slide you wish to add text to on the left.
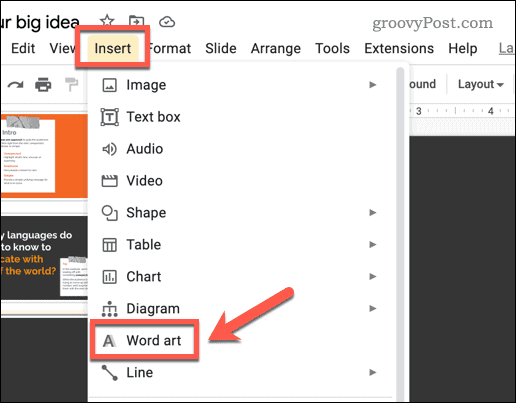
  3. Click Insert at the top of the screen, then select Word Art from the drop-down menu.
    Insert WordArt in Google Slides
  4. You’ll be prompted to insert text—write this into the box provided.
  5. A Word Art text box will appear on your slide. You can double-click it to make changes to your text or type in additional text.
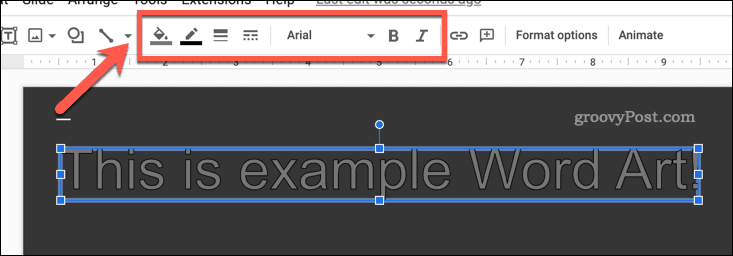
  6. With the Word Art object selected, use the formatting options on the toolbar at the top of the screen to change the font color, border color, and border weight of the text.
    Formatting Word Art in Google Slides
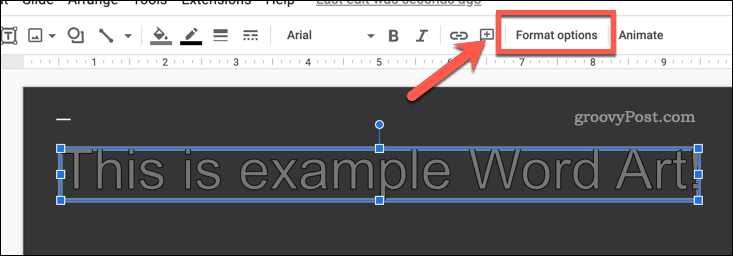
  7. To add a drop shadow or reflection to the text, select the Word Art object and click Format options on the toolbar. Alternatively, right-click the text and select Format options from the pop-up menu.
    Open Format Options in Google Slides
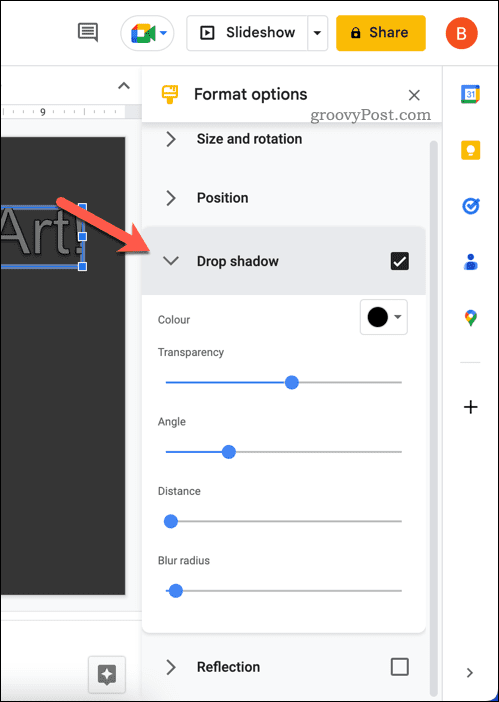
  8. In the Format options menu on the right side of the screen, select the Drop shadow or Reflection checkboxes to add these effects to your word part. You can customize the effect and style of these settings underneath.
    Google Slides Format Options menu for Word Art

Once you’ve formatted your text, make any other adjustments using the other options provided in the menu. For example, you can use the Format options menu to set the specific position for your Word Art text on your slide. You could also rotate and resize your text using this menu.

How to Outline Text Using a Text Box

If you’d prefer to use a normal text box, you can still add outline effects to your text as a whole. For instance, you could add a border, drop shadow, or reflection to the text box.

Free Newsletter

Thanks for visiting my site, groovyPost.com!

Enter your email address below and I'll send you the latest in Tech News, Tips and Reviews.

    100% Spam Free - Unsubscribe at any time.

    To insert a text box in Google Slides:

    1. Open your Google Slides presentation.
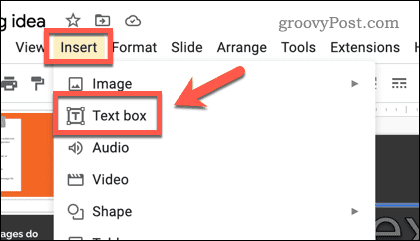
    2. Click the Insert menu at the top of the screen and then select Text box.
      Inserting a text box in Google Slides
    3. Use your mouse to draw a text box on the slide.
    4. Next, type or paste your text into the box.
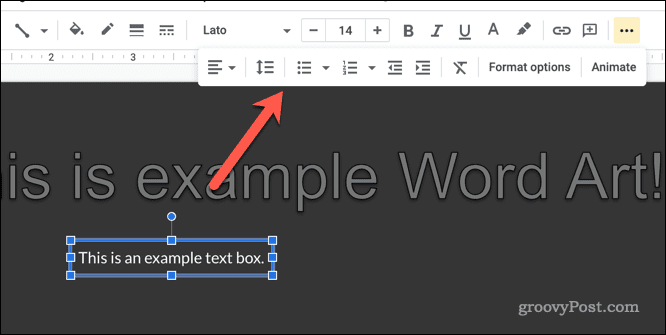
      Use the formatting options on the toolbar (such as font color, border color, and border weight) to customize the appearance of the border and text.
      Formatting Google Slides text boxes
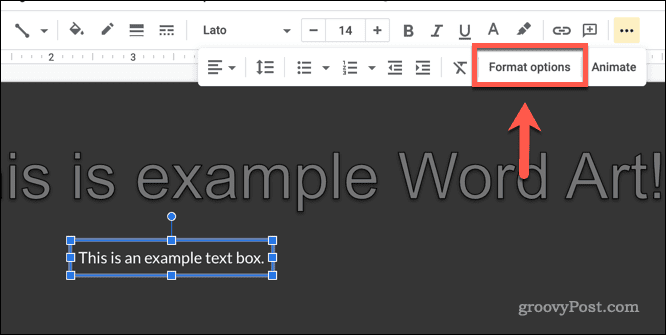
    5. To add other formatting to your text box, select the text box, then click Format options on the top menu. Alternatively, right-click the text box and select Format options.
      Open Format Options for a text box in Google Slides
    6. In the Format options menu on the right, you can set options such as a drop shadow or reflection for the text box.
      Adding effects to text boxes in Google Slides

    Make any additional changes or adjustments in the Format Options menu as desired.

    Editing in Google Slides

    As we’ve explained above, there are a number of reasons why you might want to outline text in Google Slides, but most users will find that it helps to give emphasis to points you’re making in your presentation.

    Google Slides has a number of useful features you can try next. For instance, you could consider adding GIFs to your slides to make them more engaging and help bring the content alive.

    You can also try creating a Google Slides template, allowing you to share your favorite slide styles and use them in other presentations.

    Click to comment

    Leave a Reply

    Your email address will not be published. Required fields are marked *


    How-To

    How to Hide a Slide in Google Slides

    How to Fix the Google Slides Error Image Could Not Be Loaded - Featured

    If you’re drafting a presentation in Google Slides, you might want to hide some of your slides from view temporarily. This guide explains how.

    Editing your Google Slides presentation should be an easy process, as it has many of the tools you’ll need in the app itself. One thing that can be tricky, however, is picking which slides to keep—and which slides to cut.

    If you find yourself in a situation where you need to hide certain slides from your presentation, Google Slides makes it easy enough to do. There are a few ways you can skip slides in your presentation, depending on what you’re trying to do. In addition to hiding slides, you might be interested in learning how to lock objects in Google Slides.

    How to Hide a Slide Using the Menu Bar

    Google Slides will allow you to hide slides directly. Hidden slides won’t appear when you present your presentation, but you’ll still be able to see them when you’re editing the file.

    1. Open your Google Slides presentation.
    2. Select the slide that you want to hide on the left.
    3. To hide the slide, open the Slide menu at the top and select Skip Slide. An icon with a crossed-out eye will appear on the slide in the left toolbar, indicating that the slide is hidden.
      Skip a slide in Google Slides
    4. To unhide the slide, go to Slide > Unskip Slide. This will remove the crossed-out eye icon from the slide in the left toolbar. The slide will become visible again.
      Unskipping a slide in Google Slides

    How to Hide a Slide Using the Slides Navigation Pane

    There’s another (potentially quicker) way to hide slides in Google Slides using the slides navigation pane. This is the menu pane that appears on the left.

    1. Open your Google Slides presentation.
    2. Select the slide that you want to hide from the menu on the left.
    3. Right-click on the selected slide and select Skip Slide. An icon with a crossed-out eye will appear on the slide, indicating that it is hidden.
      Skipping slides in Google Slides
    4. To unhide the slide, right-click on it again and select Unskip slide. The cross-out eye icon will disappear, indicating that the slide is now visible again.
      Unskipping slides in Google Slides

    How to Hide a Slide by Moving it to Another Presentation

    The methods above hide your presentation from view, but they don’t hide them completely. A workaround is to temporarily move the slides you want to hide into a separate presentation.

    You can then use this second presentation as a holding area, hidden from view completely. If you want to share your presentation, for instance, this would be a good way to stop others from viewing those hidden slides until you’re ready to insert them back into your presentation.

    Free Newsletter

    Thanks for visiting my site, groovyPost.com!

    Enter your email address below and I'll send you the latest in Tech News, Tips and Reviews.

      100% Spam Free - Unsubscribe at any time.

      1. First, open the Google Slides document.
      2. Select the slide that you want to copy from the list of slides on the left.
      3. Right-click on the selected slide and choose Copy.
        Copying a Google Slides slide
      4. Next, open a new Google Slides presentation by going to File > New > Presentation. This new presentation will act as a holding area for any slides you want to hide.
        New presentation in Google Slides
      5. In the new presentation, right-click on the white space in the slides bar on the left and select Paste.
        Pasting slides in Google Slides
      6. The Import Slides pop-up box will appear. Choose Keep original styles to ensure the slide formatting isn’t altered.
        Importing slides in Google Slides
      7. Alternatively, go to Make a Copy > Selected Slides to import a copy of your selected slide (or slides) into a new presentation. This will still maintain the slides in your original presentation.
        Copying slides in Google Slides
      8. Return to your previous presentation and delete the slide you copied by right-clicking the slide and selecting Delete.
        Deleting slides in Google Slides
      9. Repeat these steps for any further slides that you want to hide. 

      If you’ve followed these instructions successfully, the slides you want to hide will be moved to a new presentation.

      Editing Your Google Slides Presentations

      The steps above should allow you to quickly hide a slide in Google Slides. This will increase the clarity of your presentation.

      Want to try other Google Slides techniques? Try adding transitions and animations to your slides. These can help make your presentations more dynamic and visually appealing.

      Perhaps you’re experiencing difficulty knowing what to customize on your slides. If so, try using GIFs to add some visual sparkle to any presentation you’re giving.

      Click to comment

      Leave a Reply

      Your email address will not be published. Required fields are marked *


      How-To

      How to Change Text Case in Google Docs

      Examples of text formatting in a document featured

      Bad text capitalization can ruin your document. To change the text case for text in Google Docs, follow this guide.

      We’ve all had to deal with poorly formatted text. Bad punctuation, missing phrases, and even badly capitalized words.

      Sometimes, it might be necessary to change the text case for words in a document. Fortunately, this can be easily done in Google Docs using some of its powerful features, such as Find and Replace. This feature allows you to find specific words or phrases in your document and replace them with different ones.

      To successfully capitalize or uncapitalize text in Google Docs, follow the instructions below.

      How to Capitalize and Uncapitalize Text in Google Docs

      Google Docs will allow you to quickly change the text case in your document. You can capitalize and uncapitalize any text.

      To capitalize and uncapitalize text in Google Docs:

      1. Open your Google Docs document.
      2. Highlight the text that you want to change the capitalization of. You can do this by clicking and dragging your mouse over the text or by using the keyboard shortcut Ctrl + A to select all of the text.
        Selected text in Google Docs
      3. After selecting the text, click the Format menu at the top of the screen.
        Format menu in Google Docs
      4. Click Text.
      5. A sub-menu will appear with options for changing the capitalization of the selected text. To change the selected text to lowercase, select lower case.
      6. To change the selected text to all uppercase, select UPPER CASE.
      7. If you want to capitalize the first letter of each word in the selected text, select Title Case.
        Change capitalization in Google Docs

      How to Capitalize and Uncapitalize Text Using a Google Docs Add-On

      You can also use an add-on to change the text case for words in Google Docs. These add-ons provide additional options to change the capitalization of words in your document.

      A good add-on to use is called Doc Tools, but you can use any suitable add-on for this purpose.

      Free Newsletter

      Thanks for visiting my site, groovyPost.com!

      Enter your email address below and I'll send you the latest in Tech News, Tips and Reviews.

        100% Spam Free - Unsubscribe at any time.

         To use a Google Docs add-on to change text capitalization:

        1. Open the Google Docs document.
        2. Next, go to Extensions > Add-ons at the top and select Get add-ons.
          Open Add-ons menu in Google Docs
        3. In the search bar, type in the name of the add-on you would like to use (e.g., change case).
        4. Once you’ve found the right add-on, select it from the search results.
          Installing a text change case add-on in google docs
        5. Next, click Install.
          Installing the Doc Tools add-on in Google Docs
        6. You might be prompted to allow certain permissions for the add-on to function properly—follow any on-screen instructions to continue.
        7. Once you’ve done this, refresh the document page to load the add-on.
        8. Next, select the text that you want to change the case of in your document.
        9. Go back to Extensions > Add-ons and choose Doc Tools (or whatever your chosen add-on is called).
        10. From the options provided, select the desired case (such as ALL UPPERCASE or Sentence case). Your text will change to the selected case.
          Changing text case using the Doc Tools add-on in Google Docs

        How to Capitalize and Uncapitalize Text Using a Third-Party Website

        Third-party tools exist online that will automatically change the text case for you. You can use these to convert your text and then paste it back into your document.

        To use a third-party website to change text capitalization:

        1. Begin by opening up a website that offers a title case changer tool. If you’re unsure which tool to use, use the Capitalize My Title website.
        2. Paste the text that you want to change the case of into the input field on the website.
          Using the CapitalizeMyTitle website
        3. Select your preferred option for changing the case of the text (such as making all of the text lowercase or uppercase).
        4. If you’re using Capitalize My Title, the text will be converted automatically.
        5. Click the Copy button to copy the converted text to your clipboard.
          Changing text case using Capitalize My Title
        6. Open your Google Docs document (or open a new document).
        7. Remove any of the old text and paste the converted text in to replace it.
          Example capitalized text in Google Docs

        Formatting Your Google Docs Document

        There are a number of reasons why you might want to change the text case in Google Docs. For example, changing rogue text like this will help make you quickly solve your document formatting errors. Want to try another method to improve your documents? Try setting the background color in Google Docs, which can add an extra layer of aesthetic appeal.

        Having trouble with formatting problems? Exporting Google Docs to Microsoft Office is another way you could solve capitalization errors—just make sure all words and phrases appear correctly when they’re transferred over. Plus, it’ll save time from having to manually fix any errors that occur during the transfer.

        Google Docs offers a number of features for improved formatting. You can try rotating text in Google Docs documents next, letting you change its orientation on the page easily and quickly for a better visual effect.

        Click to comment

        Leave a Reply

        Your email address will not be published. Required fields are marked *


        To Top