How to ensure TRIM is enabled on Windows 10 to keep an SSD at top performance
TRIM is an essential feature for an SSD to keep it on top performance and helps the drive to last much longer. Here's how to make sure the feature is enabled on Windows 10.
Besides getting a speedy processor and as much RAM as you can afford, a Solid State Drive (SSD) also plays a very important role in making your PC fast. However, an SSD will stay on it best performance and last longer only if it's properly maintained.
TRIM is an ATA command set that was originally designed for the purpose of keeping a Solid State Drive at its optimal performance throughout its lifespan.
The TRIM feature allows Windows 10, or any supported operating system, to notify an SSD which blocks of data are no longer in use and can be safely wiped out to be writable again. Having this operation done ahead of time improves performance, as the drive won't have to spend time erasing a particular block when space is needed to store new data, ensuring the SSD reaches its advertised lifespan.
While the operating system should properly detect and enable TRIM automatically, sometimes this may not happen. In this Windows 10 guide, we'll show you the commands to make sure TRIM is configured and how to enable it when it's not.
How to check TRIM is enabled in your Windows 10 PC
Making sure that TRIM is enabled on Windows 10, you only need to use a command using the Command Prompt with administrator privileges.
- Use the Windows key + X keyboard shortcut to open the Power User menu and select Command Prompt (Admin).
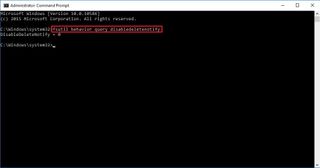
- Type the following command and press Enter:
fsutil behavior query DisableDeleteNotify

Explanation: If after executing the
fsutilcommand with the
DisableDeleteNotifyyou get a result of zero (0), then it means that TRIM is enabled, and no further action is required. However, if after running the command you see a result of one (1), then it means that TRIM is disabled.
How to enable TRIM on your Windows 10 PC
When TRIM isn't enabled on Windows 10, you need to do the following:
- Use the Windows key + X keyboard shortcut to open the Power User menu and select Command Prompt (Admin).
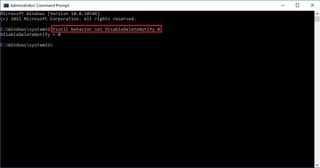
- Type the following command and press Enter:
fsutil behavior set DisableDeleteNotify 0

After running the command, you will notice the same DisableDeleteNotify = 0, which indicates that the feature is enabled.
How to disable TRIM
If at any time for any reason you need to disable TRIM, you need to do the following:
- Use the Windows key + X keyboard shortcut to open the Power User menu and select Command Prompt (Admin).
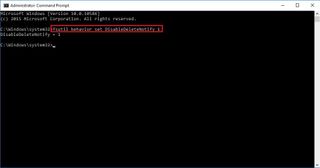
- Type the following command and press Enter:
fsutil behavior set DisableDeleteNotify 1

For TRIM to work, both the operating system and the Solid State Drive must support the feature, and it must be enabled in the operating system.
While we're focusing the guide for Windows 10, you can use the same commands on Windows 7 and Windows 8.x.
Was TRIM enabled on your computer? Let us know in the comments below.
Windows 10 resources
For more tips, coverage, and answers on Windows 10, you can visit the following resources:
- Windows 10 on Windows Central – All you need to know
- Windows 10 help, tips, and tricks
- Windows 10 forums on Windows Central
Get the Windows Central Newsletter
All the latest news, reviews, and guides for Windows and Xbox diehards.
Mauro Huculak is technical writer for WindowsCentral.com. His primary focus is to write comprehensive how-tos to help users get the most out of Windows 10 and its many related technologies. He has an IT background with professional certifications from Microsoft, Cisco, and CompTIA, and he's a recognized member of the Microsoft MVP community.
How to keep system and apps up to date on Windows 11
There are many ways to check, download, and install updates for Windows 11 and apps.
On Windows 11, even though updates are mandatory and automatic, you can still check, download, and install them manually at any time to ensure that not only the system but also your apps are up-to-date.
Sometimes, updates can cause unexpected issues (and other annoyances), but they're still essential, as they patch security vulnerabilities, introduce new features, enhance existing functionalities, and optimize overall system performance.
Windows 11 has several types of updates, including cumulative updates, which are those the device installs every month, and they usually include security fixes, improvements, and minor features. You can also download previews of upcoming updates before they are available to everyone.
Unlike cumulative updates, feature updates are new versions of the operating system that usually require complete reinstallation (in most cases) to apply new features, visual changes, and enhancements.
In addition, you also have updates for device drivers and applications as part of the system maintenance. Updates for device drivers and some Microsoft products are available from the "Windows Update" settings. In contrast, app updates can come from the Microsoft Store, the apps themselves, or the developer support website.
In this how-to guide, I will walk you through the steps to download and install updates for apps and Windows 11 to maintain your device update.
How to install stable updates on Windows 11
To manually download updates on Windows 11, use these steps:
- Open Settings.
- Click on Windows Update.
- Click the "Check for updates" button.
- Click the Restart now button (if applicable).
Once you complete the steps, the system will check, download, and install any available updates.
If you want to keep your machine up to date, you may want to consider turning on the "Give me up to date" toggle switch from the Settings > Windows Update > Advanced options page. This option will restart the computer as soon as a new update is downloaded on the computer and ignores the "Active Hours" feature.
How to install preview updates on Windows 11
To install early previews of upcoming updates, use these steps:
- Open Settings.
- Click on Windows Update.
- Check the "Get the latest updates as soon as they're available" toggle switch.
- Click the "Check for updates" button.
- Click the Restart now button.
After you complete the steps, if a preview of the next cumulative update is available, it'll download and install automatically.
Although update previews in this channel are considered final, you're still getting patches that may still contain bugs, such as only install previews if you're comfortable dealing with issues and removing updates (as necessary.)
How to install feature updates on Windows 11
To download and install feature updates on Windows 11, use these steps:
- Open Settings.
- Click on Windows Update.
- Check the "Get the latest updates as soon as they're available" toggle switch.
- Click the "Check for updates" button.
- Click the "Download & install" option.
- Click the Restart now button.
Once you complete the steps, the next version of the operating system will download and install on your computer. If this is a significant update, reinstallation may be required to apply the new changes.
Although you can install feature updates manually, I usually recommend leaving the system to decide when to install them automatically. The reason is that feature updates may still include unknown issues, or it may still not be ready for your computer, and this could negatively impact your overall experience, especially during the early days of a new version of Windows.
If it's been a few months since the launch of the new version, then you should try updating manually.
If upgrading to the new version, I recommend creating a temporary full backup before proceeding.
Installation Assistant tool
If your computer has problems downloading a newer version of the operating system, you can force the upgrade using the Installation Assistant. Here's how:
- Open the Microsoft download page.
- Click the Download Now button for the "Windows 11 Installation Assistant" section and save the file on the computer.
- Double-click the ".exe" file to launch the tool.
- Click the "Accept and install" button.
- Click the Restart button.
After you complete the steps, the system will start to apply the new version, which may also fix problems with the "Windows Update" settings.
How to install device drivers updates on Windows 11
To update drivers on Windows 11, use these steps:
- Open Settings.
- Click on Windows Update.
- Click the Advanced options page on the right side.
- Click the Optional updates option under the "Additional options" section.
- Select the drivers to update on the computer.
- Click the Download & install button.
If you can't find any updates, it's because the Windows Update online service doesn't have any newer drivers for your setup. In case you're sure that a new version of a specific driver is available, you may need to download it manually from the device manufacturer support website. (You can learn more about updating drivers manually in this guide.)
How to install Microsoft product updates on Windows 11
To allow Microsoft product updates through the Windows Update settings, use these steps:
- Open Settings.
- Click on Windows Update.
- Click the Advanced options page on the right side.
- Turn on the "Receive updates for other Microsoft products" toggle switch.
- Click the "Check for updates" button from the "Windows Update" page.
Once you complete the steps, Windows Update will also download updates for Microsoft products, depending on the products installed on your computer.
How to install Microsoft Store app updates on Windows 11
To download and install updates for apps from the Microsoft Store, use these steps:
- Open Microsoft Store app.
- Click on Library from the bottom-left corner.
- Click the Get updates button.
- Click the Update all option (if applicable).
You must manually check for updates if you have apps that are not from the Microsoft Store. Although every app is different, you should be able to check for updates from the "Help" menu or "About" page.
Some apps will notify you when a new update is available, but if you can't determine if the app needs updating, then you will have to check on the software support website to find out if a newer version is available.
If you're dealing with a paid application, you may be able to download updates, but if an entirely new version is available, you might be required to purchase an upgrade or keep using the outdated version.
Update Microsoft 365 apps
To update the Office app from your Microsoft 365 Personal or Family subscription, use these steps:
- Open the Word app.
- Click on Account from the left pane.
- Click the Update options button.
- Choose the Update Now option.
- Click the Continue button.
- Click the Close button.
After you complete the steps, the apps will update to the latest version.
More resources
For more helpful articles, coverage, and answers to common questions about Windows 10 and Windows 11, visit the following resources:
Get the Windows Central Newsletter
All the latest news, reviews, and guides for Windows and Xbox diehards.
Mauro Huculak is technical writer for WindowsCentral.com. His primary focus is to write comprehensive how-tos to help users get the most out of Windows 10 and its many related technologies. He has an IT background with professional certifications from Microsoft, Cisco, and CompTIA, and he's a recognized member of the Microsoft MVP community.