Recently I got a requirement to upgrade Zoom Desktop Client to latest version and also at the same time to remove any older zoom desktop client application from all Intune Managed devices (Windows 10 or Windows 11). After spending a lot of time in testing and troubleshooting I finally managed to make this work.
I created a Powershell script and used it to Uninstall the old versions first and then install the latest one. For this, I have used a program cleanzoom (zoom uninstallation tool provided by Zoom). Cleanzoom comes in a zip file, extract the contents of zip file and you will find cleanzoom.exe file which we will use to uninstall the application.
We will Uninstall zoom old versions and Upgrade to the latest version by creating Intune Windows app (Win32) deployment. Let’s go through all the steps from downloading Cleanzoom utility to creating Intune Windows app to Deployment and End user experience.
Download Cleanzoom
First step is to download Cleanzoom utility from Zoom’s support website. Once you have downloaded this zip file, extract its contents and copy it to a folder.
Download Zoom Latest MSI File
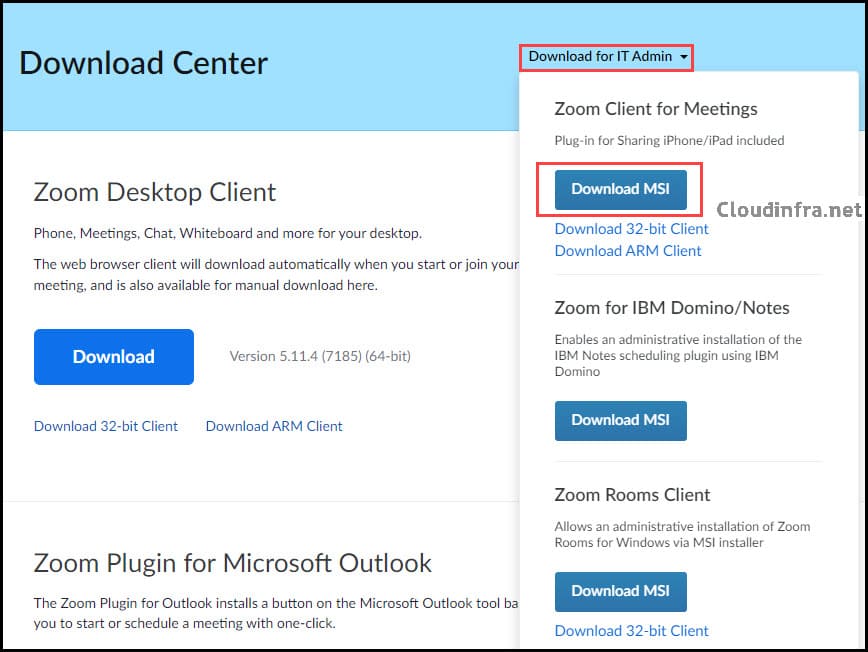
Next step is to download Zoom Desktop client latest MSI file from Zoom Download Center. Once you are on Zoom Download Center website, look for Download for IT Admin drop down on the top right hand side and then Download Zoom Client for Meetings by clicking on Download MSI button.

Powershell Script to Uninstall and Upgrade Zoom Client
Now, we will create a powershell script file called Zoomuninstall_upgrade.ps1. You can name the script file with any name you like. I am keeping this name as its relevant to the work done by this script.
As you can see in below script file, I am using cleanzoom.exe with /silent switch, it will uninstall Zoom client from the device silently without any user interaction or prompt shown on the screen.
Next command it to sleep the script for 60 seconds for cleanzoom to complete uninstallation and the final command is for installation of latest version of zoom desktop client.
Please note that as per the msiexec command in the powershell script, Zoom desktop client will be installed with pre-configured settings like ZoomAutoUpdate=True zConfig=”nogoogle=1″ ZConfig=”nofacebook=1″. If you want to add more switches / parameters to this command then please refer to the zoom support document: Mass-deploying with preconfigured settings for Windows – Zoom Support
.\cleanzoom.exe /silent
Start-Sleep -Seconds 60
msiexec /i ZoomInstallerFull.msi /qn ZoomAutoUpdate=True zConfig="nogoogle=1" ZConfig="nofacebook=1"
Create IntuneWin File
Before proceeding on to creating .Intunewin file, we will place all the application Installation files including Powershell script in to one single folder. You can call this folder with any name you like. I have placed all the files in a folder called Zoom upgrade. We will use the Microsoft Win32 Content Prep Tool to converts application installation files into the .intunewin format.

- Download Microsoft Win32 Content Prep Tool. Its a zip file therefore extract its contents into a folder.
- Create an empty folder for example C:\output or anywhere you like.
- Repackage the application folder Zoom Upgrade to .intunewin file using IntuneWinAppUtil.exe which can be located in Microsoft Win32 Content Prep Tool.
.\IntuneWinAppUtil.exe -c "C:\Zoom upgrade" -s Zoomuninstall_upgrade.ps1 -o C:\output

Once the command completes successfully, you can check c:\output folder where .intunewin file is generated. We will use this file later during Intune Windows app (win32) deployment.

Deploy Zoom Application using Intune
Please follow below steps to create Intune Windows app (Win32) using .IntuneWin file.
- Login on Microsoft Intune Admin center
- Click on Apps and then click on All Apps
- Click on + Add and Select Windows app (Win32) from the app type
App Information
Click on Select app package file to browse and select Zoomuninstall_upgrade.intunewin file and click on OK. On App information tab, provide Information about the Application. Update the Name, Description and Enter the name of the publisher. Click on Next to proceed.
- Name: Zoom Upgrade 5.11
- Description: Zoom Upgrade to 5.11 (Latest)
- Publisher: Zoom

Program
Provide the Install command, uninstall command, Install behavior, Device restart behavior. Keep the same command for Install and Uninstall commands. Click on Next to proceed.
- Install command: powershell.exe -Executionpolicy Bypass -File .\Zoomuninstall_upgrade.ps1
- Uninstall command: powershell.exe -Executionpolicy Bypass -File .\Zoomuninstall_upgrade.ps1
- Install behavior: System
- Device restart behavior: No specific Action

Requirements
Provide Operating System Architecture and Minimum operating system information. Click on Next to proceed.
- Operating System Architecture: 64-bit
- Minimum operating system: Select according to the operating system version being used in your environment. For Example: Windows 10 1607.
Detection Rules
Select Manually configure detection rules and click on +Add to add a detection rule.
- Rules Format: Select Manually configure detection rules
- Rule Type: File
- Path: You can provide location of the folder where your app gets installed. Most of the softwares are installed in Program Files of Program Files (x86) folder. You can install the application manually on any test machine to find out the default installation directory of the app. Once you get the location then you can provide it as a detection rule for Intune to check if the application is installed on your system or not. If the application folder exists, Intune will consider that application as Installed on your system and If the Folder is deleted Intune will show the application installation status as failed due to detection rules and also will try to deploy the application again in the next sync cycle.
Detection rule specific to zoom is to use zoom folder which is created in Program Files (If you are using Zoom 64 bit version). If you are using 32-bit version of Zoom Desktop client then Zoom Installation directory is Program Files (x86). We will be deploying 64-bit version of zoom desktop client and therefore the detection rules are configured accordingly.
Before creating the detection rules, I installed Zoom desktop client 64 bit manually on my test device and found that it creates a folder in program files with a name Zoom(64bit), I am using this folder to detect if the application is installed successfully or not.
- Rule type: File
- Path: C:\Program Files\Zoom
- File or folder: Zoom(64bit)
- Detection Method: File or Folder exists.

Assignments
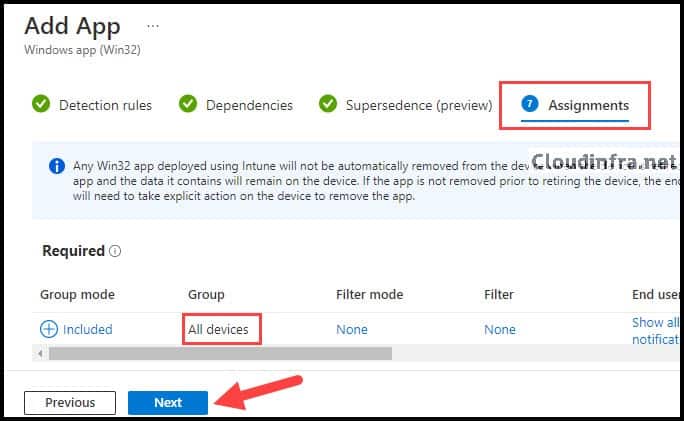
Create an Azure AD Security group which contains users or devices where this application package needs to be deployed. Please note that if you add users into the list, it will deploy this application on all of the users devices joined to Azure and Enrolled into Intune. If you want to deploy the app to specific devices then you should add devices in the Azure AD security group not users.
Make sure to add it to the Required section which will install the application on users system as soon as possible.
Required: Select the groups for which you want to make this app required. Required apps are installed automatically on enrolled devices. Some platforms may have additional prompts for the end user to acknowledge before app installation begins.

Review + Create
Next tab is for Review + Create. Save the application which will start the process of your uploading .intunewin file and also will start the deployment process.
Intune Policy Refresh Cycle
The Device will Sync / Check in to start Win32 app deployment. It may take some time for the process to start. Therefore, if you are testing it on a test device, you can force initiate Intune refresh cycle on the device which will speed up the download and installation process. You can also use Powershell to force initiate Intune refresh cycle.
Also, you can restart the device first which also starts the device check-in process. Manual sync is not mandatory on user’s devices as the device check-in process happens automatically. But if you are testing this setting on a test device then this can speed up your testing and can save some time.
Monitoring
To check the Installation status of the app, You can follow below steps:
- From Microsoft Endpoint Manager admin center, Click on Apps on the left hand side.
- Click on All apps.
- Search for the app Zoom Upgrade 5.11 and click on it.
From the Overview page of the application, you can check the status of Installation and Failures. To find more details on which devices the software is pushed successfully, you can also click on Device Install status or User Install status.
End User Experience
On the target devices, there is no user interaction with this package as the all zoom applications will be first uninstalled and then latest version will be deployed silently.
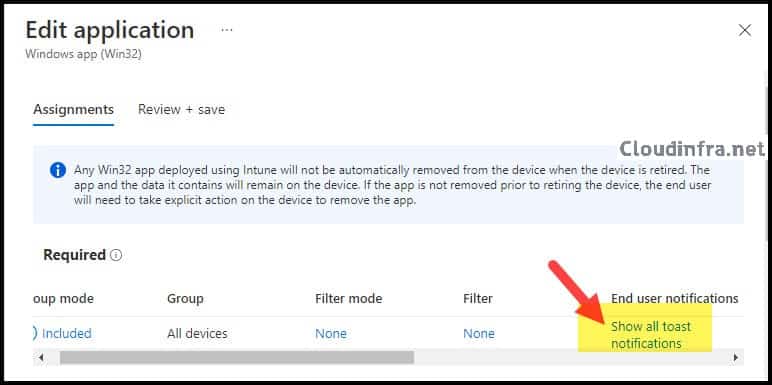
However, there will be a pop-up notification related to this application if you have “Show all toast notification” setting configured at the time of application assignment. You can disable all toast notifications from Assignments tab under End user notifications setting if you want no notifications or pop-ups related to this deployment.

Conclusion
In this blog post, we have seen how to remove all versions of Zoom Desktop Client installed on windows devices which are managed using microsoft Intune using a Powershell script. After uninstallation of Zoom client is completed, the script will installed the latest version of Zoom client on the device.

What are you doing to avoid a uninstall and reinstall loop from occurring. I see you didn’t specify any requirements other than the system architecture and operating system
Hi Miguel,
Detection logic will check for the app installation. You could add a unique detection logic which will prevent this loop. I will test this scenario and update.