Save space on your Android phone with this optional setting.
Jason Montoya / How-To Geek
Readers like you help support How-To Geek. When you make a purchase using links on our site, we may earn an affiliate commission. Read More.
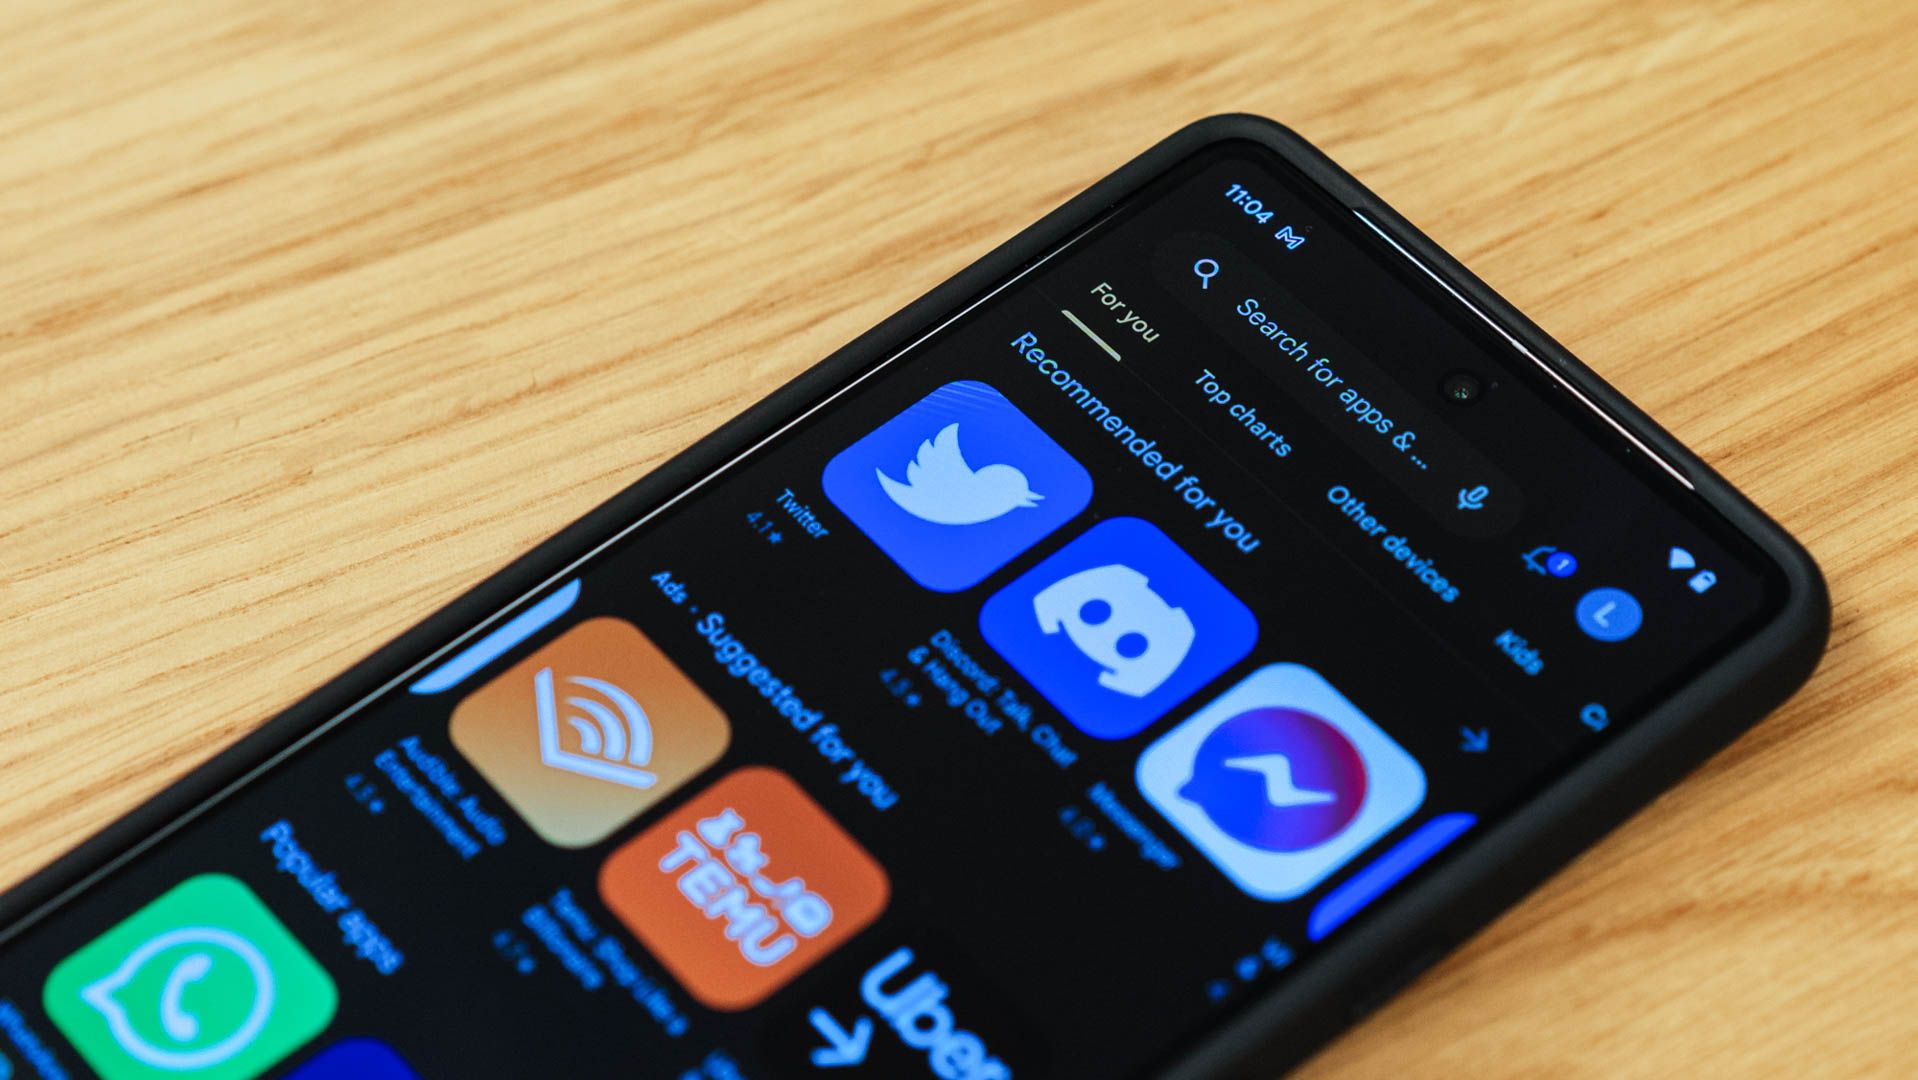
Are you always running out of storage space on your Android phone? Google is now rolling out a feature that automatically archives your least-used apps, reducing their storage impact by 60%. At first glance, this setting may seem like a recipe for disaster, but it's actually quite intuitive. Archived apps aren't completely deleted from your phone, and they still appear in your app drawer. When you try to open an archived app, it reinstalls almost immediately and retains all of your original user data.
The "automatically archive apps" setting first debuted in April of 2023, but it was only accessible when attempting to install an app with insufficient storage. Starting today, you can enable the setting at any time. Just open the Google Play store, tap the menu icon on the left side of the search bar, select "Settings," and expand the "General" settings. You should see the "automatically archive apps" toggle toward the bottom of your screen—if not, this feature may not be available on your device just yet.
Google's rollout of the "automatically archive apps" setting was first noticed by a member of Mishaal Rahman's Discord server. It was then shared to Twitter by Rahman, who previously explained how app archival works on Android — it relies on the new Android App Bundle system, which reduces app size by providing device-specific APKs to users (rather than forcing users to download several APKs). Apps that are not published as Android App Bundles cannot be archived, though this shouldn't be a problem, as all apps are now required to follow the App Bundle system.
Again, Google is currently rolling out the "automatically archive apps" toggle. It may take some time for this feature to reach all Android devices. If your phone storage is full, you can force Google Play to present this setting by attempting to install an app.
It's easy to use an Android phone for a while and slowly watch the storage space fill up with photos, videos, and download files. There are things you can do to take back some of that storage space.
How to See How Much Storage Space You Have
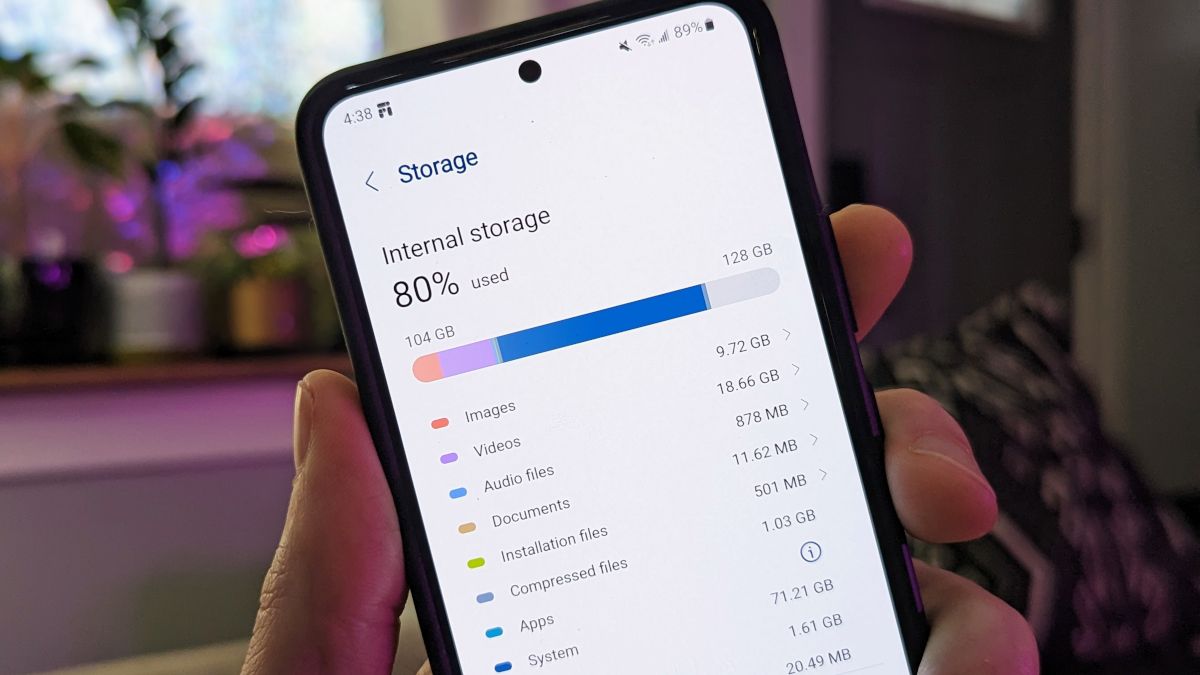
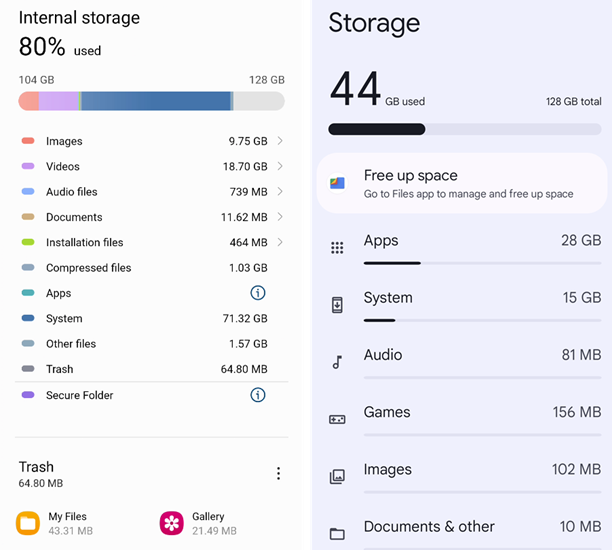
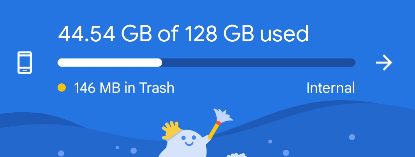
Every Android device includes some sort of "Storage" section in the Settings. This is where you can see how much space your Android phone or tablet has left and what's using up the most space. Some devices also include some helpful tools for cleaning.
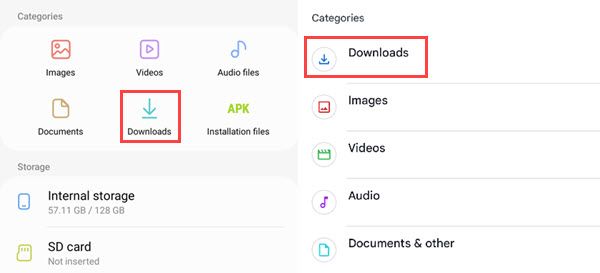
On a Samsung Galaxy device, you'll need to go to Settings > Battery & Device Care > Storage. For Google Pixel and most other Android devices, it's simply at Settings > Storage. Here you'll see the storage usage broken down by images, videos, audio, documents, apps, and more.
Samsung Galaxy / Google Pixel
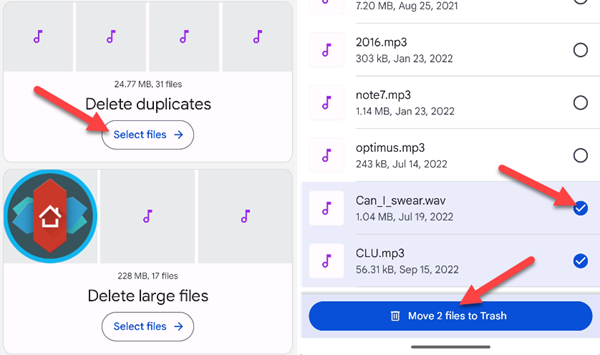
Google Pixel devices have a shortcut to "Free Up Space" in the Google Files app---which we'll cover in the next section. Samsung actually points out files you could delete to make more room, including "Duplicate Files" and "Large Files." It's a good idea to regularly check out the "Storage" section to clear out junk.
Free Up Space With Google Files
"Files by Google" comes preinstalled on some Android phones. If it's not on yours, you can download it from the Play Store. One feature that makes it extra useful is the ability to automatically identify things that can be removed from your phone to free up storage space.
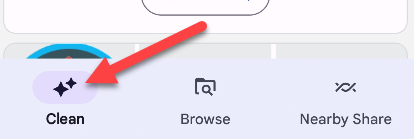
Open Files by Google and switch over to the "Clean" tab at the bottom.
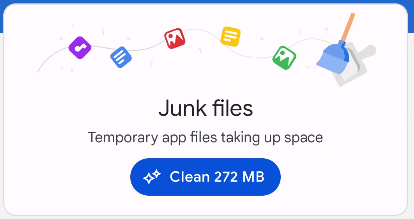
The first thing you'll notice is a progress bar of how much storage space you've used. Underneath, Google has automatically suggested files you can delete to free up storage space. Common examples are screenshots, duplicate files, and photos that are already backed up to Google Photos.
The "Junk Files" category is for temporary files, like cached files for apps. Clearing these out can cause increased battery and data usage since they'll need to be re-downloaded.
For the other categories, simply tap "Select Files" to go through and choose what you'd like to delete.
That's pretty much it! Files by Google is a handy app to have for keeping tabs on your storage usage.
How to Delete Downloads on Android
Downloads can add up quickly over time. Whether it's ringtones, memes from Facebook, photos to send friends, or PDFs for work, there's a lot of stuff that ends up in the "Downloads" folder on your Android device.
The Downloads folder can be found in the File Manager app of your choosing. On Samsung Galaxy devices, the app is simply called "My Files." Google Pixel devices come with Files by Google preinstalled.
Samsung "My Files" / Files by Google
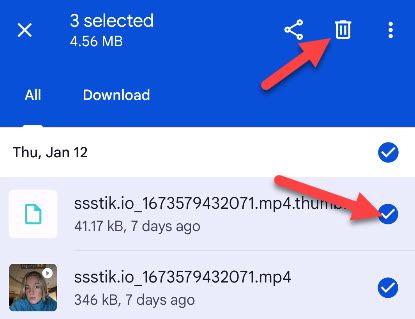
Once you've found the "Downloads" folder, it's just a matter of selecting the files you'd like to delete and tapping the trash button.
The Downloads folder can easily get filled with stuff you don't need anymore. Keeping it tidy can help your storage woes.
Clear the Cache on Android
Apps download temporary files called "cache" as you use them. These files help apps perform quicker and load things when you don't have a solid data connection. Cache files can be deleted to free up storage space without majorly disrupting the app.
To get started, swipe down from the top of the screen once or twice---depending on your phone---and tap the gear icon.
Now go to the "Apps" section in the Settings app.
You'll see a list of all the apps installed on your Android device (you may need to expand the list to see them all). Find the misbehaving app and tap it.
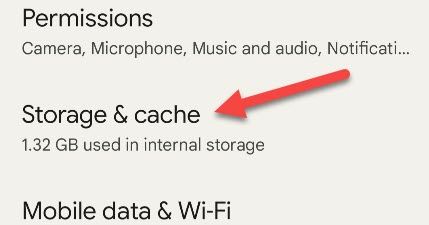
Select "Storage & Cache" or just "Storage" from the App Info page.
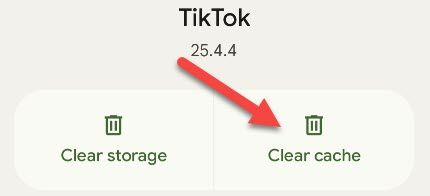
There are two options here---"Clear Data" and "Clear Cache." We want the latter. "Clear Storage" will essentially reset the app.
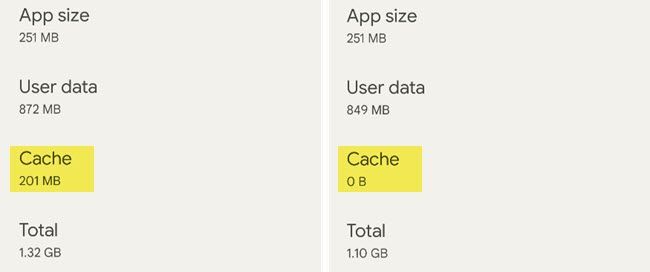
The cache will immediately be cleared, and you'll see the amount of cache listed on the page go down to zero.
Unlike what you're probably familiar with on Windows, Android doesn't have a system-wide "Trash" or "Recycle Bin." Instead, it's managed by the apps themselves, which is where you'll need to go to empty the trash.
The most common place where you might want to empty the trash is your File Manager app. We'll show you where to find the trash in Samsung's "My Files" app and "Files by Google."
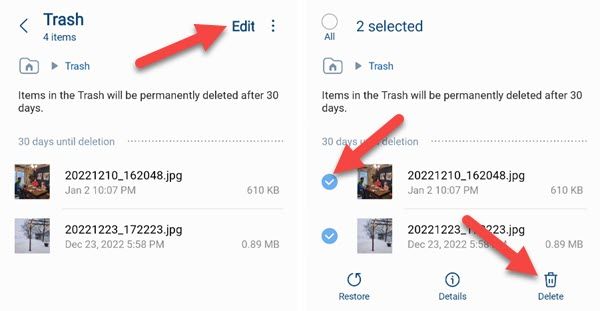
For the "My Files" app that comes preinstalled on Samsung Galaxy devices, simply scroll down to the bottom to find "Trash."
Now you can tap "Edit" and select the items you'd like to delete, then tap the trash can icon to remove them permanently.
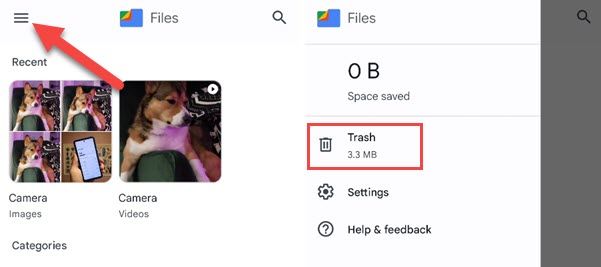
In the "Files by Google" app, you can find "Trash" in the hamburger menu in the top left.
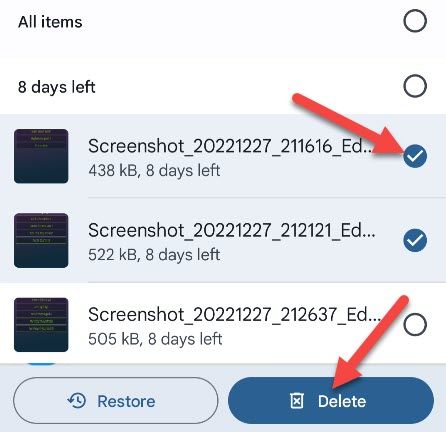
From here, you can select individual items or tap "All Items" and select "Delete" to remove them permanently.
File Manager apps typically delete trash after 30 days. However, you can go in and manually remove the files whenever you want.
Uninstall Unused Apps
Unsurprisingly, apps take up a lot of space on your Android device too. App files themselves take up space, plus they accrue extra files during installation and after being used over time. So, if you have apps that aren't being used anymore, freeing up storage space is one of several reasons why you should remove them.
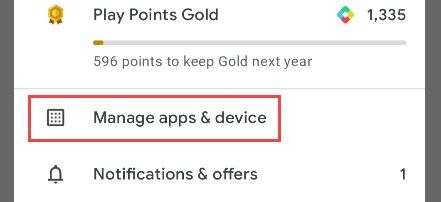
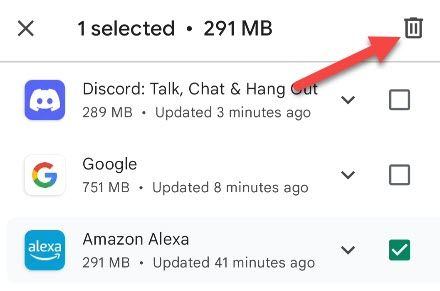
The good news is it's super easy to uninstall Android apps from the Google Play Store. Tap your profile icon and select "Manage Apps & Device."
Switch to the "Manage" tab and check the box next to any app you'd like to uninstall, then tap the trash icon in the top right.
Even if you're not in need of extra storage space, it's a good idea to get rid of apps you aren't using anymore.
Move Photos and Videos to the Cloud
If you're to the point where you feel like there's nothing left to delete to make more room on your device, it may be time to embrace the cloud. Keeping photos and videos in apps such as Google Photos, Dropbox, or OneDrive can save a lot of space.
Using a cloud storage app does come with some added concerns, though. First of all, you'll probably need to pay for a storage plan at some point. Perhaps more importantly, your media will be in the hands of a third party, and that comes with privacy and reliability concerns.
Can I Use an SD Card?
If you're lucky, you may have an option to expand your Android device's storage without moving to the cloud. Some Android devices still include SD card slots. It's become an uncommon feature among the majority of devices, but SD card slots are not yet extinct.
Micro SD cards are very affordable these days. You can snag a 128GB micro SD card for less than $20 and probably double the amount of storage space you have. Once you have the SD card, you can move files and even apps to it to get more internal storage space.
At the end of the day, these tricks will only go so far---so, for your next Android phone, make sure you have enough storage for all your photos, videos, and files. But in a pinch, these tricks should help you get a little more space to fit the stuff that matters.