Over the years, browser extensions have enabled us to customize our web experience. At first, extensions consisted of small widgets and notification badges, but as technology evolved, extensions became deeply integrated with websites. There are now even extensions that are full-blown applications.
With extensions becoming increasingly complex, developers created solutions that enabled pre-existing tools to scale and adapt. Frameworks like React, for example, improve web development and are even used — instead of vanilla JavaScript — for building web extensions.
What are Chrome extensions?
To learn more about browser extensions, let’s look at Google Chrome. A Chrome extension is a system made of different modules (or components), where each module provides different interaction types with the browser and user. Examples of modules include background scripts, content scripts, an options page, and UI elements.
In this tutorial, we’ll build a browser extension using Chrome and React. This blog post will cover:
- How to use React to build UI elements
- How to create content scripts to interact with websites
- How to use TypeScript throughout the complete solution
Building a Chrome extension
Before we jump into implementation, let’s introduce our Chrome extension: the SEO validator extension. This extension analyzes websites to detect common technical issues in the implementation of SEO metadata and the structure of a site.
Our extension will run a set of pre-defined checks over the current page DOM and reveal any detected issues.
The first step toward building our extension is to create a React application. You can check out the code in this GitHub repo.
Creating a React application with Create React App (CRA)
Creating a React application with TypeScript support is easy using CRA.
npx create-react-app chrome-react-seo-extension --template typescript
Now with our skeleton application up and running, we can transform it into an extension.
Converting the React app into a Chrome extension
Because a Chrome extension is a web application, we don’t need to adjust the application code. However, we do need to ensure that Chrome can load our application.
Extension configuration
All of the configurations for the extensions belong in the manifest.js file, which is currently living in our public folder.
This file is generated automatically by CRA. However, to be valid for an extension, it must follow the extension guidelines. There are currently two versions of manifest files supported by Chrome v2 and v3, but in this guide, we’ll use v3.
Let’s first update file public/manifest.json with the following code:
{
   "name": "Chrome React SEO Extension",
   "description": "The power of React and TypeScript for building interactive Chrome extensions",
   "version": "1.0",
   "manifest_version": 3,
   "action": {
       "default_popup": "index.html",
       "default_title": "Open the popup"
   },
   "icons": {
       "16": "logo192.png",
       "48": "logo192.png",
       "128": "logo192.png"
   }
}
Next, let’s break down each field:
name: this is the name of the extensiondescription: description of the extensionversion: current version of the extensionmanifest_version: version for the manifest format we want to use in our projectaction: actions allow you to customize the buttons that appear on the Chrome toolbar, which usually trigger a pop-up with the extension UI. In our case, we define that we want our button to start a pop-up with the contents of ourindex.html, which hosts our applicationicons: set of extension icons
Building your application
To build a React application, simply run:
npm run build
This command calls react-scripts to build our application, generating the output in the build folder. But what exactly is happening there?
When React builds our app, it generates a series of files for us. Let’s take a look at an example:
As we can see, CRA compressed the application code into a few JavaScript files for chunks, main, and runtime. Additionally, it generated one file with all our styles, our index.html, and all the assets from our public folder, including the manifest.json.
This looks great, but if we were to try it in Chrome, we would start receiving Content Security Policy (CSP) errors. This is because when CRA builds the application, it tries to be efficient, and, to avoid adding more JavaScript files, it places some inline JavaScript code directly on the HTML page. On a website, this is not a problem — but it won’t run in an extension.
So, we need to tell CRA to place the extra code into a separate file for us by setting up an environment variable called INLINE_RUNTIME_CHUNK.
Because this environment variable is particular and only applies to the build, we won’t add it to the .env file. Instead, we will update our build command on the package.json file.
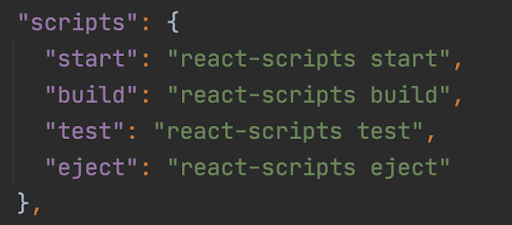
Your package.json scripts section currently looks like this:
Edit the build command as follows:
“build”: “INLINE_RUNTIME_CHUNK=false react-scripts build”,
If you rebuild your project, the generated index.html will contain no reference to inline JavaScript code.
Loading the extension into your browser
We are now ready to load the extension into Chrome. This process is relatively straightforward. First, visit chrome://extensions/ on your Chrome browser and enable the developer mode toggle:
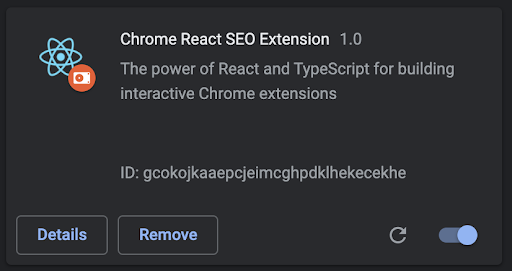
Then, click Load unpacked and select your build folder. Your extension is now loaded, and it’s listed on the extensions page. It should look like this:
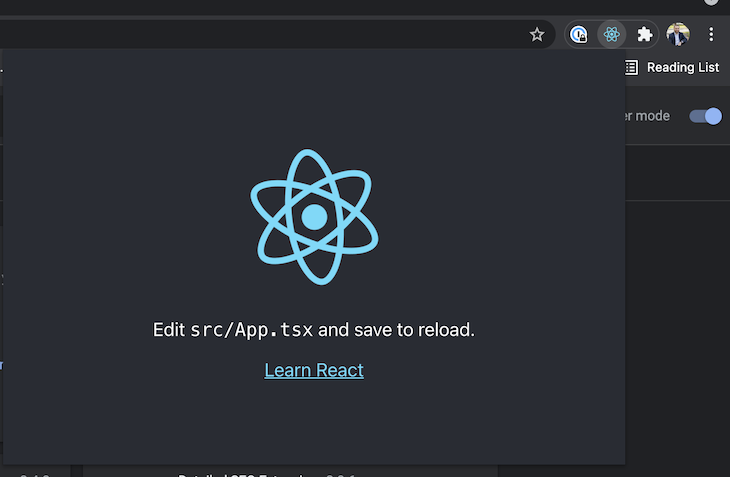
In addition, a new button should appear on your extensions toolbar. If you click on it, you will see the React demo application as a pop-up.
Building the pop-up
The action icon is the main entry point to our extension. When pressed, it launches a pop-up that contains index.html.
In our current implementation, I see two major problems: the pop-up is too small, and it’s rendering the React demo page.
The first step is to resize the pop-up to a larger size so it can contain the information we want to present to the user. All we need to do is adjust the width and height of the body element.
Open the file index.css generated by React and change the body element to contain width and height.
body {
 width: 600px;
 height: 400px;
 ...
}
Now, return to Chrome. You won’t see any difference here because our extension only works with the compiled code, which means that to see any change in the extension itself, we must rebuild the code. This is a considerable downside. To minimize the work, I generally run extensions as web applications and only run them as extensions for testing.
After rebuilding, Chrome will notice the changes automatically and refresh the extension for you. It should now look like this:
If you have any issues and your changes are not applying, review the Chrome extensions page for any errors on your extension or manually force a reload.
Designing the UI
Designing the UI happens entirely on the React application using the components, functions, and styles you know and love, and we won’t focus on creating the screen itself.
Let’s directly jump into our App.tsx with our updated code:
import React from 'react';
import './App.css';

function App() {
 return (
   <div className="App">
     <h1>SEO Extension built with React!</h1>

     <ul className="SEOForm">
       <li className="SEOValidation">
         <div className="SEOValidationField">
           <span className="SEOValidationFieldTitle">Title</span>
           <span className="SEOValidationFieldStatus Error">
             90 Characters
           </span>
         </div>
         <div className="SEOVAlidationFieldValue">
           The title of the page
         </div>
       </li>

       <li className="SEOValidation">
         <div className="SEOValidationField">
           <span className="SEOValidationFieldTitle">Main Heading</span>
           <span className="SEOValidationFieldStatus Ok">
             1
           </span>
         </div>
         <div className="SEOVAlidationFieldValue">
           The main headline of the page (H1)
         </div>
       </li>
     </ul>
   </div>
 );
}

export default App;
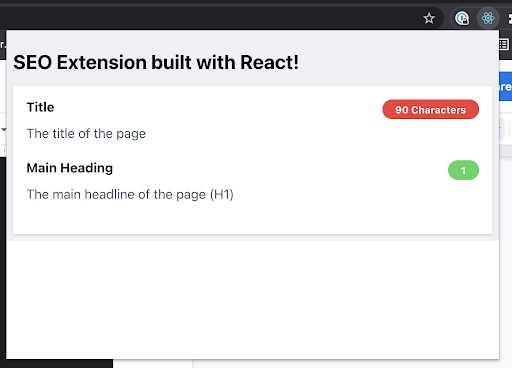
Add some styles so it looks like this:
It looks better, but it’s not quite there yet. In the component code, we hardcoded the title of the page, the main heading, and the validations.
As it stands, our extension works well in isolation as a pure React application. But what happens if we want to interact with the page the user is visiting? We now need to make the extension interact with the browser.
Accessing the website contents
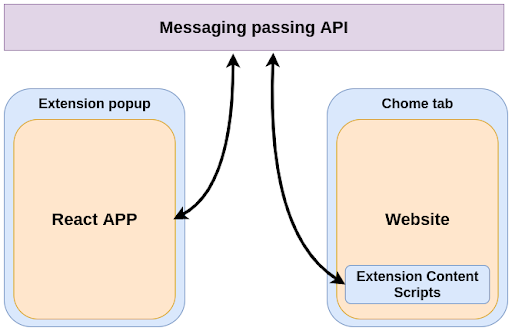
Our React code runs in isolation inside the pop-up without understanding anything about the browser information, tabs, and sites the user is visiting. The React application can’t directly alter the browser contents, tabs, or websites. However, it can access the browser API through an injected global object called chrome.
The Chrome API allows our extension to interact with pretty much anything in the browser, including accessing and altering tabs and the websites they are hosting, though extra permissions will be required for such tasks.
However, if you explore the API, you won’t find any methods to extract information from the DOM of a website, so then, how can we access properties such as the title or the number of headlines a site has? The answer is in content scripts.
Content scripts are special JavaScript files that run in the context of web pages and have full access to the DOM elements, objects, and methods. This makes them perfect for our use case.
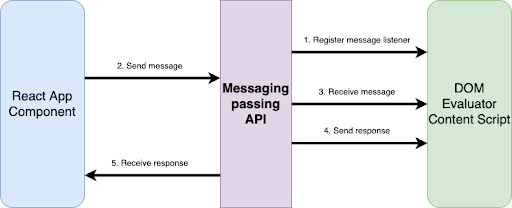
But the remaining question is, how does our React app interact with these content scripts?
Using message passing
Message passing is a technique that allows different scripts running in different contexts to communicate with each other. Messages in Chrome are not limited to content scripts and pop-up scripts, and message passing also enables cross-extension messaging, regular website-to-extension messaging, and native apps messaging.
As you may expect, messages establish a connection between two parts, where one of the parts sends a request, and the other part can send a response, also known as one-time requests. There are other types of messages as well, which you can read about in the official documentation.
Let’s put the messaging passing API into practice by building our messaging system within our extension.
Setting up the project
Interacting with the message passing API for our requirements requires three things:
- Access to the Chrome API
- Permissions
- Content scripts
The Chrome API is accessible through the chrome object globally available in our React app. For example, we could directly use it to query information about the browser tabs through the API call chrome.tabs.query.
Trying that will raise type errors in our project, as our project doesn’t know anything about this chrome object. So, the first thing we need to do is to install proper types:
npm install @types/chrome --save-dev
Next, we need to inform Chrome about the permissions required by the extension. We do that in the manifest file through the permissions property.
Because our extension only needs access to the current tab, we only need one permission: activeTab.
Please update your manifest to include a new permissions key:
"permissions": [
   "activeTab"
],
Lastly, we need to build the content script to gather all the information we need about the websites.
Building content scripts in separate JavaScript files
We already learned that content scripts are special JavaScript files that run within the context of web pages, and these scripts are different and isolated from the React application.
However, when we explained how CRA builds our code, we learned that React will generate only one file with the application code. So how can we generate two files, one for the React app and another for the content scripts?
I know of two ways. The first involves creating a JavaScript file directly in the public folder so it is excluded from the build process and copied as-is into the output. However, we can’t use TypeScript here, which is very unfortunate.
Thankfully, there’s a second method: we could update the build settings from CRA and ask it to generate two files for us. This can be done with the help of an additional library called Craco.
CRA performs all the magic that is needed to run and build React applications, but it encapsulates all configurations, build settings, and other files into their library. Craco allows us to override some of these configuration files without having to eject the project.
To install Craco, simply run:
npm install @craco/craco --save
Next, create a craco.config.js file in the root directory of your project. In this file, we will override the build settings we need.
Let’s see how the file should look:
module.exports = {
   webpack: {
       configure: (webpackConfig, {env, paths}) => {
           return {
               ...webpackConfig,
               entry: {
                   main: [env === 'development' && require.resolve('react-dev-utils/webpackHotDevClient'),paths.appIndexJs].filter(Boolean),
                   content: './src/chromeServices/DOMEvaluator.ts',
               },
               output: {
                   ...webpackConfig.output,
                   filename: 'static/js/[name].js',
               },
               optimization: {
                   ...webpackConfig.optimization,
                   runtimeChunk: false,
               }
           }
       },
   }
}
CRA utilizes webpack for building the application. In this file, we override the existing settings with a new entry. This entry will take the contents from ./src/chromeServices/DOMEvaluator.ts and build it separately from the rest into the output file static/js/[name].js, where the name is content, the key where we provided the source file.
At this point, Craco is installed and configured but is not being used. In your package.json, it’s necessary to edit your build script once again to this:
"build": "INLINE_RUNTIME_CHUNK=false craco build",
The only change we made is replacing react-scripts with craco. We are almost done now. We asked craco to build a new file for us, but we never created it. We will come back to this later. For now, know that one key file is missing, and in the meantime, building is not possible.
Telling Chrome where to find content scripts
We did all this work to generate a new file called content.js as part of our build project, but Chrome doesn’t know what to do with it, or that it even exists.
We need to configure our extension in a way that the browser knows about this file, and that it should be injected as a content script. Naturally, we do that on the manifest file.
In the manifest specification, there’s a section about content_scripts. It’s an array of scripts, and each script must contain the file location and to which websites should be injected.
Let’s add a new section in the manifest.json file:
"content_scripts": [
   {
       "matches": ["http://*/*", "https://*/*"],
       "js": ["./static/js/content.js"]
   }
],
With these settings, Chrome will inject the content.js file into any website using HTTP or HTTPS protocols.
Developing the DOMEvaluator content script
As configurations, libraries, and settings go, we are ready. The only thing missing is to create our DOMEvaluator content script and to make use of the messaging API to receive requests and pass information to the React components.
Here’s how our project will look:
First, let’s create the missing file. In the folder src, create a folder named chromeServices and a file named DOMEvaluator.ts
A basic content script file would look like this:
import { DOMMessage, DOMMessageResponse } from '../types';

// Function called when a new message is received
const messagesFromReactAppListener = (
   msg: DOMMessage,
   sender: chrome.runtime.MessageSender,
   sendResponse: (response: DOMMessageResponse) => void) => {

   console.log('[content.js]. Message received', msg);

   const headlines = Array.from(document.getElementsByTagName<"h1">("h1"))
                       .map(h1 => h1.innerText);

    // Prepare the response object with information about the site
   const response: DOMMessageResponse = {
       title: document.title,
       headlines
   };

   sendResponse(response);
}

/**
* Fired when a message is sent from either an extension process or a content script.
*/
chrome.runtime.onMessage.addListener(messagesFromReactAppListener);
There are three key lines of code:
- Registering a message listener
- Listener function declaration (
messagesFromReactAppListener) sendResponse(defined as a parameter from the listener function)
Now that our function can receive messages and dispatch a response, let’s move next to the React side of things.
React App component
Our application is now ready to interact with the Chrome API and send messages to our content scripts.
Because the code here is more complex, let’s break it down into parts that we can put together at the end.
Sending a message to a content script requires us to identify which website will receive it. If you remember from a previous section, we granted the extension access to only the current tab, so let’s get a reference to that tab.
Getting the current tab is easy and well documented. We simply query the tabs collection with certain parameters, and we get a callback with all the references found.
chrome.tabs && chrome.tabs.query({
   active: true,
   currentWindow: true
}, (tabs) => {
   // Callback function
});
With the reference to the tab, we can then send a message that can automatically be picked by the content scripts running on that site.
chrome.tabs.sendMessage(
   // Current tab ID
   tabs[0].id || 0,

   // Message type
   { type: 'GET_DOM' } as DOMMessage,

   // Callback executed when the content script sends a response
   (response: DOMMessageResponse) => {
       ...
   });
Something important is happening here: when we send a message, we provide the message object, and, within that message object, I’m setting a property named type. That property could be used to separate different messages that would execute different codes and responses on the other side. Think of it as dispatching and reducing when working with states.
Additionally, notice that on the content script, I’m not currently validating the type of message it receives. If you want to have access to the full code, check out the chrome-react-seo-extension GitHub.
Conclusion
Today, we introduced many new concepts and ideas, from how extensions work, their different modules, and how they communicate. We also built a fantastic extension, making use of the full power of React and TypeScript. Thanks for reading!
LogRocket: Full visibility into your web and mobile apps

LogRocket is a frontend application monitoring solution that lets you replay problems as if they happened in your own browser. Instead of guessing why errors happen, or asking users for screenshots and log dumps, LogRocket lets you replay the session to quickly understand what went wrong. It works perfectly with any app, regardless of framework, and has plugins to log additional context from Redux, Vuex, and @ngrx/store.
In addition to logging Redux actions and state, LogRocket records console logs, JavaScript errors, stacktraces, network requests/responses with headers + bodies, browser metadata, and custom logs. It also instruments the DOM to record the HTML and CSS on the page, recreating pixel-perfect videos of even the most complex single-page and mobile apps.
Try it for free.Get set up with LogRocket's modern React error tracking in minutes:
- Visit https://logrocket.com/signup/ to get an app ID.
- Install LogRocket via NPM or script tag.
LogRocket.init()must be called client-side, not server-side. - (Optional) Install plugins for deeper integrations with your stack:
- Redux middleware
- ngrx middleware
- Vuex plugin
$ npm i --save logrocket

// Code:

import LogRocket from 'logrocket';
LogRocket.init('app/id');
Add to your HTML:
<script src="https://cdn.lr-ingest.com/LogRocket.min.js"></script>
<script>window.LogRocket && window.LogRocket.init('app/id');</script>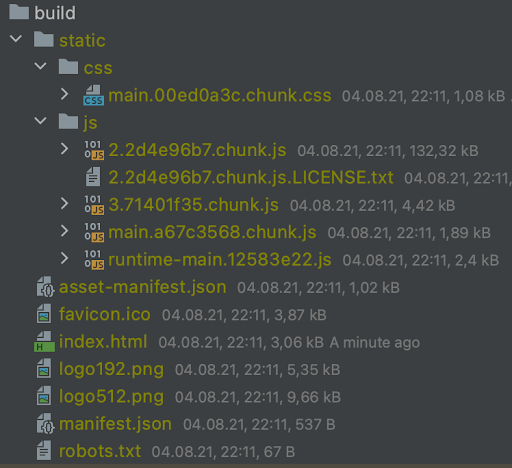

great article!
This was my very first chrome extension.
Btw. I could load the extension in MS Edge for macOS, without any adjustments.
My only little complaint would be that the section about the actual implementation of the content script doesn’t say a word about having to create a folder “types” and actually defining the types for DOMMessage and DOMMessageResponse. I somehow believed that those came from @types/chrome.
Keep them articles coming!
Hey Juan, Great article!! Really helped get me started on my react app and using DOM. Have 2 questions for you im hoping you can help me understand or resolve an issue.
1) im getting an error from in the error.message saying error type unknown, was a data type supposed to be created to handle these error?
2) when I spin the extension up in chrome it uses ALOT of resources and I’ve noticed the console is constantly ticking due to the send message and message response being updated every second. How do I set these new values without it updating the app and resending the message?
Hey, Jordan.
About typing, you might want to check github repository linked from this page. You have to create src/types/DomMessages.ts
About resources, I assume it is because useEffect should have second value as dependencies. In this case, it should be useEffect(() => {…}, []). Updating useState in useEffect without the second value causes an infinite loop.
Dude…. Infinite thanks for this. You probably shaved a week off of my timeline.
great article, I have a question like if I have to do some activity when the user click on the active tab’s page like on click of a certain button on the tab I have to inject modal on that tab so how can I do it ?
Many thanks for this tutorial. Pls i want to manipulate the DOM using CSS. How do you advise i incorporate it into the build folder? Also is it possible to add buttons into a webpage dom using typescript. Tried using the querySelectorAll().foreach() to insert button it doesnt work. It only works for paragraphs and text. Why is this so?
Hi. Great tutorial. It has one small, yet crucial issue with its flow. The part where you start explaining about the usage of chrome.tabs, you never mentioned on which file should it all be written in.
regards!