

人手で競馬予想を行うのは限界があるため、機械学習を利用したい。
学習する上でのデータの収集方法を教えて欲しい。
こんなお悩みを解決します。
前回までで、環境構築を行いました。今回は、データの収集方法について解説します。
前回の記事を確認していない方は、以下の記事を参考に環境構築を行っておいてください。
-


【Python】機械学習を用いた競馬予想【環境構築編】
続きを見る
実際にPythonの実装結果もあわせて記載していくので、興味がある方はぜひご覧ください。
効率良く技術習得したい方へ
短期間でプログラミング技術を習得したい場合は、経験者からフォローしてもらえる環境下で勉強することをおすすめします。
詳細は、以下の記事をご覧ください。
-

【比較】プログラミングスクールおすすめランキング6選【初心者向け】
続きを見る
目次 [非表示]
今回の実装結果
今回の実装結果は、GitHubに掲載しています。
一部省略している箇所もあるため、全体像を把握したい方は、以下のリンクからアクセスしてください。
https://github.com/yuruto-free/machine-learning-keiba/tree/v0.2.1
注意点
Web上からデータを取得する場合は、相手側のサーバに負荷がかかるため、アクセスする際は十分に注意してください。
また、本記事はスクレイピングの方法を解説していますが、スクレイピングを推奨している訳ではないため、自己責任で利用してください。
データの収集の概要
今回は、以下のデータを収集し、それぞれ該当するディレクトリに格納します。対象 概要 格納先 ファイル名 レース結果 レースが開催された日の馬の情報・着順 data/html/race {race_id}.bin 馬の過去成績 各馬ごとの過去の成績 data/html/horse {horse_id}.bin 血統情報 各馬ごとの血統情報 data/html/ped {horse_id}.bin
ここで、race_id、horse_idは、それぞれのレースやそれぞれの馬に一意に割り当てられる情報となります。
学校でいう、学籍番号みたいなものとなります。
これらのIDを用いることで、データ間の対応付けが可能となるため、今後は、データを識別するために利用します。
また、データ収集後のイメージは、以下のようになります。
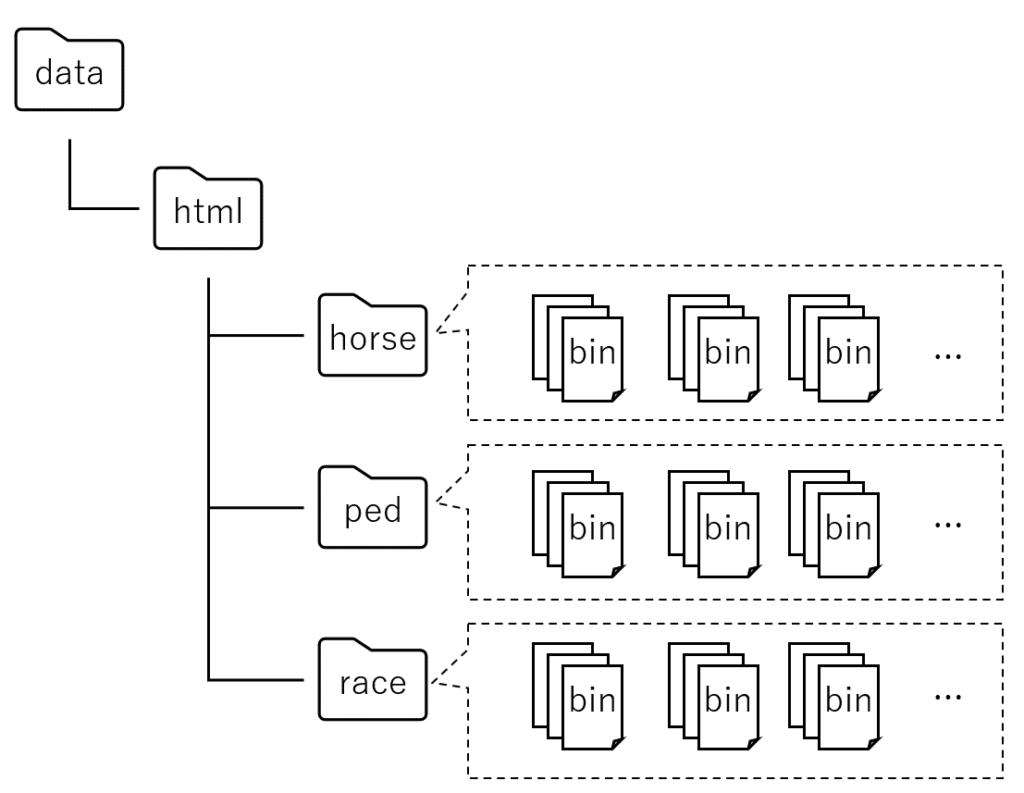
以降では、それぞれのデータの事例を紹介したいと思います。
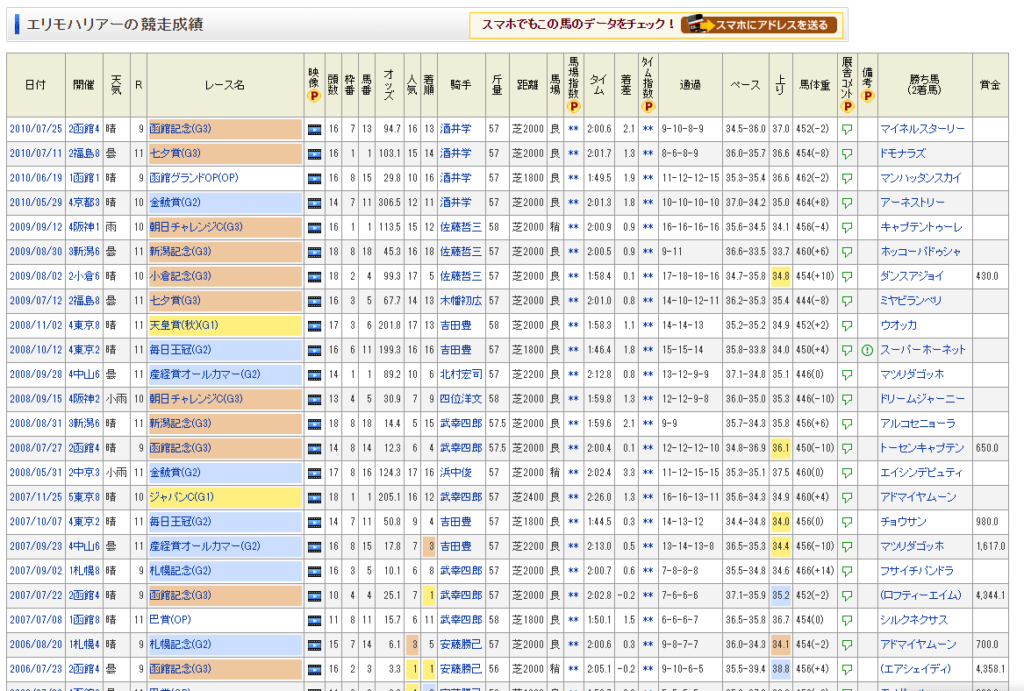
レース結果
レース結果としては、以下のようなデータを収集することになります。
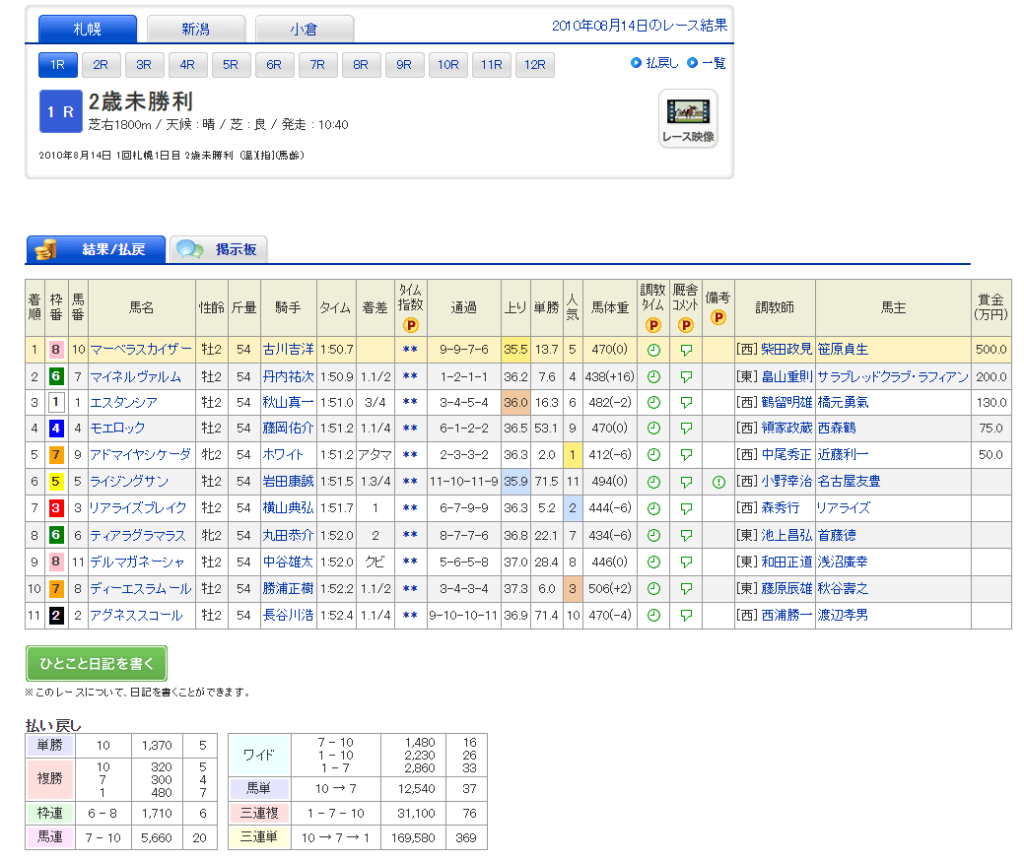
それぞれの内訳は、以下のようになります。
今回は、データ収集後に、スクレイピングによりそれぞれのデータを抽出します。
抽出結果は、それぞれ以下のファイル名で保存します。対象 保存先 レース情報 data/raw/race_info.pkl レース結果 data/raw/results.pkl 払い戻し結果 data/raw/payback.pkl
馬の過去成績
馬の過去成績としては、以下のようなデータを収集することになります。
このデータは、以下のファイル名で保存します。対象 保存先 馬の過去成績 data/raw/horse_results.pkl
血統情報
血統情報としては、以下のようなデータを収集することになります。
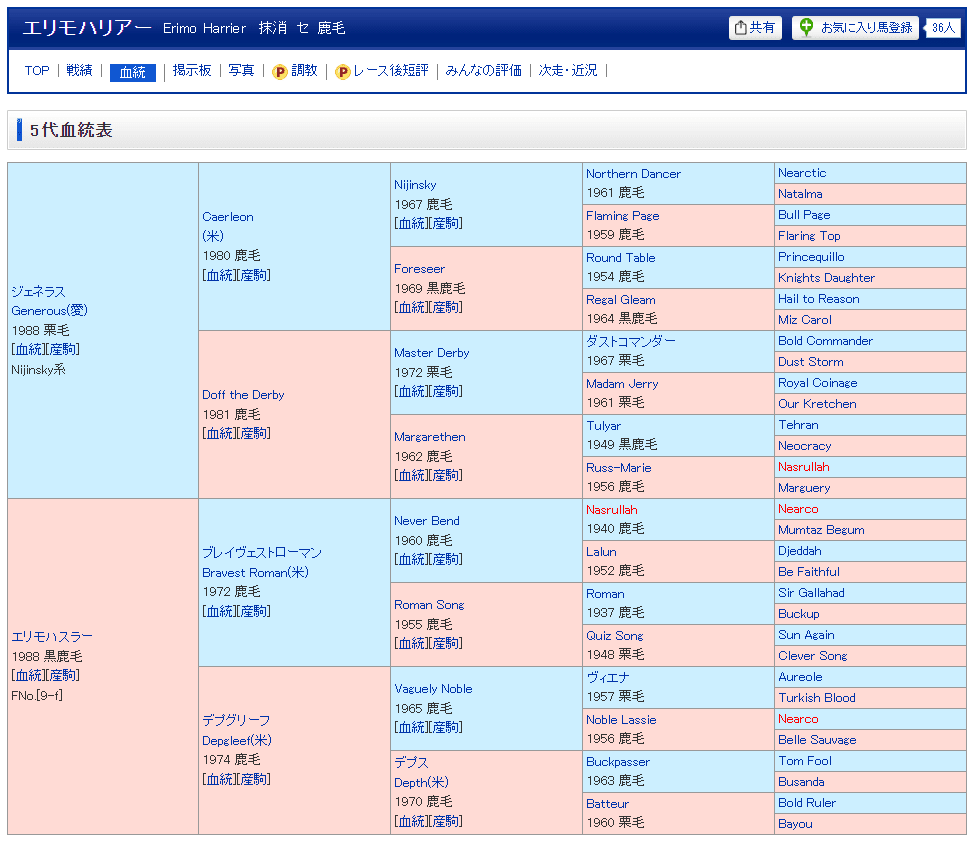
このデータは、以下のファイル名で保存します。対象 保存先 血統情報 data/raw/ped_results.pkl
データの収集方法
以下のステップでデータを収集します。
- 指定した期間内でのレース開催日を取得します。
- レース開催日に開催される全レース(最大12レース)分のデータを取得します。
ここで、各レースには、上記に示したrace_idが割り振られるため、この情報をもとにレース結果を保存します。 - 取得したデータから分析に必要な情報を抽出するため、それぞれのデータに対してスクレイピングを行います。
- 上記の作業を馬の過去成績と各馬の血統情報に対しても行います。
- スクレイピングした結果を所定のパスに保存します。
データ収集の準備
以降では、Pythonを用いてデータ収集を行うためのプログラムについて解説していきます。
データ収集を行うプログラムを追加した後のディレクトリ構造は、以下のようになります。
また、データ収集時のアクセス先やデータ保存時の保存先は決まっているため、定数として定義しておきます。
以下のように定数を定義し、modules/Constants.pyに保存します。
さらに、JupyterLabでモジュールを読み込む際に、必要な情報のみ読み込めるよう、以下の内容でmodules/__init__.pyを作成します。
上記のようにすることで、下記のように簡単にimportが行えつつ、利用者側に公開するクラスも制限できます。
データ収集
実際にデータを収集するためのプログラムを実装していきたいと思います。
scrape.ipynb
まず、実際の処理の流れを表現しているscrape.ipynbの内容を以下に示します。
利用時にユーザが設定する項目は、以下の4点となります。 レース情報の取得要否を指定(True:取得する、False:取得しない)項目 内容 _RaceParams EXECUTION FROM レース情報の取得開始時期を指定(format:yyyy-mm) TO レース情報の取得終了時期を指定(format:yyyy-mm) ExecParams HORSE_EXECUTION 馬の過去成績の取得要否を指定(True:取得する、False:取得しない) PED_EXECUTION 血統情報の取得要否を指定(True:取得する、False:取得しない)
次に、実際にデータを収集するメインのプログラムmodules/Collection.pyについて説明します。
modules/Collection.py
modules/Collection.pyは、大きく分けて以下のような構成となっています。処理の概要 内容 初期化 Webページから情報を取得する際のインターバルを定義する。 開催日一覧の取得 取得開始時期と取得終了時期の間で、レースが開催される日にちを一覧で取得する。 レースID一覧の取得 レースの開催年月日からレースIDを取得する。 Webページの取得・保存 対象のURLのページを取得し、結果を所定のディレクトリに保存する。 保存したWebページのスクレイピング Webページを解析し、必要な情報を抽出する。 スクレイピング結果の保存 スクレイピング結果を所定のパスに保存する、
以降では、それぞれの実装結果について説明します。
初期化
関連するモジュールのimportも含め、初期化処理は以下のようになります。
Webページを取得する際は、requestsライブラリを利用し、スクレイピングには、pandasのread_htmlとbs4のBeautifulSoupを利用します。
また、連続してデータを取得するとサーバ側に負担がかかるため、一定期間のインターバルを設けるようにしています。(今回のケースでは、1.2秒~2.2秒となります)
開催日一覧の取得
取得開始時期から取得終了時期まで、毎月レースが開催される日を調べることで、開催日一覧を取得できます。
ここで、monthmodは、引数で与えられた年月日間の差分を計算してくれる関数です。
今回は、月ごとに確認していくため、取得開始時期から1ヶ月ずつずらしていくことで、所望する動作を実現できます。
また、取得先のURL(CALENDAR_URL: https://race.netkeiba.com/top/calendar.html)は、クエリ文字列を指定できるため、以下のように算出した年月の情報を付与することで、取得したいページにアクセスできます。
例えば、2022年1月を指定した場合、以下のようなページが取得できます。
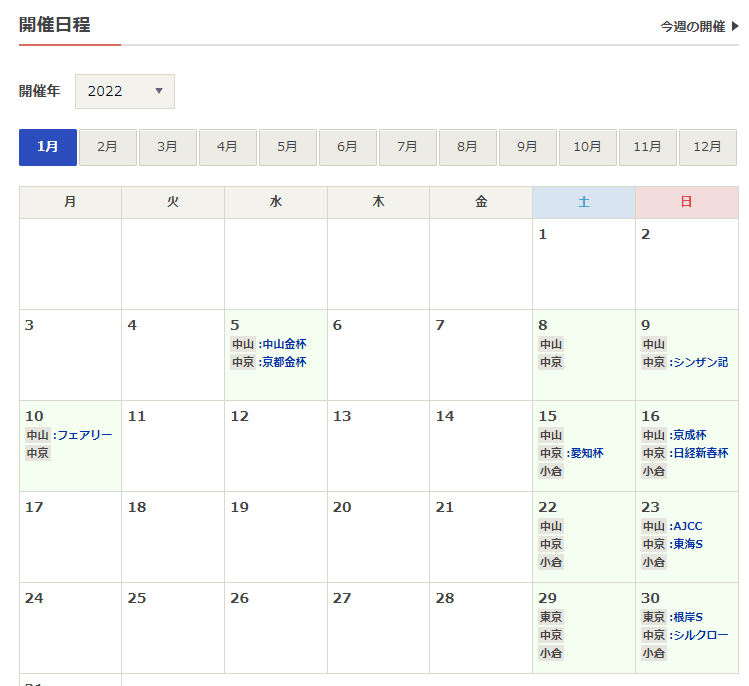
上記は、HTMLのtableタグで構成されているため、pandasのread_htmlで情報が取得できます。
レース開催日には、日付以外に、開催場所が含まれているため、各日付の情報が2つ以上に分割で切る場合がレース開催日に該当すると判断し、候補日として取り上げます。
レースID一覧の取得
先程のカレンダーからアクセスできるレース開催日の詳細から、レースIDを調べることができます。
ただ、このページはajaxで非同期通信によりページが更新されるようになっているため、PythonでWebページにアクセスしてもレースIDを取得できません。
少し調べたところ、https://race.netkeiba.com/top/race_list_sub.htmlというファイルがベースになっていることが分かったため、Pythonではこちらにアクセスし、情報を取得します。
Webページのソースコードを確認すると、class名がRaceList_Dataとなっている内部に、class名がMyRace_List_Itemとなっている箇所があります。
class名がMyRace_List_Itemとなっている要素のidにレースIDが埋め込まれているため、ここの情報を取得すればよさそうです。
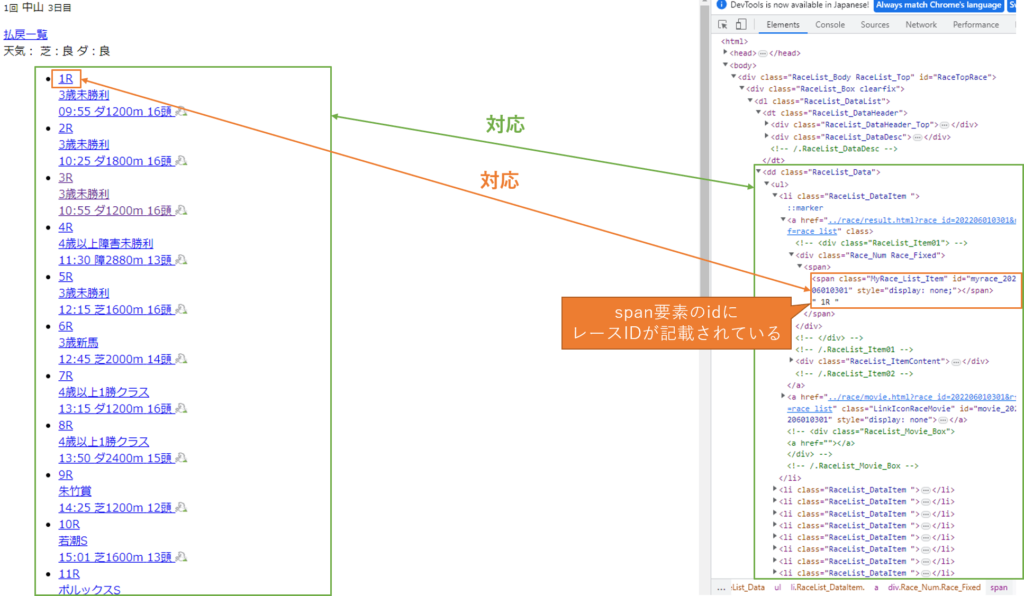
ここまで分かれば、BeautifulSoupのfind_allメソッドと正規表現を用いることで、レースIDを取得できます。
該当するコードは以下のようになります。
Webページの取得・保存
今回の場合、Webページを取得する際は、URLと保存先が変わるだけで、実際の処理は似通ったものとなるため、内部用のメソッドを定義しました。
実装結果は以下のようになります。
また、今回はDockerを用いており、Windows環境とLinux環境で文字コードの違いが生じます。
このような環境の違いを考慮せずに処理を行う為に、binary形式でデータを扱う方針としました。
先に述べたように、このメソッドを用いることで、呼び出し元では引数を切り替えるだけで済みます。
すべて示すと冗長になるため、レース結果を取得する場合の例を以下に示します。
他のメソッド(scrape_html_ped, scrape_html_horse_with_master)も同様の処理となります。
詳細は、冒頭に示したGitHubのリンクをご確認ください。
保存したWebページのスクレイピング
本記事の最後になる、スクレイピングに関してです。
以降の前処理を行う上での準備も行っているので、参考になれば幸いです。
まず、以下に示すように、保存したHTMLファイルを読み込む処理を定義します。
最初に述べた通り、ファイル名に対象のID(race_idやhorse_id)を指定する構成としたため、こちらの情報をもとにデータを管理します。
レース結果の取得
次に、レース結果を取得する処理を実装します。
こちらも、Webページのソースコードを確認するとレース結果がtableタグとして定義されているため、pandasのread_htmlを用いることで取得できます。
ただし、horse_idやjockey_id(騎手ID)はソースコード中にしかないため、BeautifulSoupもあわせて利用します。
上記を踏まえた実装結果は以下のようになります。
取得後のデータは、以下のような形式になります。

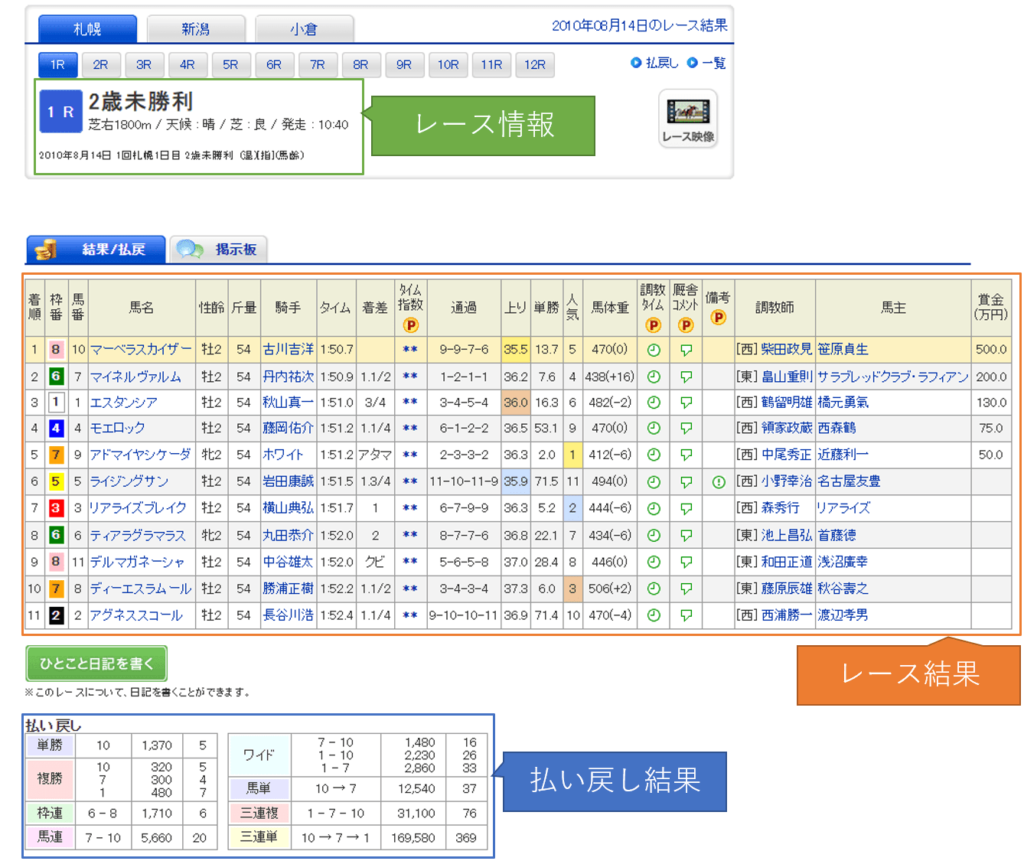
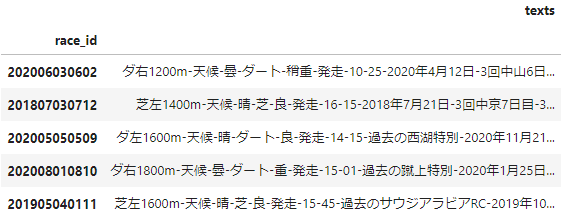
レース情報の取得
レース情報は、tableタグで囲われていないため、BeautifulSoupで該当箇所を抽出する必要があります。
また、以降の前処理の事を踏まえ、各データを「-」で結合した1つの文字列としてデータを保存します。
上記を踏まえた実装結果は以下のようになります。
取得後のデータは、以下のような形式になります。
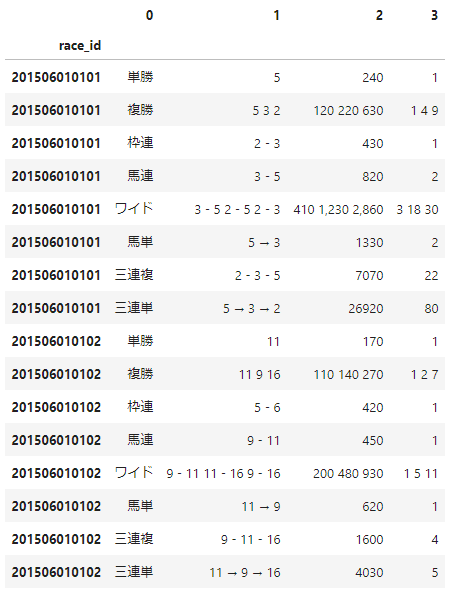
払い戻し結果の取得
レース結果と同様に、払い戻し結果もtableタグとして定義されているため、pandasのread_htmlを用いることで取得できます。
1点注意することとして、2つのtableに分かれているため、pandasのDataFrameを結合して保存する必要があります。
上記を踏まえた実装結果は以下のようになります。
取得後のデータは、以下のようになります。
馬の過去成績
レース結果、払い戻し結果と同様に、馬の過去成績もtableタグとして定義されているため、pandasのread_htmlを用いることで取得できます。
ただし、馬の過去成績は、受賞歴の有無により取り出す位置が異なります。
上記を踏まえた実装結果は以下のようになります。
取得後のデータは、以下のようになります。

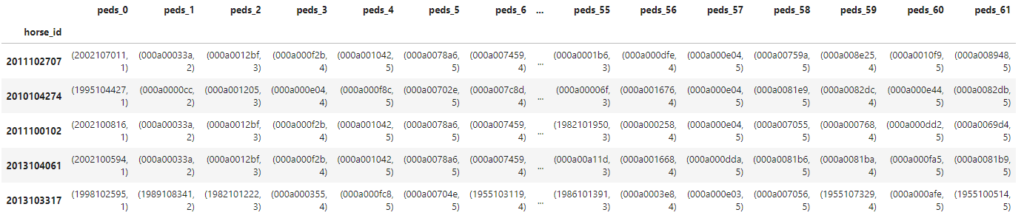
血統情報の取得
血統情報は、以降の後処理のことを考慮し、変則的ですが、該当するhorse_idと親等の情報をタプル型で保存します。
また、親等の情報は、該当するhorse_idの親要素(tdタグ)のrowspanから判定できます。
rowspanと親等の関係は、以下のようになります。rowspanの値 対応する親等 16 1親等(両親) 8 2親等(祖父母) 4 3親等(曾祖父母) 2 4親等(高祖父母) 1 5親等(5世の祖)
このような関係を保持しておくことで、血統情報を利用する際に「何親等まで利用するか」を制御できます。
上記を踏まえた実装結果は以下のようになります。
取得後のデータは、以下のようになります。
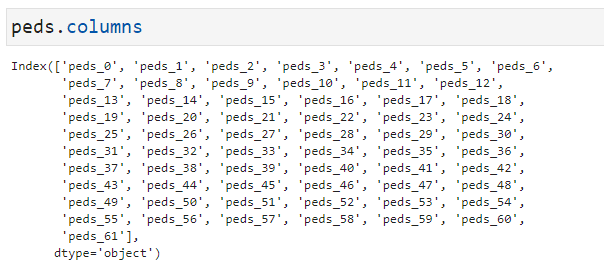
また、columnは、以下のようになっています。
スクレイピング結果の保存
スクレイピングにより得られた結果を保存する処理を実装します。
この時、過去の結果に追記する形式にしたいため、古いデータが存在する場合は、重複する部分を削除した上で保存するようにします。
上記を踏まえた実装結果は以下のようになります。
また、馬の過去成績や血統情報を取得する際は、horse_idが必要になるため、同様に読み込むためのメソッドも定義します。
実装結果は以下のようになります。
実行結果の例
今回のプログラムを実行した場合、ディレクトリ構成の例は以下のようになります。
以降では、これらの情報を用いて前処理を行っていきます。
まとめ
今回は、機械学習を用いた競馬予想を行う上で必要となるデータを収集する方法について解説しました。
機械学習には膨大な量のデータが必要になるため、これらの情報も効率良く収集する基盤が必要になります。
今回は、データ収集の基盤を構築できたと思います。
次回以降では、これらのデータに対する前処理について解説したいと思います。
効率良く技術習得したい方へ
今回の話の中で、プログラミングについてよく分からなかった方もいると思います。
このような場合、エラーが発生した際に対応できなくなってしまうため、経験者からフォローしてもらえる環境下で勉強することをおすすめします。
詳細は、以下の記事をご覧ください。
-

【比較】プログラミングスクールおすすめランキング6選【初心者向け】
続きを見る
前処理関連の記事を執筆しました。
-

【Python】機械学習を用いた競馬予想【前処理・特徴量生成編】
続きを見る

 HELP
HELP