
CognitoとAWS SDK for JavaScriptを使って、S3フォルダにCognitoユーザーごとのアクセス権を割り当てる機能を実装します!
要件
ログインしたユーザーが自分のフォルダにのみ画像をアップロード・表示できるブラウザ画面を作成します。
- Cognitoへのサインアップ、ログイン機能の実装
- 写真のアップロード・表示機能の実装(各フォルダに1ユーザー割り当て)
- フォルダはコンソールから手動で作成(自動がよかったですが時間がありませんでした)
事前情報
以下の記事が今回のベースになってます。なので先にこちらをハンズオンしておくと理解がスムーズだと思います。
1.写真アップロード
2.Cognitoサインイン・ログイン機能実装
AWSのCognitoを使って画面サインアップをやってみた
AWSのCognitoを使って画面サインインをやってみた
手順
1. S3バケット作成
2. Cognito UserPool作成
3. Cognito IdPool作成
4. IAMポリシー設定
5. Webページ実装
6. ローカルで動作テスト
コード品質やCognito Tokenの取り扱いといったセキュリティの担保は度外視した実装のため、プロダクトで利用する場合は適宜組み換えをお願いします。
実装開始
1. S3バケット作成
AWSコンソール画面からS3のバケットを作成を行います。
各設定
・パブリックアクセスをすべてブロック→URL経由での画像へのアクセスは一切無効にします
・バケットポリシー→なし
・CORS設定→後述
CORS設定
バケット>アクセス許可>Cross-Origin Resource Sharing (CORS)で下記コードをコピペします。
[
    {
        "AllowedHeaders": [
            "*"
        ],
        "AllowedMethods": [
            "HEAD",
            "GET",
            "PUT",
            "POST",
            "DELETE"
        ],
        "AllowedOrigins": [
            "*"
        ],
        "ExposeHeaders": [
            "ETag"
        ]
    }
]
S3の設定は以上になります。後ほどのテストの際、ユーザー用フォルダ作成のために戻ってきます。
2. Cognito UserPool作成
こちらの記事を参考に作成します。
アプリクライアントも同様に作成します。
3. Cognito IdPool作成
Cognito>フェデレーティッドアイデンティティ>新しいIDプールの作成でIDプールを新規作成します。
各設定
・認証フローの設定→「基本(クラシック)フローを許可する」オン
・認証プロバイダー→後述
認証プロバイダーの設定
こちらに先程作成したユーザープールIDとアプリクライアントを入力します。
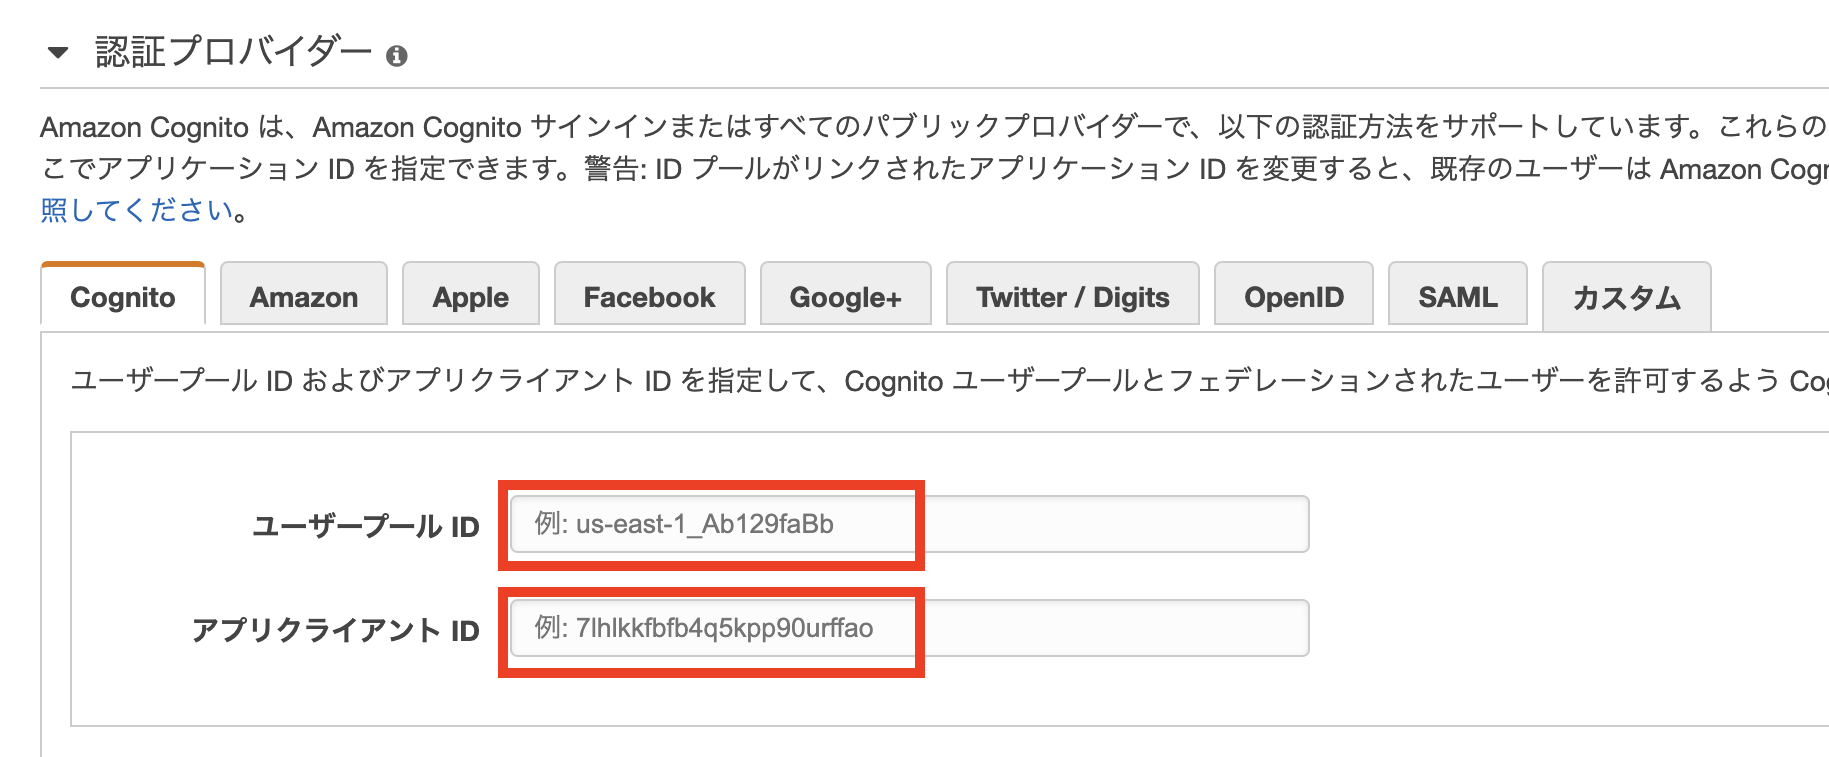
それぞれのIDは以下から確認可能です。
ユーザープールID:Cognito>[ユーザープール名]>全般設定>プールID(画面上部)
アプリクライアントID:Cognito>[ユーザープール名]>アプリクライアント>アプリクライアントID
入力して右下の「作成」ボタンを押します。
この後新しいIAMロールを作成する画面が表示されますが、いずれもデフォルトで「許可」を押します。
この時、ロール名称の最後が「Auth_Role」の方のロール名を控えておきます(次のIAMポリシー設定で使います)。
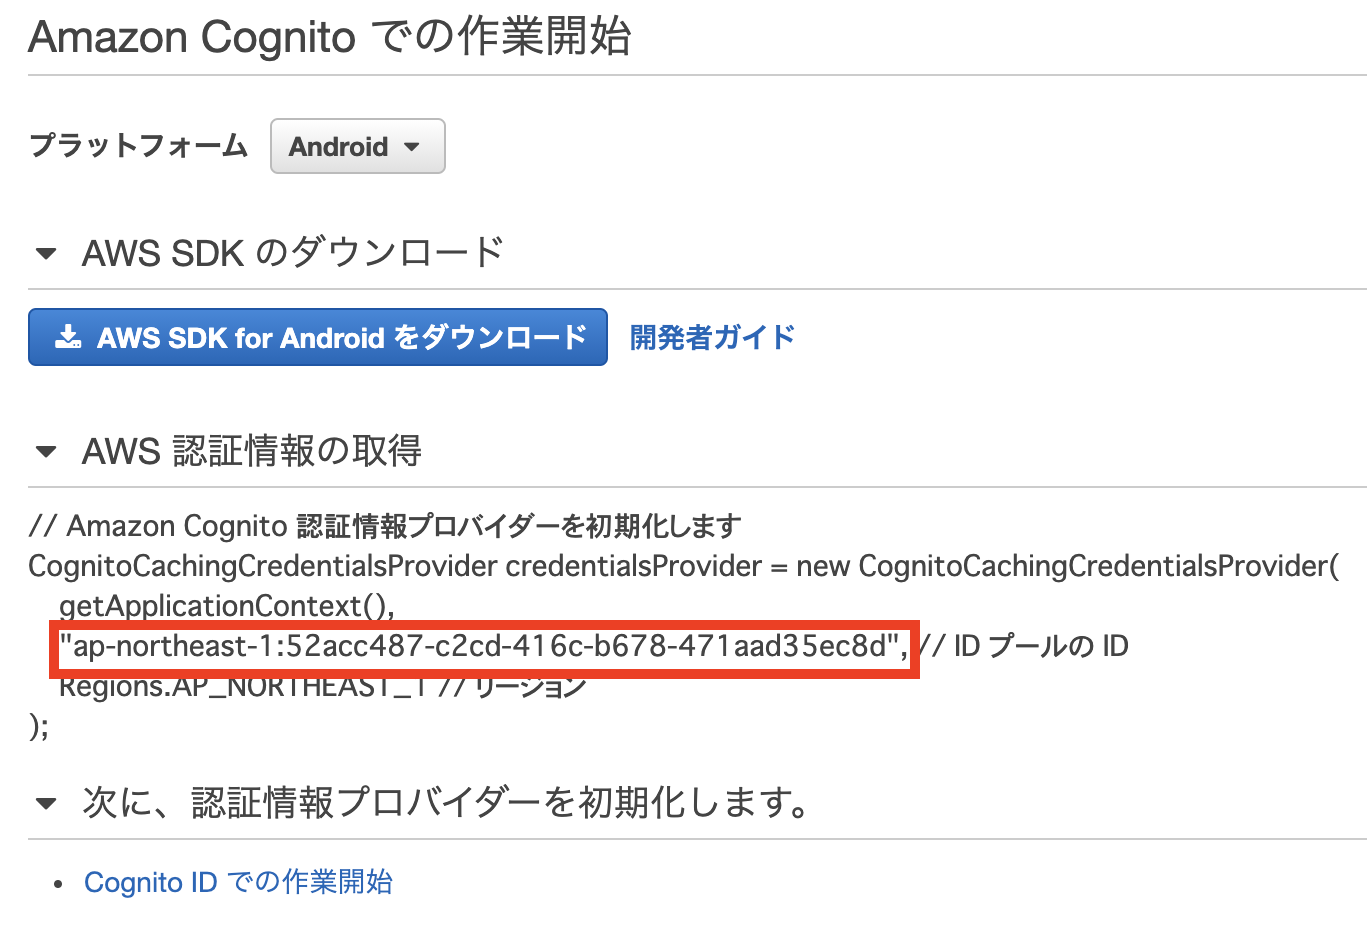
作成完了後、IdentityPoolIdを控えておきます(JavaScriptの実装で使います)。
4. IAMポリシー設定
AWSコンソールで以下のページまで遷移します。
IAM>ロール>[IDプール作成時に作られたAuth_Role名]
「ポリシーをアタッチします」をクリックしたあと、画面左上の「ポリシーの作成」をクリックします。
JSONタブにて、以下のコードをコピペしてポリシーを保存します。
※BUCKETNAMEのところは最初に作ったS3のバケット名を入力してください。
{
    "Version": "2012-10-17",
    "Statement": [
        {
            "Sid": "VisualEditor0",
            "Effect": "Allow",
            "Action": [
                "s3:ListBucketVersions",
                "s3:ListBucket"
            ],
            "Resource": "arn:aws:s3:::BUCKENAME",
            "Condition": {
                "StringLikeIfExists": {
                    "s3:prefix": [
                        "",
                        "common/*",
                        "${cognito-identity.amazonaws.com:sub}/*"
                    ]
                }
            }
        },
        {
            "Sid": "VisualEditor1",
            "Effect": "Allow",
            "Action": [
                "s3:ListAllMyBuckets",
                "s3:GetBucketLocation"
            ],
            "Resource": "*"
        },
        {
            "Sid": "VisualEditor2",
            "Effect": "Allow",
            "Action": [
                "s3:PutObject",
                "s3:GetObject",
                "s3:DeleteObject"
            ],
            "Resource": [
                "arn:aws:s3:::BUCKENAME",
                "arn:aws:s3:::BUCKENAME/common",
                "arn:aws:s3:::BUCKENAME/common/*",
                "arn:aws:s3:::BUCKENAME/${cognito-identity.amazonaws.com:sub}",
                "arn:aws:s3:::BUCKENAME/${cognito-identity.amazonaws.com:sub}/*"
            ]
        }
    ]
}
IAMロールの画面に戻り、作成したIAMポリシー名にチェックを入れて「ポリシーのアタッチ」をクリックします。
これでIAMポリシー割り当て作業は完了です。
5. Webページ実装
作業としてはこれが最後です。まずフォルダ構成を示します。
work/
  ├js/
  │  ├jscookie/
  │  │  └js.cookie.js
  │  ├info/
  │  │  ├login_info.js
  │  │  ├submit_info.js
  │  │  └s3_photoExample.js
  │  ├sjcl.js
  │  ├amazon-cognito-identity.min.js
  |  ├aws-cognito-sdk.min.js
  │  ├moment.js
  │  ├aws-sdk.js
  │  ├jquery-3.1.1min.js
  │  ├jsbn.js
  │  └jsbn2.js
  ├login.html
  ├submit.html
  └album.html
メインで組むファイルは以下です。
-
submit.html,submit_info.js -
login.html,login_info.js -
albm.html,s3_photoExample.js
上記以外はライブラリを落としてきます。
ライブラリDL
以下のライブラリをwgetコマンド等使って所定のフォルダにDLします。
Cognito SDK
https://raw.githubusercontent.com/aws/amazon-cognito-identity-js/master/dist/aws-cognito-sdk.min.js
https://raw.githubusercontent.com/aws/amazon-cognito-identity-js/master/dist/amazon-cognito-identity.min.js
http://www-cs-students.stanford.edu/~tjw/jsbn/jsbn.js
http://www-cs-students.stanford.edu/~tjw/jsbn/jsbn2.js
https://raw.githubusercontent.com/bitwiseshiftleft/sjcl/master/sjcl.js
http://momentjs.com/downloads/moment.js
AWSのSDK
https://github.com/aws/aws-sdk-js/releases/download/v2.6.6/browser.zip
JQuery
https://code.jquery.com/jquery-3.1.1.min.js
Js-Cookie
npm install js-cookie --save
サインアップ処理
以下からコーディングです。
随所にプールIDなどを埋め込む必要があるのでご注意ください。
<!DOCTYPE html>
<html lang="ja">
<head>
<meta charset="UTF-8" />
<title>Cognitoサインアップ</title>
<!--上記で記載していたライブラリを読み込む(S3にアップした名前をsrc=""に入れる)//-->
<!-- aws sdk //-->
<script src="js/aws-sdk.min.js"></script>
<!-- aws cognito sdk//-->
<script src="js/jsbn.js"></script>
<script src="js/jsbn2.js"></script>
<script src="js/sjcl.js"></script>
<script src="js/moment.js"></script>
<script src="js/aws-cognito-sdk.min.js"></script>
<script src="js/amazon-cognito-identity.min.js"></script>
<!-- jquery //-->
<script src="js/jquery-3.1.1.min.js"></script>
<script src="js/info/submit_info.js"></script>
<!--上記で記載していたライブラリを読み込む(S3にアップした名前をsrc=""に入れた) //-->
<!-- bootstrap3 //-->
<!-- bootstrap3(以下3行)は画面の装飾なので使わなくてもサインアップ出来ます //-->
<link rel="stylesheet" href="https://maxcdn.bootstrapcdn.com/bootstrap/3.3.6/css/bootstrap.min.css"
integrity="sha384-1q8mTJOASx8j1Au+a5WDVnPi2lkFfwwEAa8hDDdjZlpLegxhjVME1fgjWPGmkzs7" crossorigin="anonymous">
<link rel="stylesheet" href="https://maxcdn.bootstrapcdn.com/bootstrap/3.3.6/css/bootstrap-theme.min.css"
integrity="sha384-fLW2N01lMqjakBkx3l/M9EahuwpSfeNvV63J5ezn3uZzapT0u7EYsXMjQV+0En5r" crossorigin="anonymous">
<script src="https://maxcdn.bootstrapcdn.com/bootstrap/3.3.6/js/bootstrap.min.js"
integrity="sha384-0mSbJDEHialfmuBBQP6A4Qrprq5OVfW37PRR3j5ELqxss1yVqOtnepnHVP9aJ7xS"
crossorigin="anonymous"></script>
</head>
<body>
<div class="container">
<form class="form-signin">
<h2 class="form-signin-heading">サインアップ</h2>
<div id="message" class="alert" style="display:none;"></div>
<label for="inputUsername" class="sr-only">ユーザー名</label>
<input type="text" id="inputUsername" class="form-control" placeholder="User name" required autofocus>
<label for="inputPassword" class="sr-only">パスワード</label>
<input type="password" id="inputPassword" class="form-control" placeholder="Password" required>
<br />
<input type="button" class="btn btn-lg btn-primary btn-bloc" id="user_add_btn" value="ユーザーを作成する">
</form>
</div>
<script>
$('#user_add_btn').click(function () {
//画面上の入力値であるメールアドレス+パスワードを代入する
username = $("#inputUsername").val();
password = $("#inputPassword").val();
if (!username || !password) {
return false;
}
userPool.signUp(username, password, attributeList, null, function (err, result) {
if (err) {
console.log(err);
message_text = err;
message_class = "alert-danger";
} else {
cognitoUser = result.user;
console.log('user name is ' + cognitoUser.getUsername());
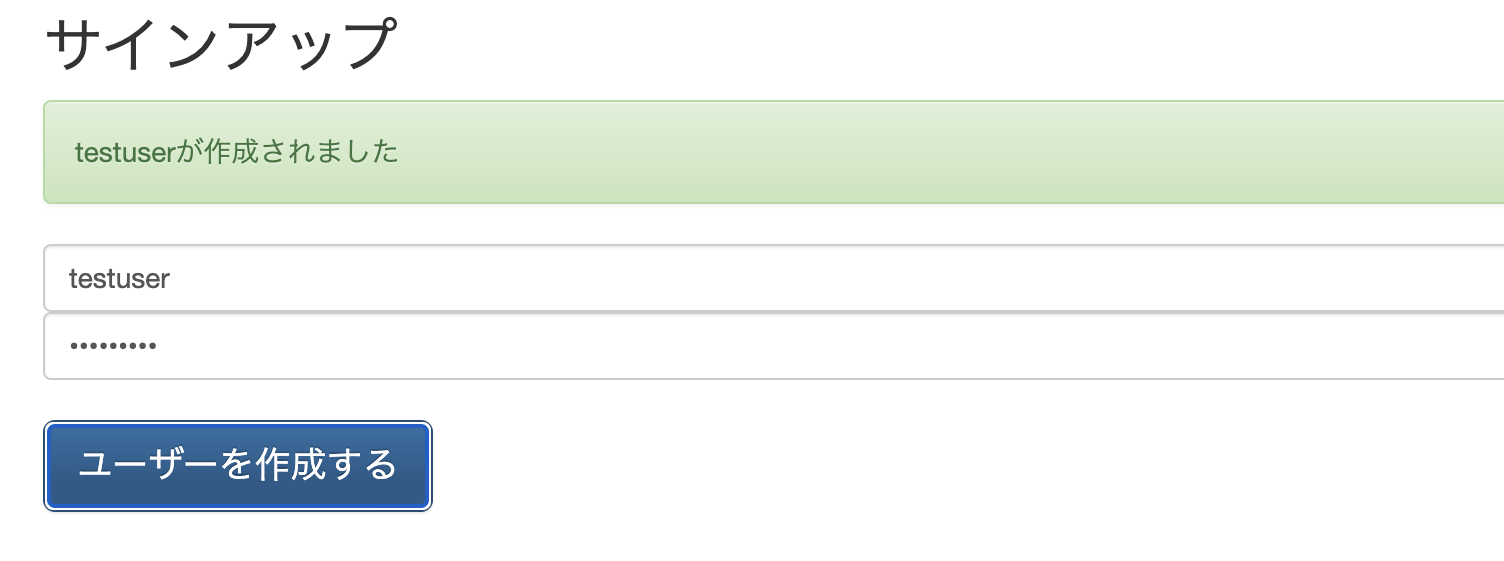
message_text = cognitoUser.getUsername() + "が作成されました";
message_class = "alert-success";
}
$("#message").text(message_text);
$("#message").addClass(message_class);
$('#message').show();
//setTimeoutはmessage表記後フェードアウトする関数なのでmustではない
setTimeout(function () {
$('#message').fadeOut();
$("#message").removeClass(message_class);
}, 5000);
});
});
</script>
</body>
</html>
// Amazon Cognito 認証情報プロバイダーを初期化します
AWS.config.region = 'ap-northeast-1'; // リージョン
AWS.config.credentials = new AWS.CognitoIdentityCredentials({
  IdentityPoolId: '', //IDプールのID
});

// Amazon Cognito Userpoolの指定+クライアントアプリの指定
let poolData = {
  UserPoolId: '', //ユーザープールのID
  ClientId: '' //クライアントアプリの設定上のID

};
//ユーザープール+クライアントアプリの情報を格納
let userPool = new AmazonCognitoIdentity.CognitoUserPool(poolData);
let attributeList = []; //本来であればattributelistに電話番号や住所など入れることも可能(今回はしない)
let cognitoUser;
ログイン処理
※コード中盤にID等の定数入力欄あり
<!DOCTYPE html>
<html lang="ja">
<head>
    <meta charset="UTF-8" />
    <title>Cognitoサインイン</title>
 <!--上記で記載していたライブラリを読み込む(S3にアップした名前をsrc=""に入れる)//-->
    <!-- aws sdk //-->
    <!-- aws sdk //-->
    <script src="js/aws-sdk.min.js"></script>
    <!-- aws cognito sdk//-->
    <script src="js/jsbn.js"></script>
    <script src="js/jsbn2.js"></script>
    <script src="js/sjcl.js"></script>
    <script src="js/moment.js"></script>
    <script src="js/aws-cognito-sdk.min.js"></script>
    <script src="js/amazon-cognito-identity.min.js"></script>
    <!-- jquery //-->
    <script src="js/jquery-3.1.1.min.js"></script>
    <script src="js/info/login_info.js"></script>
 <!--上記で記載していたライブラリを読み込む(S3にアップした名前をsrc=""に入れる)//-->
    <script src="js/js-cookie/js.cookie.js"></script>
    <!-- bootstrap3 //-->
    <link rel="stylesheet" href="https://maxcdn.bootstrapcdn.com/bootstrap/3.3.6/css/bootstrap.min.css" integrity="sha384-1q8mTJOASx8j1Au+a5WDVnPi2lkFfwwEAa8hDDdjZlpLegxhjVME1fgjWPGmkzs7" crossorigin="anonymous">
    <link rel="stylesheet" href="https://maxcdn.bootstrapcdn.com/bootstrap/3.3.6/css/bootstrap-theme.min.css" integrity="sha384-fLW2N01lMqjakBkx3l/M9EahuwpSfeNvV63J5ezn3uZzapT0u7EYsXMjQV+0En5r" crossorigin="anonymous">
    <script src="https://maxcdn.bootstrapcdn.com/bootstrap/3.3.6/js/bootstrap.min.js" integrity="sha384-0mSbJDEHialfmuBBQP6A4Qrprq5OVfW37PRR3j5ELqxss1yVqOtnepnHVP9aJ7xS" crossorigin="anonymous"></script>
</head>
<body>
<div class="container">
    <form class="form-signin">
        <h2 class="form-signin-heading">サインイン</h2>
        <div id="message" class="alert" style="display:none;"></div>
        <label for="inputUsername" class="sr-only">ユーザー名</label>
        <input type="text" id="inputUsername" class="form-control" placeholder="User name" required autofocus>
        <label for="inputPassword" class="sr-only">パスワード</label>
        <input type="password" id="inputPassword" class="form-control" placeholder="Password" required>
        <br/>
        <input type="submit" class="btn btn-lg btn-primary btn-bloc" id="login-button" value="ログイン">
    </form>
</div>
<script>

</script>
<script>
    $(function() {
        $("#login-button").click(function(event){

            const cognitoRegion = "ap-northeast-1"; //Cognitoリージョン名入力
            const userPoolId = ''; //ユーザープール入力
            const clientId = ''; //アプリクライアントID入力
            const identityPoolId = ''; //IDプール入力

            //画面上の入力値であるメールアドレス+パスワードを代入する
            event.preventDefault();
            const authenticationData = {
                Username : $('#inputUsername').val(),
                Password : $('#inputPassword').val(),
            };

            //authenticateUser()(ログインメソッド)で使用する引数
            const authenticationDetails = new AmazonCognitoIdentity.AuthenticationDetails(authenticationData);

            //2Amazon Cognito Userpoolの指定+クライアントアプリの指定
            const poolData = {
                UserPoolId: userPoolId,
                ClientId: clientId
            };

            const userPool = new  AmazonCognitoIdentity.CognitoUserPool(poolData);
            const userData = {
                Username : $("#inputUsername").val(),
                Pool : userPool
            };

            const cognitoUser = new AWSCognito.CognitoIdentityServiceProvider.CognitoUser(userData);

            //ログイン処理(引数:authenticationDetails、コールバック関数(Success, Failure)をまとめたオブジェクト)
            cognitoUser.authenticateUser(authenticationDetails, {
                onSuccess: function (authresult) {
                    alert("Well done!");

                    // アクセストークン取得(UserPoolから発行されるトークン。通常は要認証APIの検証用で使うがここではいらない?)
                    const accessToken = authresult.getAccessToken().getJwtToken();

                    // PROVEDER_KEY作成
                    const PROVIDER_KEY = 'cognito-idp.' + cognitoRegion + '.amazonaws.com/' + userPoolId;

                    // IdentityPoolとUserPoolの統合
                    AWS.config.region = 'ap-northeast-1';
                    AWS.config.credentials = new AWS.CognitoIdentityCredentials({
                        IdentityPoolId: identityPoolId,
                        Logins: {
                            [PROVIDER_KEY]: authresult.getIdToken().getJwtToken() //UserPoolから発酵されるIDトークン。federated IDの取得に必要。
                        }
                    });

                    //資格情報のリフレッシュ処理
                    AWS.config.credentials.refresh((err) => {
                        if(err) {
                            console.log(err);
                            alert(err);
                            return;
                        }

                        // inentity ID(sub)、各種認証情報をCookieにセット
                        Cookies.set('identityId', AWS.config.credentials.identityId, {expires:7});
                        Cookies.set('accessKeyId', AWS.config.credentials.accessKeyId, {expires:7});
                        Cookies.set('secretAccessKey', AWS.config.credentials.secretAccessKey, {expires:7});
                        Cookies.set('sessionToken', AWS.config.credentials.sessionToken, {espires:7});
                        Cookies.set('IdToken', authresult.getIdToken().getJwtToken(), {espires:7});
                        console.log(Cookies.get('IdToken'));

                        // アルバムへ移動
                        window.location.href = 'album.html' //追加
                    });

                },
                onFailure: function(err) {
                    alert(err.message);
                    alert("You are looser");
                },
            });
        });
    });
</script>
</body>
</html>
const identityPoolId = ""; //IDプールIDを入力

// Amazon Cognito 認証情報プロバイダーを初期化します
AWS.config.region = 'ap-northeast-1'; // リージョン
AWS.config.credentials = new AWS.CognitoIdentityCredentials({
  IdentityPoolId: identityPoolId,
});

//AWS-Cognito-SDKを初期化します
AWSCognito.config.region = 'ap-northeast-1'; // リージョン(デフォルトだとこのまま)
AWSCognito.config.credentials = new AWS.CognitoIdentityCredentials({
  IdentityPoolId: identityPoolId,
});
アルバムページ
<!DOCTYPE html>
<html>
  <head>
    <!-- **DO THIS**: -->
    <!--   Replace SDK_VERSION_NUMBER with the current SDK version number -->
    <script src="https://sdk.amazonaws.com/js/aws-sdk-2.860.0.min.js"></script>
    <script src="js/js-cookie/js.cookie.js"></script>
    <script src="js/info/s3_photoExample.js"></script>
    <script>
       function getHtml(template) {
          return template.join('\n');
       }
       listAlbums();
    </script>
  </head>
  <body>
    <h1>My Photo Albums App</h1>
    <div id="app"></div>
  </body>
</html>
s3_photoExample.js(長いので折りたたみ)
const albumBucketName = ""; //バケット名入力
const bucketRegion = "ap-northeast-1"; //バケットのリージョン名入力
const cognitoRegion = "ap-northeast-1"; //Cognitoのリージョン名入力
const userPoolId = ""; //ユーザープールID入力
const identityPoolId = ""; //IDプール入力

const PROVIDER_KEY = 'cognito-idp.' + cognitoRegion + '.amazonaws.com/' + userPoolId;
const idToken = Cookies.get('IdToken');
const identityId = Cookies.get('identityId'); //Identity ID 取得(ユーザーフォルダ作成用)

//Federated発行
AWS.config.region = 'ap-northeast-1';
AWS.config.credentials = new AWS.CognitoIdentityCredentials({
    IdentityPoolId: identityPoolId,
    Logins: {
      [PROVIDER_KEY]: idToken //UserPoolから発酵されるIDトークン。federated IDの取得に必要。
      }
});

//資格情報のリフレッシュ処理
AWS.config.credentials.refresh((err) => {
  if(err) {
      console.log(err);
      alert(err);
      return;
  }
});

var s3 = new AWS.S3({
  apiVersion: "2006-03-01",
  params: { Bucket: albumBucketName }
});


function listAlbums() {

    s3.listObjects({ Delimiter: `/`}, (err, data ) => {
      if(err) {
        return alert("There was an error listing your albums: " + err.message);
      }
    });


    s3.listObjects({ Delimiter: "/" }, function(err, data) {
      if (err) {
        return alert("There was an error listing your albums: " + err.message);
      } else {
        var albums = data.CommonPrefixes.map(function(commonPrefix) {
          var prefix = commonPrefix.Prefix;
          var albumName = decodeURIComponent(prefix.replace("/", ""));
          return getHtml([
            "<li>",
            "<span onclick=\"deleteAlbum('" + albumName + "')\">X</span>",
            "<span onclick=\"viewAlbum('" + albumName + "')\">",
            albumName,
            "</span>",
            "</li>"
          ]);
        });
        var message = albums.length
          ? getHtml([
              "<p>Click on an album name to view it.</p>",
              "<p>Click on the X to delete the album.</p>"
            ])
          : "<p>You do not have any albums. Please Create album.";
        var htmlTemplate = [
          "<h2>Albums</h2>",
          message,
          "<ul>",
          getHtml(albums),
          "</ul>",
          "<button onclick=\"createAlbum(prompt('Enter Album Name:'))\">",
          "Create New Album",
          "</button>"
        ];
        document.getElementById("app").innerHTML = getHtml(htmlTemplate);
      }
    });
}

  function createAlbum(albumName) {
    albumName = albumName.trim();
    if (!albumName) {
      return alert("Album names must contain at least one non-space character.");
    }
    if (albumName.indexOf("/") !== -1) {
      return alert("Album names cannot contain slashes.");
    }
    var albumKey = encodeURIComponent(albumName);
    s3.headObject({ Key: albumKey }, function(err, data) {
      if (!err) {
        return alert("Album already exists.");
      }
      if (err.code !== "NotFound") {
        return alert("There was an error creating your album: " + err.message);
      }
      s3.putObject({ Key: albumKey }, function(err, data) {
        if (err) {
          return alert("There was an error creating your album: " + err.message);
        }
        alert("Successfully created album.");
        viewAlbum(albumName);
      });
    });
  }

// Show the photos that exist in an album. 画像をURLではなくデータそのもので取得し表示
function viewAlbum(albumName) {
  //const albumPhotosKey = encodeURIComponent(albumName) + '/'; //URLencodeすると「:」が「%3A」になってしまいアルバムん内のデータが取れなくなるので一旦回避
  const albumPhotosKey = albumName + '/';
  s3.listObjects({Prefix: albumPhotosKey}, async function(err, data) {
    if (err) {
      return alert('There was an error viewing your album: ' + err.message);
    }
    // 'this' references the AWS.Response instance that represents the response
    const href = this.request.httpRequest.endpoint.href;
    const bucketUrl = href + albumBucketName + '/';

    let images = {};
    for(photo of data.Contents){
      const photoKey = photo.Key;
      if (photoKey === albumPhotosKey) {
        images[photoKey] = "";
        continue;
      }

      let image = "";
      s3.getObject({Key: photoKey}, function(err, file) {
        if (err) {
          console.log('Error: ' + err);
        } else {
          image = "data:image/png;base64," + encode(file.Body);
        }
      });
      await sleep(200);

      images[photoKey] = image;
    }

    const photos = data.Contents.map(function(photo) {
      const photoKey = photo.Key;
      if (photoKey === albumPhotosKey) {
        return getHtml([]);
      }

      const image = images[photoKey];
      return getHtml([
        '<span>',
          '<div>',
            '<br/>',
            '<img style="width:128px;height:128px;" src="' + image + '"/>',
          '</div>',
          '<div>',
            '<span>',
              photoKey.replace(albumPhotosKey, ''),
            '</span>',
          '</div>',
        '</span>',
      ]);
    });

    const message = photos.length ?
      '<p>The following photos are present.</p>' :
      '<p>There are no photos in this album.</p>';
    const htmlTemplate = [
      '<div>',
        '<button onclick="listAlbums()">',
          'Back To Albums',
        '</button>',
      '</div>',
      '<h2>',
        'Album: ' + albumName,
      '</h2>',
      message,
      '<div>',
        getHtml(photos),
      '</div>',
      '<input id="photoupload" type="file" accept="image/*">',
      '<button id="addphoto" onclick="addPhoto(\'' + albumName + "')\">",
      "Add Photo",
      "</button>",
      '<button onclick="listAlbums()">',
      "Back To Albums",
      "</button>"
    ];
    document.getElementById('app').innerHTML = getHtml(htmlTemplate);
  });
}

function sleep(ms) {
  return new Promise(resolve => setTimeout(resolve, ms));
}

function encode(data)
{
  const str = data.reduce(function(a,b){ return a+String.fromCharCode(b) },'');
  return btoa(str).replace(/.{76}(?=.)/g,'$&\n');
}

  function addPhoto(albumName) {
    var files = document.getElementById("photoupload").files;
    if (!files.length) {
      return alert("Please choose a file to upload first.");
    }
    var file = files[0];
    var fileName = file.name;
    // var albumPhotosKey = encodeURIComponent(albumName) + "/";
    var albumPhotosKey = albumName + "/"; //一旦URLエンコード回避

    var photoKey = albumPhotosKey + fileName;

    // Use S3 ManagedUpload class as it supports multipart uploads
    var upload = new AWS.S3.ManagedUpload({
      params: {
        Bucket: albumBucketName,
        Key: photoKey,
        Body: file
      }
    });

    var promise = upload.promise();

    promise.then(
      function(data) {
        alert("Successfully uploaded photo.");
        viewAlbum(albumName);
      },
      function(err) {
        return alert("There was an error uploading your photo: ", err.message);
      }
    );
  }

  function deletePhoto(albumName, photoKey) {
    s3.deleteObject({ Key: photoKey }, function(err, data) {
      if (err) {
        return alert("There was an error deleting your photo: ", err.message);
      }
      alert("Successfully deleted photo.");
      viewAlbum(albumName);
    });
  }

  function deleteAlbum(albumName) {
    var albumKey = encodeURIComponent(albumName) + "/";
    s3.listObjects({ Prefix: albumKey }, function(err, data) {
      if (err) {
        return alert("There was an error deleting your album: ", err.message);
      }
      var objects = data.Contents.map(function(object) {
        return { Key: object.Key };
      });
      s3.deleteObjects(
        {
          Delete: { Objects: objects, Quiet: true }
        },
        function(err, data) {
          if (err) {
            return alert("There was an error deleting your album: ", err.message);
          }
          alert("Successfully deleted album.");
          listAlbums();
        }
      );
    });
  }
6. ローカルで動作テスト
実際にブラウザで動作確認します。
※注意:Cookie使っているのでServedなどでローカルにWebサーバーを立ててから実行してください。そうしないと動かないと思います。
サインアップ
submit.htmlにアクセス後、ユーザー名とパスワードを入力してユーザー登録してみます
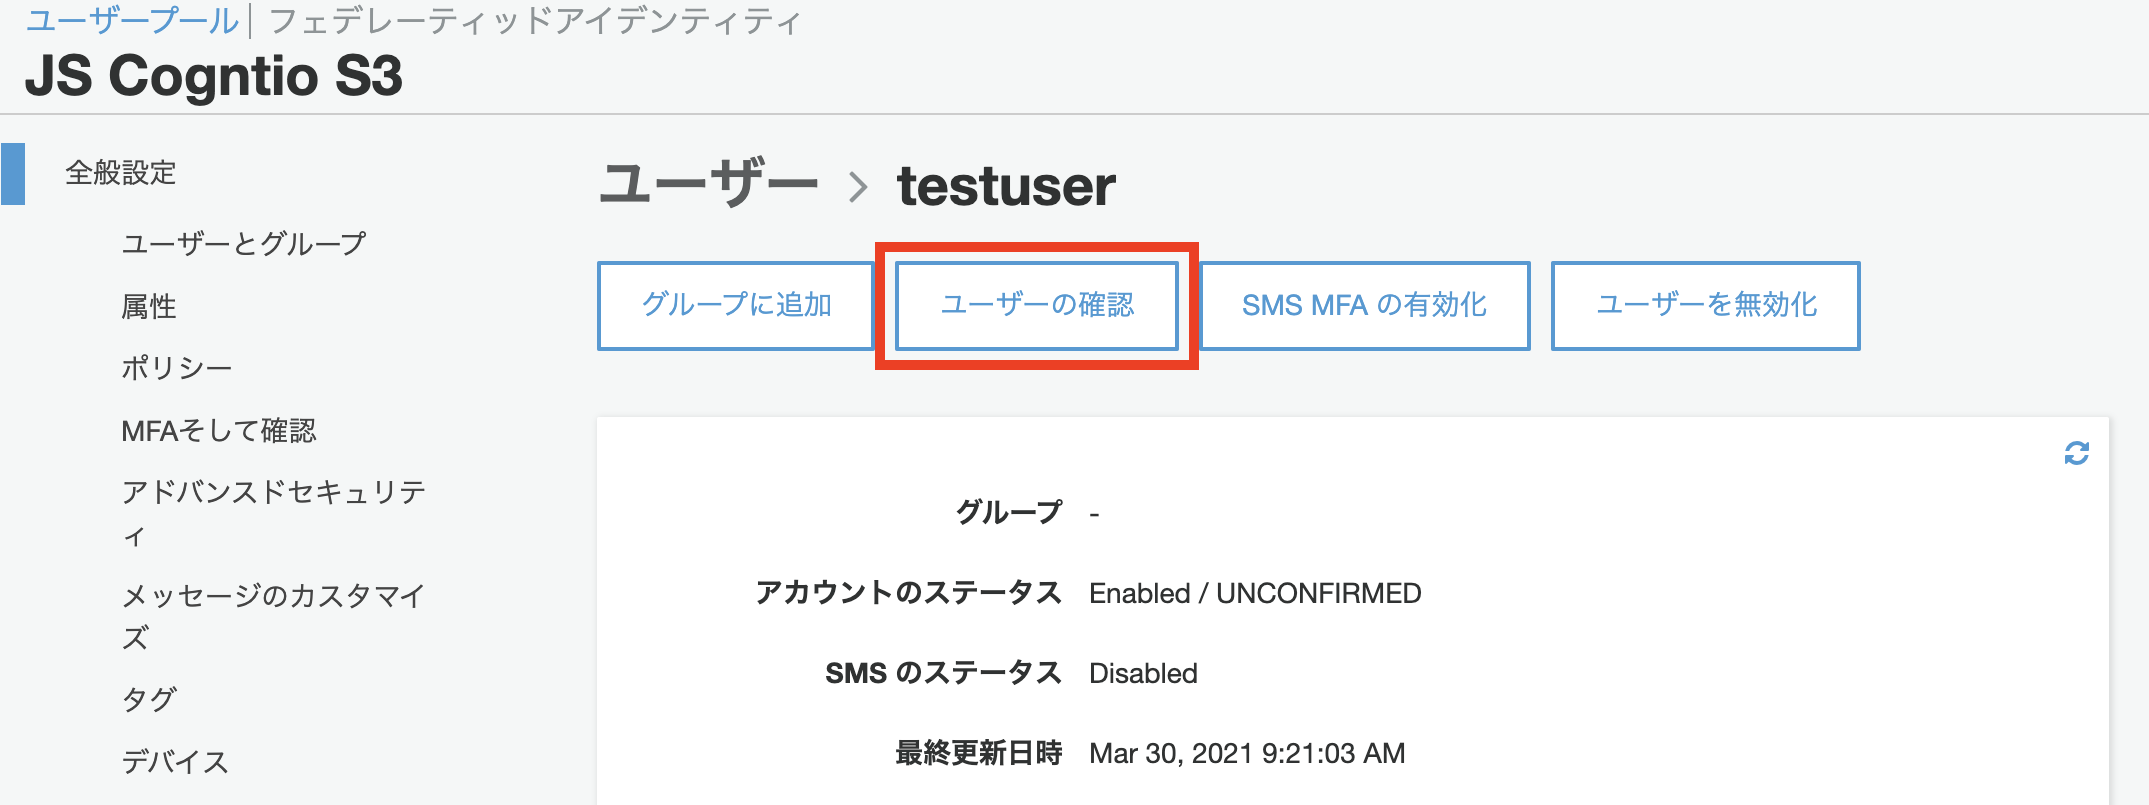
ユーザー確認
AWSコンソールからユーザーを確認しCONFIRMEDにします。本来であればメール認証など実装して自動化します。
ユーザープール>全般設定>ユーザーとグループ>[ユーザー名]>ユーザーの確認
ログイン
login.htmlに移動し、ログインしてみます
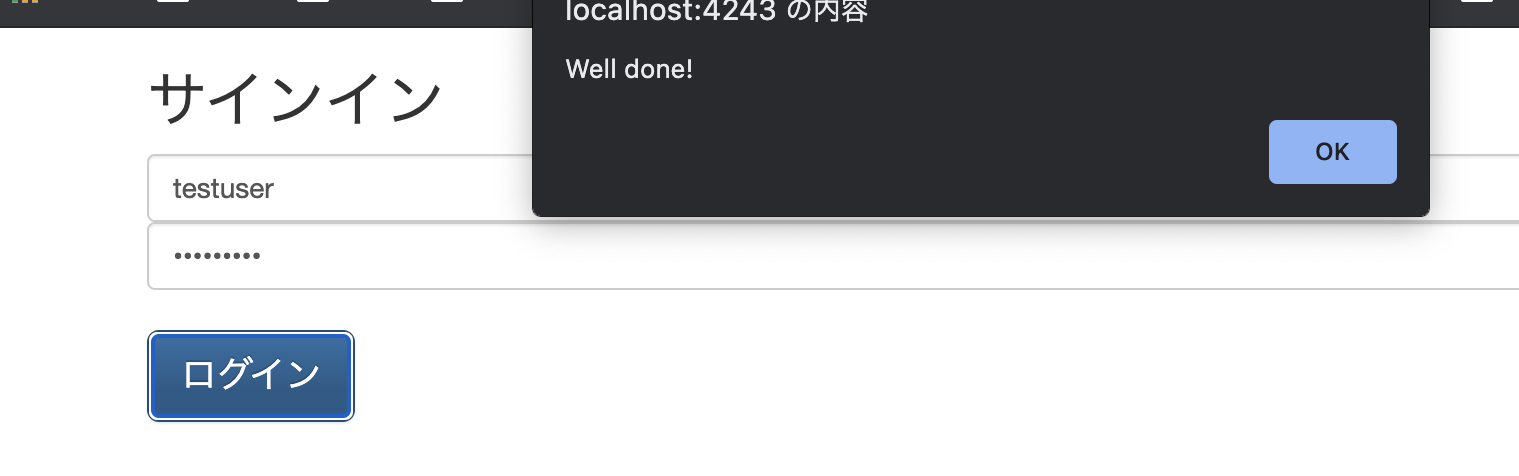
成功すればWell done!ダイアログが表示されます。
S3フォルダの作成
AWSコンソールから、ユーザー専用のフォルダを作成します。
ログイン→Albumページに遷移後、開発者ツールでCookieの情報を確認します。
ChoromeであればApplication>Cookiesで確認できます。
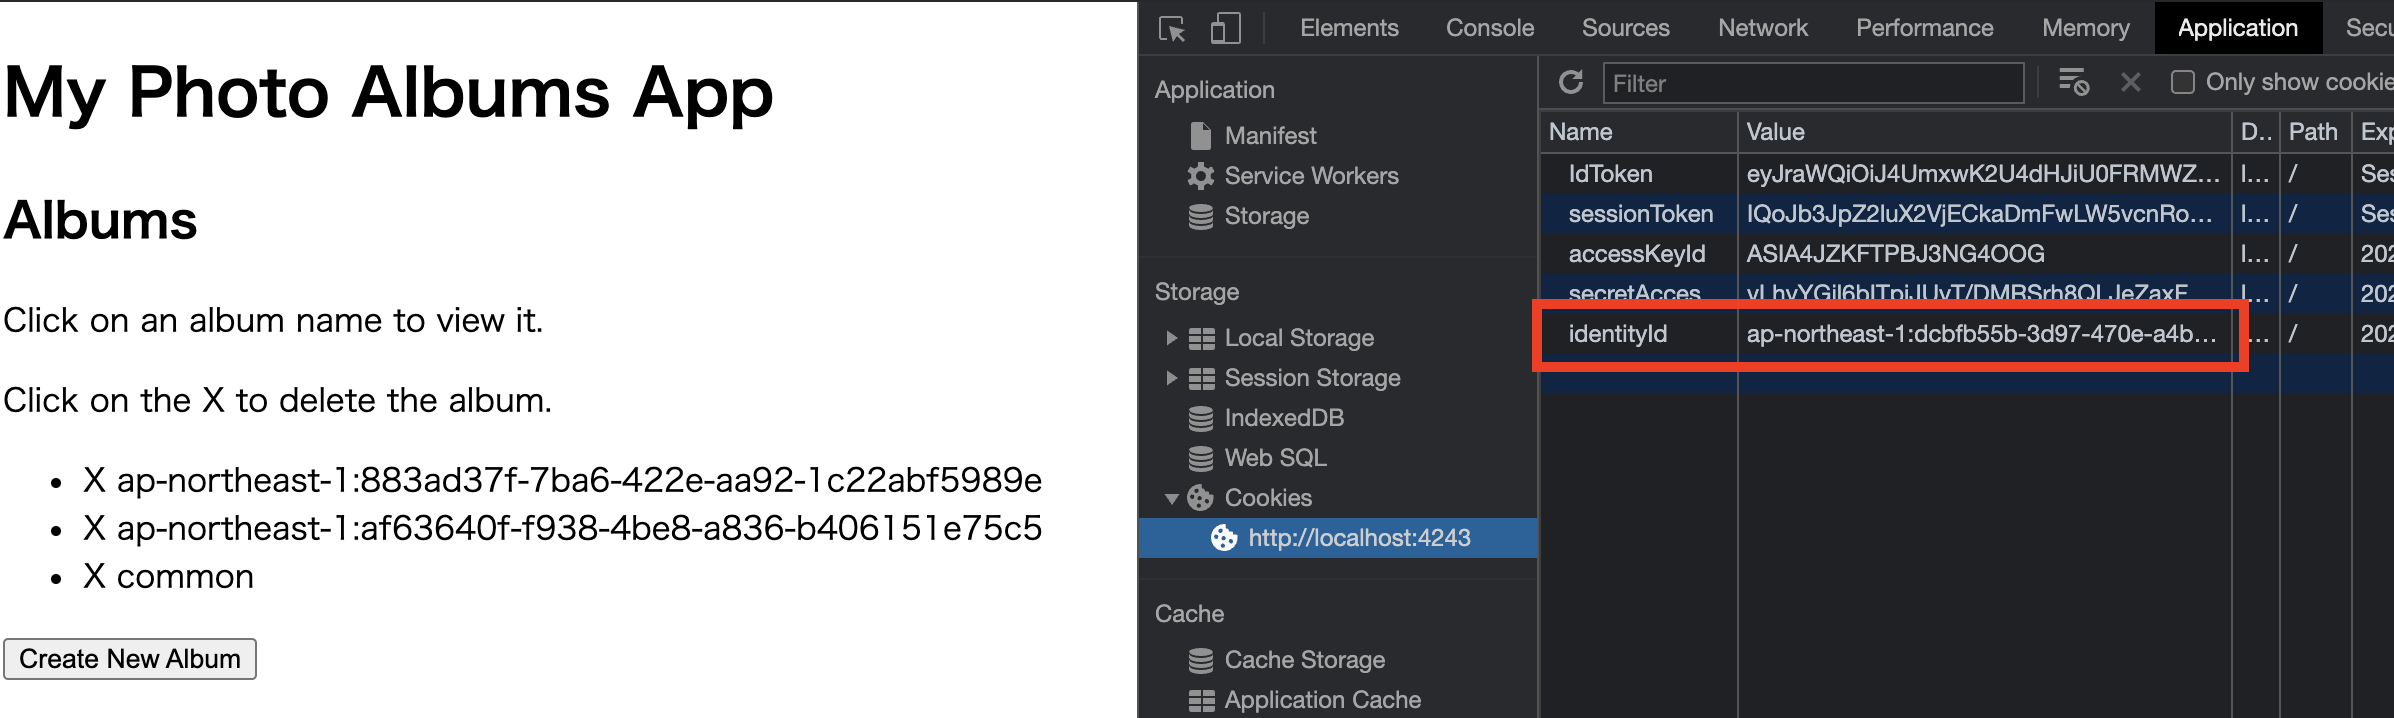
Cooikeの中にあるidentityIdのValueをコピーします。
そしてS3バケット上に新規でルートにフォルダ作成します。フォルダ名はコピーしたidentityIDのValueにします。
画像のアップロード
Albumページを更新すると、作成したフォルダ名がブラウザに表示されます。
このフォルダ名をクリックすると、画像アップロードページに遷移します。
後はこちらで画像をアップしてみてください。好きなだけ画像を突っ込めます。
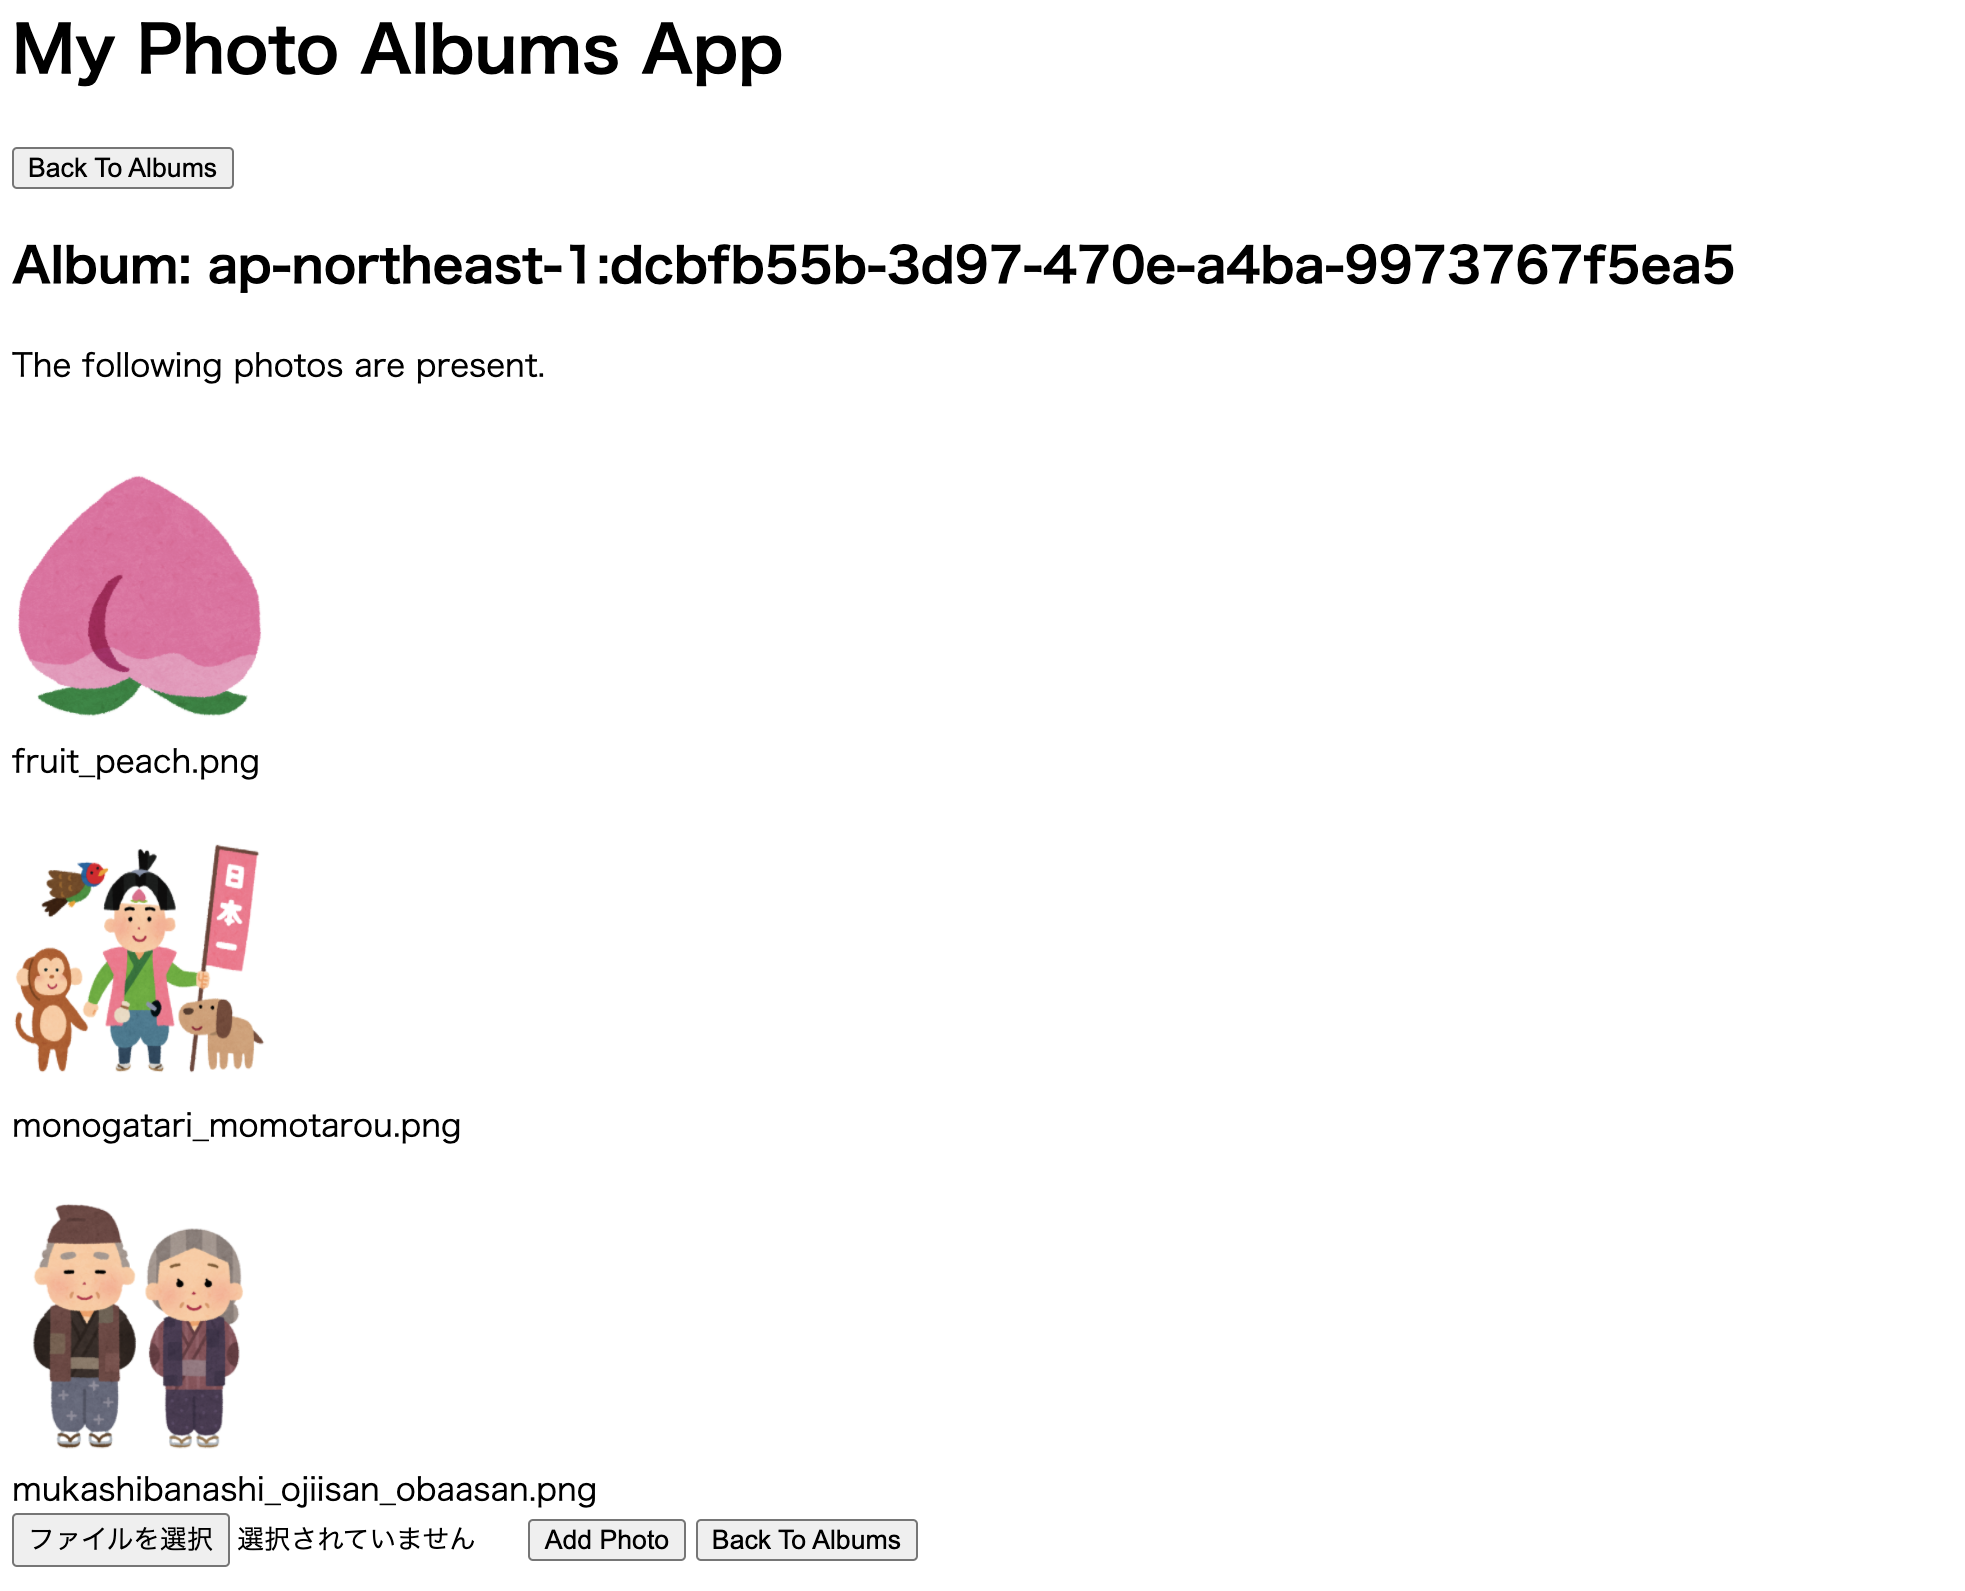
試しに違うユーザーでログインしてみて、フォルダにアクセスしようとすると弾かれることがわかると思います。
ちなみにcommonフォルダは全ユーザーがログインできるようなIAMポリシーにしてるので確認してみてください。
参考にさせていただいた記事・ドキュメント
Cognito のIDプールでS3のユーザー毎フォルダにアクセスしてみる
【Cognito】Amazon Cognito Identity SDK for JavaScriptで動くサンプルを作ってみた #2/2【JavaScript】
Amazon S3 による Web ページの作成
ブラウザから Amazon S3 への写真のアップロード
Amazon Cognito Identity SDK for JavaScript
サインイン後に ID プールを使用して AWS サービスへアクセスする
IAM JSON ポリシーの要素: 条件演算子


コメント