高速化とマルチコア向け設定
LuCiをしばらく触ってみた感触は、キビキビとしていて今まで使ってきたシングルコアルータとは全く異次元のレスポンスと安定性。このままでも申し分ないのですが、マルチコア向けの設定をいくつか試してみましょう。
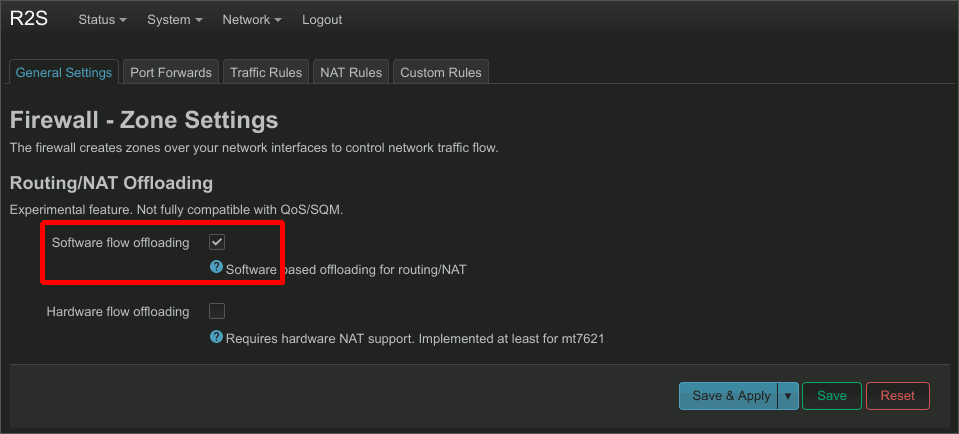
まず、以前GL-AR750Sで試してパフォーマンス向上が図れたFlow Offloadingを有効にしてみます。メニューを
Network →Firewall
図08.Flow Offloadingの有効化
uci set firewall . @ defaults [ 0 ] .flow_offloading =1
次に、
Network →Interface のGlobal network optionsタブにある、Packet Steering機能を有効にします。
図09.Packet Steeringの有効化
uci set network .globals .packet_steering =1
これは、
OpenWRTユーザガイド によると「Use every cpu to handle packet traffic」と記述がありました。
そして最後にマルチコアの各コアへ負荷分散を促してくれる、irqbalanceを導入します。こちらもOpenWRTユーザガイドに個別のページ が用意されているので、導入も簡単です。
# opkg update
# opkg install irqbalance
Installing irqbalance ( 1.9.0 -4 ) to root . . .
Downloading https : //downloads .openwrt .org /releases /21.02.2 /packages /aarch64_generic /packages /irqbalance_1 . 9.0 -4_aarch64_generic.ipk
Configuring irqbalance .
パッケージのインストール後、設定ファイルのを編集するか
uci
# uci set irqbalance.irqbalance.enabled=1
# /etc/init.d/irqbalance status
active with no instances
# /etc/init.d/irqbalance start
# /etc/init.d/irqbalance status
running
コア間で負荷分散する様子は
/proc /interrupt
1
2
3
4
5
6
7
8
9
10
11
12
13
14
15
16
17
18
19
20
21
22
23
24
25
26
# cat /proc/interrupts
CPU0 CPU1 CPU2 CPU3
3 : 43766 30852 157566 27419 GICv2 30 Level arch_timer
6 : 4 0 0 0 GICv2 32 Level ff1f0000 .dmac
7 : 0 0 0 0 GICv2 33 Level ff1f0000 .dmac
12 : 1 0 0 0 GICv2 89 Level ttyS2
13 : 7938 0 0 0 GICv2 69 Level ff160000 .i2c
15 : 0 0 0 0 GICv2 90 Level rockchip_thermal
24 : 0 0 0 0 GICv2 43 Level ff350800 .iommu
25 : 302516 0 0 0 GICv2 44 Level dw -mci
26 : 29001 0 0 0 GICv2 56 Level eth0
28 : 0 0 0 0 GICv2 48 Level ehci_hcd : usb1
29 : 0 0 0 0 GICv2 49 Level ohci_hcd : usb2
34 : 0 0 0 0 rockchip_gpio_irq 0 Edge keys
90 : 0 0 0 0 rockchip_gpio_irq 24 Level rk805
162 : 0 0 0 0 GICv2 94 Level rockchip_usb2phy
163 : 27257 0 205105 0 GICv2 99 Level xhci -hcd : usb3
169 : 0 0 0 0 rk805 5 Edge RTC alarm
IPI0 : 42550 104298 116643 42936 Rescheduling interrupts
IPI1 : 68 95 39 101 Function call interrupts
IPI2 : 0 0 0 0 CPU stop interrupts
IPI3 : 0 0 0 0 CPU stop ( for crash dump ) interrupts
IPI4 : 0 0 0 0 Timer broadcast interrupts
IPI5 : 833 658 748 589 IRQ work interrupts
IPI6 : 0 0 0 0 CPU wake -up interrupts
Err : 0
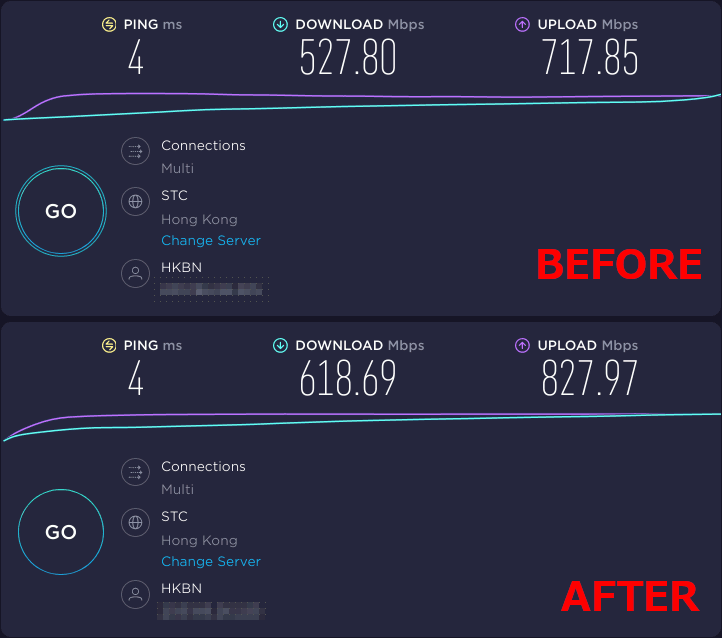
ここまで手を加えたところで、インターネットスピードテストを比較してみると、おそらくFlow Offloadingの働きにより、上下共に速度が上がりました。
図10.Speedtest 結果向上
USB給電ケーブルにはUSBテスターUM25C を通して、その消費電力を測っていたのですが、WiFiインターフェイス未搭載なこともあり、このスピードテスト計測時でも、0.5A 2.8W程度しか消費していませんでした。
図11.スピードテスト時の消費電力
opkgでの一括更新
本機種に限らず、OpenWRTでパッケージをインストールするにつれ、手間に感じるのがその更新手段ではないでしょうか。
Linuxの多くのディストリビューションではパッケージ管理マネージャ(Debian系
apt
OpenWRTの
opkg こちらのフォーラム で紹介されていました(Great Works!)。
# opkg list-upgradable | cut -f 1 -d ' ' | xargs -r opkg upgrade
早速、ワンライナーを左方から順に実行して、その仕組みを確認してみます。
1
2
3
4
5
6
7
8
9
10
11
12
13
14
15
16
17
18
19
20
21
22
23
24
25
26
27
28
29
30
31
32
33
34
35
36
37
38
39
40
41
42
43
44
# opkg update
# opkg list-upgradable
luci -app -opkg - git -21.312.69848 -4745991 - git -22.154.41894 -1cf976c
rpcd - 2021 -03 -11 -ccb75178 -1 - 2022 -02 -19 -8d26a1ba -1
libiwinfo -lua - 2021 -04 -30 -c45f0b58 -2.1 - 2022 -04 -26 -dc6847eb -1
luci -mod -system - git -22.019.40321 -7a37d02 - git -22.130.00635 -21f99bd
luci -theme -bootstrap - git -22.047.35373 -cc582eb - git -22.084.39047 -f1d687e
firewall - 2021 -03 -23 -61db17ed -1 - 2021 -03 -23 -61db17ed -1.1
luci -app -firewall - git -22.046.85957 -59c3392 - git -22.089.67741 -3856d50
rpcd -mod -file - 2021 -03 -11 -ccb75178 -1 - 2022 -02 -19 -8d26a1ba -1
libiwinfo -data - 2021 -04 -30 -c45f0b58 -2.1 - 2022 -04 -26 -dc6847eb -1
luci -base - git -22.046.85957 -59c3392 - git -22.119.37126 -a993714
libiwinfo20210430 - 2021 -04 -30 -c45f0b58 -2.1 - 2022 -04 -26 -dc6847eb -1
luci -lib -jsonc - git -19.317.29469 -8da8f38 - git -22.097.61937 -bc85ba5
rpcd -mod -iwinfo - 2021 -03 -11 -ccb75178 -1 - 2022 -02 -19 -8d26a1ba -1
# opkg list-upgradable | cut -f 1 -d ' '
luci -app -opkg
rpcd
libiwinfo -lua
luci -mod -system
luci -theme -bootstrap
firewall
luci -app -firewall
rpcd -mod -file
libiwinfo -data
luci -base
libiwinfo20210430
luci -lib -jsonc
rpcd -mod -iwinfo
# opkg list-upgradable | cut -f 1 -d ' ' | xargs -r opkg upgrade
Upgrading luci -app -opkg on root from git -21.312.69848 -4745991 to git -22.154.41894 -1cf976c...
Downloading https : //downloads .openwrt .org /releases /21.02.2 /packages /aarch64_generic /luci /luci -app -opkg_git -22.154.41894 -1cf976c_all.ipk
Upgrading rpcd on root from 2021 -03 -11 -ccb75178 -1 to 2022 -02 -19 -8d26a1ba -1...
Downloading https : //downloads .openwrt .org /releases /21.02.2 /packages /aarch64_generic /base /rpcd_2022 -02 -19 -8d26a1ba -1_aarch64_generic.ipk
Upgrading libiwinfo -lua on root from 2021 -04 -30 -c45f0b58 -2.1 to 2022 -04 -26 -dc6847eb -1...
Downloading https : //downloads .openwrt .org /releases /21.02.2 /packages /aarch64_generic /base /libiwinfo -lua_2022 -04 -26 -dc6847eb -1_aarch64_generic.ipk
Upgrading luci -mod -system on root from git -22.019.40321 -7a37d02 to git -22.130.00635 -21f99bd...
Downloading https : //downloads .openwrt .org /releases /21.02.2 /packages /aarch64_generic /luci /luci -mod -system_git -22.130.00635 -21f99bd_all.ipk
Upgrading luci -theme -bootstrap on root from git -22.047.35373 -cc582eb to git -22.084.39047 -f1d687e . . .
Downloading https : //downloads .openwrt .org /releases /21.02.2 /packages /aarch64_generic /luci /luci -theme -bootstrap_git -22.084.39047 -f1d687e_all .ipkUpgrading firewall on root from 2021 -03 -23 -61db17ed -1 to 2021 -03 -23 -61db17ed -1.1...
Downloading https : //downloads .openwrt .org /releases /21.02.2 /packages /aarch64_generic /base /firewall_2021 -03 -23 -61db17ed -1.1_aarch64_generic.ipk
- 略 -
尚、
opkg upgrade
# opkg list-upgradable | cut -f 1 -d ' ' | xargs opkg install
デフォルトシェルをBashに
今まで使って来たフラッシュベースのOpenWRTではその性質上、シェルのコマンドヒストリhistoryが保持されないのは納得していましたが、今回は違います。シェルでhistoryを有効にする方法を調べてみると、
「OpenWRT標準シェルであるashはBusyBoxにより、提供されている。コマンドヒストリを有効にしたい場合は、自身で当該オプションを設定した状態でリコンパイル、インストールするしかない」
とあり、技量の問題はもちろん、後々のことも考えると明らかに非現実的です。
OpenWrt Forum
How to make CLI command cache working? (busybox feature)
https://forum.openwrt.org/t/how-to-make-cli-command-cache-working-busybox-feature/4469
In Arokh's OpenWRT FW when I used the up arrow, even after a restart of the router, the previous commands used in the CLI popped up. Now in a build I use here, it does not, I already installed BASH, but that doesn't seem to make a difference, anyone got any pointers on it? I already tried searching on Google, but couldn't find anything useful, except for BASH and that doesn't work for me. Maybe I am not using the correct search string, but still, would love to get that fu...
上記スレッドを読み進めてゆくと 、Bashパッケージを導入してこれを標準シェルとするのが便利、との記述が目に留まったので早速試してみます。
# opkg update && opkg install bash
Installing bash ( 5.1 -2 ) to root . . .
Downloading https : //downloads .openwrt .org /releases /21.02.2 /packages /aarch64_generic /packages /bash_5 . 1 -2_aarch64_generic.ipk
Installing terminfo ( 6.2 -3 ) to root . . .
Downloading https : //downloads .openwrt .org /releases /21.02.2 /packages /aarch64_generic /base /terminfo_6 . 2 -3_aarch64_generic.ipk
Installing libncurses6 ( 6.2 -3 ) to root . . .
Downloading https : //downloads .openwrt .org /releases /21.02.2 /packages /aarch64_generic /base /libncurses6_6 . 2 -3_aarch64_generic.ipk
Installing libreadline8 ( 8.1 -1 ) to root . . .
Downloading https : //downloads .openwrt .org /releases /21.02.2 /packages /aarch64_generic /base /libreadline8_8 . 1 -1_aarch64_generic.ipk
Configuring terminfo .
Configuring libncurses6 .
Configuring libreadline8 .
Configuring bash .
パッケージのインストールを終えたら、Bashをログイン時の標準シェルにすべく、/etc/passwdファイルを編集します。
# vi /etc/passwd
旧)
root : x : 0 : 0 : root : /root : /bin /ash
新)
root : x : 0 : 0 : root : /root : /bin /bash
次に自分仕様に定義した
. bashrc /root /
# cat /root/.bashrc
HISTCONTROL =ignoreboth : erasedups
HISTIGNORE =history : ls : ll :
HISTSIZE =
HISTFILESIZE =
このファイルを読み込んでくれるように、
. bash_profile
# echo ". $HOME/.bashrc" > /root/.bash_profile
# cat /root/.bash_profile
. /root /. bashrc
# ls -la /root/
-rw ------- 1 root root 52 Jun 15 11 : 34 . bash_history
-rw -r --r -- 1 root root 16 Jun 15 11 : 38 . bash_profile
-rw -r --r -- 1 root root 137 Jun 15 11 : 31 . bashrc
これでターミナルへ入り直せば標準シェルはBashに変わり、コマンドヒストリも有効になっているはずです。
root @ 192.168.51.2 's password :
# echo $SHELL
/bin /bash
# echo $0
-bash
上述のスレッドを更に読み進めると、この設定の以外な落とし穴が指摘 されていました。
それは、sysupgrade時などで
opkg
実際にLuCiでBashパッケージを削除してから、ターミナルへ入ろうとすると弾き出されました。
$ ssh root @ 192.168.51.2
root @ 192.168.51.2 's password :
Connection to 192.168.51.2 closed .
そのスレッドの最後には解決策が提示 されていて、起動時の自動起動スクリプト
/etc /rc . local /bin /bash /etc /passwd
# Put your custom commands here that should be executed once
# the system init finished. By default this file does nothing.
# Check whether bash is available, change default shell to ash if unavailable.
test -x /bin /bash && sed '/^root/ s_/bin/.*_/bin/bash_g' -i /etc /passwd | | sed '/^root/ s_/bin/.*_/bin/ash_g' -i /etc /passwd
exit 0
これも実際にBashパッケージを抜いて試してみましたが、ターミナルへashでログインすることが出来ました(Great Works!)。
次回はOpenWRTの鬼門でもあるWiFiモジュールについて、NanoPi R2SのUSB2.0ポートに挿して使えるUSBドングル をいくつか試してみたいと思います。
関連記事 FriendlyElec NanoPi R2Sを自宅ルータとして使い始めて発覚した発熱問題。一体どの…
2022年9月18日 Glafanaのようなスタイリッシュなダッシュボードを備えた、 リアルタイムモニタリング ツールであ…
2022年11月13日 FriendlyElec NanoPi R2Sを例に、 OpenWRT 設定 のNASへの定期 バッ…
2022年9月26日