
はじめに
ここでは、GUIでストップ狩りを回避するラインを実装します。
GitHubにソースを公開しました。細かい修正は、こちらをご覧下さい。
GitHub : KEG_Qiita_EA
前回までの記事を理解しているのが前提です。
【MQL4 : MT4】GUI で ストップ狩りを回避するライン を実装した EA を作る。①
作成手順としては、以下の通りです。
- ComboBoxにライン作成Listを追加
- 2本のライン作成処理
GUIを拡張(横スクロールできる予定)- ライン情報( pips, 損益,
RR)を表示 - 仕掛けに対して、ラインで決済できる処理
- 細かい修正etc...
※3. GUIを拡張(横スクロールできる予定)
GUIを拡張し、横スクロールすると、レイアウトが崩れる不具合がありました。
現在解決策がありませんので、横ではなく、下にライン情報を表示するように変更しました。
今回は、3. と 4. ライン情報( pips, 損益, RR )を表示 を実装します。
※ネーミングセンスはありません。なるだけ分かりやすくしているつもりです!
いろいろと初心者な為、至らない部分もありますが、宜しくお願いします。
フォルダ構造のアドバイスなどを頂けると助かります。
- Experts/
- Sample/
- Common/
- CMD.mqh
- Common.mqh
- Plugin/
- ExitCurrency.mqh
- LineOrder.mqh ←今回のメインファイルです。
- guiwindow.mq4
- AppWindow.mqh
- Event.mqh
- Common/
- Sample/
実行結果
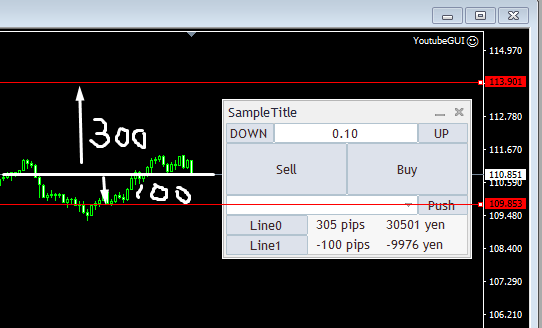
Line0,1ボタンを押下すると、ラインが表示されます。
そのラインを移動すると、pipsと損益が更新されます。
ライン情報を表示
AppWindow.mqh
~
略
~
bool CPanelDialog::CreateLabelPips0()
{
   int widths = ClientAreaWidth() / 8;
   int x1 = widths * 3;
   int y1 = ClientAreaHeight() - 40;
   int x2 = ClientAreaWidth();
   int y2 = ClientAreaHeight() - 20;

   if( !m_labelPips0.Create( m_chart_id, m_name + "labelPips0", m_subwin, x1, y1, x2, y2 ) ) return false;
   if( !m_labelPips0.Text( "" ) ) return false;
   if( !Add( m_labelPips0 ) ) return false;

   return true;
}
bool CPanelDialog::CreateLabelProfit0()
{
   int widths = ClientAreaWidth() / 8;
   int x1 = widths * 5;
   int y1 = ClientAreaHeight() - 40;
   int x2 = ClientAreaWidth();
   int y2 = ClientAreaHeight() - 20;

   if( !m_labelProfit0.Create( m_chart_id, m_name + "labelProfit0", m_subwin, x1, y1, x2, y2 ) ) return false;
   if( !m_labelProfit0.Text( "" ) ) return false;
   if( !Add( m_labelProfit0 ) ) return false;

   return true;
}
bool CPanelDialog::CreateLabelPips1()
{
   int widths = ClientAreaWidth() / 8;
   int x1 = widths * 3;
   int y1 = ClientAreaHeight() - 20;
   int x2 = ClientAreaWidth();
   int y2 = ClientAreaHeight();

   if( !m_labelPips1.Create( m_chart_id, m_name + "labelPips1", m_subwin, x1, y1, x2, y2 ) ) return false;
   if( !m_labelPips1.Text( "" ) ) return false;
   if( !Add( m_labelPips1 ) ) return false;

   return true;
}
bool CPanelDialog::CreateLabelProfit1()
{
   int widths = ClientAreaWidth() / 8;
   int x1 = widths * 5;
   int y1 = ClientAreaHeight() - 20;
   int x2 = ClientAreaWidth();
   int y2 = ClientAreaHeight();

   if( !m_labelProfit1.Create( m_chart_id, m_name + "labelProfit1", m_subwin, x1, y1, x2, y2 ) ) return false;
   if( !m_labelProfit1.Text( "" ) ) return false;
   if( !Add( m_labelProfit1 ) ) return false;

   return true;
}
bool CPanelDialog::CreateBtnLine0()
{
   int widths = ClientAreaWidth() / 6;
   int x1 = 0;
   int y1 = ClientAreaHeight() - 40;
   int x2 = ClientAreaWidth() - widths * 4;
   int y2 = ClientAreaHeight() - 20;

   if( !m_btnLine0.Create( m_chart_id, m_name + "btnLine0", m_subwin, x1, y1, x2, y2 ) ) return false;
   if( !m_btnLine0.Text( "Line0" ) ) return false;
   if( !Add( m_btnLine0 ) ) return false;

   return true;
}
bool CPanelDialog::CreateBtnLine1()
{
   int widths = ClientAreaWidth() / 6;
   int x1 = 0;
   int y1 = ClientAreaHeight() - 20;
   int x2 = ClientAreaWidth() - widths * 4;
   int y2 = ClientAreaHeight();

   if( !m_btnLine1.Create( m_chart_id, m_name + "btnLine1", m_subwin, x1, y1, x2, y2 ) ) return false;
   if( !m_btnLine1.Text( "Line1" ) ) return false;
   if( !Add( m_btnLine1 ) ) return false;

   return true;
}
Common.mqh
#include "../AppWindow.mqh"
#include "CMD.mqh"
#include "../Plugin/ExitCurrency.mqh"
#include "../Plugin/LineOrder.mqh"
//CPanelDialog   AppWindow;
CCMD           CMD;
CExitCurrency  ExitCurrency;
CLineOrder     LineOrder;
bool b_lineCreate0 = false; // --- 1
bool b_lineCreate1 = false;
Common.mqh の ソースコード詳細
1. ボタン押下チェック変数
bool b_lineCreate0 = false;
bool b_lineCreate1 = false;
いろんなファイルで使うので、Common.mqhに入れました。
Line0,1 のボタンを押下したら、 true にします。
LineOrder.mqh
#include "../AppWindow.mqh";
CPanelDialog   AppWindow;
class CLineOrder
{
   public:
      bool  check();
      bool  GetLine();
      bool  create( string str_name, double d_param );
};
bool CLineOrder::create( string str_name, double d_param )     // --- 2
{
   int      i_sub;
   datetime dt_x;
   double   d_y;
   ChartXYToTimePrice( ChartID(), 0, d_param, i_sub, dt_x, d_y );

   if( !ObjectCreate( str_name, OBJ_HLINE, 0, Time[0], NormalizeDouble( d_y, Digits() ) ) ) return false;


   return true;
}
bool CLineOrder::GetLine() // --- 3
{
   double DigitsValue = MathPow( 10, Digits() - 1 );

   double d_line0 = ObjectGet( "LineOrder0", OBJPROP_PRICE1 );
   double d_line1 = ObjectGet( "LineOrder1", OBJPROP_PRICE1 );

   double d_pips0 = ( d_line0 - Close[0] ) * DigitsValue;
   double d_pips1 = ( d_line1 - Close[0] ) * DigitsValue;
   double d_profit0 = ( d_pips0 * (double)AppWindow.m_editLots.Text() ) * 1000;
   double d_profit1 = ( d_pips1 * (double)AppWindow.m_editLots.Text() ) * 1000;


   AppWindow.m_labelProfit0.Text( DoubleToString( d_profit0, 0 ) + " yen" );
   AppWindow.m_labelProfit1.Text( DoubleToString( d_profit1, 0 ) + " yen" );

   AppWindow.m_labelPips0.Text( DoubleToString( d_pips0, 0 ) + " pips" );
   AppWindow.m_labelPips1.Text( DoubleToString( d_pips1, 0 ) + " pips" );

   return true;
}
/* TODO ObjectFindで、特定の文字列が含まれていたら。。。
      全Objectを検索対象にする。
*/
bool CLineOrder::check()
{
   if( ObjectFind( ChartID(), "LineOrder0" ) )  return false;
   if( ObjectFind( ChartID(), "LineOrder1" ) )  return false;

   return true;
}
LineOrder.mqh の ソースコード詳細
2. create関数
Event.mqhからパラメータを受け取り、水平ラインを作ります。
bool CLineOrder::create( string str_name, double d_param )
{
   int      i_sub;
   datetime dt_x;
   double   d_y;
   ChartXYToTimePrice( ChartID(), 0, d_param, i_sub, dt_x, d_y );

   if( !ObjectCreate( str_name, OBJ_HLINE, 0, Time[0], NormalizeDouble( d_y, Digits() ) ) ) return false;


   return true;
}
ChartXYToTimePrice( ChartID(), 0, d_param, i_sub, dt_x, d_y );
OnChartEventの引数からは、X軸、Y軸しか受け取れないので、時間と価格に変換します。
3. GetLine関数
先ほど作ったラインから、pipsと損益の計算をします。
bool CLineOrder::GetLine()
{
   double DigitsValue = MathPow( 10, Digits() - 1 );
   double d_line0 = ObjectGet( "LineOrder0", OBJPROP_PRICE1 );
   double d_line1 = ObjectGet( "LineOrder1", OBJPROP_PRICE1 );
   double d_pips0 = ( d_line0 - Close[0] ) * DigitsValue;
   double d_pips1 = ( d_line1 - Close[0] ) * DigitsValue;
   double d_profit0 = ( d_pips0 * (double)AppWindow.m_editLots.Text() ) * 1000;
   double d_profit1 = ( d_pips1 * (double)AppWindow.m_editLots.Text() ) * 1000;
   AppWindow.m_labelProfit0.Text( DoubleToString( d_profit0, 0 ) + " yen" );
   AppWindow.m_labelProfit1.Text( DoubleToString( d_profit1, 0 ) + " yen" );
   AppWindow.m_labelPips0.Text( DoubleToString( d_pips0, 0 ) + " pips" );
   AppWindow.m_labelPips1.Text( DoubleToString( d_pips1, 0 ) + " pips" );
   return true;
}
double DigitsValue = MathPow( 10, Digits() - 1 );
Digits で小数点桁数がわかるので、ほぼ全ての通貨ペアに対応させます。
2桁=10 (ゴールド)
3桁=100(ドル円、クロス円)
5桁=10000(ポン系)
double d_line0 = ObjectGet( "LineOrder0", OBJPROP_PRICE1 );
ObjectGetで、ラインの現在価格を取得します。
double d_pips0 = ( d_line0 - Close[0] ) * DigitsValue;
以下の公式で、Pipsを計算します。
( ラインの価格 - 現在の価格 ) * 桁あわせ;
double d_profit0 = ( d_pips0 * (double)AppWindow.m_editLots.Text() ) * 1000;
以下の公式で、損益を計算します。
( pips * ロット数 ) * 1ロットの通貨
1ロットの通貨は、MarketInfoとかで取得したいのですが、なんかうまく行かないので、手打ちです。。。
AppWindow.m_labelProfit0.Text( DoubleToString( d_profit0, 0 ) + " yen" );
損益に、double型なので、string型にし、整数で表示させます。
AppWindow.m_labelPips0.Text( DoubleToString( d_pips0, 0 ) + " pips" );
pipsも同様に、整数で表示させてます。
guiwindow.mq4
#include "Event.mqh"
CEvent         Event;
int i_reason;
int OnInit()
{
   if( i_reason != REASON_CHARTCHANGE && i_reason != REASON_RECOMPILE )
   {
      if( !AppWindow.Create( 0, "AppWindow", 0, 0, 0, 250, 160 ) )
         return( INIT_FAILED );
      if( !AppWindow.Run() )
         return ( INIT_FAILED );

      EventSetMillisecondTimer( 900 ); // --- 4
   }
   return( INIT_SUCCEEDED );
}
void OnDeinit( const int reason )
{
   if( reason != REASON_CHARTCHANGE && reason != REASON_RECOMPILE )
   {
      EventKillTimer();             // --- 5
      AppWindow.Destroy( reason );
   }
   i_reason = reason;
}
void OnTimer()
{
   LineOrder.GetLine(); // --- 6
}
void OnChartEvent( const int     id,
                   const long    &lparam,
                   const double  &dparam,
                   const string  &sparam )
{
   AppWindow.ChartEvent( id, lparam, dparam, sparam );
   Event.OnEvent( id, lparam, dparam, sparam );

   //Alert( "id = " + id + " \nlparam = " + lparam + " \ndparam = " + dparam + " \nsparam = " + sparam );
}
guiwindow.mq4 の ソースコード詳細
4.5. OnTimer宣言
EventSetMillisecondTimer( 900 )
~~~~
EventKillTimer()
0.9秒ごとにOnTimer関数を呼び出します。
6. OnTimer関数
void OnTimer()
{
   LineOrder.GetLine();
}
0.9秒ごとに、ライン情報を計算します。
いまは、ラインが表示されてない時も、計算していて重くなる可能性があるので、
最後の細かい修正で改善します。
Event.mqh
bool CEvent::OnEvent( const int id, const long lparam, const double dparam, const string sparam )
{
   if( !btnOrder( id, lparam, dparam, sparam ) )
      Alert( "Error : " + (string)GetLastError() );
   if( !combSelect( id, lparam, dparam, sparam ) )
      CMD.Error( "combSelect" );
   if( !btnLine( id, lparam, dparam, sparam ) )
      CMD.Error( "btnLine" );


   return true;
}
~
略
~
bool CEvent::btnLine( const int id, const long lparam, const double dparam, const string sparam ) // --- 7
{
   if( ( StringFind( sparam, "btnLine0", 4 ) != -1 ) && id == CHARTEVENT_OBJECT_CLICK )
      b_lineCreate0 = true;
   if( ( StringFind( sparam, "btnLine1", 4 ) != -1 ) && id == CHARTEVENT_OBJECT_CLICK )
      b_lineCreate1 = true;

   if( b_lineCreate0 && id == CHARTEVENT_CLICK )
      if( !LineOrder.create( "LineOrder0", dparam ) )
         CMD.Error( "LineOrder : Create" );
      else
         b_lineCreate0 = false;

   if( b_lineCreate1 && id == CHARTEVENT_CLICK )
      if( !LineOrder.create( "LineOrder1", dparam ) )
         CMD.Error( "LineOrder : Create" );
      else
         b_lineCreate1 = false;


   return true;
}
Event.mqh の ソースコード詳細
7. btnLine関数
bool CEvent::btnLine( const int id, const long lparam, const double dparam, const string sparam ) // --- 7
{
   if( ( StringFind( sparam, "btnLine0", 4 ) != -1 ) && id == CHARTEVENT_OBJECT_CLICK )
      b_lineCreate0 = true;
   if( ( StringFind( sparam, "btnLine1", 4 ) != -1 ) && id == CHARTEVENT_OBJECT_CLICK )
      b_lineCreate1 = true;

   if( b_lineCreate0 && id == CHARTEVENT_CLICK )
      if( !LineOrder.create( "LineOrder0", dparam ) )
         CMD.Error( "LineOrder : Create" );
      else
         b_lineCreate0 = false;

   if( b_lineCreate1 && id == CHARTEVENT_CLICK )
      if( !LineOrder.create( "LineOrder1", dparam ) )
         CMD.Error( "LineOrder : Create" );
      else
         b_lineCreate1 = false;


   return true;
}
if( ( StringFind( sparam, "btnLine0", 4 ) != -1 ) && id == CHARTEVENT_OBJECT_CLICK )
btnLine0が押されたら、b_lineCreate0 を true にします。
if( !LineOrder.create( "LineOrder0", dparam ) )
ボタンが押されて、チャートがクリックされたら、水平ラインを作成します。
引数は、ラインの名前と、Y軸を送ってます。
ラインを作成し、エラーがなかったら、b_lineCreate0 を false に戻します。
ボタンを押したところにラインが表示されてしまうので、最後の細かい修正で改善します。
さいごに
今回は、3. と 4. ライン情報( pips, 損益, RR )を表示 を実装します
次回は、5. 仕掛けに対して、ラインで決済できる処理 を実装します。
GitHubにソースを公開しました。細かい修正は、こちらをご覧下さい。
2年振りぐらいなので、いろいろと覚えてなかった。。。
GitHub : KEG_Qiita_EA
YoutubeでLive配信しながら作ってます。
https://www.youtube.com/channel/UCcTw_iVgpLfrep9f94KxwLg?sub_confirmation=1
チャンネル登録お願いします![]()
Twitterでは毎日呟いています。
https://twitter.com/IceSeed_bz
フォローお願いします![]()
お疲れ様。![]()
![]()


コメント