
(Want just the bare tl;dr bones? Go read this Gist by harishanand95. It says everything this does, but for a more experienced audience.)
Stable Diffusion has recently taken the techier (and art-techier) parts of the internet by storm. It's an open-source machine learning model capable of taking in a text prompt, and (with enough effort) generating some genuinely incredible output.
See the cover image for this article? That was generated by a version of Stable Diffusion trained on lots and lots of My Little Pony art. The prompt I used for that image was kirin, pony, sumi-e, painting, traditional, ink on canvas, trending on artstation, high quality, art by sesshu.
Unfortunately, in its current state, it relies on Nvidia's CUDA framework, which means that it only works out of the box if you've got an Nvidia GPU.
Fear not, however. Because Stable Diffusion is both a) open source and b) good, it has seen an absolute flurry of activity, and some enterprising folks have done the legwork to make it usable for AMD GPUs, even for Windows users.
Requirements🔗
Before you get started, you'll need the following:
- A reasonably powerful AMD GPU with at least 6GB of video memory. I'm using an AMD Radeon RX 5700 XT, with 8GB, which is just barely powerful enough to outdo running this on my CPU.
- A working Python installation. You'll need at least version 3.7. v3.7, v3.8, v.39, and v3.10 should all work.
- The fortitude to download around 6 gigabytes of machine learning model data.
- A Hugging Face account. Go on, go sign up for one, it's free.
The Process🔗
I'll assume you have no, or little, experience in Python. My only assumption is that you have it installed, and that when you run python --version and pip --version from a command line, they respond appropriately.
Preparing the workspace🔗
Before you begin, create a new folder somewhere. I named mine stable-diffusion. The name doesn't matter.
Once created, open a command line in your favorite shell (I'm a PowerShell fan myself) and navigate to your new folder. We're going to create a virtual environment to install some packages into.
When there, run the following:
python -m venv ./virtualenv
This will use the venv package to create a virtual environment named virutalenv. Now, you need to activate it. Run the following:
# For PowerShell
./virtualenv/Activate/Activate.ps1
rem For cmd.exe
venv\Scripts\activate.bat
Now, anything you install via pip or run via python will only be installed or run in the context of this environment we've named virtualenv. If you want to leave it, you can just run deactivate at any time.
Okay. All set up, let's start installing the things we need.
Installing Dependencies🔗
We need a few Python packages, so we'll use pip to install them into the virtual envrionment, like so:
pip install diffusers==0.3.0
pip install transformers
pip install onnxruntime
Now, we need to go and download a build of Microsoft's DirectML Onnx runtime. Unfortunately, at the time of writing, none of their stable packages are up-to-date enough to do what we need. So instead, we need to either a) compile from source or b) use one of their precompiled nightly packages.
Because the toolchain to build the runtime is a bit more involved than this guide assumes, we'll go with option b).
Head over to https://aiinfra.visualstudio.com/PublicPackages/_artifacts/feed/ORT-Nightly/PyPI/ort-nightly-directml/overview/1.13.0.dev20220908001
(Or, if you're the suspicious sort, you could go to https://aiinfra.visualstudio.com/PublicPackages/_artifacts/feed/ORT-Nightly and grab the latest under ort-nightly-directml yourself).
Either way, download the package that corresponds to your installed Python version: ort_nightly_directml-1.13.0.dev20220913011-cp37-cp37m-win_amd64.whl for Python 3.7, ort_nightly_directml-1.13.0.dev20220913011-cp38-cp38-win_amd64.whl for Python 3.8, you get the idea.
Once it's downloaded, use pip to install it.
pip install pathToYourDownloadedFile/ort_nightly_whatever_version_you_got.whl ---force-reinstall
Take note of that --force-reinstall flag! The package will override some previously-installed dependencies, but if you don't allow it to do so, things won't work further down the line. Ask me how I know >.>
Getting and Converting the Stable Diffusion Model🔗
First thing, we're going to download a little utility script that will automatically download the Stable Diffusion model, convert it to Onnx format, and put it somewhere useful. Go ahead and download https://raw.githubusercontent.com/huggingface/diffusers/main/scripts/convert_stable_diffusion_checkpoint_to_onnx.py and place it next to your virtualenv folder.
Now is when that Hugging Face account comes into play. The Stable Diffusion model is hosted here, and you need an API key to download it. Once you sign up, you can find your API key by going to the website, clicking on your profile picture at the top right -> Settings -> Access Tokens.
Once you have your token, authenticate your shell with it by running the following:
huggingface-cli.exe login
And paste in your token when prompted.
Once that's done, we can run the utility script.
python convert_stable_diffusion_checkpoint_to_onnx.py --model_path="CompVis/stable-diffusion-v1-4" --output_path="./stable_diffusion_onnx"
--model_path is the path on Hugging Face to go and find the model. --output_path is the path on your local filesystem to place the now-Onnx'ed model into.
Sit back and relax--this is where that 6GB download comes into play. Depending on your connection speed, this may take some time.
...done? Good. Now, you should have a folder named stable_diffusion_onnx which contains an Onnx-ified version of the Stable Diffusion model.
Your folder structure should now look something like this:
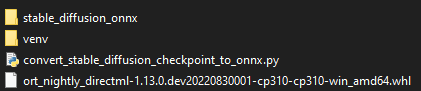 (I named my virtual environment
 venv instead of virtualenv. Same same though.)
Almost there.
Running Stable Diffusion🔗
Now, you just have to write a tiny bit of Python code. Let's create a new file, and call it text2img.py. Inside of it, write the following:
from diffusers import StableDiffusionOnnxPipeline
pipe = StableDiffusionOnnxPipeline.from_pretrained("./stable_diffusion_onnx", provider="DmlExecutionProvider")

prompt = "A happy celebrating robot on a mountaintop, happy, landscape, dramatic lighting, art by artgerm greg rutkowski alphonse mucha, 4k uhd'"

image = pipe(prompt).images[0]
image.save("output.png")
Take note of the first argument we pass to StableDiffusionOnnxPipeline.from_pretrained(). "./stable_diffusion_onnx". That's a file path to the Onnx-ified model we just created.
And provider needs to be "DmlExecutionProvider" in order to actually instruct Stable Diffusion to use DirectML, instead of the CPU.
Once that's saved, you can run it with python .\text2img.py.
Once it's done, you'll have an image named output.png that's hopefully close to what you asked for in prompt!

Bells and Whistles🔗
Now, that was a little bit bare-minimum, particularly if you want to customize more than just your prompt. I've written a small script with a bit more customization, and a few notes to myself that I imagine some folks might find helpful. It looks like this:
from diffusers import StableDiffusionOnnxPipeline
import numpy as np

def get_latents_from_seed(seed: int, width: int, height:int) -> np.ndarray:
    # 1 is batch size
    latents_shape = (1, 4, height // 8, width // 8)
    # Gotta use numpy instead of torch, because torch's randn() doesn't support DML
    rng = np.random.default_rng(seed)
    image_latents = rng.standard_normal(latents_shape).astype(np.float32)
    return image_latents

pipe = StableDiffusionOnnxPipeline.from_pretrained("./stable_diffusion_onnx", provider="DmlExecutionProvider")
"""
prompt: Union[str, List[str]],
height: Optional[int] = 512,
width: Optional[int] = 512,
num_inference_steps: Optional[int] = 50,
guidance_scale: Optional[float] = 7.5, # This is also sometimes called the CFG value
eta: Optional[float] = 0.0,
latents: Optional[np.ndarray] = None,
output_type: Optional[str] = "pil",
"""

seed = 50033
# Generate our own latents so that we can provide a seed.
latents = get_latents_from_seed(seed, 512, 512)
prompt = "A happy celebrating robot on a mountaintop, happy, landscape, dramatic lighting, art by artgerm greg rutkowski alphonse mucha, 4k uhd"
image = pipe(prompt, num_inference_steps=25, guidance_scale=13, latents=latents).images[0]
image.save("output.png")
With this script, I can pass in an arbitrary seed value, easily customize the height and width, and in the triple-quote comments, I've added some notes about what arguments the pipe() function takes.
My plan is to wrap all of this up into an argument parser, so that I can just pass all of these parameters into the script without having to modify the source file itself,
but I'll do that later.
Some Final Notes🔗
- As far as I can tell, this is still a fair bit slower than running things on Nvidia hardware! I don't have any hard numbers to share, only anecdotal observations that this seems to be anywhere from 3x to 8x slower than it is for people on similar-specced Nvidia hardware.
- Currently, the Onnx pipeline doesn't support batching, so don't try to pass it multiple prompts, or it will be sad.
- All of this is changing at breakneck pace, so I fully expect about half of this blog post to be outdated a few weeks from now. Expect to have to do some legwork of your own. Sorry!
- There is a very good guide on how to use Stable Diffusion on Reddit that goes through the basics of what each of the parameters means, how it affects the output, and gives tips on what you can do to get better ouputs.
Closing Thoughts🔗
So hopefully, now you've got your AMD Windows machine generating some AI-powered images. As I said before, I expct much of this information to be out of date two weeks from now. I might try to keep this post updated if I find the time and inclination, but that depends a lot on how this develops, and my own free time. We'll see!
As ever, I can be found on GitHub as pingzing and Twitter as @pingzingy. Happy generating!
 The text of this blog post is licensed under a Creative Commons Attribution 4.0 International License.
Stephen
Thu, Sep 15, 2022, 01:07:07File "C:\stable-diffusion\stable-diffusion\text2img.py", line 12, in
pipe = StableDiffusionOnnxPipeline.from_pretrained("./stable_diffusion_onnx", provider="DmlExecutionProvider")
RuntimeError: D:\a\_work\1\s\onnxruntime\core\providers\dml\dml_provider_factory.cc(124)\onnxruntime_pybind11_state.pyd!00007FFF3E877BF3: (caller: 00007FFF3E7C9C16) Exception(1) tid(d50) 80070057 The parameter is incorrect.
MK
Thu, Sep 15, 2022, 01:09:08Traceback (most recent call last):
File "C:\Program Files\WindowsApps\PythonSoftwareFoundation.Python.3.8_3.8.2800.0_x64__qbz5n2kfra8p0\lib\runpy.py", line 194, in _run_module_as_main
return _run_code(code, main_globals, None,
File "C:\Program Files\WindowsApps\PythonSoftwareFoundation.Python.3.8_3.8.2800.0_x64__qbz5n2kfra8p0\lib\runpy.py", line 87, in _run_code
exec(code, run_globals)
File "I:\stable-diffusion\virtualenv\Scripts\huggingface-cli.exe\__main__.py", line 7, in
File "i:\stable-diffusion\virtualenv\lib\site-packages\huggingface_hub\commands\huggingface_cli.py", line 41, in main
service.run()
File "i:\stable-diffusion\virtualenv\lib\site-packages\huggingface_hub\commands\user.py", line 176, in run
_login(self._api, token=token)
File "i:\stable-diffusion\virtualenv\lib\site-packages\huggingface_hub\commands\user.py", line 344, in _login
hf_api.set_access_token(token)
File "i:\stable-diffusion\virtualenv\lib\site-packages\huggingface_hub\hf_api.py", line 705, in set_access_token
write_to_credential_store(USERNAME_PLACEHOLDER, access_token)
File "i:\stable-diffusion\virtualenv\lib\site-packages\huggingface_hub\hf_api.py", line 528, in write_to_credential_store
with subprocess.Popen(
File "C:\Program Files\WindowsApps\PythonSoftwareFoundation.Python.3.8_3.8.2800.0_x64__qbz5n2kfra8p0\lib\subprocess.py", line 858, in __init__
self._execute_child(args, executable, preexec_fn, close_fds,
File "C:\Program Files\WindowsApps\PythonSoftwareFoundation.Python.3.8_3.8.2800.0_x64__qbz5n2kfra8p0\lib\subprocess.py", line 1311, in _execute_child
hp, ht, pid, tid = _winapi.CreateProcess(executable, args,
FileNotFoundError: [WinError 2] The system cannot find the file specified
(virtualenv) PS I:\stable-diffusion>