
- 1. Introduction:
- 2. FAQ:
- 3. Prerequisites
- 4. Part 1: Decompiling the code in Ghidra
- 5. Part 2: Symbols and Functions
- 6. Part 3: Research
- 6.1. Debugging (Optional)
- 7. Part 4: Writing New Code:
- 8. Step 5: Patching your new code
- 8.1. Extra: Combining code patches
- 9. Part 6: Magikoopa
- 9.1. Requirements:
- 9.2. Setting up MagiKoopa:
- 9.3. Writing the Patches:
- 9.4. Compiling a patch:
- 10. Final Words
1. Introduction:
Code modding are a very advanced type of modding which involves modifying the complied game code. There's many programs and a certain level of knowledge you need to make code patches. This is NOT for beginners and is even complex for most veteran modders. If your the type of person that skims through a tutorial and then ask questions the were already answered or explained in said tutorial you best stop now. This process is very advanced and requires your full attention. so READ THE GUIDE CLEARLY. however if you did read it clearly and are still confused confused about something feel free to ask for a more detailed explanation2. FAQ:
Where is the game code?The game code is the file named code.bin located in the exefs, not the romfs.
How do I open the code.bin? Can I use something like Paragon?
Unfortunately no, since this is complied code and not a data file there's not a defined structure where certain data points will always be, you need you use a program to decompile the code.
If we can decompile the code can we just recompile after writing new code?
no you can't, the decompile code isn't a 1:1 or the original source code and thus won't compile correctly
3. Prerequisites
Programs:- Ghidra or IDA Pro(Free Version of IDA won't work)
- armips
- Notepad++ or VS Code
- gdb-multiarch(optional for Debugging)
- Citra or Luma
- A dump of the exefs for Fates
- Some knowledge of ARM Assemble
- Some experience in Reverse Engineering
In this guide I will be using Ghidra and Notepad++, if you have access to IDA Pro and know how to use it then go for that but I would recommend Ghidra as it's free.
4. Part 1: Decompiling the code in Ghidra
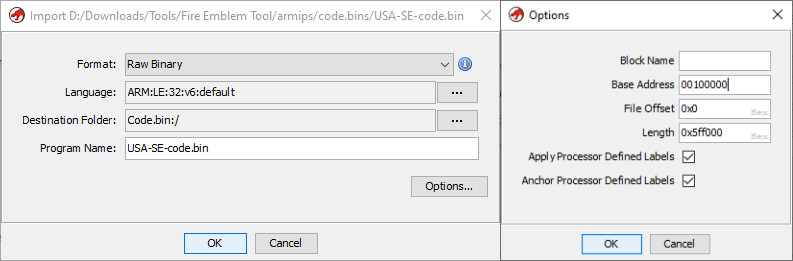
Once you have Ghidra installed and a project setup you'll need to import a file under File > Import File. then navigate to your code.bin file and chose "Select File To Import". There's a few options that need to be set for this game,Format: "Raw Binary"
Language: ARM v6 Little Endian
Base Address: 00100000
The Language can be chosen with the 3 dots beside the text box and the Base Address in the options, you should have something like this,

Press okay and then okay again on the results, you should now see your file in the active project, Double click it to open the file. You should get prompted
with Analysis options, leave those as default and hit "Analyze". Once it's done analyzing(which might take some time), you want to Analysis is again. So choose Analysis > Auto Analysis and this time turn on "Arm Aggressive Instruction Finder" in addition to the default options. Once that's done you now have a decompiled version of the games code.
Note: these programs won't produce at 100% correct decompile, sometimes functions, instructions, and strings won't get defined right, these can be manually fixed if you know what it should be, use "c" to clear the current instruction and the Right Click -> Data and select the data type it should be.
String inside the code are always Shift-JIS so with the string selected Right Click -> Data -> Default Settings and change ASCII to Shift-JIS.
5. Part 2: Symbols and Functions
Symbols are the Names of the Functions which makes the code much easier to navigate and find the points where you want to edit, so instead of something likeFUN_001AE290 is would be called FaceInstance::DrawOption, most games don't come with symbols which makes do code mods much harder, luckily Fates has debugging symbols for almost every function in the game.The symbols are stored in 2 files know as the Stack Trace in the
romfs\debug folder. The addr.StackTrace contains a list of functions addresses and the name.StackTrace contains the corresponding names. These files aren't readable by themselves but can be viewed within a hex editor however I have made a python script that will write the files to a human readable text file which you can find here on my github. Once you have the Stack Trace dumped you can search for function names and key words and then find the corresponding offset. once you have the offset you can press "
g" in ghidra, and type in the number, press enter and that will take you the function, sometimes ghidra won't decompile right so if there's no function there press "f" to define a function there. Then you can select the function by clicking on it and press "l" to edit the label to the function name in the Stack Trace. As you fill out more and more Function names you might see them appear in other functions when they get referenced. 6. Part 3: Research
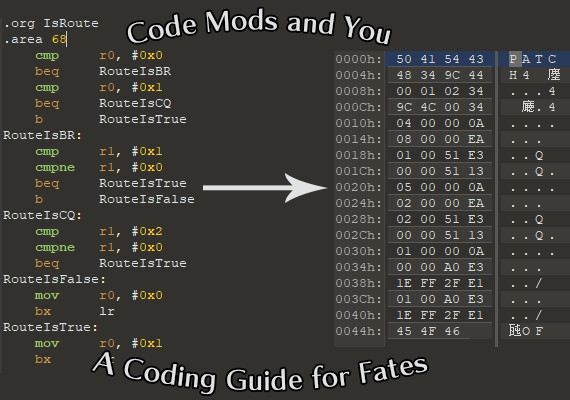
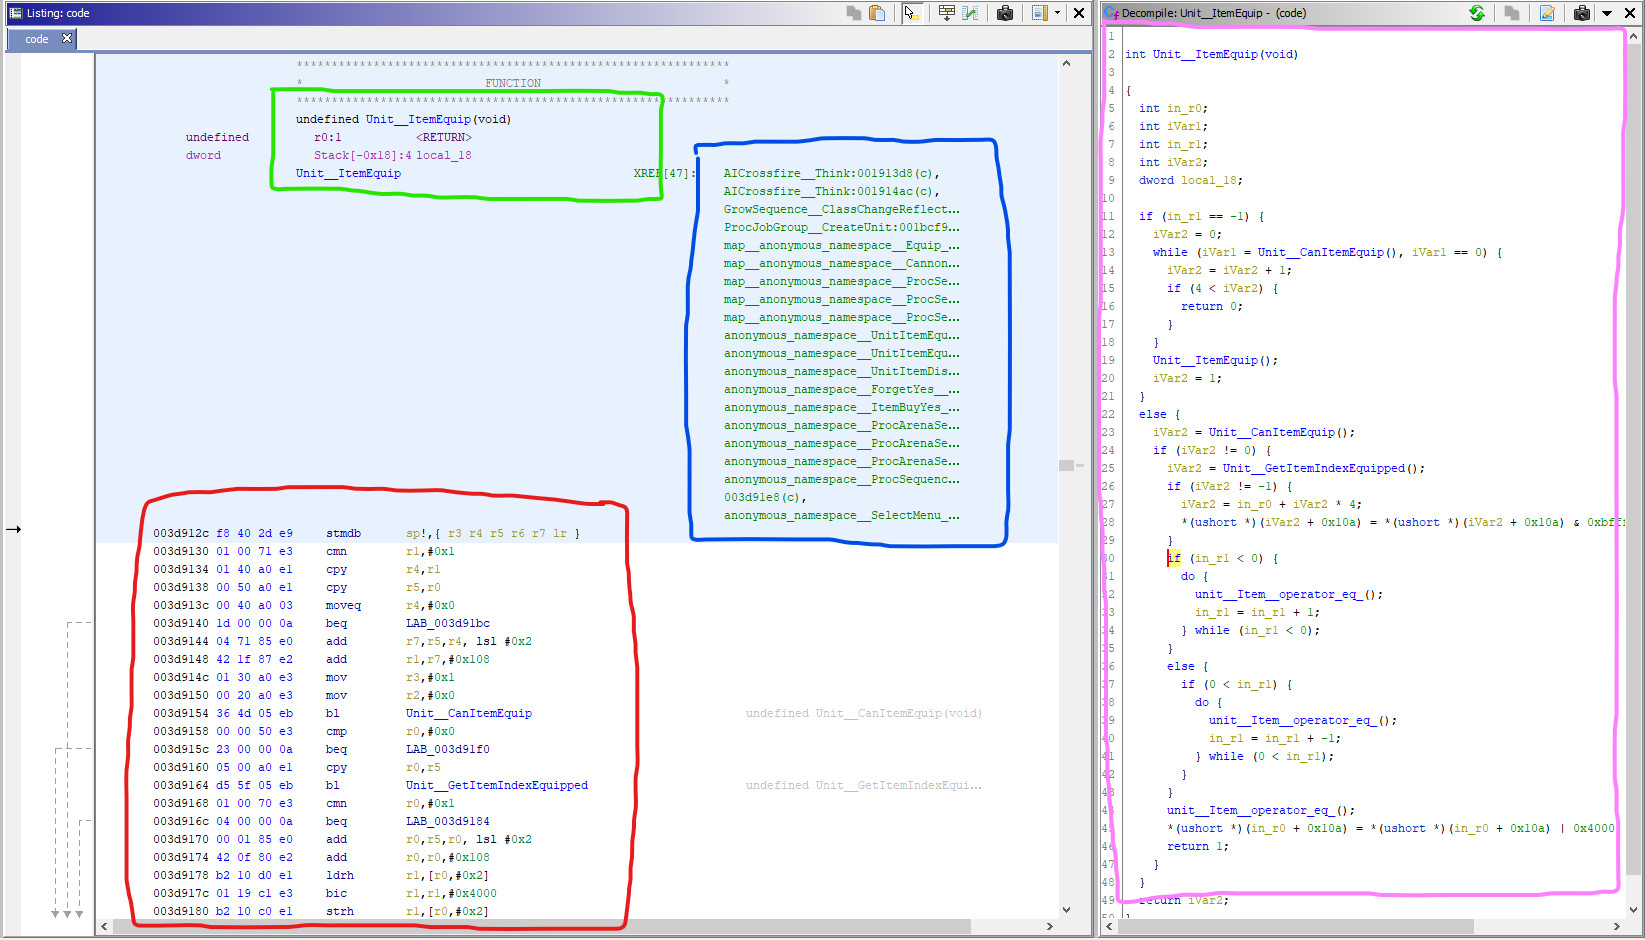
This is where things get hard. there's 2 options here when looking at the decompiled code, you can either look are the ARM ASM or the C++ decompile. the ARM will be more accurate but ARM is a very low level language and is very hard to read without experience. the C++ is a decompile of the ARM decompile and thus things get a little more blurred.I personally recommend reading up on basic ARM ASM like
mov, add, sub, b, etc and ignoring the C++ section. The Stack Trace is a very value tool in this process because it defines the function names and their location. so finding the function you need/want is easy and gives a good starting point to work from. In Red is the Decompiled ARM ASM, Green is the Function Lable, Blue is where that Function gets referenced, and Pink is the C++ decompile.

6.1. Debugging (Optional)
You can also use a debugger which can stop the code and analyze registers while the game is running but that's an even more advanced method. IDA Pro has a built in Debugger but since most people have the $2000 to drop on IDA Pro then I'd recommend gdb in a Linux sub system like Ubuntu. Once you have Ubuntu setup you'll want to install gdb AND gdb-multiarch which it required for this to work.With gdb install just type
gdb-multiarch in Ubuntu or gdb-multiarch Fates.elf if you have an elf file. an elf file will show debugging symbols in gdb but it's not required to get running. the process to get gdb hooked up to your game is a little different for Citra and Luma. I recommend Citra for debugging since you don't even need a high frame rate to do it and it's easier to setup.For Citra:
- Go to Emulation -> Configuration -> General -> Debug and under GDB you can tick the "Enable GDB Stub" you can also change the port, I set mine to 4000 because that's what luma uses for it's port and that makes it easier to remember.
- Once that' enabled you can launch the game. It will look frozen but it's actually waiting for gdb to tell it to continue.
- In Unbuntu type target remote
127.0.0.1:[Your port value], 127.0.0.1 is always the internal ip of your PC, and the port is what's defined in Citra.
- Make sure you have your Wireless enable, without it gdb can't connect to your 3ds.
- Launch Fates and once it's loaded you can open the Rosalina Menu with L + D pad down + Select
- open Debugger options and Enable Debugger then go to the processes menu and press A on Iron15(Fates internal name)
- In Unbuntu type target remote
[3ds Ip adress]:4000, when you enable the debugger it will shoe the IP addess in the upper right coner
Once you've got GDB connected to Fates type "
c" and hit enter, this will let the game continue. you should be looking at something like this.
Now lets get into some common commands for gdb.
- CTRL + C will pause the code where is it.
- set breakpoints with "
b {Function name}" if you have an elf file loaded or "b *{Address in code}" - Print memory with "
x /{number of data}x {address}" or "x /{number of data}x {$r[register number]}" info registerswill list all the current register valueslayout asmwill enable Assembly view exit with CRTL+X CRTL+A without letting go of Controlsiornito execute a single assembly instruction
- x = current data type in hex
- b = 1 byte
- h = 2 bytes
- w = 4 bytes
- g = 8 bytes
7. Part 4: Writing New Code:
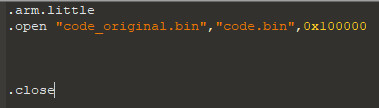
Once you've done your research found what you need to change it's time to write your new code. Open notepad++, VS code, or your other favorite text editor that supports utf-8 formatting. Make a new file and set the language to ARM Assembly. we'll be written a patch for armips, which can compile arm and patch it into a file where you want it.First up it to start with basic setup for armips, first line will define the arm version and the second will open the file, then comes the code and finally the closing the file. the base of you code patch should look like this before we get to writing the actually code.

The
.open command arguments are as follows, the first is the original file to get patched, this should unique so you don't overwrite it accidentally. the second is the new file it will make after patching. and the third is base offset of the code, which should look familiar. All your new code will be written in between the .open and .close.An important thing to do when writing assembly is keeping a good workflow comments are added with "
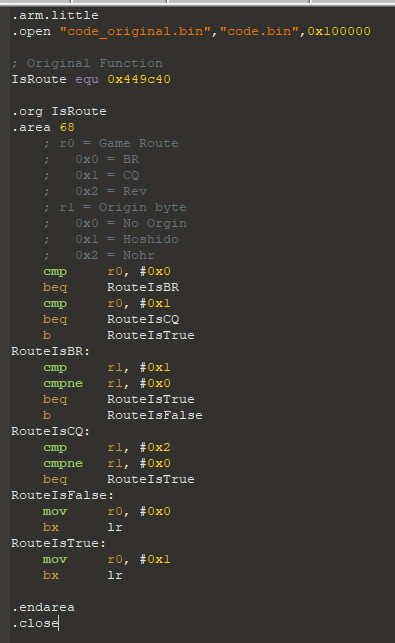
;" and will be ignored when complied. I also like to define my functions and hooks at the start of the file instead of just using the raw offset hex so it's easier to read. and finally add a tab or spaces to separate and line up the instruction type and data. of course everyone works differently so do what works for you. Here's and example of a code patch before it's complied.
The
equ assigns the offset number to "IsRoute", so whenever "IsRoute" is used from now on when complied it will use the offset number instead. The
.org command will move the working offset to the number defined.The
.area setups up and area size that will stop the code from compiling if it's bigger than the area. this is useful so you don't overwrite another function. then use .endarea to to close off the area.When you define a name with a "
:" at the end that will allow you to jump the that point using things like a branch instruction.Arm Instructions should be tabbed in by one.
8. Step 5: Patching your new code
Once you have you new code written save is as a .asm or .s and move it and your original code file into the same folder as armips. From there open command prompt and typearmips {name of code file}, assuming everything went right your should have a new file with the same name you defined in the patch. if anything went wrong like going over your area size armips will print an error in the console.Now you can use LunarIPS to make an ips make from your original and new code files. this patch should be called code.ips.
8.1. Extra: Combining code patches
Lets say you've made a code mod or have 2 code mods you want to play with, what do you do? well there's a couple different options for you. the first one would be to apply both patches to a code.bin then make a new patch from that file. or you can use this tool, IPS Merger and this should merge the 2 patches for you.9. Part 6: Magikoopa
Magikoopa is an alternative but more advanced way of patching in new code. One of the benefits of using Magikoopa is that instead of overwriting existing code Magikoopa can patching and expand the code.bin for your new code. there are a few more requirements needed to use Magikoopa but if you plan of writing big patches this the preferable options so you don't run out of space.9.1. Requirements:
- Magikoopa (Need to build it yourself)
- devkipPro (Only 3ds package is required)
- PatchTemplate found on Magikoopa's github page
- code.bin AND exheader.bin from the exefs
9.2. Setting up MagiKoopa:
Once you have a build of Magickoopa you'll want to setup and patches folder. make sure this folder path doesn't have any spaces in it at all, this is will Magikoopa since space is an escape character. Make a copy of the PatchTemplate and give it a unique name. Inside that folder you'll need to add your code.bin and exheader.bin. Inside the source folder is where your new code will go.9.3. Writing the Patches:
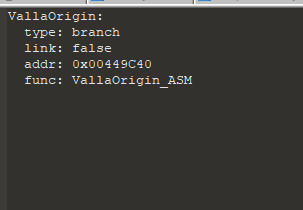
Magikoopa patch are similar to ones made for ARMips but there are a few differences. For this we will need a .hks and .s/.cpp file with the same name. The .hks file defines how Magikoopa will patch the game and the .s/.cpp file is the code itself, .s is for ARM ASM and .cpp is for C++.The .hks should look a little like this, different types and what they require is but usually you'll be using branch and patch.

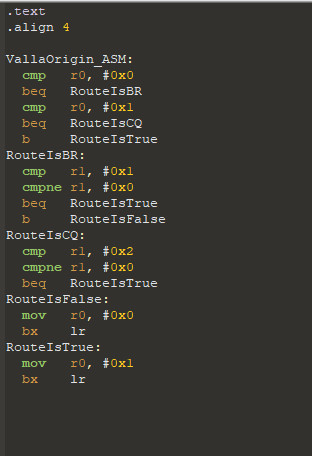
And example of a .s file is here, this the same code as the one shown in Part 4.

Notes to keep in mind: ARMips can write strings in different character sets like Shift-JIS using .sjis however Magikoopa can only use UTF-8 using the .asciz, so if you need a string in Shift-JIS which is what Fates uses to read Japanese/Kanji then you'll need to so some hex editing after it's compiled.
The "adr" instruction doesn't work very well in Magikoopa so use ldr instead for example;
use,
ldr r0, =YourStringHereinstead of,
adr r0, YourStringHere9.4. Compiling a patch:
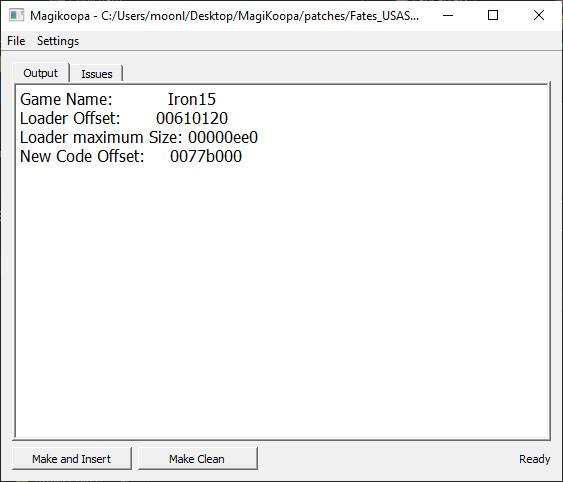
Once you have your patch written it's time to patch it into the game. Load Magikoopa and choose "File>Set Working Directory" to the folder for your patch. After that choose the "Make and Insert" option to compile your new code, and issue that show up will be in the "Issues" tab
You new code with be in the code.bin and exheader.bin in the patch directory. to load them in game either add both files to your Title ID in Luma or add the code.bin to your exefs folder and the exheader in your TitleId folder for Citra.


