
Ambient へセンサデータを送信するスケッチ
では、次は、BME680 のセンサデータをクラウドサービスの Ambient へ送信して、ブラウザにグラフ表示させてみます。
前回の記事を参照して、Ambient サービスのチャンネルID と Writeキーを発行しておき、グラフ設定を済ませておいてください。
以下のスケッチを入力してみてください。
【ソースコード】 (※無保証 ※PCの場合、ダブルクリックすればコード全体を選択できます)
1 2 3 4 5 6 7 8 9 10 11 12 13 14 15 16 17 18 19 20 21 22 23 24 25 26 27 28 29 30 31 32 33 34 35 36 37 38 39 40 41 42 43 44 45 46 47 48 49 50 51 52 53 54 55 56 57 58 59 60 61 62 63 64 65 66 67 68 69 70 71 72 73 74 75 76 77 78 79 80 81 82 83 84 85 86 87 88 89 90 91 92 93 94 95 96 97 98 99 100 101 102 103 104 105 106 107 108 109 110 111 112 113 114 115 116 117 118 119 120 121 122 123 124 125 126 127 128 129 130 131 132 133 134 135 136 137 138 139 140 141 142 143 144 145 146 147 148 149 150 151 152 153 154 155 156 157 158 159 160 161 162 163 164 165 166 167 168 169 170 171 172 173 174 175 176 177 178 179 180 181 182 183 184 185 186 187 188 189 190 191 192 193 194 195 196 197 198 199 200 201 202 203 204 205 206 207 208 209 210 | #include <Wire.h>#include <WiFi.h>#include "bme680.h"#include "Ambient.h"const int sda = 21;const int scl = 22;const char* ssid = "xxxxxxxx"; //ご自分のルーターのSSIDに書き換えてくださいconst char* password = "xxxxxxxx"; //ご自分のルーターのパスワードに書き換えてくださいstruct bme680_dev gas_sensor;struct bme680_field_data data;uint16_t meas_period;float fPressure = -500.0; //とりあえず、有り得ない数値で初期化float fTemperature = -500.0;float fHumidity = -500.0;uint32_t iGas = 0;uint32_t get_sensor_last_time = 0;//------Ambient関連初期化-------------WiFiClient client;Ambient ambient;unsigned int channelId = 1000; // AmbientのチャネルIDconst char* writeKey = "**********"; // ライトキーuint32_t send_last_time = 0;//***********セットアップ****************************void setup() { delay(1000); Serial.begin(115200); Serial.println(); Serial.println(F("Connecting Wifi...")); Serial.println(ssid); WiFi.begin(ssid, password); while (WiFi.status() != WL_CONNECTED) { delay(500); Serial.print("."); } if( WiFi.status() == WL_CONNECTED ){ Serial.println(""); Serial.println("WiFi connected"); Serial.println("IP address: "); Serial.println(WiFi.localIP()); } //----Ambientライブラリ初期化-------- ambient.begin(channelId, writeKey, &client); // チャネルIDとライトキーを指定してAmbientの初期化 bme680init(); send_last_time = millis();}//***********メインループ****************************void loop(){ bme680GetData(); sendDataToAmbient();}//**********************************void bme680init(){ Wire.begin( sda, scl, 100000 ); gas_sensor.dev_id = BME680_I2C_ADDR_PRIMARY; gas_sensor.intf = BME680_I2C_INTF; gas_sensor.read = user_i2c_read; gas_sensor.write = user_i2c_write; gas_sensor.delay_ms = user_delay_ms; /* amb_temp can be set to 25 prior to configuring the gas sensor * or by performing a few temperature readings without operating the gas sensor. */ gas_sensor.amb_temp = 28; int8_t rslt = BME680_OK; rslt = bme680_init(&gas_sensor); Serial.printf( "bme680_init rslt=%d\r\n", rslt ); uint8_t set_required_settings; /* Set the temperature, pressure and humidity settings */ gas_sensor.tph_sett.os_hum = BME680_OS_2X; gas_sensor.tph_sett.os_pres = BME680_OS_4X; gas_sensor.tph_sett.os_temp = BME680_OS_8X; gas_sensor.tph_sett.filter = BME680_FILTER_SIZE_3; /* Set the remaining gas sensor settings and link the heating profile */ gas_sensor.gas_sett.run_gas = BME680_ENABLE_GAS_MEAS; //gas_sensor.gas_sett.run_gas = BME680_DISABLE_GAS_MEAS ; /* Create a ramp heat waveform in 3 steps */ gas_sensor.gas_sett.heatr_temp = 320; /* degree Celsius */ gas_sensor.gas_sett.heatr_dur = 150; /* milliseconds */ /* Select the power mode */ /* Must be set before writing the sensor configuration */ gas_sensor.power_mode = BME680_FORCED_MODE; /* Set the required sensor settings needed */ set_required_settings = BME680_OST_SEL | BME680_OSP_SEL | BME680_OSH_SEL | BME680_FILTER_SEL | BME680_GAS_SENSOR_SEL; /* Set the desired sensor configuration */ rslt = bme680_set_sensor_settings(set_required_settings,&gas_sensor); Serial.printf( "sensor settings rslt=%d\r\n",rslt ); /* Set the power mode */ rslt = bme680_set_sensor_mode(&gas_sensor); Serial.printf( "sensor mode rslt=%d\r\n", rslt ); /* Get the total measurement duration so as to sleep or wait till the * measurement is complete */ bme680_get_profile_dur(&meas_period, &gas_sensor);}//*********************************************void bme680GetData(){ if( millis() - get_sensor_last_time > 3000 ){ //user_delay_ms(meas_period); /* Delay till the measurement is ready */ int8_t rslt = bme680_get_sensor_data(&data, &gas_sensor); fPressure = (float)data.pressure / 100.0f; fTemperature = (float)data.temperature / 100.0f; fHumidity = (float)data.humidity / 1000.0f; iGas = data.gas_resistance; Serial.printf("P: %.2f hPa, T: %.2f degC, H %.2f %%rH ", fTemperature, fPressure, fHumidity ); /* Avoid using measurements from an unstable heating setup */ if(data.status & BME680_GASM_VALID_MSK){ Serial.printf(", G: %d ohms\r\n", iGas); } /* Trigger the next measurement if you would like to read data out continuously */ if (gas_sensor.power_mode == BME680_FORCED_MODE) { rslt = bme680_set_sensor_mode(&gas_sensor); } get_sensor_last_time = millis(); }}//**********************************void user_delay_ms(uint32_t period){ delay(period);}//*********************************int8_t user_i2c_read( uint8_t dev_id, uint8_t reg_addr, uint8_t *reg_data, uint16_t len ){ int8_t rslt_read = 0; /* Return 0 for Success, non-zero for failure */ Wire.beginTransmission( dev_id ); Wire.write( reg_addr ); Wire.endTransmission(); uint8_t req_from_ret = Wire.requestFrom((uint16_t)dev_id, (uint8_t)len, true); if( req_from_ret == 0 ){ Serial.println("------- Error requestForm return 0 --------"); rslt_read = 1; }else{ for(int i=0; i<len; i++){ reg_data[i] = Wire.read(); } rslt_read = 0; } return rslt_read;}//******************************int8_t user_i2c_write(uint8_t dev_id, uint8_t reg_addr, uint8_t *reg_data, uint16_t len){ int8_t rslt_write = 0; /* Return 0 for Success, non-zero for failure */ Wire.beginTransmission( dev_id ); Wire.write( reg_addr ); for( int i = 0; i < len; i++ ){ Wire.write( reg_data[i] ); } rslt_write = Wire.endTransmission(); return rslt_write;}//******Ambientクラウドへデータ送信**************************void sendDataToAmbient(){ if( millis() - send_last_time > 10000 ){ //10秒毎Ambientへ送信 boolean fP_ok = false, fT_ok = false, fH_ok = false, iG_ok = false; if( fPressure > 800.0 && fPressure < 1100.0 ) fP_ok = true; if( fTemperature > -10 && fTemperature < 60 ) fT_ok = true; if( fHumidity >= 0.0 && fHumidity <= 100.0 ) fH_ok = true; if( iGas > 0 && iGas < 120000 ) iG_ok = true; if( (fP_ok == true) && (fT_ok == true) && (fH_ok == true) && (iG_ok == true) ){ fPressure = (float)data.pressure / 100.0f; fTemperature = (float)data.temperature / 100.0f; fHumidity = (float)data.humidity / 1000.0f; iGas = data.gas_resistance; String pres_str = String(fPressure); String temp_str = String(fTemperature); String hum_str = String(fHumidity); String gas_str = String(iGas); Serial.println("-------------Send to Ambient--------------"); Serial.printf("pressure = %s, temperature = %s, humidity = %s, gas = %s\r\n", pres_str.c_str(), temp_str.c_str(), hum_str.c_str(), gas_str.c_str() ); Serial.println("------------------------------------------"); ambient.set(1, pres_str.c_str()); ambient.set(2, temp_str.c_str()); ambient.set(3, hum_str.c_str()); ambient.set(4, gas_str.c_str()); ambient.send(); } send_last_time = millis(); }} |
【解説】
●9-10行目で、WiFiルーターの SSID とパスワードに書き換えてください。
●25-26行目で、Ambient のチャンネルID とWriteキーに書き換えてください。
●116行目で、センサデータを3000ms(3秒)毎に取得する設定にしています。
よって、112行目の meas_period 自動計算は使っていません。
●180-210行で、Ambient へセンサデータを送信しています。
ここではとりあえず 10秒毎に送信しています。
放っておくと多量のデータを Ambient へ送信してしまうので、ご自分で適宜変えてください。
Ambient 送信スケッチをコンパイル書き込み実行
では、WiFiルーターを起動し、インターネットに接続できる状態にしておいて、このスケッチをコンパイル書き込み実行してみてください。
シリアルモニターではこんな感じになります。
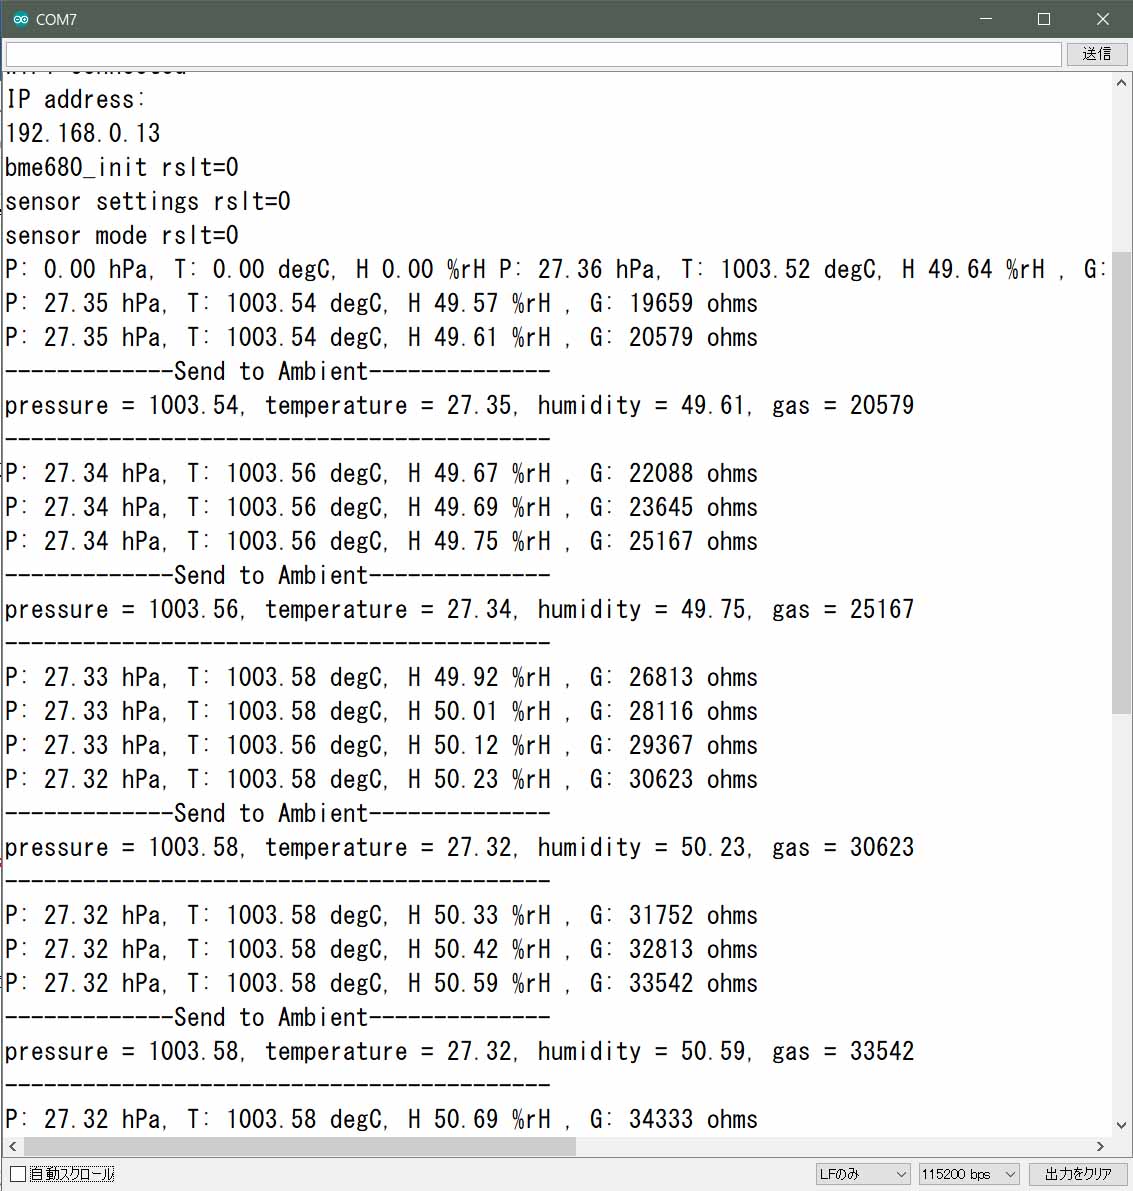
先にも述べたように、センサデータ取得間隔はあまり空き過ぎず、かつ温度湿度が精度ある間隔とすると、3秒毎に計測することにしました。
ただし、クラウドサービスの Ambient には、ネットワーク上のトラフィックを圧迫したくないので、あまり頻繁にデータを送りたくありません。
ですが、今回は実験の為に、10秒毎に Ambient へ送信しています。
ポイントは、Ambient へ送信する時に、プログラムが停止してセンサ値取得時間間隔を空け過ぎないように注意してプログラミングすることです。
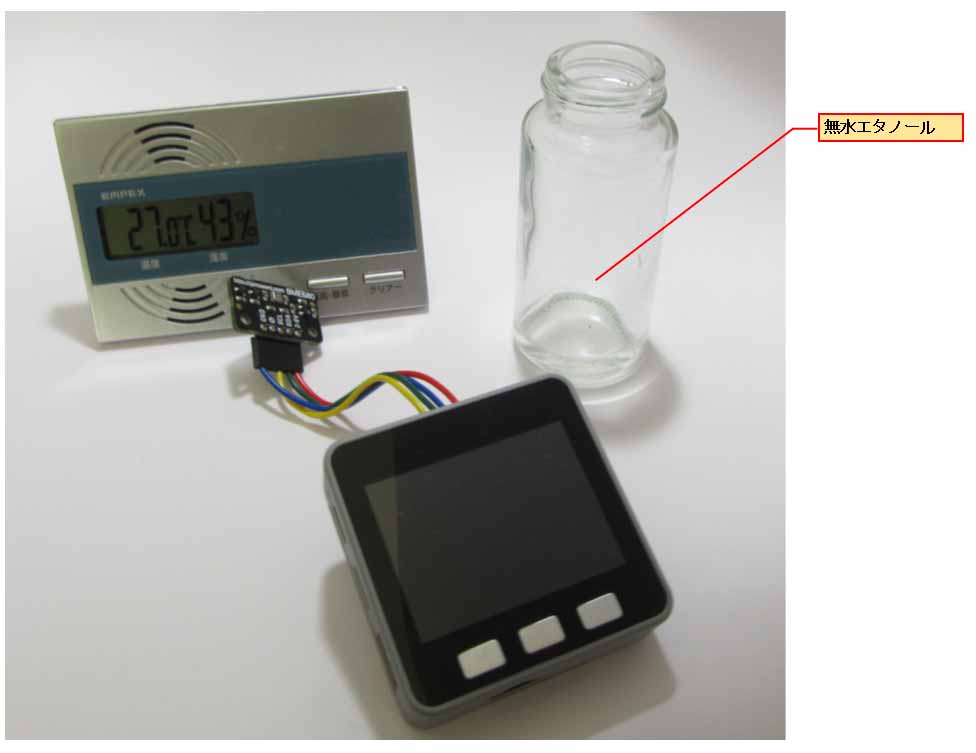
さて、ここで、実験の為に、計測途中で無水エタノールを小瓶に少量入れたものを、下図の様に BME680 近くに置いて計測を続けてみます。
その結果、Ambient 上のグラフは下図の様になりました。
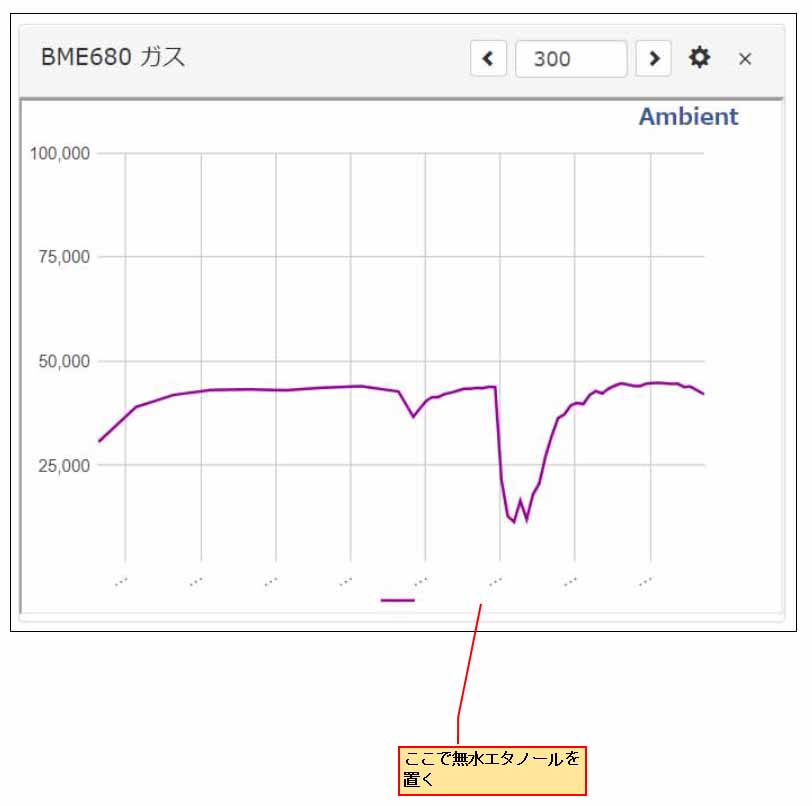
かなり素早くガスセンサが反応しました。
しかし、この Ambient っていうものは素晴らしいですね。
M5Stack 側で NTP 時刻補正しなくても、データを送れば勝手に時刻をプロットしてくれます。
ただ単に揮発性有機化合物が空気中に有るか無いかだけを判断するのであれば、これで十分ではないかと思います。
ですから、先に述べた、meas_period = 3000 時のガスセンサの抵抗値は、不安定時の値かも知れませんが、ガスが発生したかしていないかを検知する分には十分に使えるデータだと個人的に思いました。
因みに、汚い話ですが、計測中に屁をこいてみました。
すると、下図の様に素早く反応します。
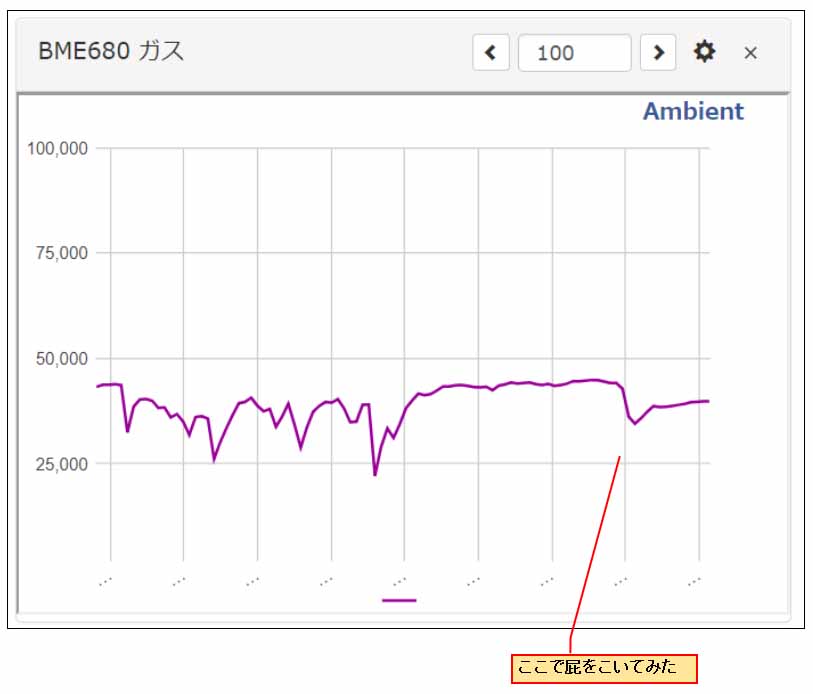
しっかりメタンガス?? にも反応しています。
素晴らしい!!!
そして、電子工作やハンダ付けでよく使うフラックスをセンサ近くで蒸発させてみました。
すると、こんな感じです。
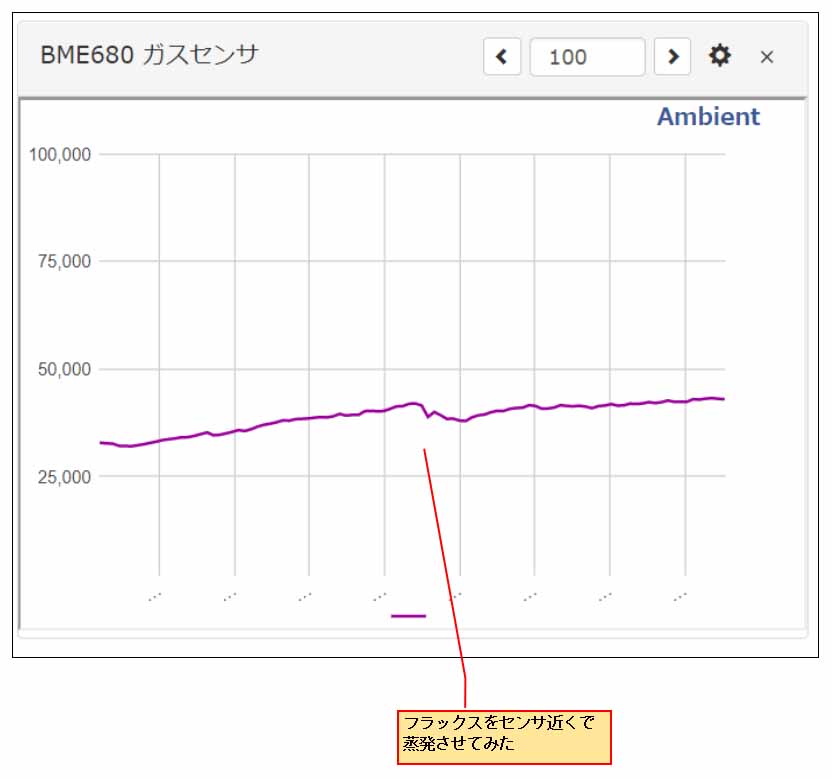
しっかり素早く反応してくれます。
おならの方が反応は大きいですね。
まぁ、有毒なフラックスはあまり充満させたくないので、少量に留めておいたせいだと思います。
因みに、ヤニ入りハンダ程度のフラックスではあまり反応しませんでした。
含有量が少ないからだと思います。
ガスセンサは有機化合物に反応しますが、鉛(Pb)などの無機化合物には反応しないみたいです。
本当は、室内空気中の揮発性有機化合物の含有量の指標となる IAQ値( 0~500の値)なるものを算出するらしいのですが、勉強不足で良く分かりません。
いつか算出してみたいと思います。
おそらく、有機化合物の無い純粋な空気の部屋をゼロとし、エタノール等の試験媒体で一杯になった密閉した箱の中の空気質を500 と設定するのかな? くらいに予想しています。
しかし、個人的には電子工作のハンダ付け等で、有機化合物が揮発したのかどうかを知ることができれば十分なので、グラフ表示さえできれば満足です。
普段、純粋な空気と思われる部屋の値を測って置いて、それを基準とすれば良いと思います。
編集後記
いかがでしたでしょうか。
M5Stack でもなかなかの精度で気圧・温度・湿度が測定できて、しかもガスセンサにもなって、なかなか良いものができました。
BME680を購入してからちゃんと使えるようになるまでに長い時間を要しました。
これで、電子工作のハンダ付けなどで、部屋の空気品質をモニタリングできるようになりました。
意外とハンダ付けする時の換気を怠ったりすることが多いですからね。
フラックスの蒸発空気は毒ですからね。
ということで、BME680 が使えるようになったので、次回は M5Stack のディスプレイにグラフ表示させてみたいと思います。
ではまた・・・。
コメント