- Home & Garden
- Home Improvement
- How to Unjam CD and DVD Drives and Trays
How to Unjam CD and DVD Drives and Trays
By Gary Hedstrom, Peg Hedstrom, Judy Ondrla Tremore
Unless your home has air purifiers, the dust raised by you and your children and pets gravitates to everything that’s plugged in. Look at the TV a few days after you dust it; it’s coated again. CD and DVD players attract just as much dust as televisions, which can affect the trays and rails that move discs back and forth. Once the cover is off, you can blow air into the player to remove the dust.
Follow the steps below. You need a screwdriver and canned air, a blow dryer, or a vacuum cleaner attachment. Here’s what to do:
-
Unplug the disc player.
-
Take out the screws securing the cover and remove it.
If it won’t come off, look for clips or more screws along the cover’s rear and bottom perimeter and take them out. Be careful here. You may see some screws on the underside, but they may be securing working parts of the mechanism. Don’t unscrew them.
-
Blow air into the mechanism to remove dust.
-
Plug the player back in.
-
Try ejecting the tray.
-
If it doesn’t eject, look for something jamming the tray.
Most of time, you’ll find a foreign object in it, such as a paper clip or pin.
-
Also see if the belt is damaged or broken or fell off.
You can try to put the belt back on if it fell off, but if it’s damaged or broken, it has to be replaced. Take the player in for service.
-
If the tray chatters as it tries to come out, look it over to see if there’s anything obvious blocking it. But most of time you’ll have to take it in for service.
Always wash your hands to remove oils before wiping a belt or the drive. An oily fingerprint will affect how well the player works. If you touch the parts accidentally, leaving a fingerprint, clean it off with rubbing alcohol.
-
Reassemble the player.
About the Book Author
Gary and Peg Hedstrom are self-taught repair masters with experience in carpentry, plumbing, appliance repair, and more. Judy Ondrla Tremore is a writer and editor for various newspapers and magazines.
- Home & Garden
- Home Improvement
- How to Stop Refrigerator Water Leaks
How to Stop Refrigerator Water Leaks
By Gary Hedstrom, Peg Hedstrom, Judy Ondrla Tremore
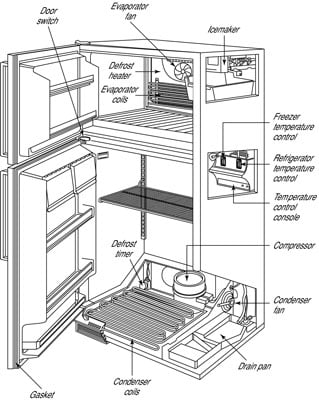
When a refrigerator is leaking water, it needs to be addressed immediately. Before being able to fix, it is important to first know why the refrigeration is leaking water. There are many causes for a leaking refrigerator. The most common instances are that your water may not be able to reach the drain due to being leveled incorrectly or that the defrost drain is actually clogged. For these cases, any homeowner can implement a DIY fix and stop the leaking pretty easily (see our steps below). Other reasons may include improper installation (for example, the water filter) or damaged equipment such as a cracked drain pain. These issues may require part replacement and professional help.
Leveling the refrigerator
When you see water under a refrigerator, check the front legs. Water (actually condensation) is supposed to run from inside the refrigerator into a drain hole, and then into a drip pan underneath, where it evaporates. If the refrigerator is completely level or tipped slightly forward, the water may not be able to flow into the drain. All you have to do to get it working is to adjust the front legs so that the refrigerator tips back slightly. That tilt also makes the door swing closed after you turn away from the refrigerator.
Here’s how to level your refrigerator to prevent it from leaking water:
-
Have a helper tip the fridge slightly back so you can get under it.
-
Unscrew the front legs a couple turns to raise them. (Don’t take them off, though.)
-
Put the refrigerator down.
-
Use a level on the front edge of the refrigerator to make sure the legs are even.
-
Partially open the door and walk away. It should close by itself now.
Tip the refrigerator only slightly because it is designed to be (almost) level, and tilting it too much might cause a problem somewhere else.
If you can’t adjust the legs, put a shim under each of them, about 1/8 inch thick at the wide edge.
Cleaning the drain hole
If adjusting the legs doesn’t stop water from leaking, then you have to clear the drain hole. It gets clogged with food particles that can prevent water from being drained, leading to an overflow and leakage. In this case, take the following steps to stop your refrigerator from leaking water:

-
Locate the drain tubes at the rear of the refrigerator or freezer.
-
Push a small plastic tube or a pipe cleaner through the tubes.
-
Pour a mild solution of soapy water and ammonia down the drain tube to kill bacteria. If you have a turkey baster or syringe, use it to squeeze water into the hole.
-
Check the drain pan under the refrigerator, on the left side, by removing the front grill.
-
If the soapy water hasn’t drained into it, you still have a problem. Go to Step 6.
-
Working inside the refrigerator, push the tube or pipe cleaner into and through the drain tube.
-
Flush the hole with water again.
-
You should now find water in the pan. If you do, don’t worry; it evaporates.
You can also have water problems if you keep the refrigerator in an unheated garage, porch, or basement. As heat from the motor flows across the cold exterior, it condenses and water forms, dripping onto the floor. All you need to do is put a space heater nearby, and if there’s no more water, you know condensation’s the problem. Solve the problem permanently by moving the refrigerator to a warmer place.
About the Book Author
Gary and Peg Hedstrom are self-taught repair masters with experience in carpentry, plumbing, appliance repair, and more. Judy Ondrla Tremore is a writer and editor for various newspapers and magazines.