Grinding is the act of staying in a certain area, and fighting many enemies over an extended period of time, to obtain Gold or jewels for a certain purpose.
Often times, grinding has a lot to do with Luck, as higher-leveled enemies within a certain family drop significantly higher amounts of Gold, and have a higher chance of dropping jewels.
Tips[edit | edit source]
The best way to make grinding as painless as possible is to invest in a larger sword. This way, you can hit as many enemies as possible with each attack. You will also want to get the following accessories: Gauntlet, for less clicking (150,000 Gold, Port, Area 5); Winger Boots, for faster travel (50,000 Gold, Port, Area 5); and Buckler Shield, for safer fighting (250,000 Gold, Port, Area 5). Depending on what you are grinding, the Coin of Bravery may help to avoid attacks or prevent accidental leaving of the screen (5000 Gold, Port, Area 5).
To purchase these accessories, consider farming some bosses nearby. One good possibility is the Dark Mist. With a spell such as Cross Napalm, it will go down within a few seconds.
Later in the game, while you'll want to increase all of your stats, consider investing particularly in Strength to attack higher-level mobs more effectively - it will greatly increase your cash flow over time. Intelligence is also worthwhile to some extent. Luck is your most important stat for grinding, however, since it allows for rarer mobs more often, and increases both Gold and jewels gained over time.
If you are grinding a boss, have the Coin of Bravery equipped for maximum survivability, if that is an issue. For most bosses, only a couple dozen points in Vitality will allow you to outlast the boss no matter what you get hit with.
You may want to designate different swords for different types of grinding - having one enchanted with Fire, for instance, to grind for Aquamarines.
Multi-Mob Locations[edit | edit source]
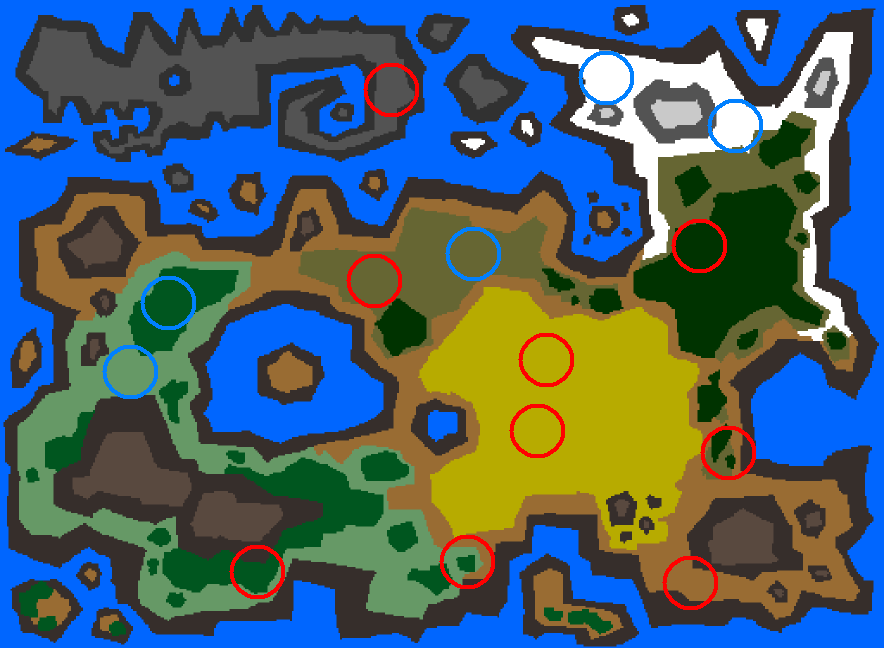
The fourteen Multi-mob locations. Locations necessary for fighting the Area boss are circled in red, secret locations in blue.
Throughout the map, there are fourteen locations which are termed Multi-mob locations. In addition to enemies found elsewhere in that Area, these locations also contain other enemies from earlier Areas. Multi-mob locations are some of the best grinding places because these earlier mobs, while no harder to kill, drop as much Gold as any other monster in that Area.
Of the fourteen locations, six are secret, meaning they do not have to be conquered to unlock the Area boss. Secret locations are usually much better for grinding than required ones.
Required for Area Boss[edit | edit source]
- Supply Base, Area 2. A small depot for trade goods passing between the western cities and the eastern hub. It is often fought over by numerous races in the area.
- Park, Area 3. At the very edge of the western plains, this park is a quaint rest area before heading eastward, into the hostile mountainous regions.
- Supply Base
- Waste, Area 4. A small lowland region southwest of the mountains. Barely anything grows here, save for some kinds of fungi.
- Theater, Area 5. A nightclub in the suburbs of the eastern hub. It attracts many of the lesser races, who are on good terms with the humans, who control this Area.
- Waste
- Tomb, Area 6. An ancient ruin containing many corpses - it is unrelated to the Pyramid to the southeast culturally, so no linen is to be found here.
- Zombie
- Skeleton
- Dry Lake, Area 6. A lakebed to the southwest of the Pyramid. Nothing interesting of note occurs here.
- Morass, Area 10. A particularly wet and flooded area of the swamps. Some aquatic life thrives here that cannot in higher regions.
- Fortress, Area 15. A massive buttress complex which serves as the international headquarters for both the undead horde and the legions of darkness. Representatives from most of the higher races appear here from time to time, to discuss both military and trade affairs.
Secret Locations[edit | edit source]
- Field, Area 8. A secluded meadow. Not many people pass through here, preferring to stick to the coast. Lots of creatures thrive here though, relatively undisturbed.
- Waste/Theater
- Orchard, Area 9. A secluded part of the forest with many fruit trees blooming. It is a training ground for Fire-based monsters, which have trouble finding appropriate and safe areas elsewhere.
- Marshland, Area 11. Situated in the very east of the swamps, it is a hub for both amphibious life and the undead.
- Morass
- Skeleton
- Zombie
- Ghost
- Woods, Area 12. Another secluded section of the eastern forests. Creatures from around the world come here - many of them likely passing through to head north.
- Waste/Theater
- Orchard
- Marshland
- Will-o'-the-Wisp
- Snowfield, Area 13. An international mob hangout. While it is often covered over by snow, in the summer its comfortable temperatures make it the perfect spot for a party, mostly free of human intervention.
- All enemies up to and including Area 13
- Ice Plains, Area 14. Another international mob hangout. It is closer to the sea, which means it is slightly warmer in the summer. There are also good beaches nearby.
- All enemies up to and including Area 14
This makes the Ice Plains the best location on the map for grinding.