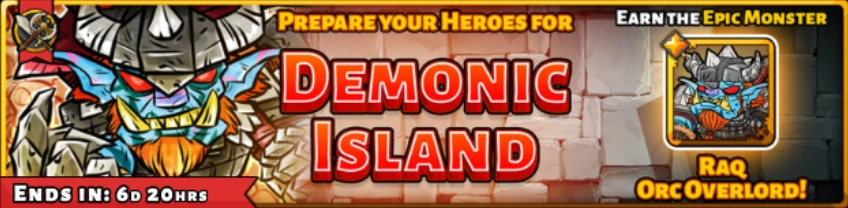
Demonic Island is a bonus campaign that lasts a full week. Its rewards span all possible content, from battle chests to crafting components to portal stones and skill scrolls. The Mission 4 boss, Raq the Orc Overlord, is exclusively obtainable in Demonic Island as an epic monster.
Campaign Properties  Edit
Edit
One could say the theme of Demonic Island is "Orcs, demons, and no buffs allowed." There are also two boss missions in this campaign, on Missions 6 and 11.
There are no specific restrictions or additions for the player in this campaign; however, enemies that normally are support have new skills starting in Mission 2 and onwards. These enemies are tinted red and marked below as demonic. It's uncertain what this demonic effect has on the orcs, but demons (shaded black instead of red) have abnormally higher armor and shadow resistance. Commonly, one will see a high damage Mass Dispel skill that will obliterate even the strongest teams. This is the reason why buffs are bad for this campaign.
The enemies are all from the three orc types (basic, Frozen Blood, Black Fist) and various demons. Their base stats do seem to be higher than normal, although this may be due to the "Demonic" effect.
Here are some demonic skills (in addition to their normal skill sets):
- Orc: unknown
- Vicious Orc: Savage Swipe + Hard to Kill (bonus armour below a high health threshold) + Deadly Rage (bonus % attack below 25% health)
- Orc Warchanter: Disenchant (targets enemies) + Mass Dispel (unusually high damage) + Frost Bolt (hits two targets)
- Orc Scout: Headshot + Piercing Shot
- Plague Demon: Vampiric Touch
- Frozen Blood Conjurer: Foretell + Mass Dispel (extremely high damage) + Renewal + Nightmare applies to all enemies
- Orc Warrior: Deadly Cut + Finishing Strike
- Orc Overlord (boss): Bloodbath + high attack
- Frozen Blood Veteran: Dispatch Foe + Taunt + Inner Focus to all allies
- Lesser Demon: Shadow Shroud + Mass Dispel (extremely high damage) + Inflict Wounds + high defense
- Black Fist Skirmisher: unknown
- Frozen Blood Hero: Shield Allies + Warcry twice as powerful
- Frozen Blood Executioner: Raging Shout
- Black Fist Enforcer: Vicious Strike
- Black Fist Evoker: Magic Missile (target type: double and unusually high damage) + Healing Circle + high defense + summon demon (extremely long cooldown; summons non-demonic lesser demon)
- Demonic Watcher: Shadow Shroud + Death Glare + Horrify + Acid Lance + Curse (original skill set has been replaced by these skills)
- Orc Warrior (12 and 13): Vanish, Renewal, Vital Strike, Overload (raises attack but lowers defense), dropping below 30% HP resets cooldowns
- Vicious Orc (12 and 13): Vicious Strike, Vicious Blow, Whirlwind Strike, Raging Strike, Deadly Rage (at 50% and again at 25%), Shield of Discipline, being hit increases armor and reduces cooldowns
- Orc Scout (12 and 13): Target Weakness (column), Shadow Shroud (all allies), Multi Shot (melee, hits targets equally 4 times), Disenchant (all allies), immune to crits and stuns, Deadly, Wrath of the Sea, Swarm of Arrows (hits 20 targets equally)
- Plague Demon (12 and 13): Eat Your Soul, Deathly Crunch, Dark Infection, Leaping Strike (targets lowest HP), Feint, Riposte, dodge chance greatly reduced, Balestra
- Orc Warchanter (12 and 13): Demonfire (hits up to 3 targets), Regeneration, Shadow Bolt (true damage, targets lowest HP), Mass Dispel (extremely high damage)
- Orc Shaman (12 and 13): Cyclone (reduces defense), Ball of Darkness (reduces resistances), Lightning Bolt (hits targets equally 6 times, lowers armour), Spirit Rage, Blade Barrier (true damage, all allies), Demon Shout (raises resistances by 20%), Mass Dispel (impossibly high damage)
- Raq, Orc Overlord (11 and 13): Recruits (revives an ally), Blade Barrier (all allies), Raging Shout (all allies), Weapon Throw, Bloodbath, Tendril of Shadow, Reckless, Bloodthirsty, Berserker's Rampage (hits targets equally 20 times)
Missions Edit
| Mission | Rec. Level (N, H, EX) | Min Food Cost (N, H, EX) | Max Food Cost (N, H, EX) | Enemies |
|---|---|---|---|---|
| 1 | 15, 19, 25 | 20, 36, 60 | 60, 76, 100 | 5x Orc, Orc Shaman, 6x Orc Scout, Orc Warrior, Orc Warchanter |
| 2 | 20, 24, 31 | 40, 56, 84 | 80, 96, 124 | 4x Orc, Vicious Orc, 4x Orc Warchanter, 2x Orc Shaman, 2x Orc Warrior, 3x Orc Scout |
| 3 | 25, 30, 38 | 60, 80, 112 | 100, 120, 152 | 4x Vicious Orc, 5x Orc Scout, 3x Orc Warrior, 4x Orc Warchanter, 2x Orc |
| 4 | 30, 35, 44 | 80, 100, 136 | 120, 140, 176 | 4x Orc Scout, 4x Vicious Orc, 4x Orc Warchanter, 3x Frozen Blood Executioner, 2x Frozen Blood Conjurer |
| 5 | 35, 41, 50 | 100, 124, 160 | 140, 164, 200 | 3x Frozen Blood Veteran, 4x Frozen Blood Conjurer, 2x Frozen Blood Executioner, 3x Plague Demon, 2x Orc Warrior, 5x Orc Scout |
| 6 | 40, 46, 56 | 120, 144, 184 | 160, 184, 224* | 4x Frozen Blood Hero, 5x Frozen Blood Conjurer, 2x Plague Demon, 3x Orc Warrior, 5x Frozen Blood Veteran, 4x Orc Scout, Orc Overlord |
| 7 | 44, 51, 61 | 136, 164, 204 | 176, 204, 244* | 3x Frozen Blood Veteran, 6x Frozen Blood Conjurer, 2x Plague Demon, 3x Orc Warrior, 3x Frozen Blood Hero, 2x Black Fist Skirmisher, Lesser Demon |
| 8 | 48, 55, 65 | 152, 180, 220 | 192, 220, 260* | 4x Frozen Blood Hero, 5x Black Fist Skirmisher, 2x Black Fist Enforcer, 5x Frozen Blood Conjurer, Orc Scout, 3x Frozen Blood Veteran, Orc Warrior |
| 9 | 50, 57, 68 | 160, 188, 232 | 200, 228, 272* | 3x Black Fist Enforcer, 3x Lesser Demon, 2x Frozen Blood Veteran, 3x Frozen Blood Executioner, 2x Black Fist Skirmisher, Frozen Blood Hero, Frozen Blood Conjurer, Black Fist Evoker |
| 10 | 54, 61, 72 | 168, 204, 248 | 208, 244*, 288* | 2x Frozen Blood Executioner, 2x Frozen Blood Veteran, 2x Frozen Blood Hero, 2x Black Fist Enforcer, 3x Black Fist Evoker, Lesser Demon, 3x Black Fist Skirmisher, 2x Frozen Blood Conjurer |
| 11 | 58, 66, 77 | 192, 224, 268 | 232*, 264*, 308* | 2x Frozen Blood Hero; 3x Black Fist Skirmisher; 2x Black Fist Enforcer; 2x Frozen Blood Veteran; Lesser Demon; 4x Black Fist Evoker; 2x Plague Demon; 7x Frozen Blood Conjurer; 2x Demonic Watcher; Frozen Blood Hero; Raq, Orc Overlord |
| 12 | 40, 46, 56 | 120, 144, 184 | 160, 184, 224* | 3x Orc Warrior, 3x Orc Scout, 2x Orc Warchanter, 3x Vicious Orc, 2x Plague Demon, 2x Orc Shaman |
| 13 | 50, 57, 68 | 160, 188, 232 | 200, 228*, 272* | 3x Orc Warrior; 3x Orc Warchanter; 3x Plague Demon; 3x Orc Shaman; 3x Orc Scout; 3x Vicious Orc; Raq, Orc Overlord |
*All max food costs above 220 are impossible to obtain normally.
Rewards Edit
| Mission | Difficulty | Rewards |
|---|---|---|
| 1 | Normal | 750 × |
| Hard | 75 × | |
| Extreme | 5 × | |
| 2 | Normal | 1 × |
| Hard | 1 × | |
| Extreme | 2 × | |
| 3 | Normal | 2 × |
| Hard | 125 × | |
| Extreme | 5 × | |
| 4 | Normal | 1 × |
| Hard | 1 × | |
| Extreme | 1 × | |
| 5 | Normal | 1 × |
| Hard | 1 × | |
| Extreme | 5 × | |
| 6 | Normal | 300 × |
| Hard | 3 × | |
| Extreme | 1 × | |
| 7 | Normal | 2 × |
| Hard | 1 × | |
| Extreme | 240 × | |
| 8 | Normal | 10 × |
| Hard | 1 × | |
| Extreme | 1 × | |
| 9 | Normal | 1 × |
| Hard | 1 × | |
| Extreme | 1 × | |
| 10 | Normal | 3 × |
| Hard | 15 × | |
| Extreme | 2 × | |
| 11 | Normal | 1 × |
| Hard | 5 × | |
| Extreme | 1 × | |
| 12 | Normal | 1 × |
| Hard | 5 × | |
| Extreme | 1 × | |
| 13 | Normal | 25 × |
| Hard | 3 × | |
| Extreme | 1 × |
Strategy Edit
- The first objective is to avoid mass dispel entirely, which is present in every Mission with Lesser Demons and deals game-ending damage. Mission 12 is incredibly annoying, even for a Level 55. It has repeating True Damage from the Orc Scouts, Orc Warriors can Vanish as well as Overload, and one of the monsters does a very large defense debuff.
- Heals over time (including Cleanse and Druid's soul skill) count as buffs. These should be avoided.
- Blackguard's Death Glare skill counts as a self-buff.
- The Mystic is probably necessary for her disenchant, which is the only way to remove debuffs in this campaign without incurring Mass Dispel. Be sure to avoid her Foretell skill, as that is a buff.
- The Spellsword is also recommended for the numerous buffs that demonic minions stack heavily. Remember that his Haste skill is a buff and will be subject to Mass Dispel.
- Blackguard is a good tank because he does not need any buffs to be tanky. The Necromancer may also work if sufficiently geared/starred.
- In the final Mission, area of effect (AOE) damage from Mage or Warlock can be quite powerful in lieu of Cleric.
- At high enough stars and epic gear, it may be possible to simply clear all missions with area damage from the Warlock and Necromancer, and crowd control from the Ninja.
Strategy for Missions up to 11 for pre-55 Edit
Team:
- Spellsword, Mystic, Blackguard, Cleric (3:1 formation, Blackguard in front)
Skills:
- Spellsword - Magic Missile, Power Strike, Spell Strike, Energy Reserves, Martial Mastery
- Mystic - Confuse, Horrify, Disenchant, Knowledge, Visions
- Blackguard - Double Swing, Vicious Strike, Tendril of Shadow, Hell's Bulwark, Find Weakness
- Cleric - Righteous Call, Quick Heal, Powerful Heal, Charismatic Leader, Healer
Gear:
- Spellsword - Perfect Katana/Vorpal Warsword/Blade of Wonder, Dragonscale Armor
- Mystic - Abjurer's Staff of Protection, Aetheron Robes
- Blackguard - Dark Defender, Strength of Legend
- Cleric: Moon Mace/Ambusher's Hacker, Dragonscale Armor
The setup above is not set in stone, but avoid Haste, Power Shield, Foretell, Safety Ward, Cleanse, and Death Glare. All of those count as buffs and are vulnerable to Mass Dispel, which can deal up to thousands of damage. After attack debuffs, first disenchant (removes negative effects) Blackguard, then Spellsword, then Mystic and Cleric. After defense debuffs, first disenchant Cleric, then Blackguard, then Mystic and Spellsword. At the beginning of each stage, wait until the monsters cast most of their buffs and use mass dispel right before the monsters' first attack. During the stage, use Mass Dispel as much as possible, but be sure to have the cooldown up for the next stage. Spam Doom unless you are low on soul energy. If anyone dies, resurrect with cleric. If Cleric dies, resurrect with potion. In Mission 11, Stage 4, use Soul Rend on Raq as much as possible to keep him from doing too much. Focus most powerful heals and quick heals on Cleric unless she is at or near maximum health. To beat Mission 11 extreme, 7-star heroes are needed and a little bit of luck, along with heal, resurrect, and/or immune potions for cleric. Enchants will help a lot. The team may take a while but be patient. Somebody beat it with level 45 heroes and tier 1 epics, so don't give up if you fail the first few times.
Strategy for Missions 12 and 13 Edit
Team:
- Cleric, Necromancer, Barbarian, Mystic (2 by 2 formation, Cleric + Mystic in back and Necro + Barb in front)
- Target the archers first and spam Baleful Glare, with Energy Drain when Necro's health is low, and Doom if you have lots of soul energy. If a hero is about to die, save soul energy so you can resurrect them.
Skills:
- Barbarian - Turtle's Shell, Leaping Strike, Weapon Throw, Hawk's Speed/Owl's Insight
- Necromancer - Fear, Ray of Enfeeblement, Inflict Wounds, Shadow Master/Protective Wards
- Mystic - Horrify*, Safety Ward, Disenchant, Knowledge/Visions
- Cleric - Quick Heal, Powerful Heal, Righteous Call, Healer, Charismatic Leader
Gear:
- Barbarian - King's Hammer, Living Leather
- Necromancer - Piercing Blade or Iron Rose, Spellthread Robe
- Mystic - Staff of Viarus, Eye of Chaos or Abjurer's Staff; Aetheron Robe or Soul Cage
- Cleric - King's Hammer, Keldis' Raiment
*use confuse instead if bringing Abjurer's Staff
As you can see, there's more in comments: \/


