
On Windows 10, the Windows Defender Antivirus is your default anti-malware engine to protect your device and data from viruses, roolkits, ransomware, and other security threats.
Although for the most part the built-in Windows 10 antivirus does a pretty good job, it may flag a file or folder that you trust as malicious. If you want to prevent this type of behavior from happening, Windows Defender Antivirus includes an option to exclude files and folders, as well as file types and processes from getting scanned and blocked.
In this Windows 10 guide, we walk you through the steps to exclude specific items and locations from Windows Defender Antivirus scans.
How to prevent Windows Defender from scanning specific files
If you have certain files, folders, file types, and processes that you want to exclude from Windows Defender Antivirus scans, use the following steps:
- Open Windows Defender Security Center.
- Click Virus & threat protection.
Click the Virus & threat protection option.


- Under "Exclusions," click the Add or remove exclusions option.
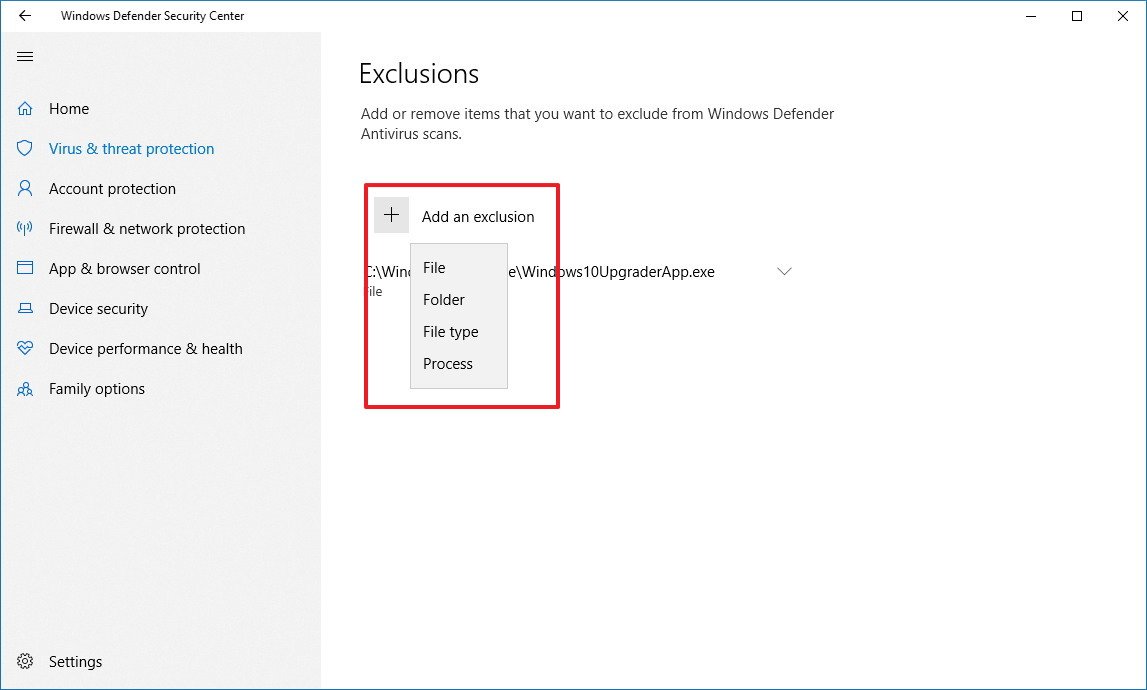
Click the Add an exclusion button.
Select the content you want to exclude from Windows Defender Antivirus, such as:
- File — Excludes only one file per exclusion.
- Folder — Excludes a folder and its content, including sub-folders.
- File type — Instead of excluding files and folder locations, you can configure the antivirus to ignore files with a specific extension no matter their location.
- Process — Excludes background processes by name.


Continue with the on-screen directions to add the new exclusion depending on your selection. (For example, if you select File, you simply need to browse and select the file you want to exclude. Or if you select the File type option, you only need to enter the extension of the file format to skip during scans.)


Once you complete these steps, you may need to repeat the instructions to exclude other items you don't want the antivirus to scan to avoid false positives.
At any time, you can remove an exclusion using the same instructions, but on step No. 5, make sure to select the item and click the Remove button.
More Windows 10 resources
For more helpful articles, coverage, and answers to common questions about Windows 10, visit the following resources:
- Windows 10 on Windows Central – All you need to know
- Windows 10 help, tips, and tricks
- Windows 10 forums on Windows Central
We may earn a commission for purchases using our links. Learn more.
Peek inside Surface Laptop Go shows easy access to replaceable SSD
So far, the Surface Laptop Go hasn't received the same sort of teardown treatment we're used to seeing from the folks at iFixit. However, one Reddit user recently posted a quick look inside the laptop, showing it took some cues from its bigger sibling, the Surface Laptop 3.

Best Xbox Series X, Series S games to try first at launch
The Xbox Series X will bring a range of improvements to existing games, but what are the best games to break in a new system? Here are our picks.

Review: Assassin's Creed Valhalla just doesn't do enough
Assassin's Creed Valhalla may be too long for its own good, but it has a beautiful world to explore full of wonders and mysteries. It's a typical Assassin's Creed game, for better or worse.

The NFL is back! Check out these must-have Windows apps for football fans
After months of waiting through a unique offseason and no preseason games, the NFL is finally back this week. With these Windows 10 apps, you won't miss a snap of the NFL action.


