Here's a tweet from Mechin, who provides more information on detailing with Substance Painter .
The old account has been frozen and deleted, so I will post the restored one .
Lottery
Mold making
An acquaintance told me in detail about the mold workflow at SP, so I
'll just list the general method.
Since the filter that lowers the excitement is excellent, it is made like this, but in the opposite case, just reverse the painting.
After that, add various effects as you like. #substancepainter
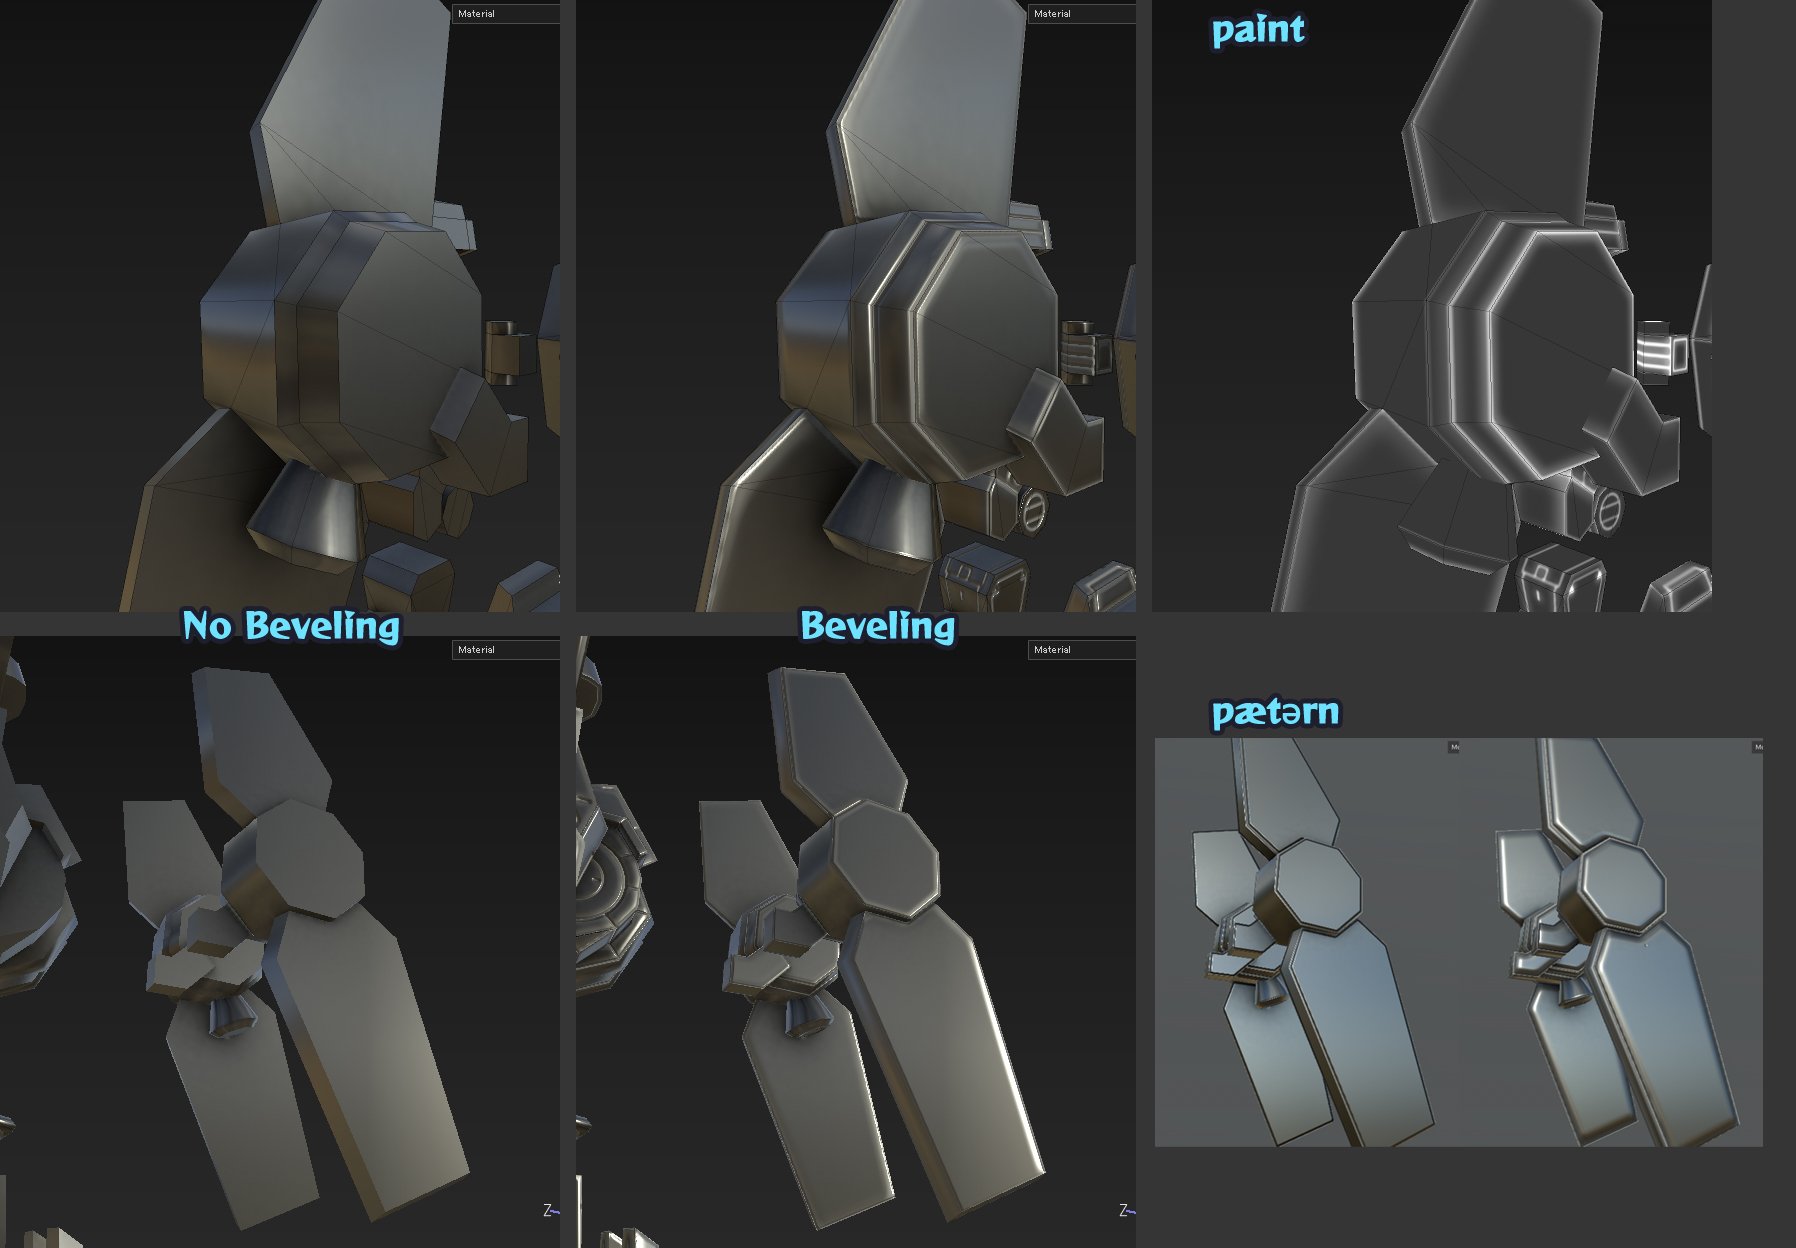
A tricky technique that chamfers the crisp borders peculiar to hard edges and low poly to make them invisible to cheap.
It's a way to reproduce with paint when you can't add a bevel on the model.
Any tool that can change the height difference with the height & normal map is possible.

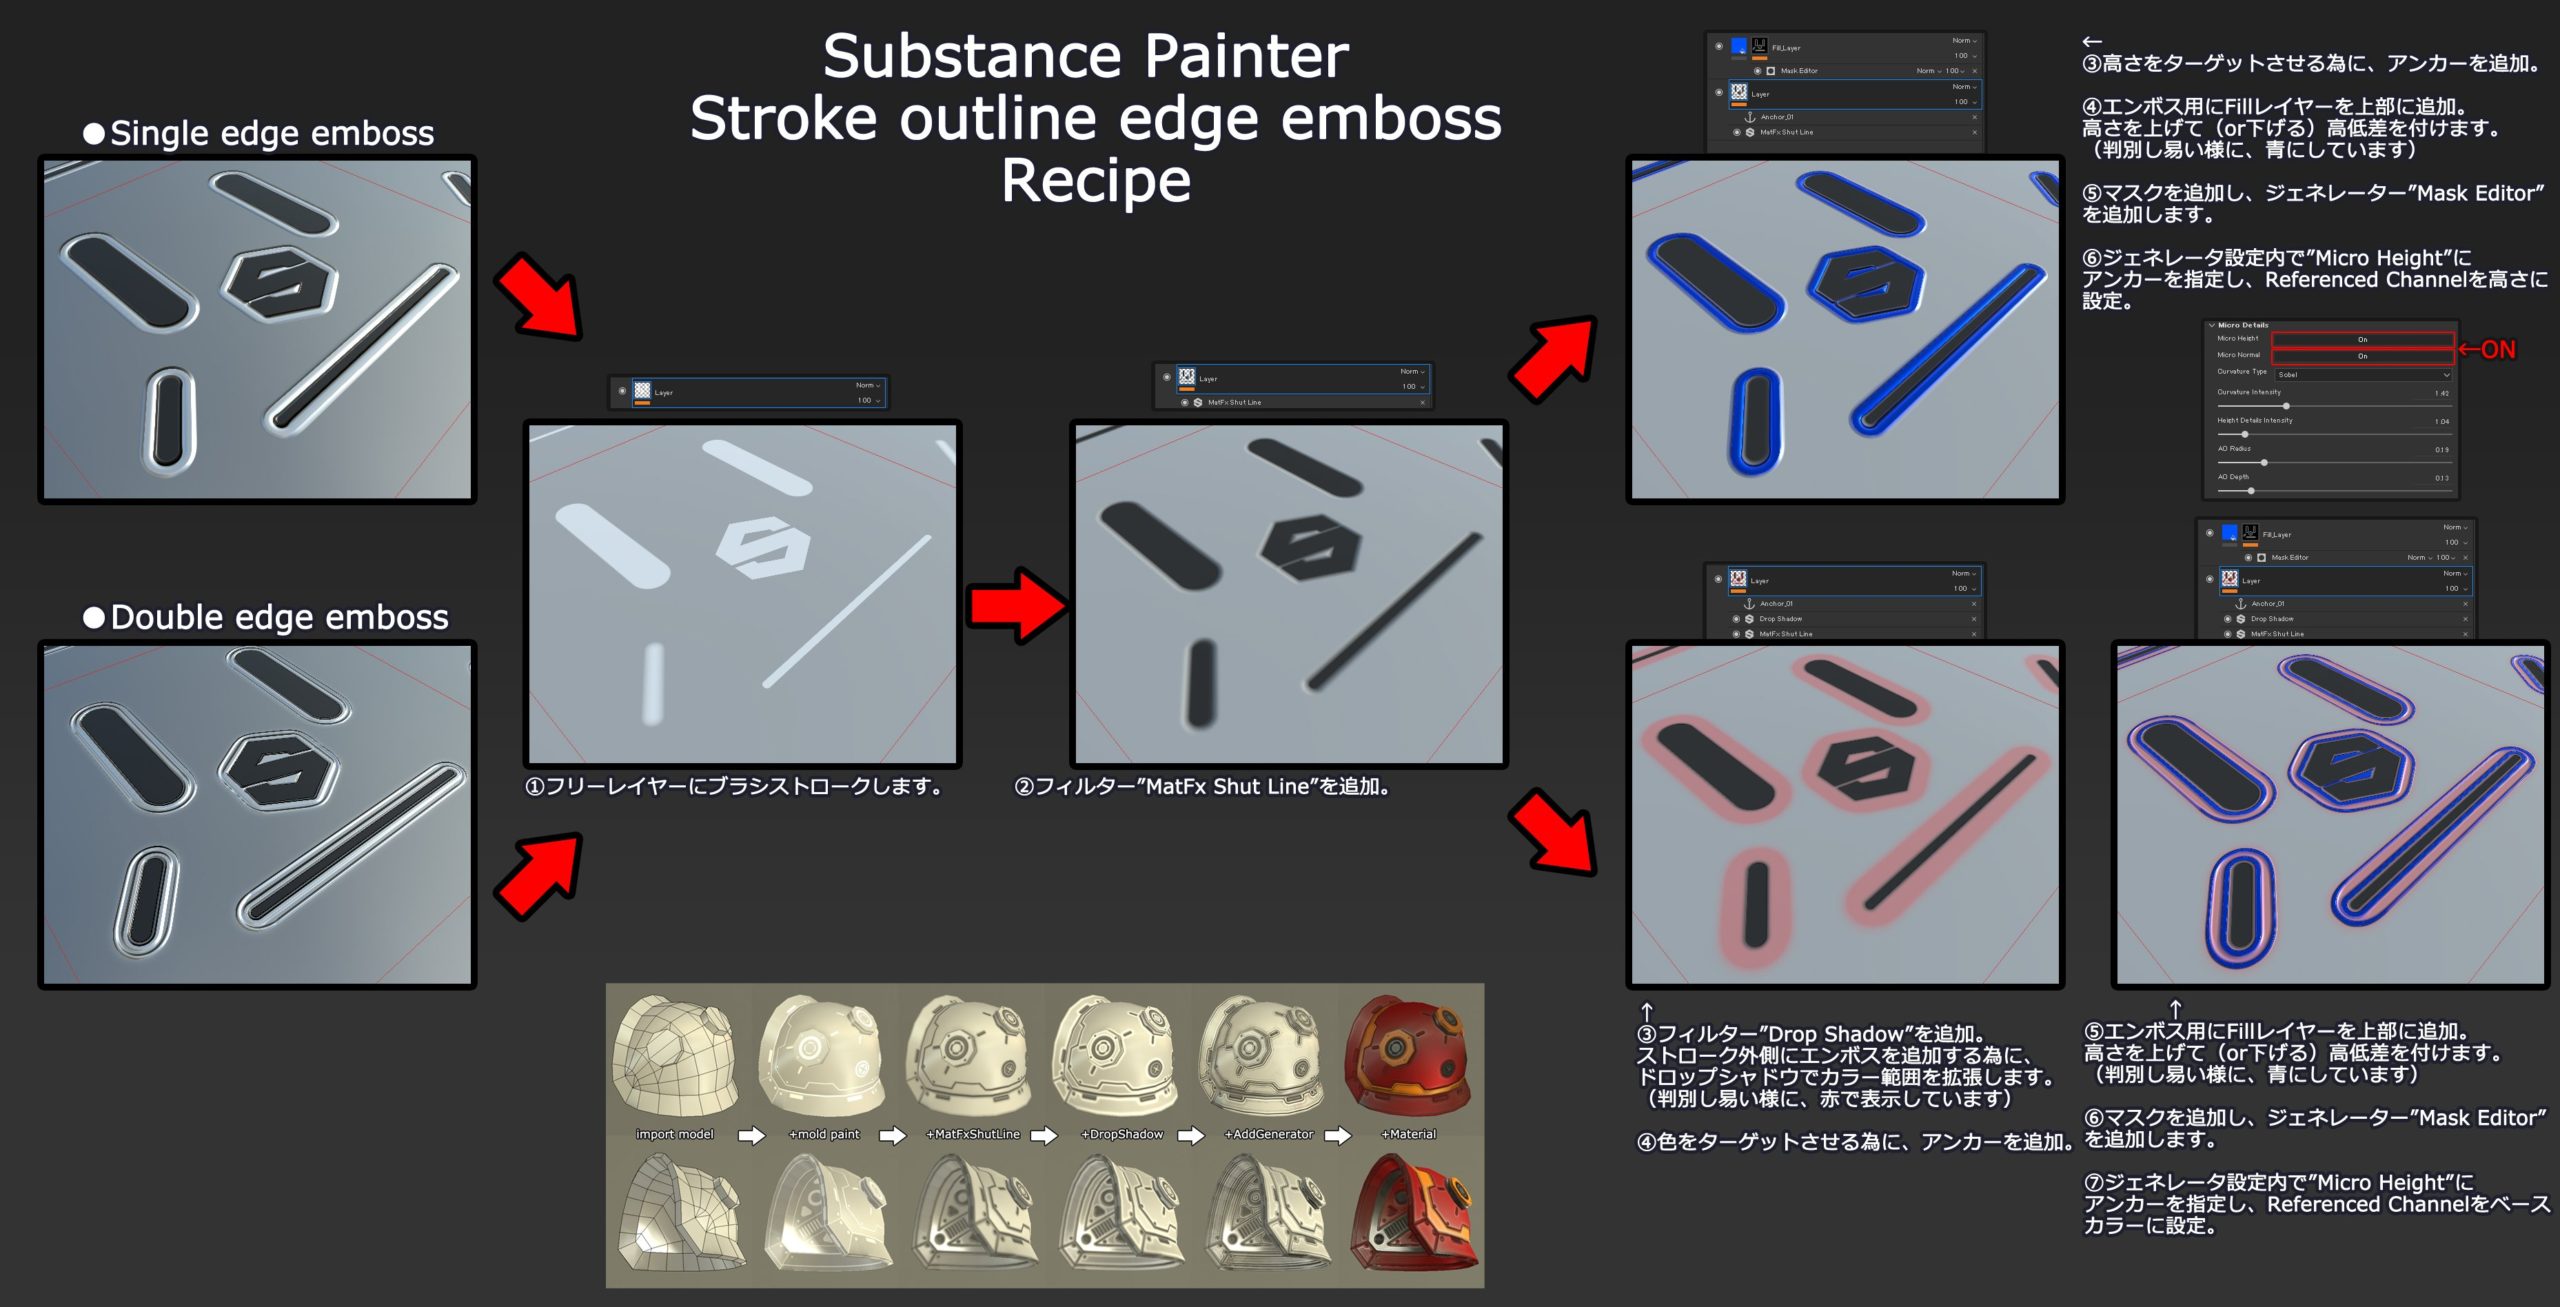
Mold making with Substance Painter Final Part 1
This is how to make the stroke outline edge emboss that appeared in 2.5.
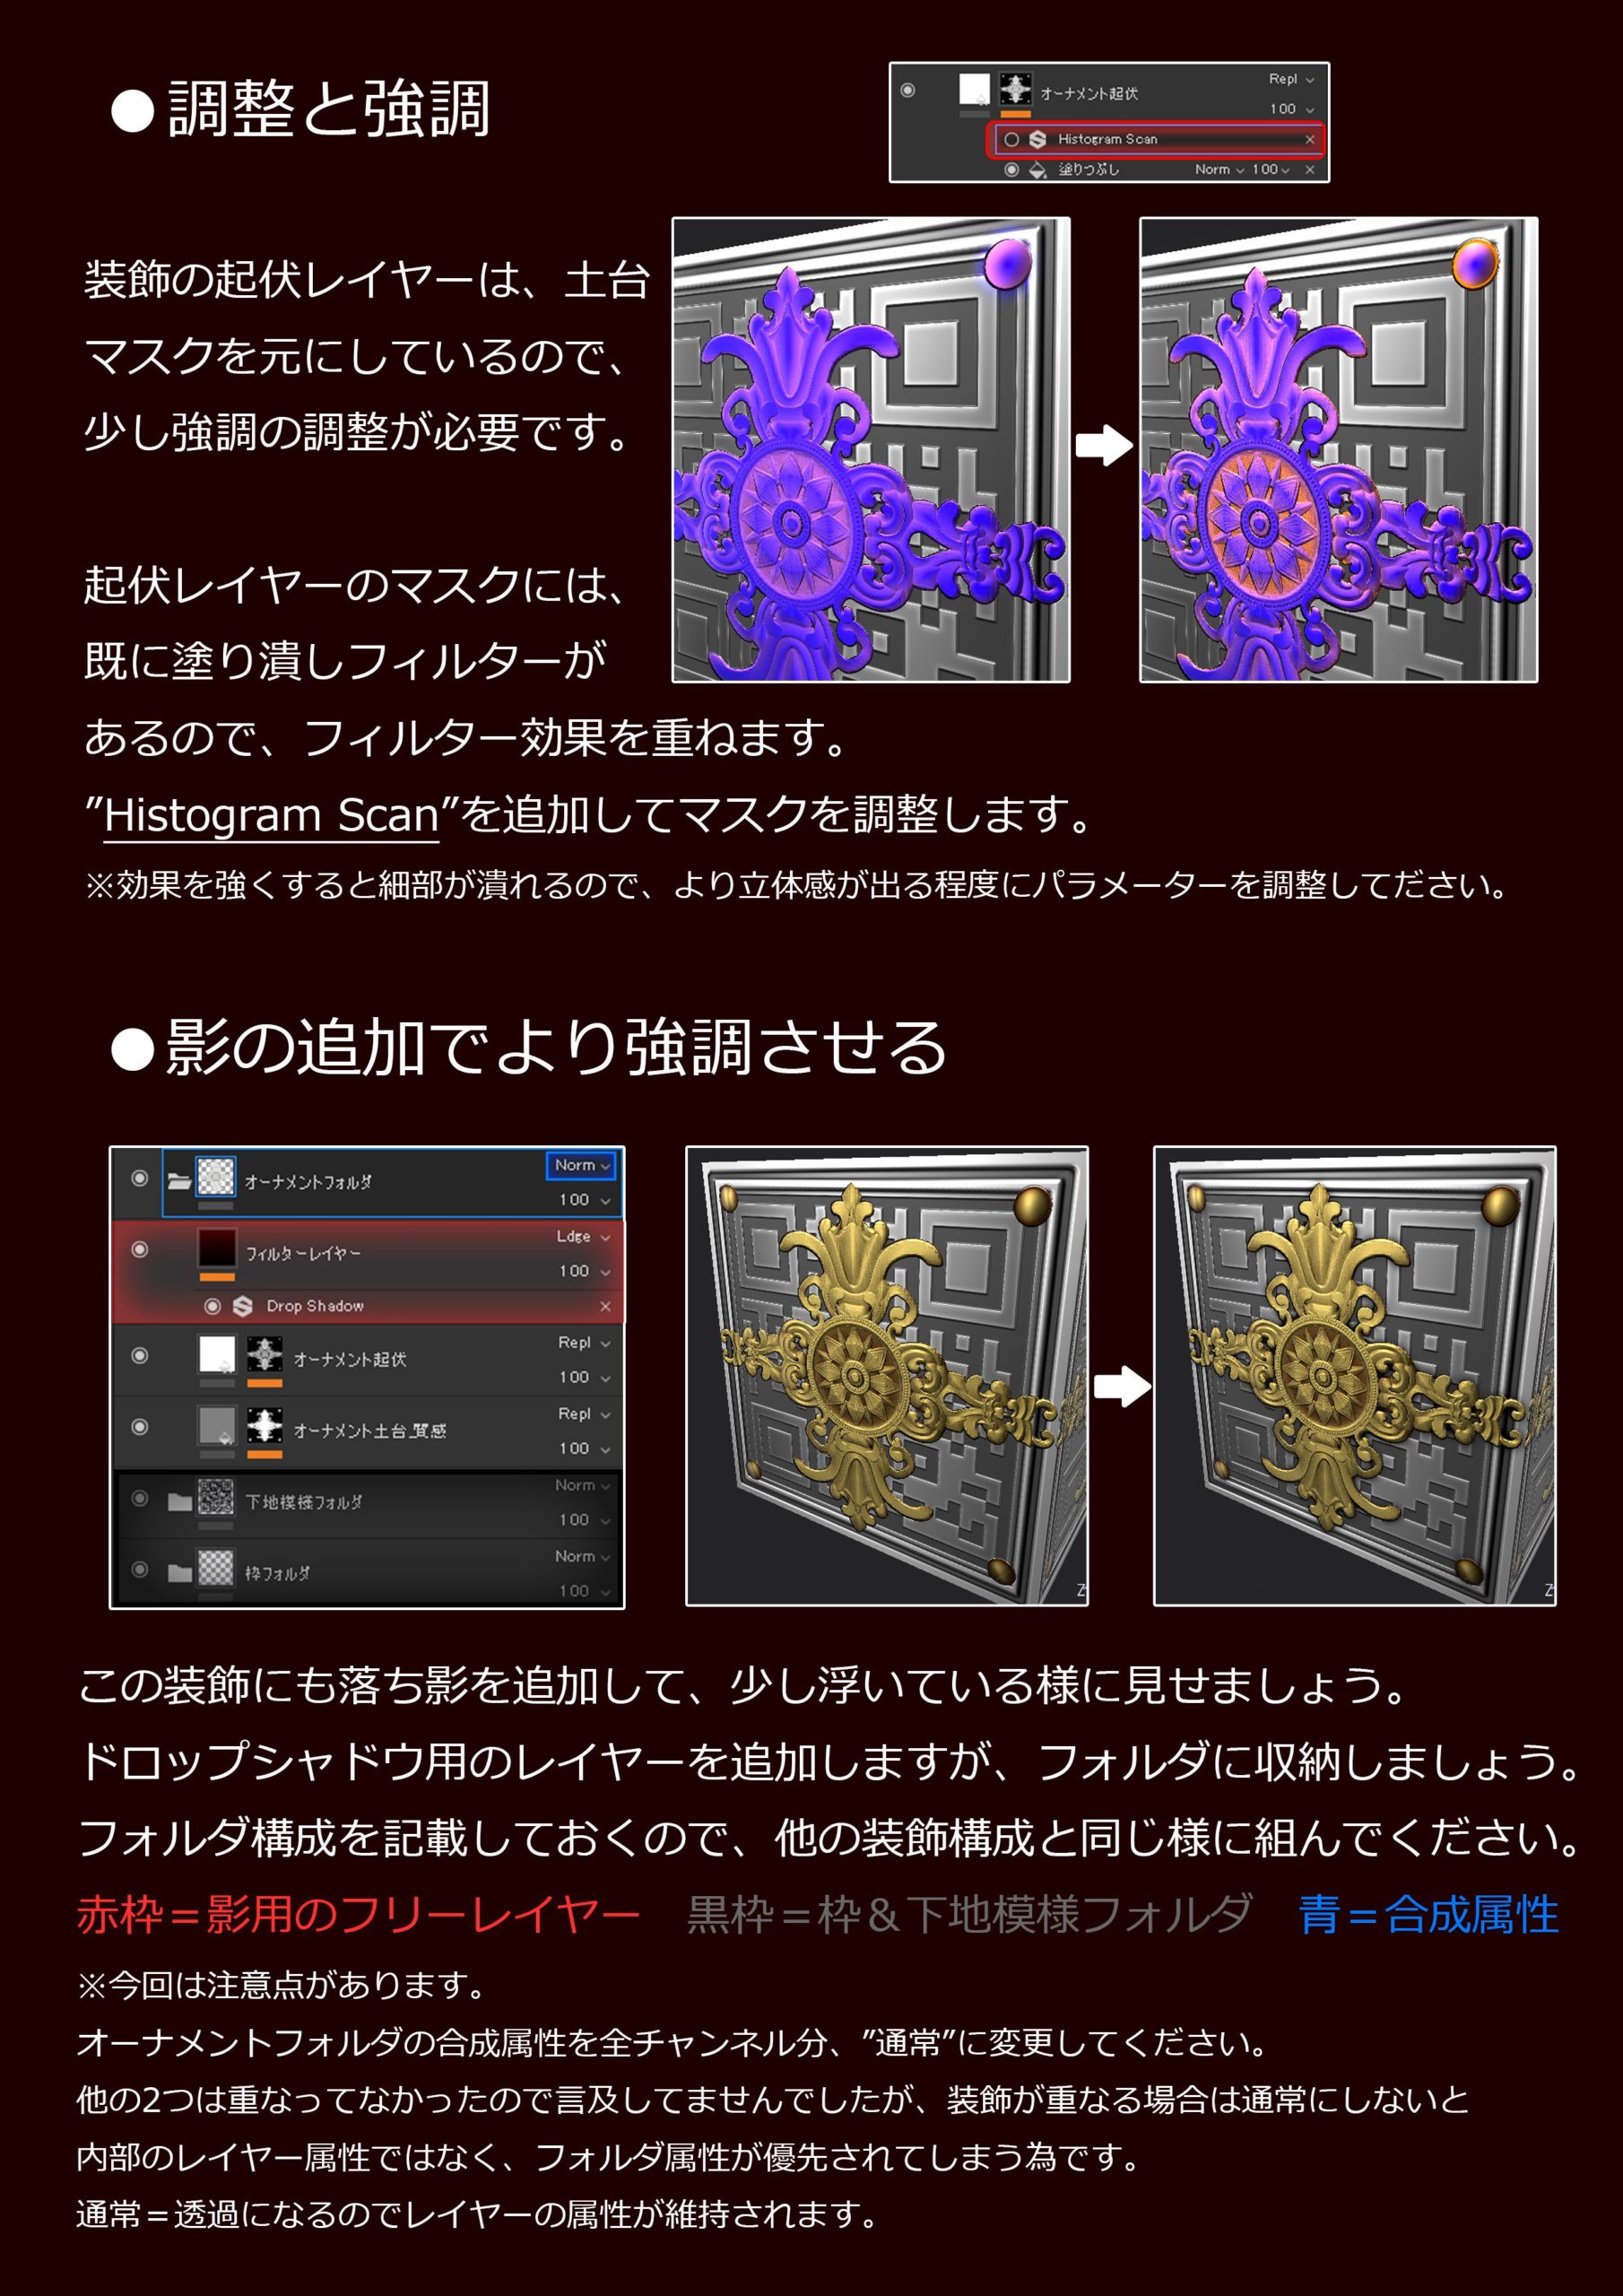
The details are written in the image and use multiple filters and layer settings.
Since I prepared two patterns, I understand the structure with a single edge at first,
and apply it with a double.
(Broken image link)
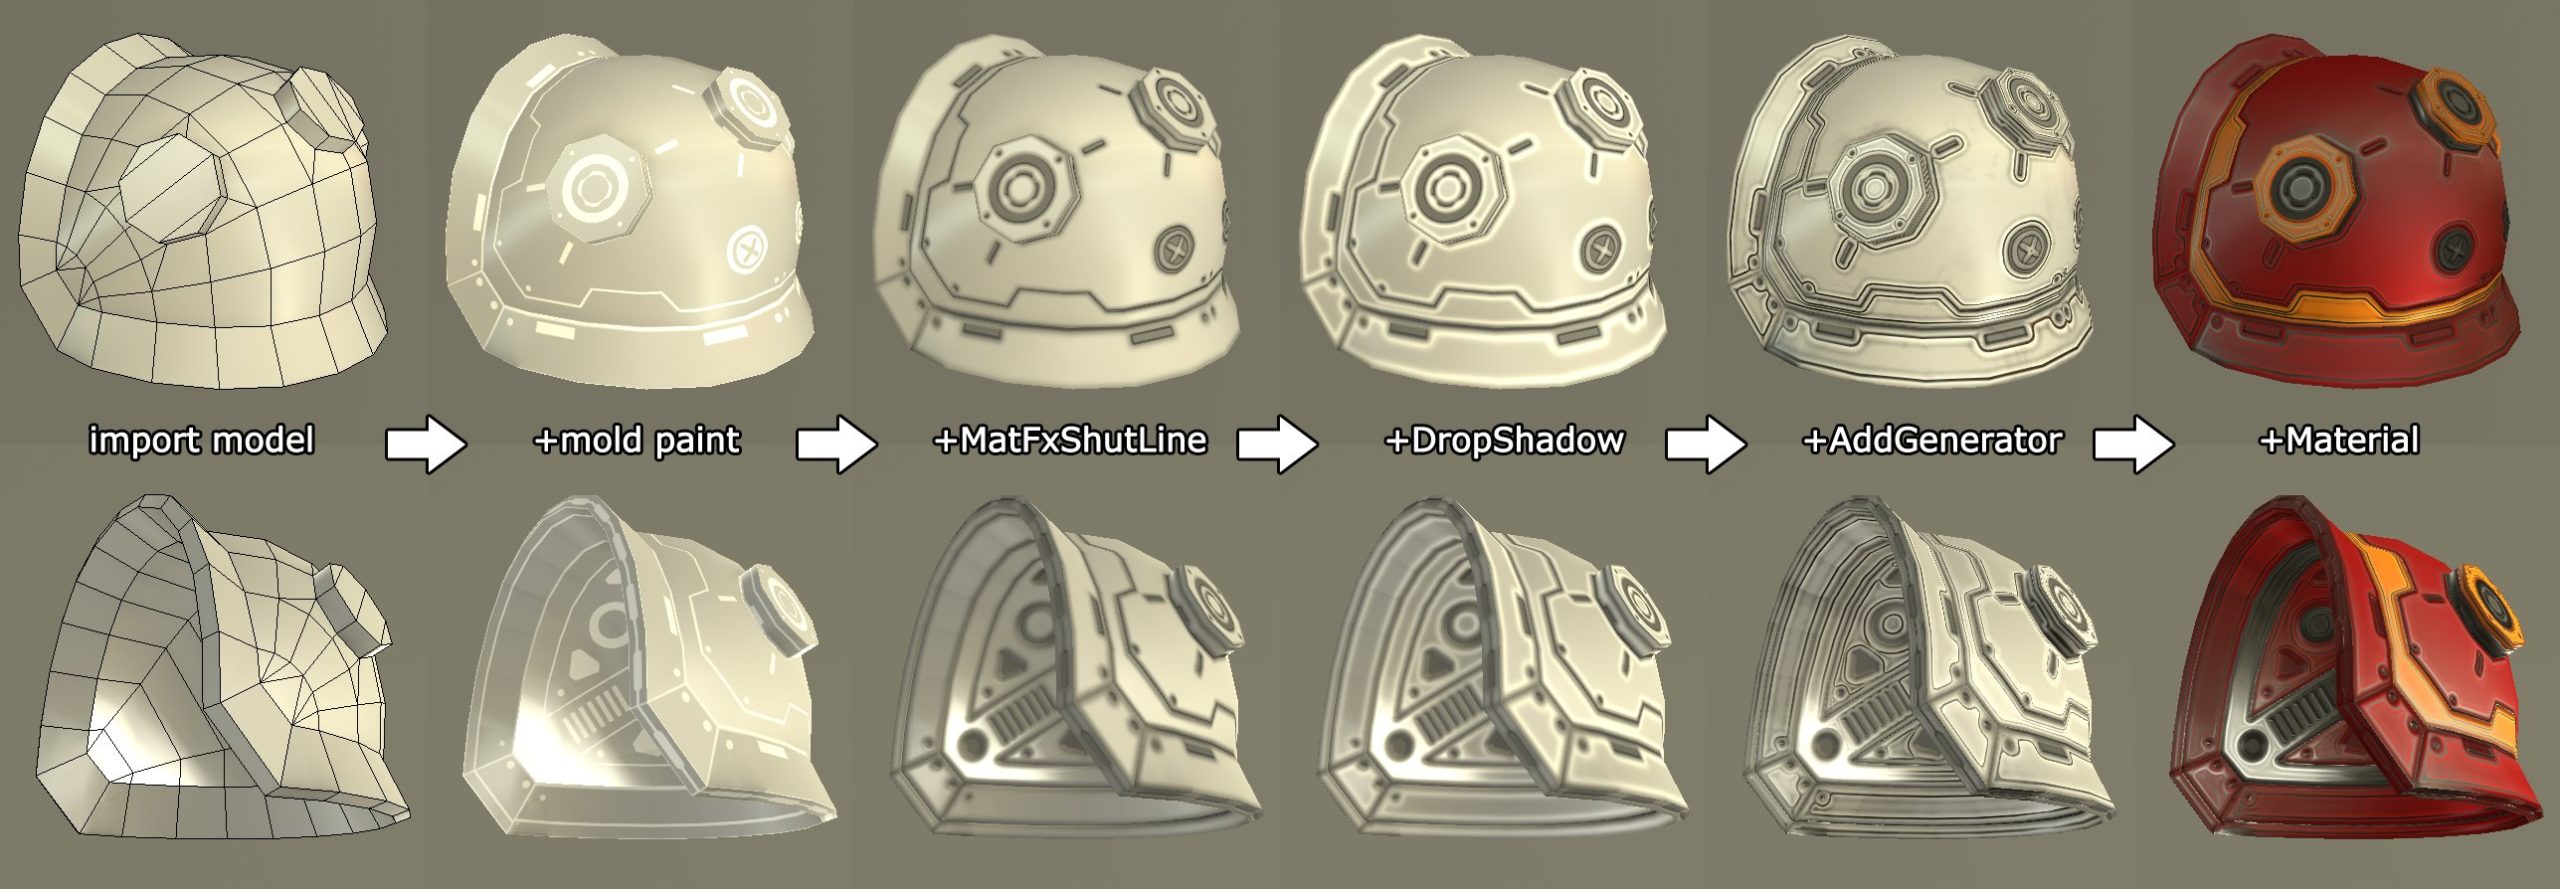
Mold making with Substance Painter Final Part 2
Since it is
created by linking three types of sit line, drop shadow, and generator, if you play with each parameter, you can draw a wide variety of molds.
(The image is an example)
(Broken image link)
Immersion expression
There are various methods and it is not certain, but the effect of giving a dent around the drawn area.
Can it be used for iron rivets, embedding seams, embedding decorations, etc.
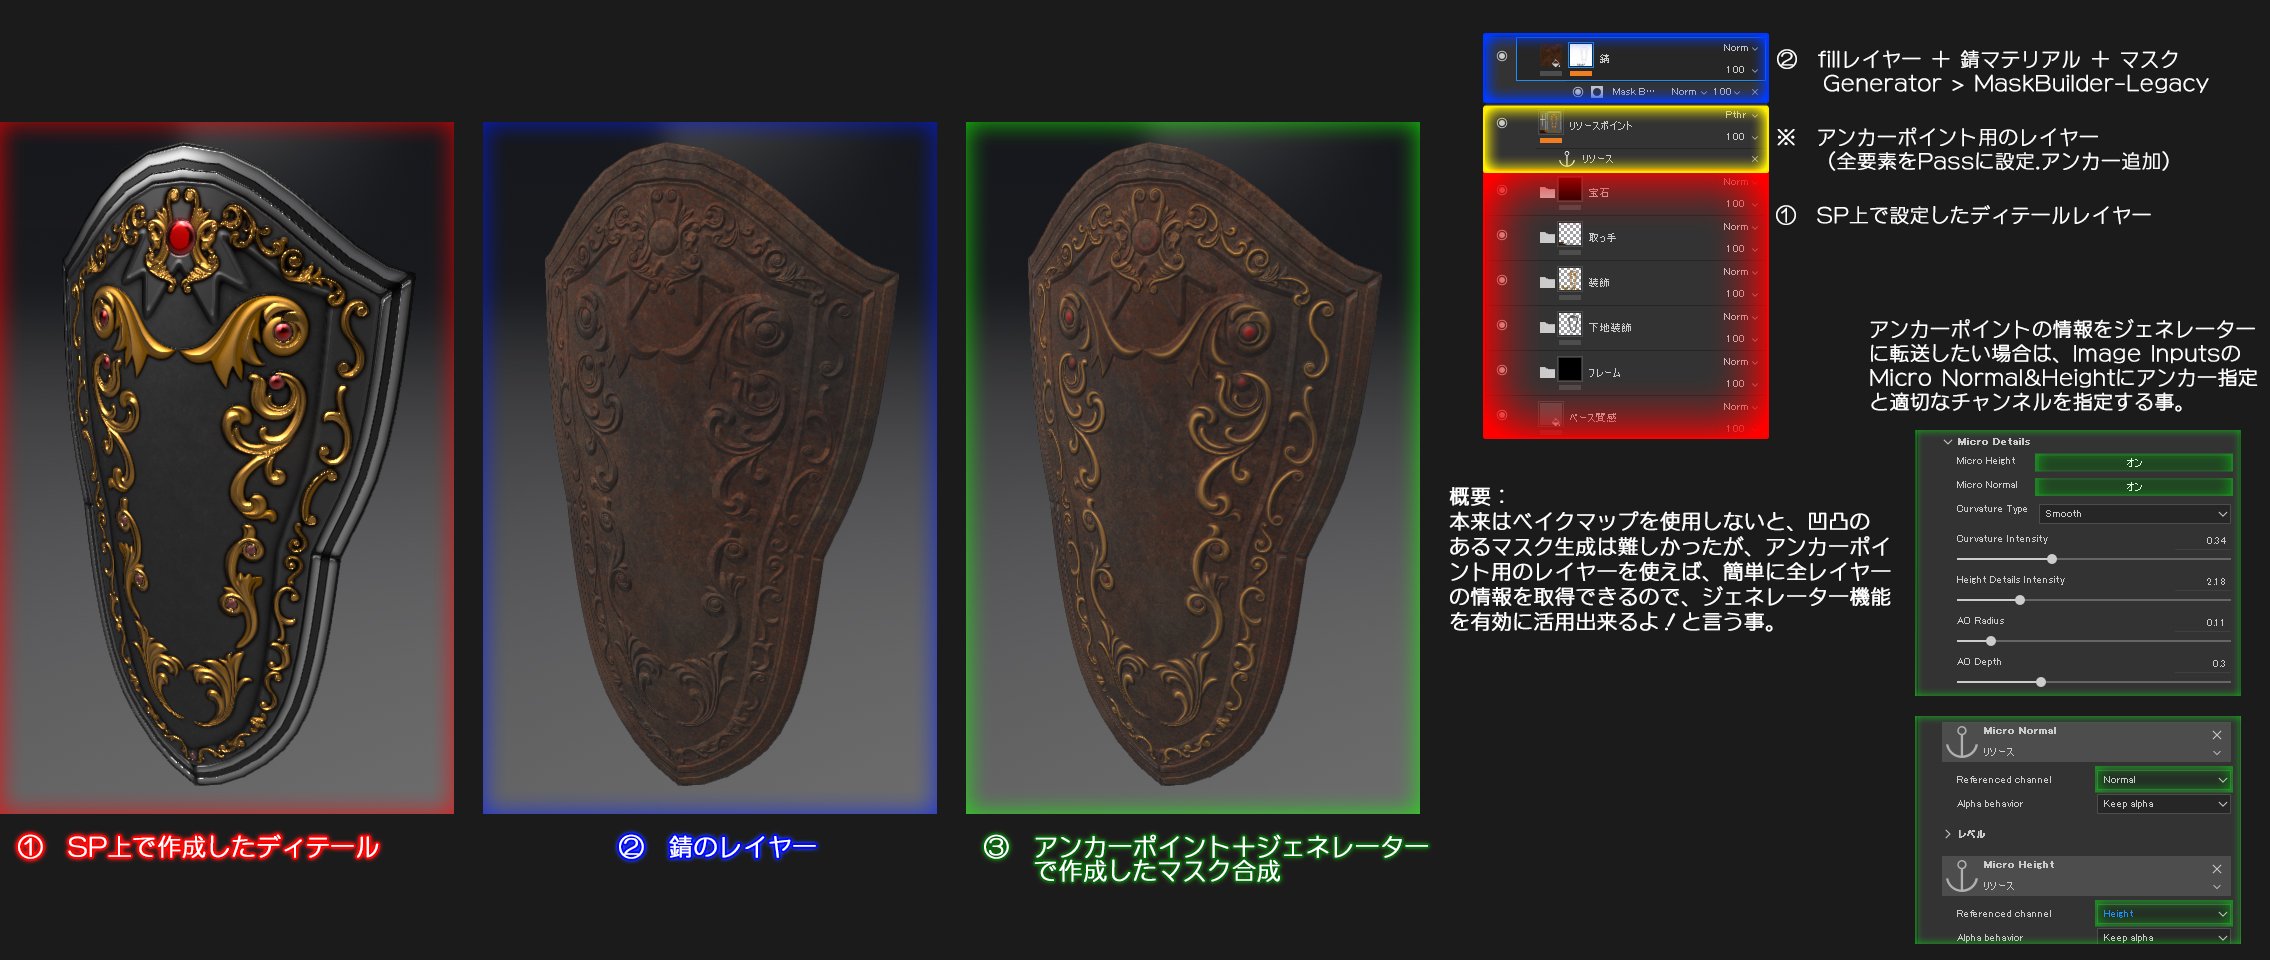
Substance Painter Meri-included expression recipe released

Layer composition of meri-included expression using SP. I think this is probably the easiest and most versatile.
As a feature, the texture of the part that stands out in the drawn place and the expression of the surrounding merit are
displayed at once.
Since the anchor function is used, be careful of the order of application!
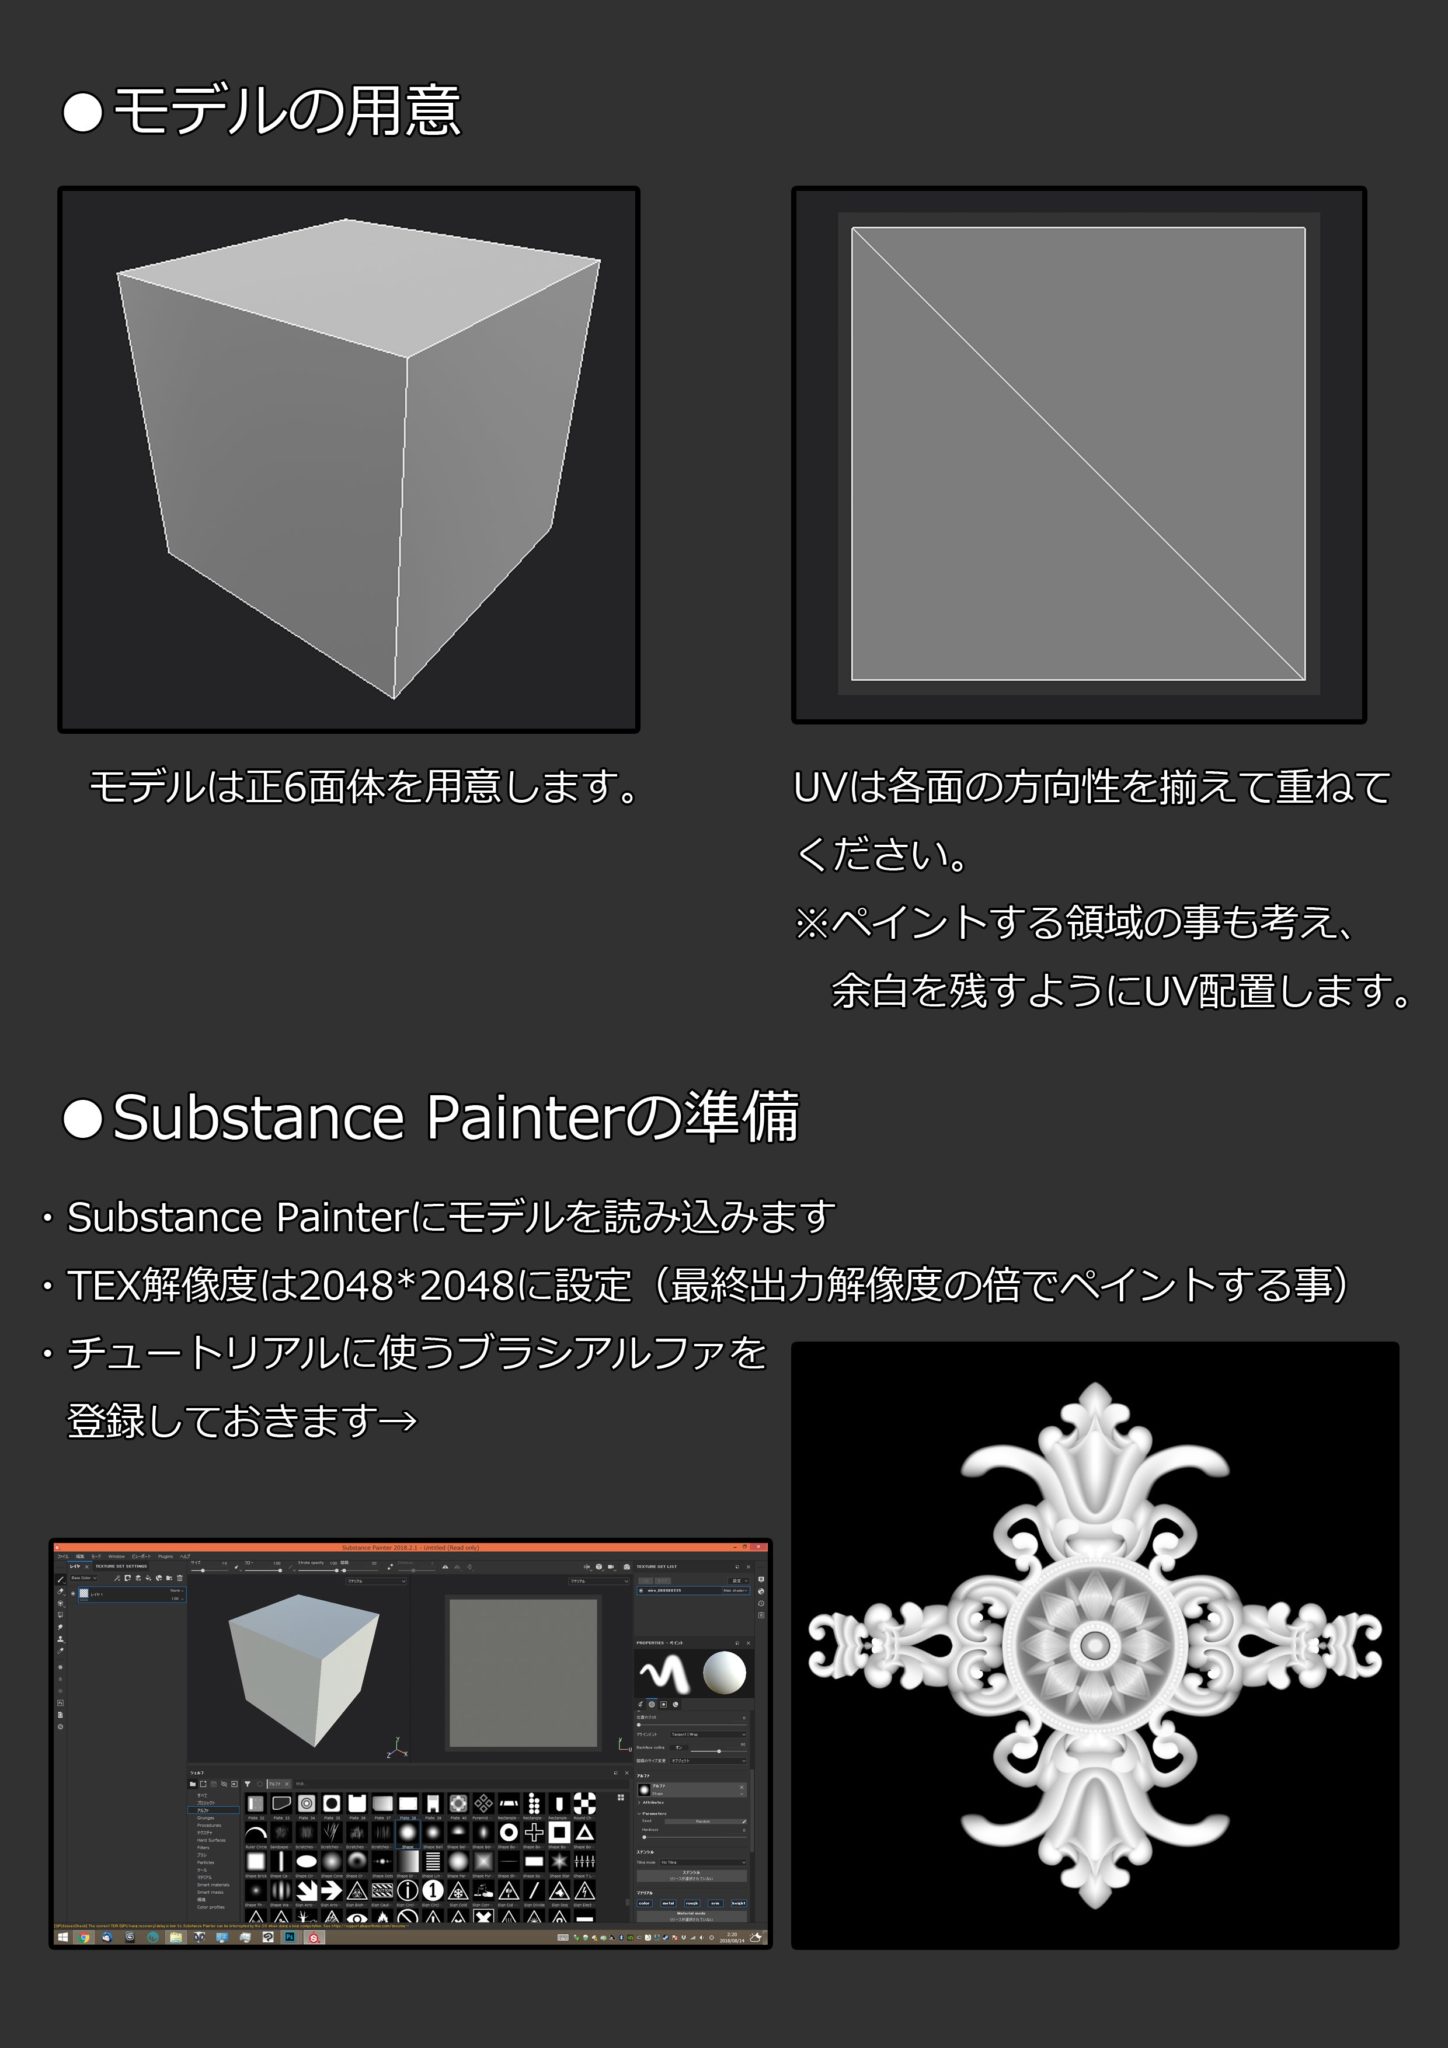
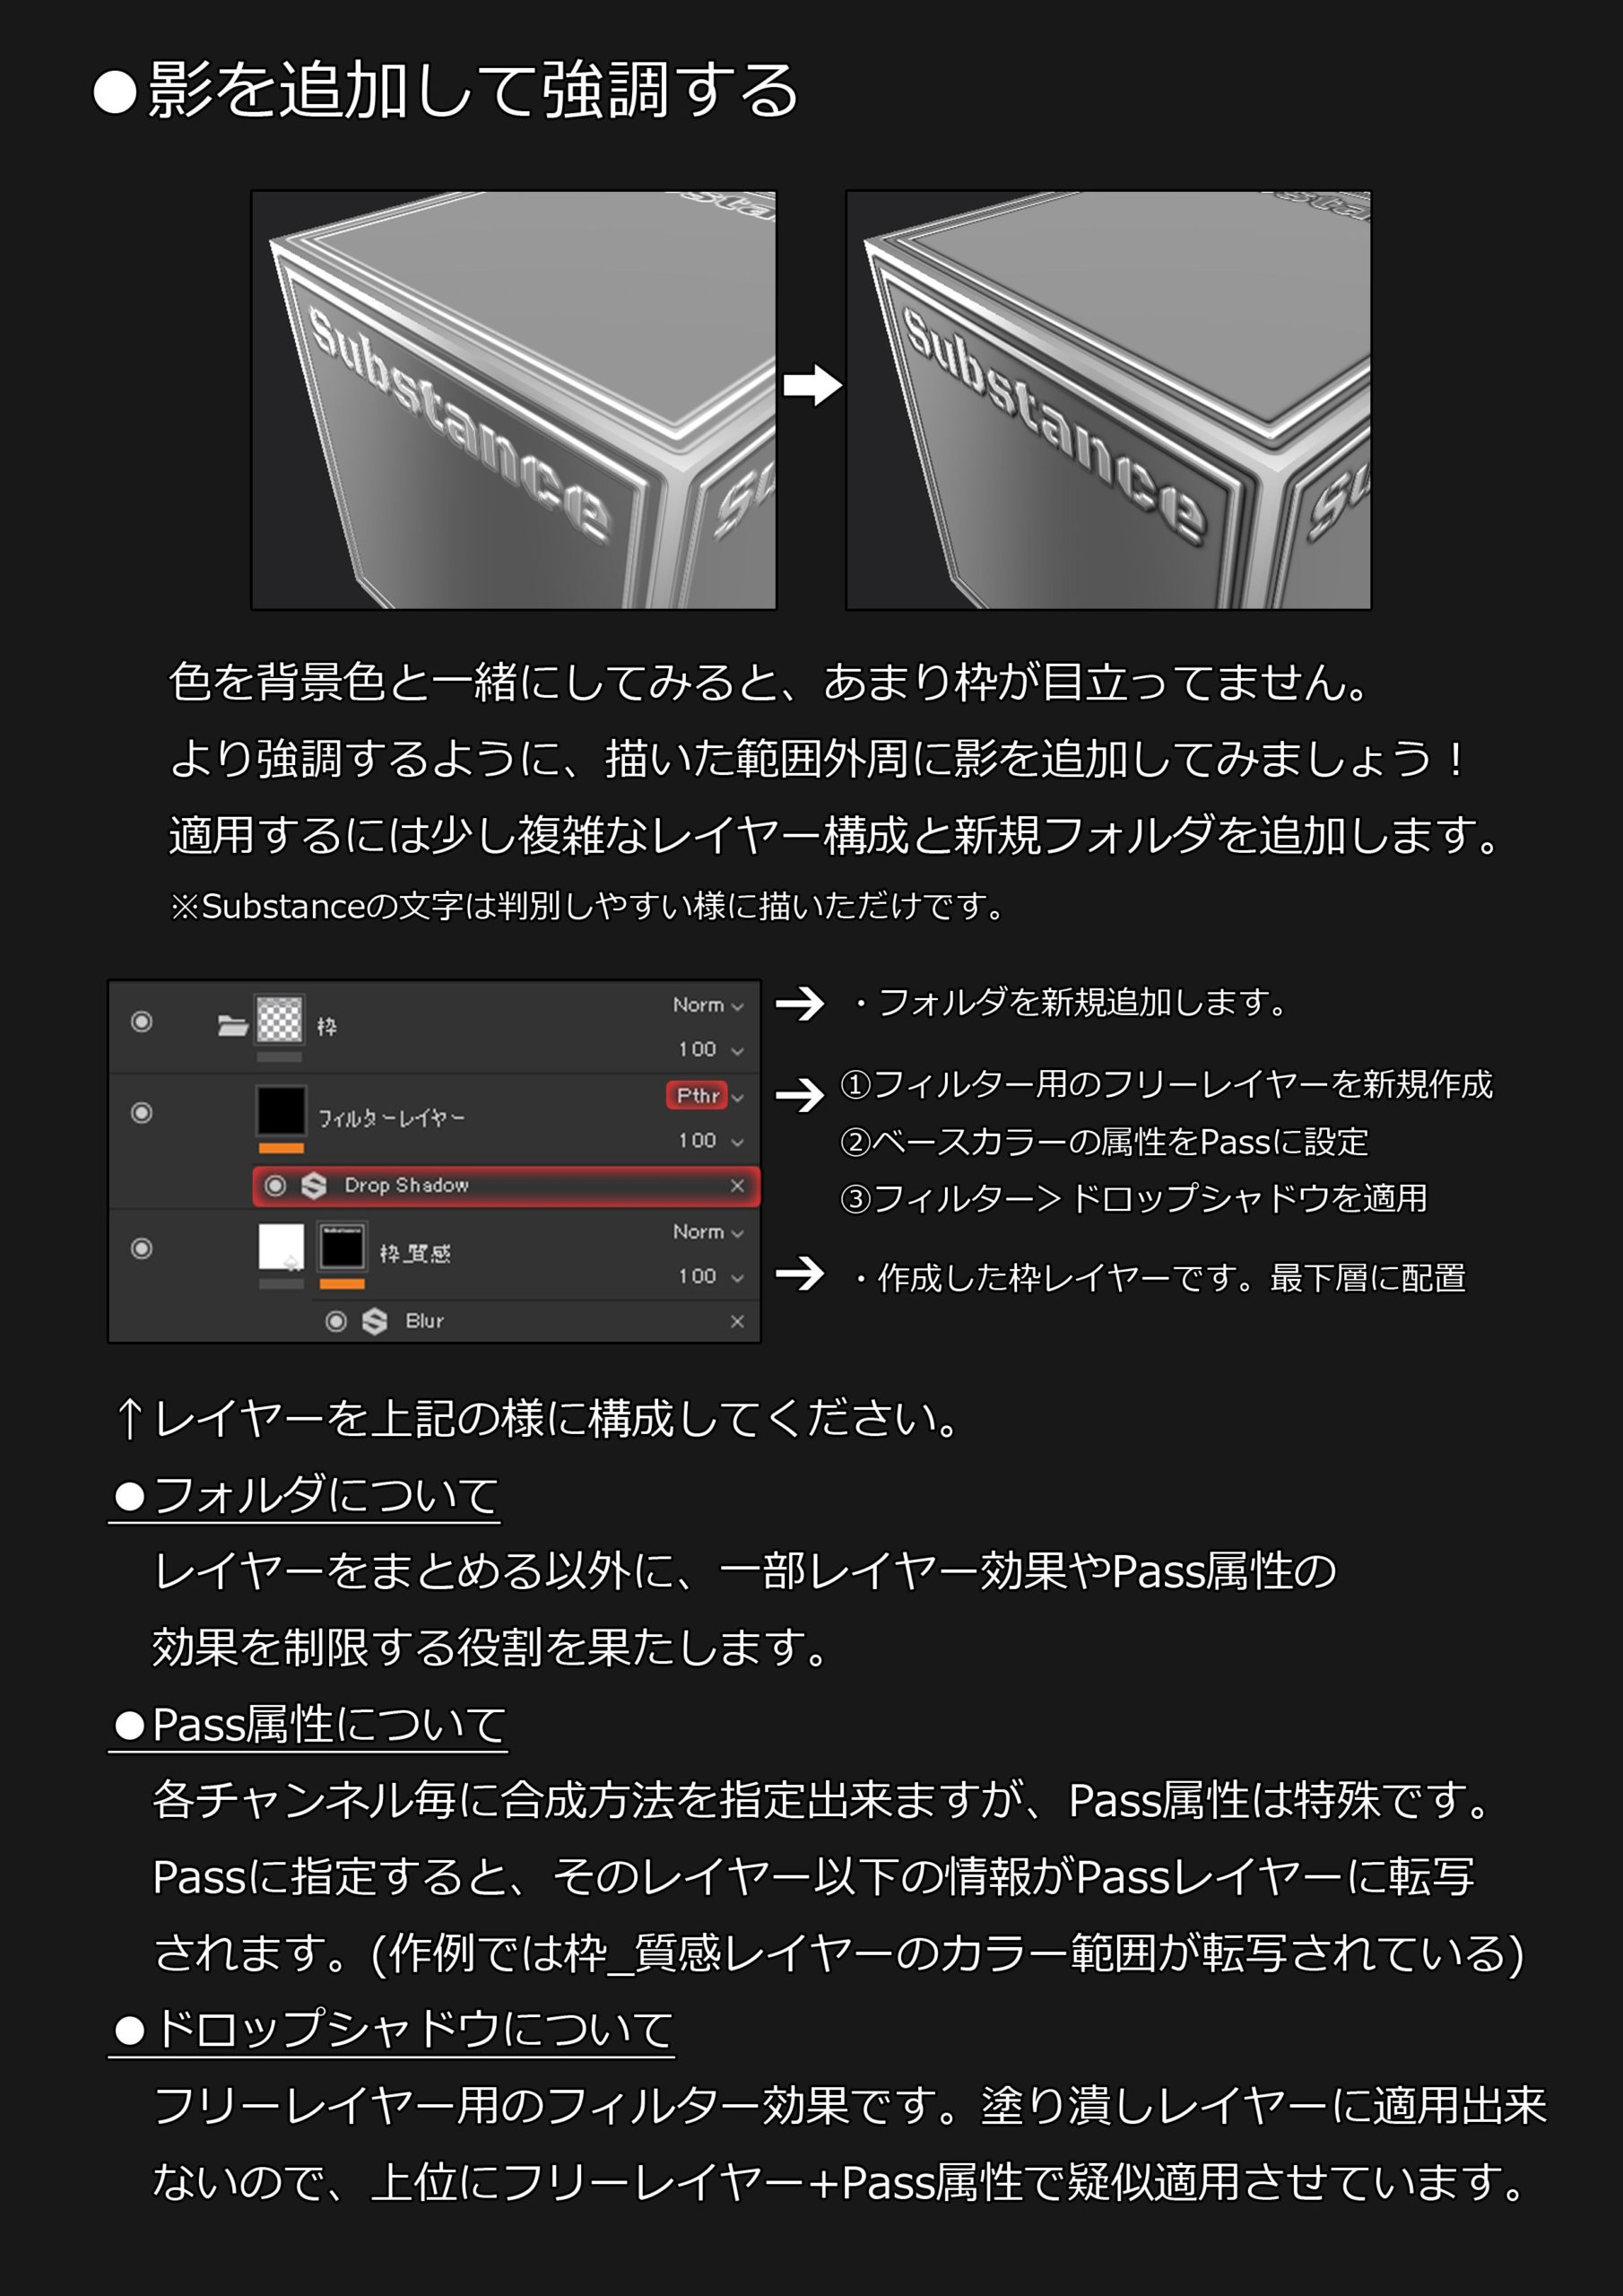
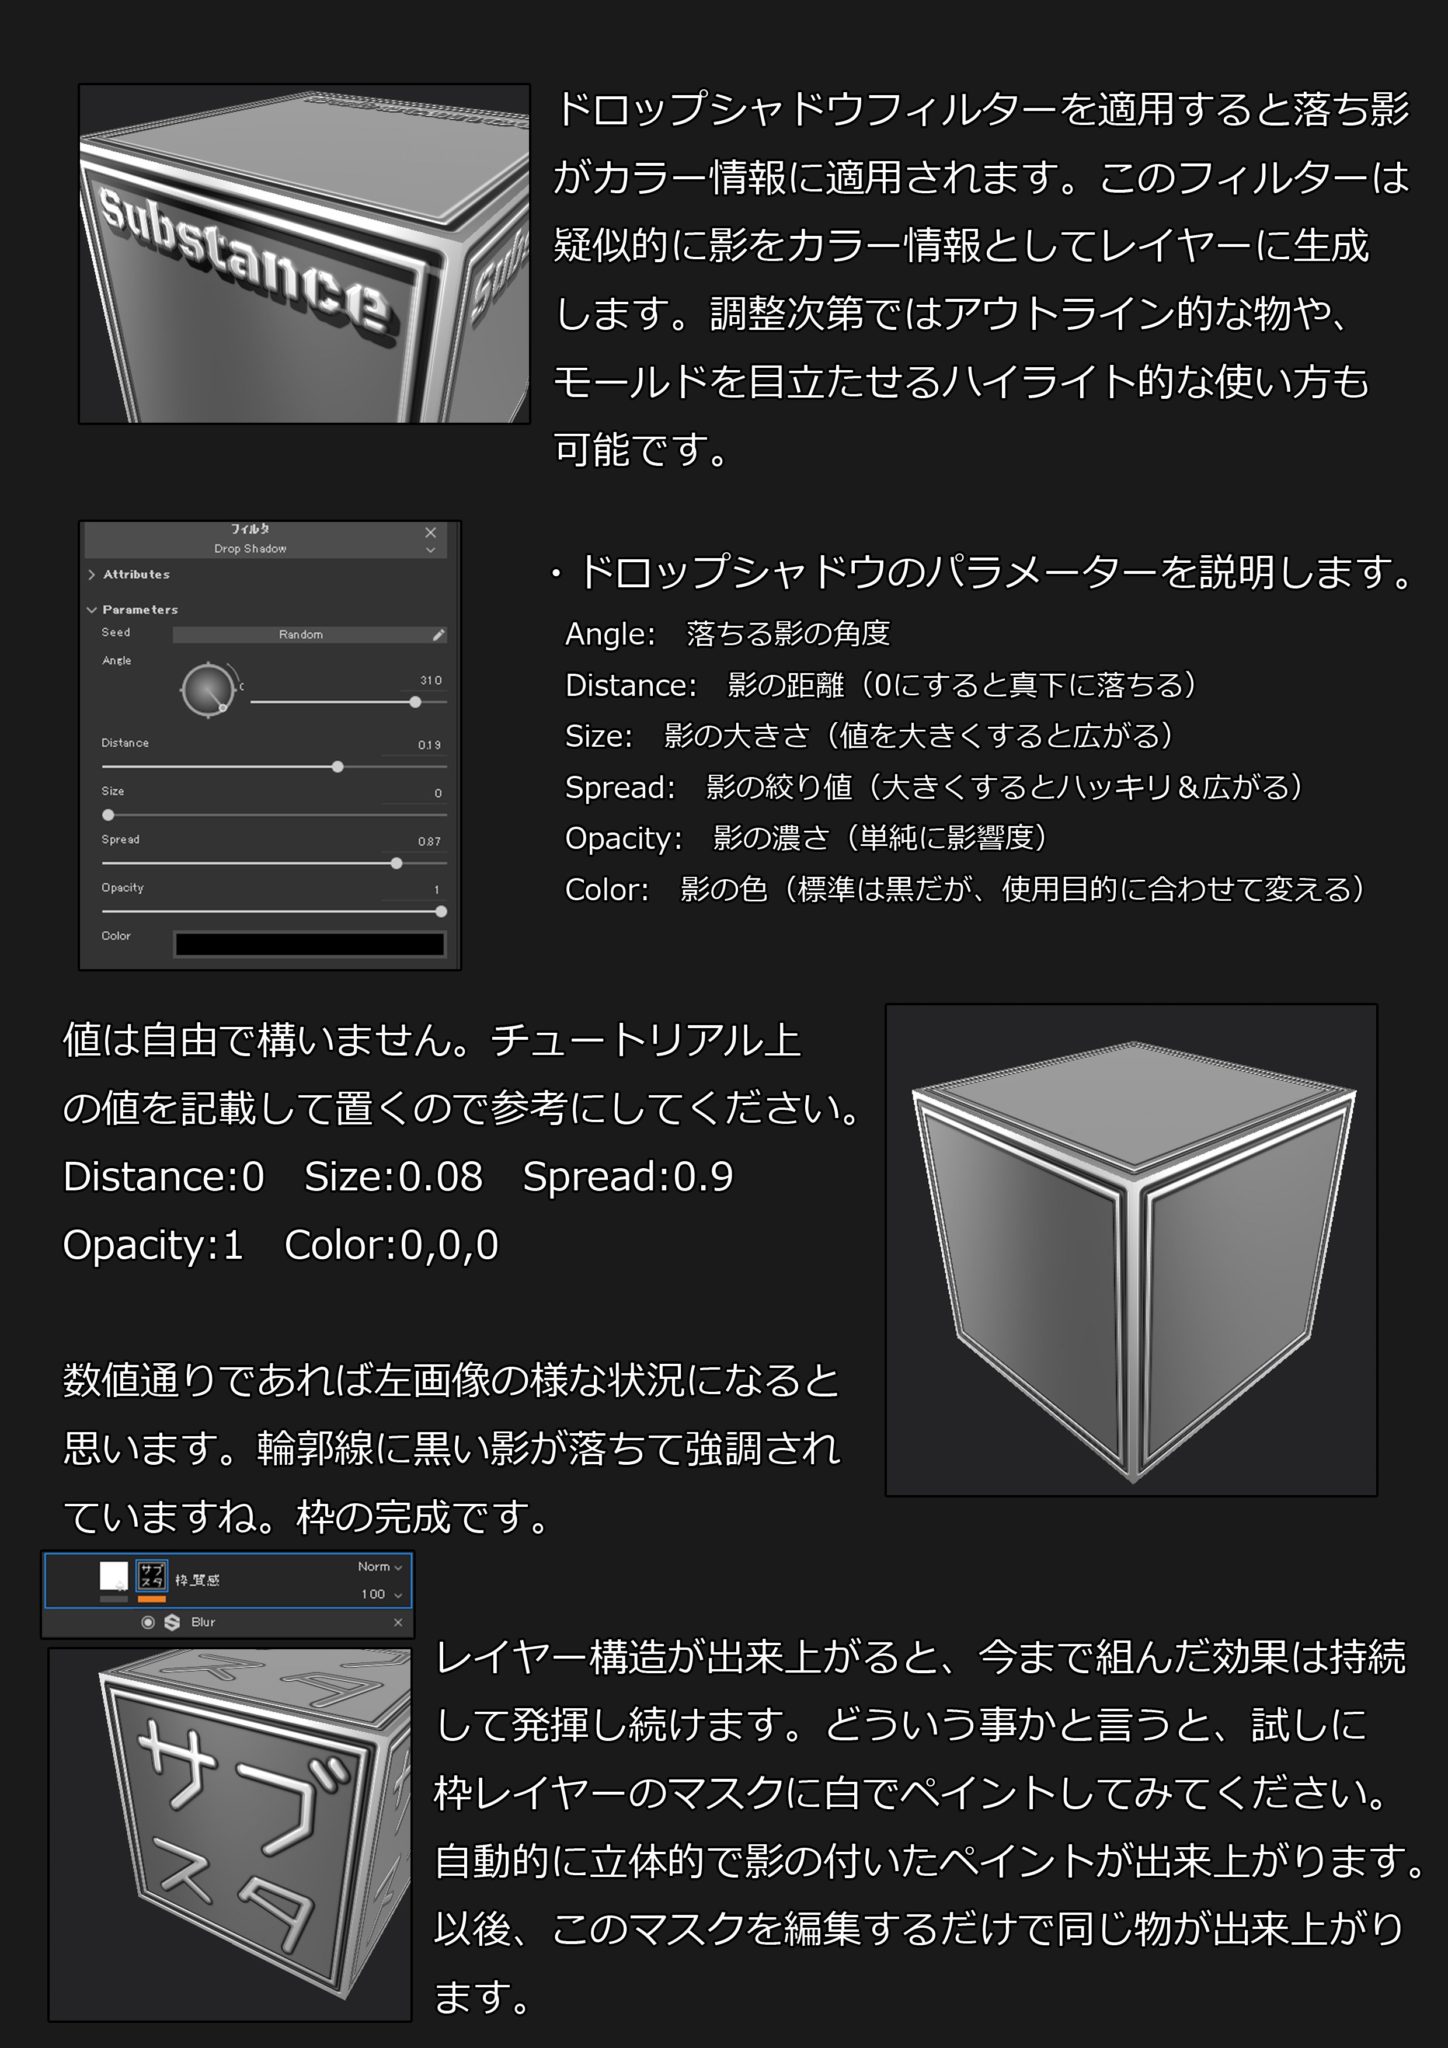
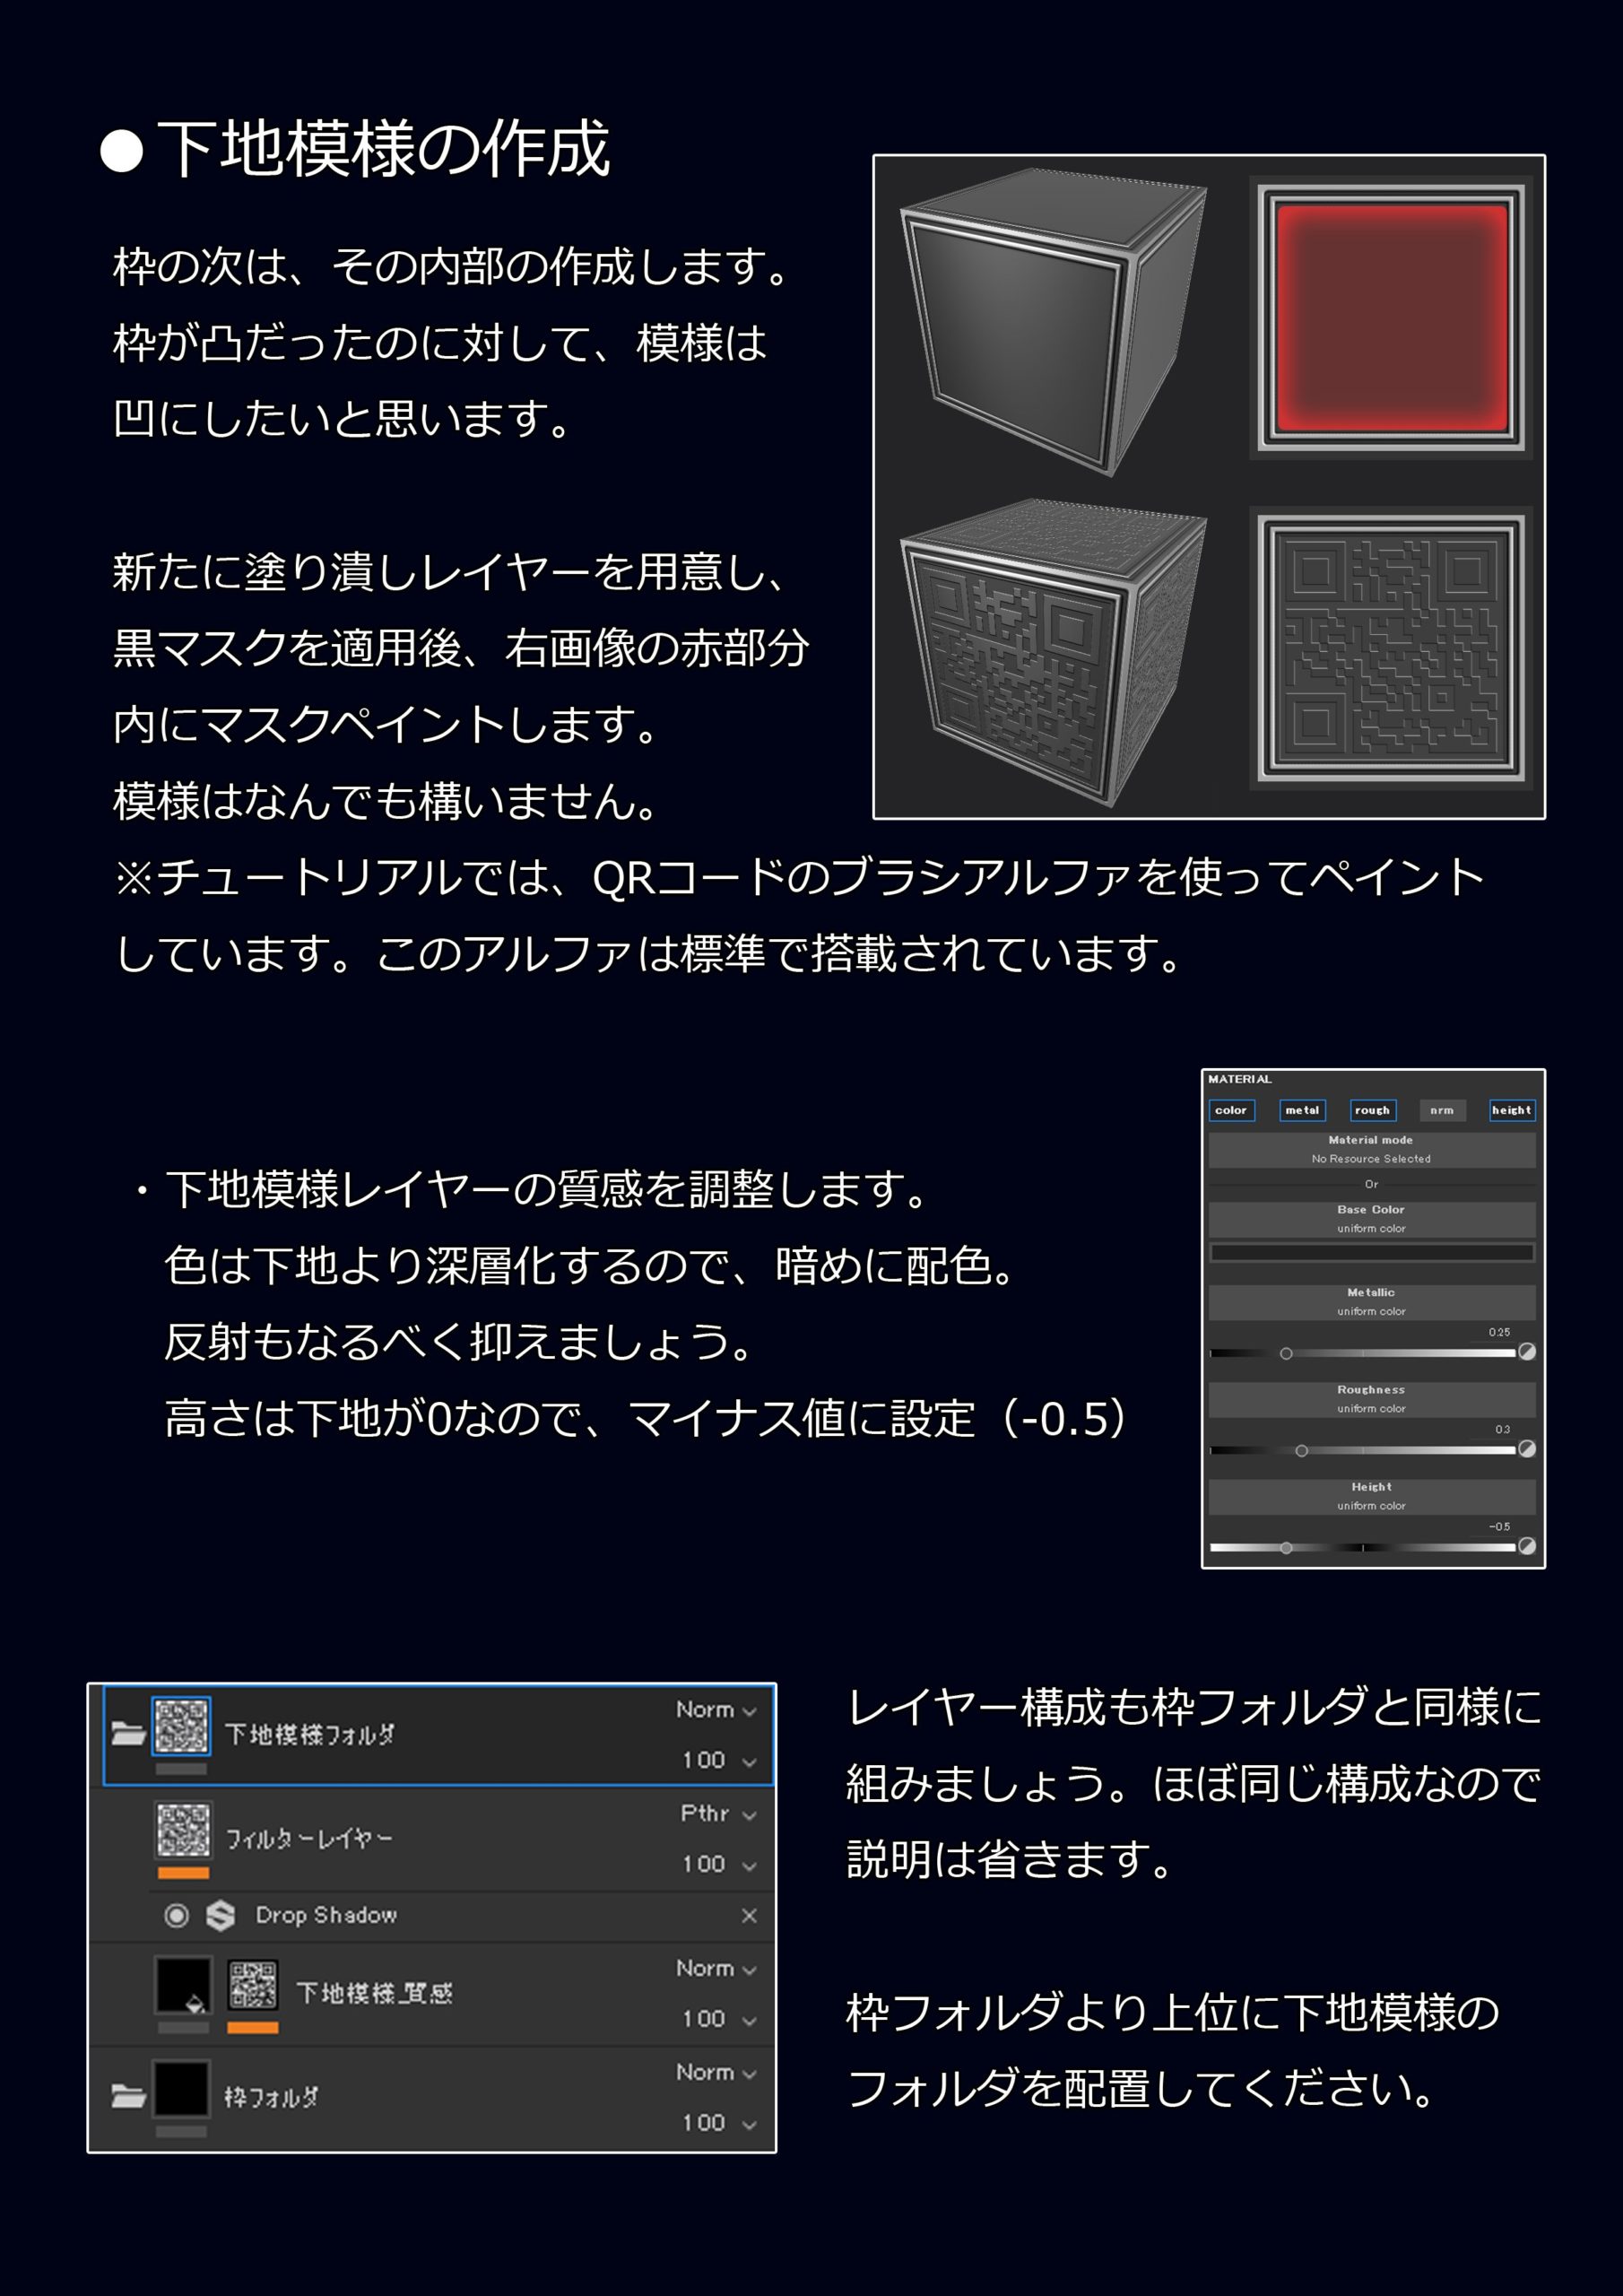
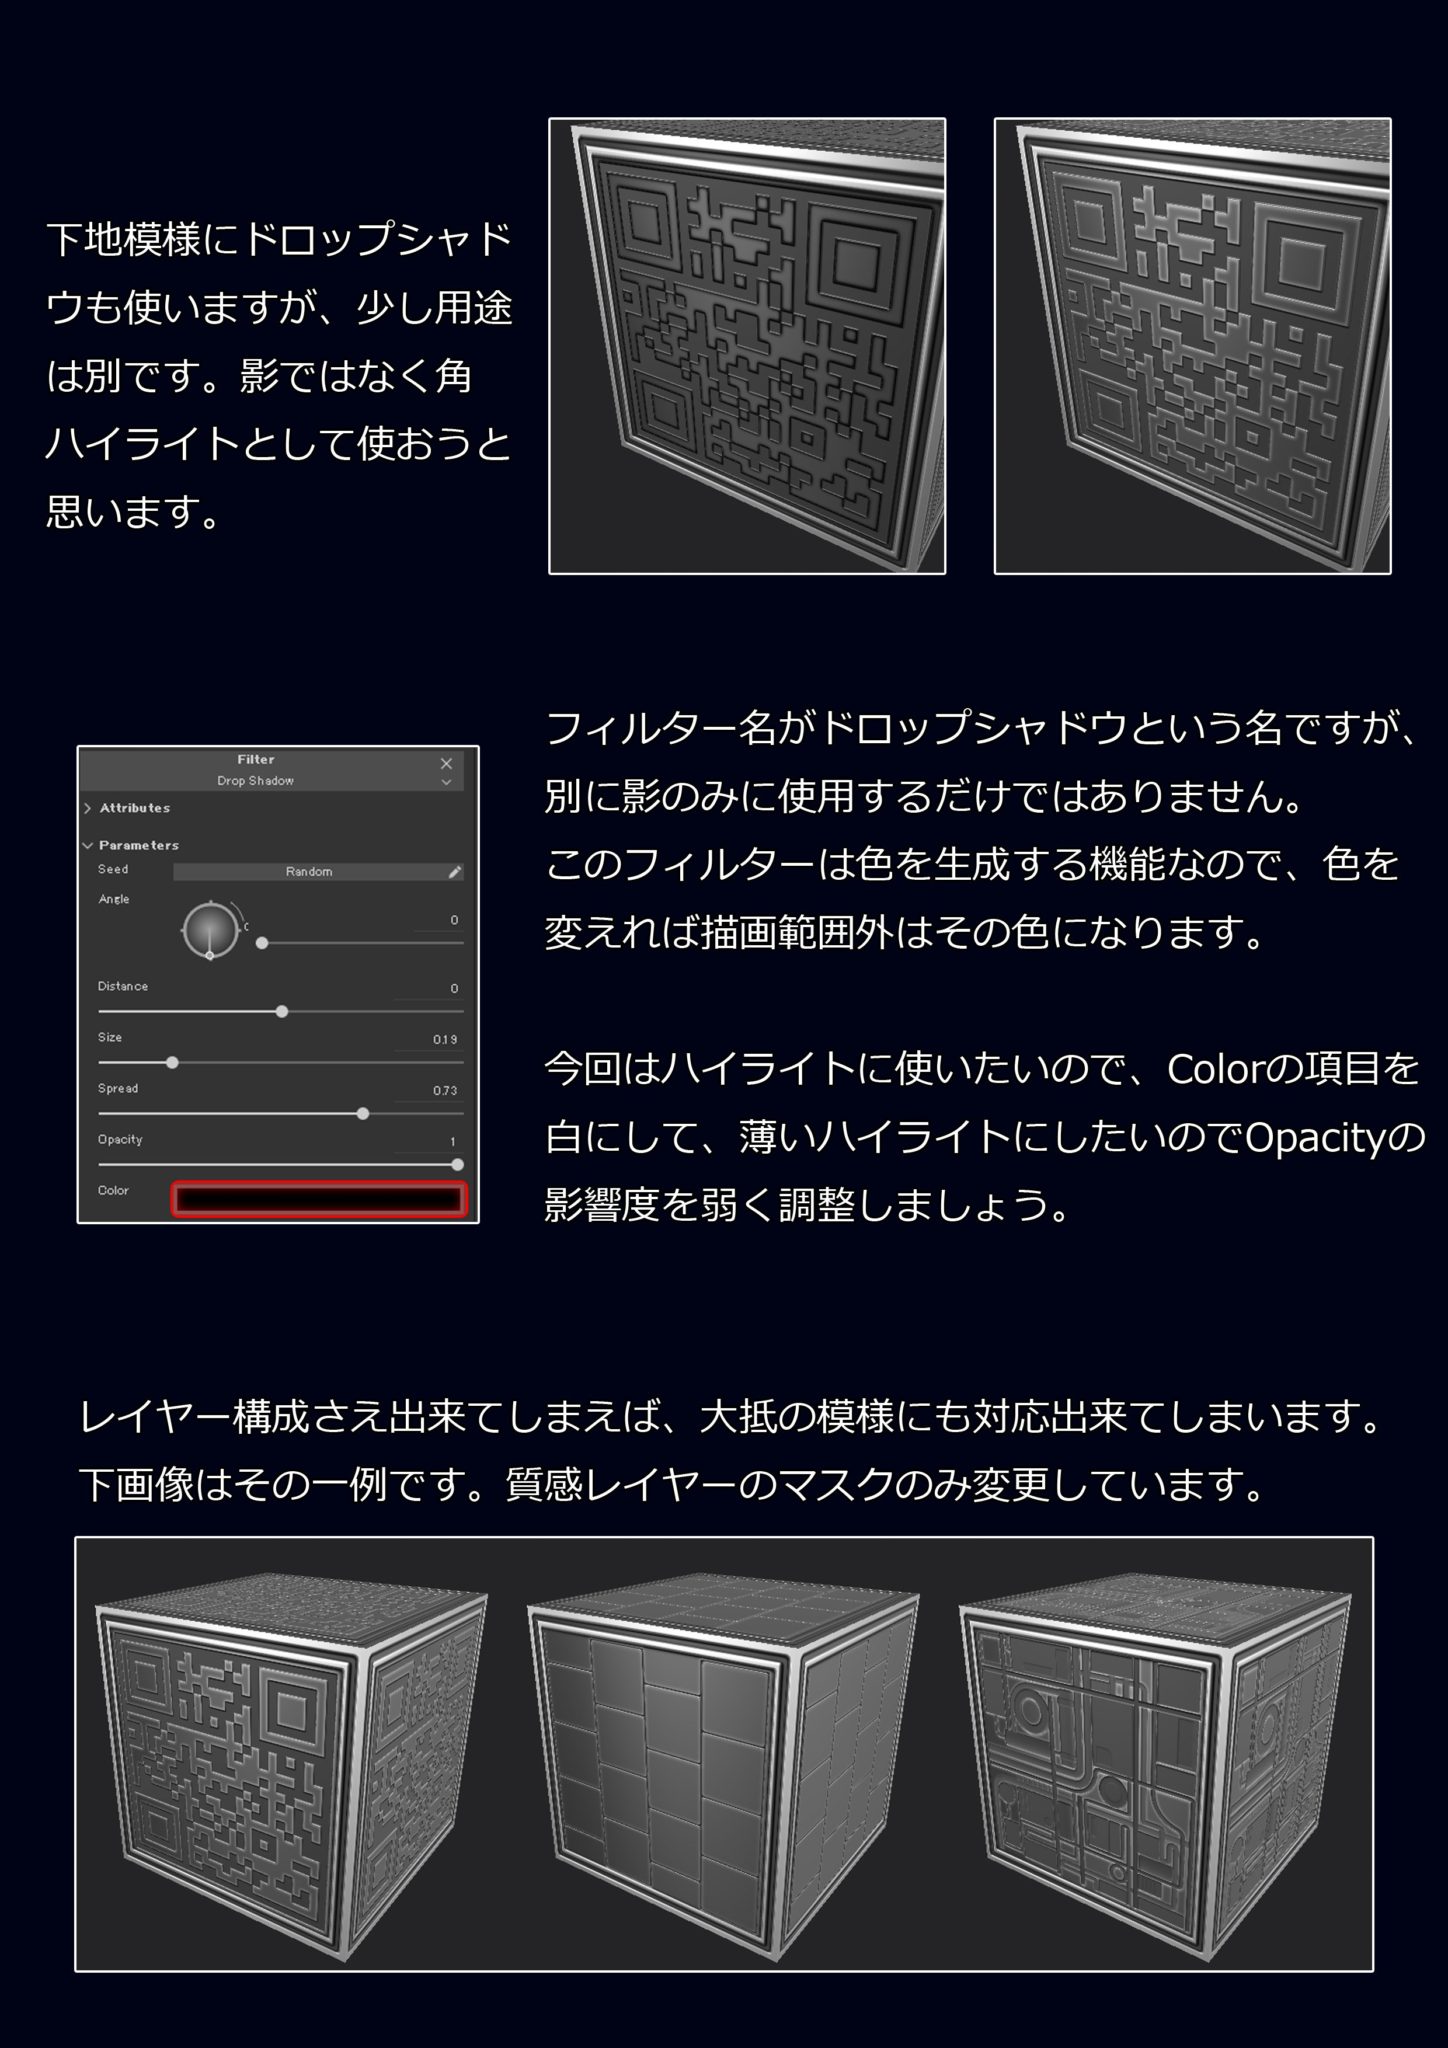
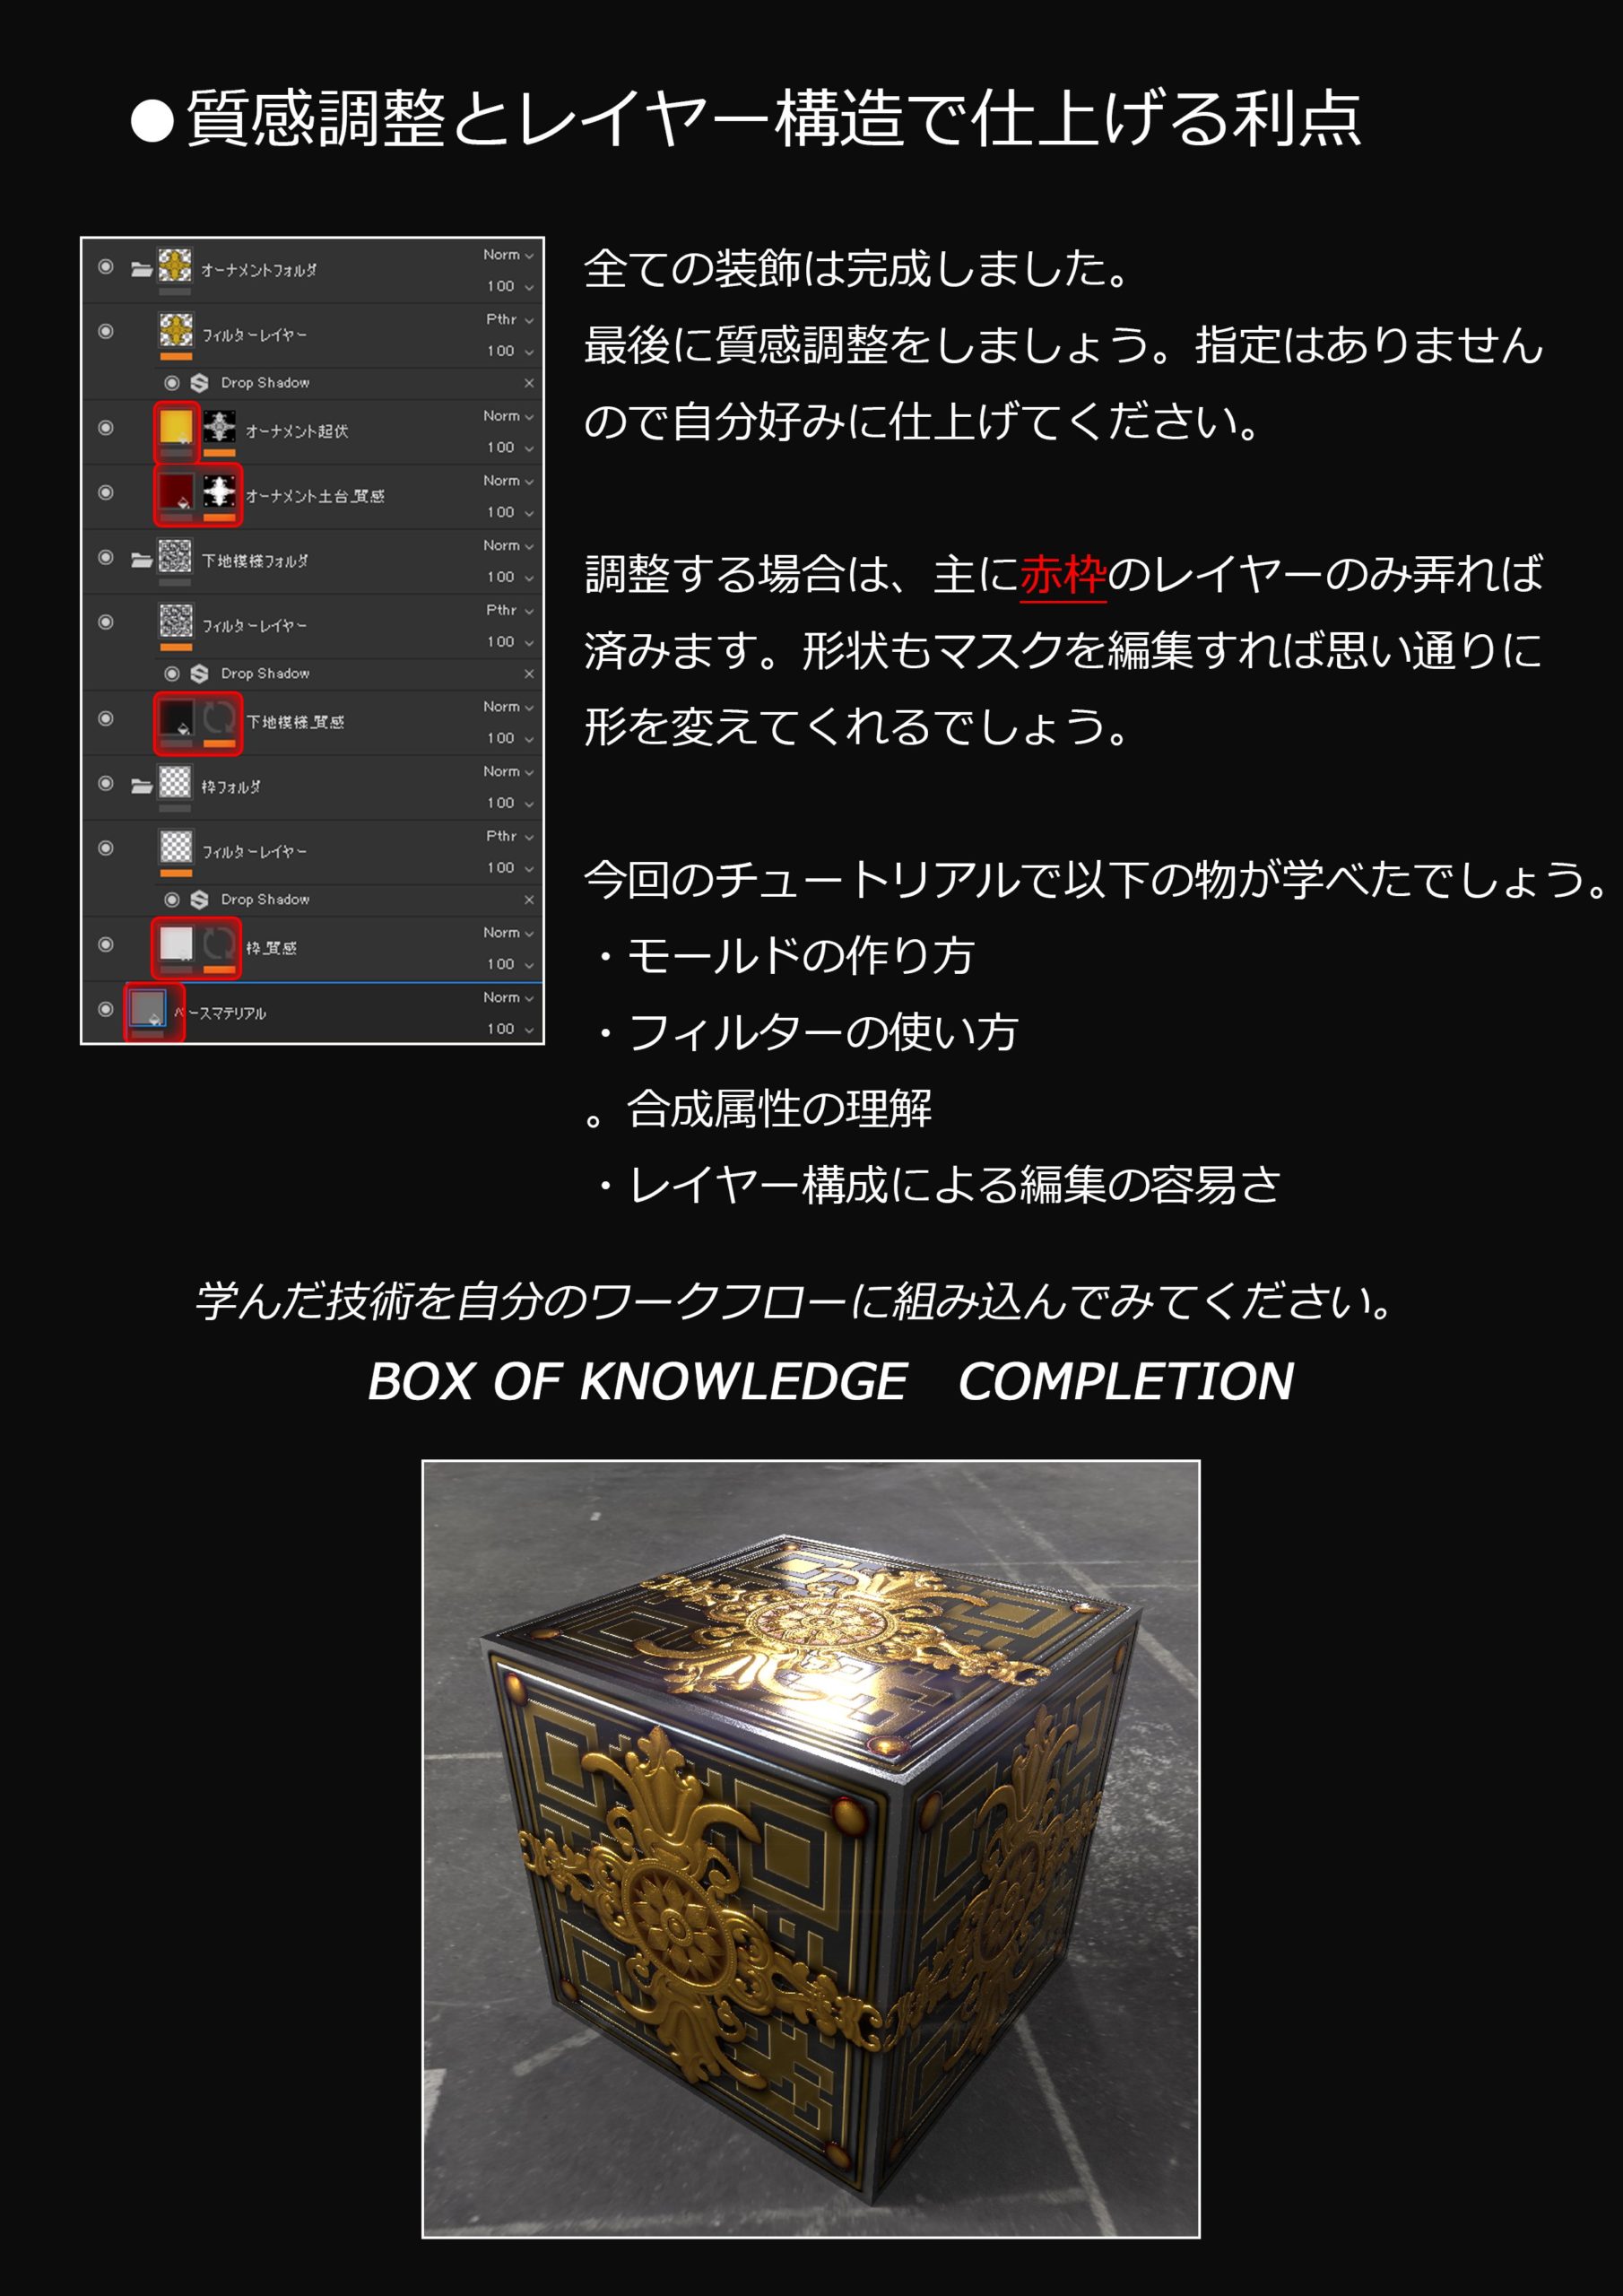
Make a mold with the Box of knowledge Substance Painter!
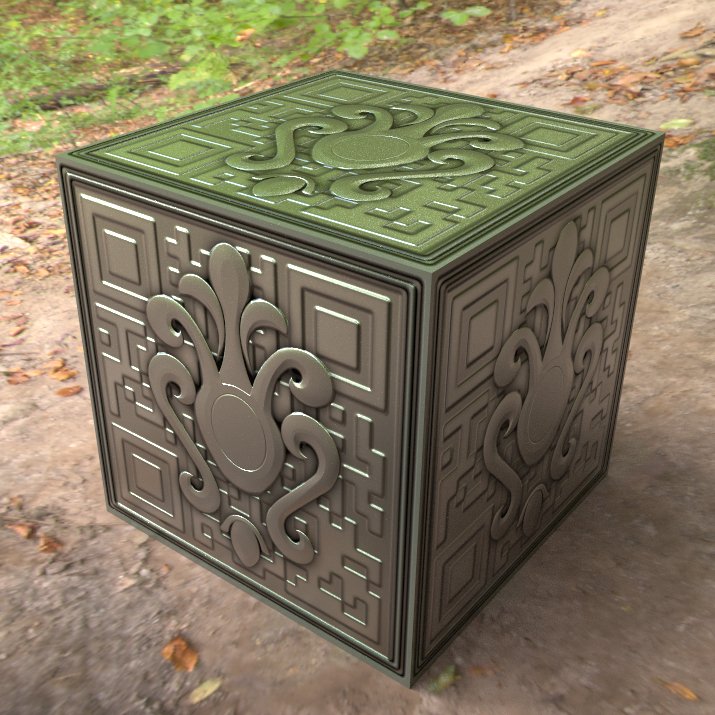
Modeling and UV explanations are troublesome in the explanation of SP, so I think it's better to simply explain using the BOX that everyone loves.
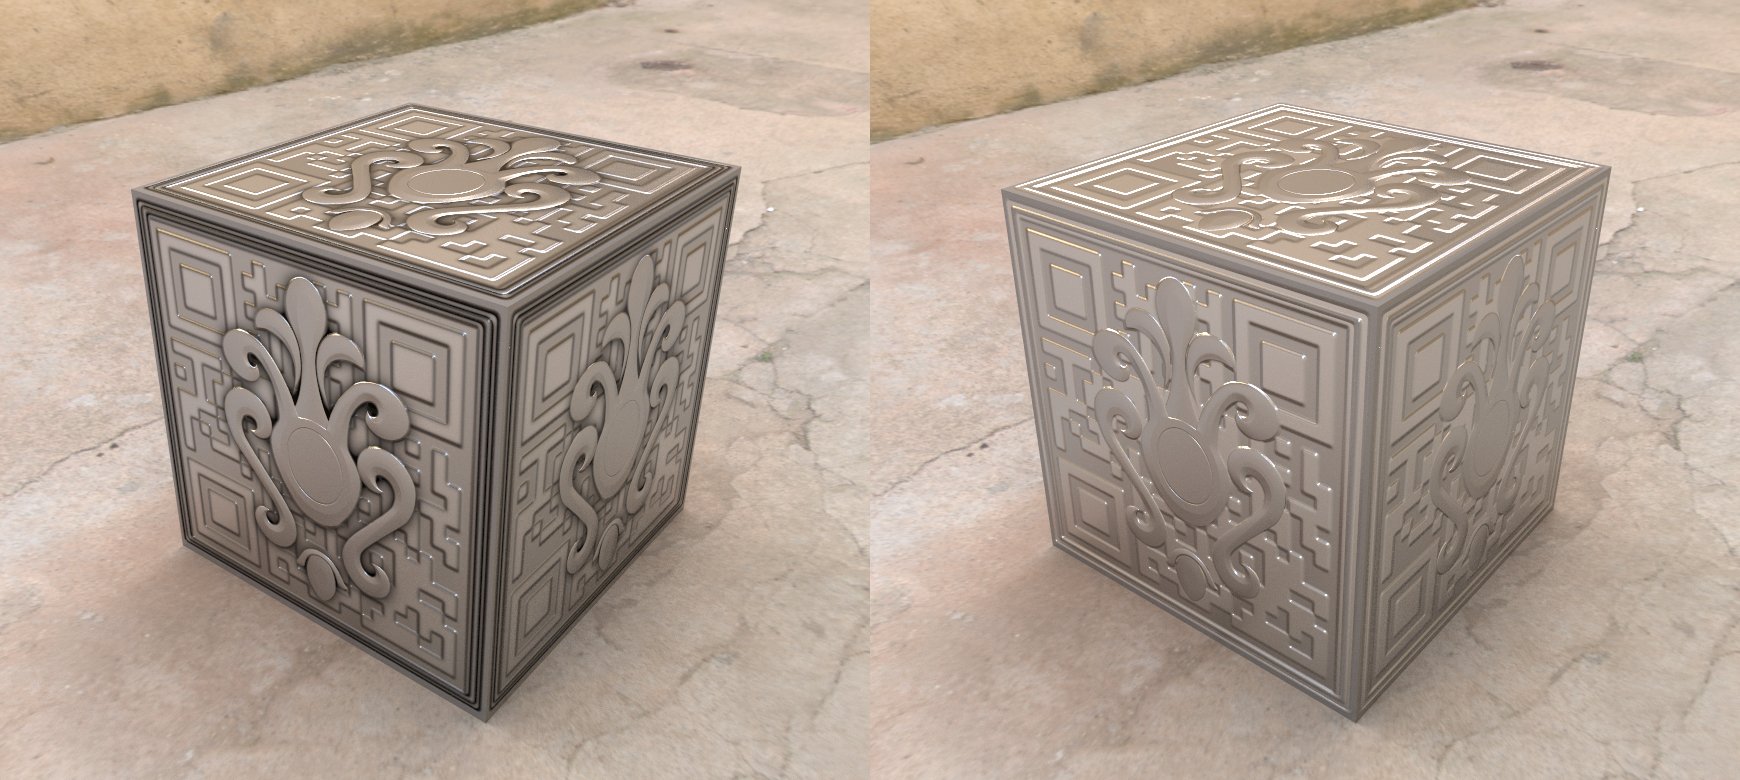
The problem is that the details have to stand out. I hope I can explain how to do that.
Make a mold with the Box of knowledge Substance Painter!


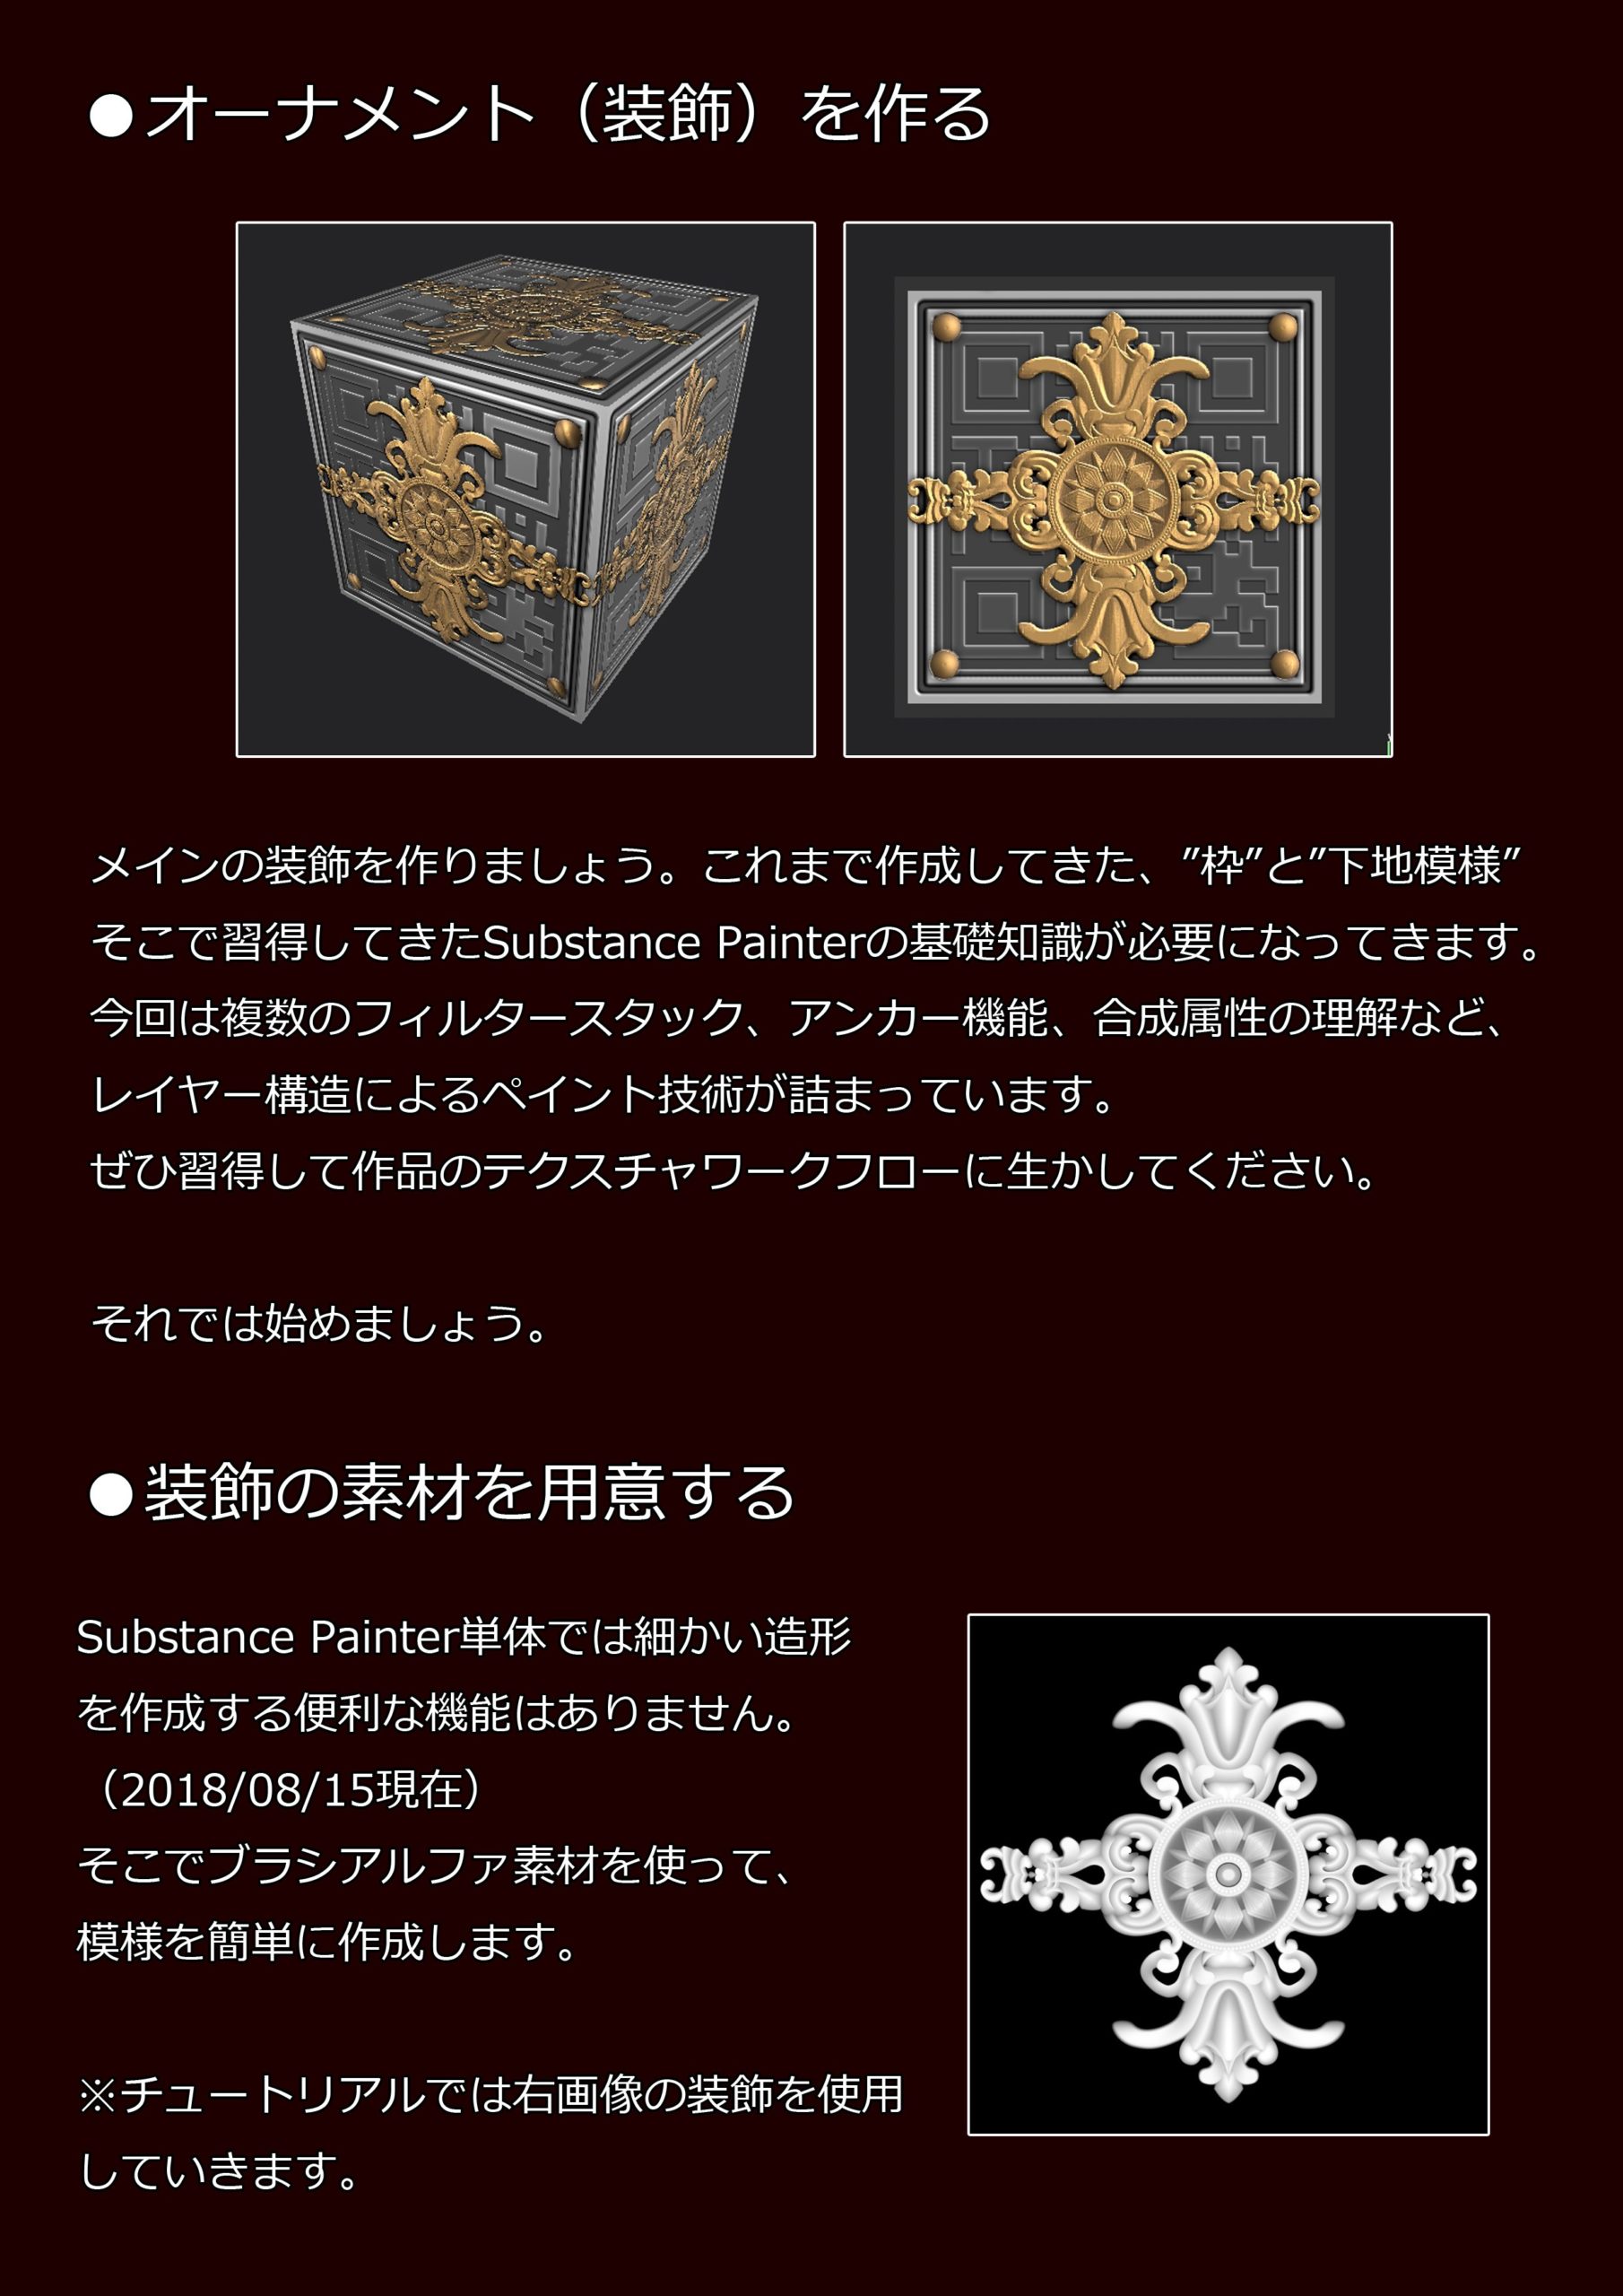
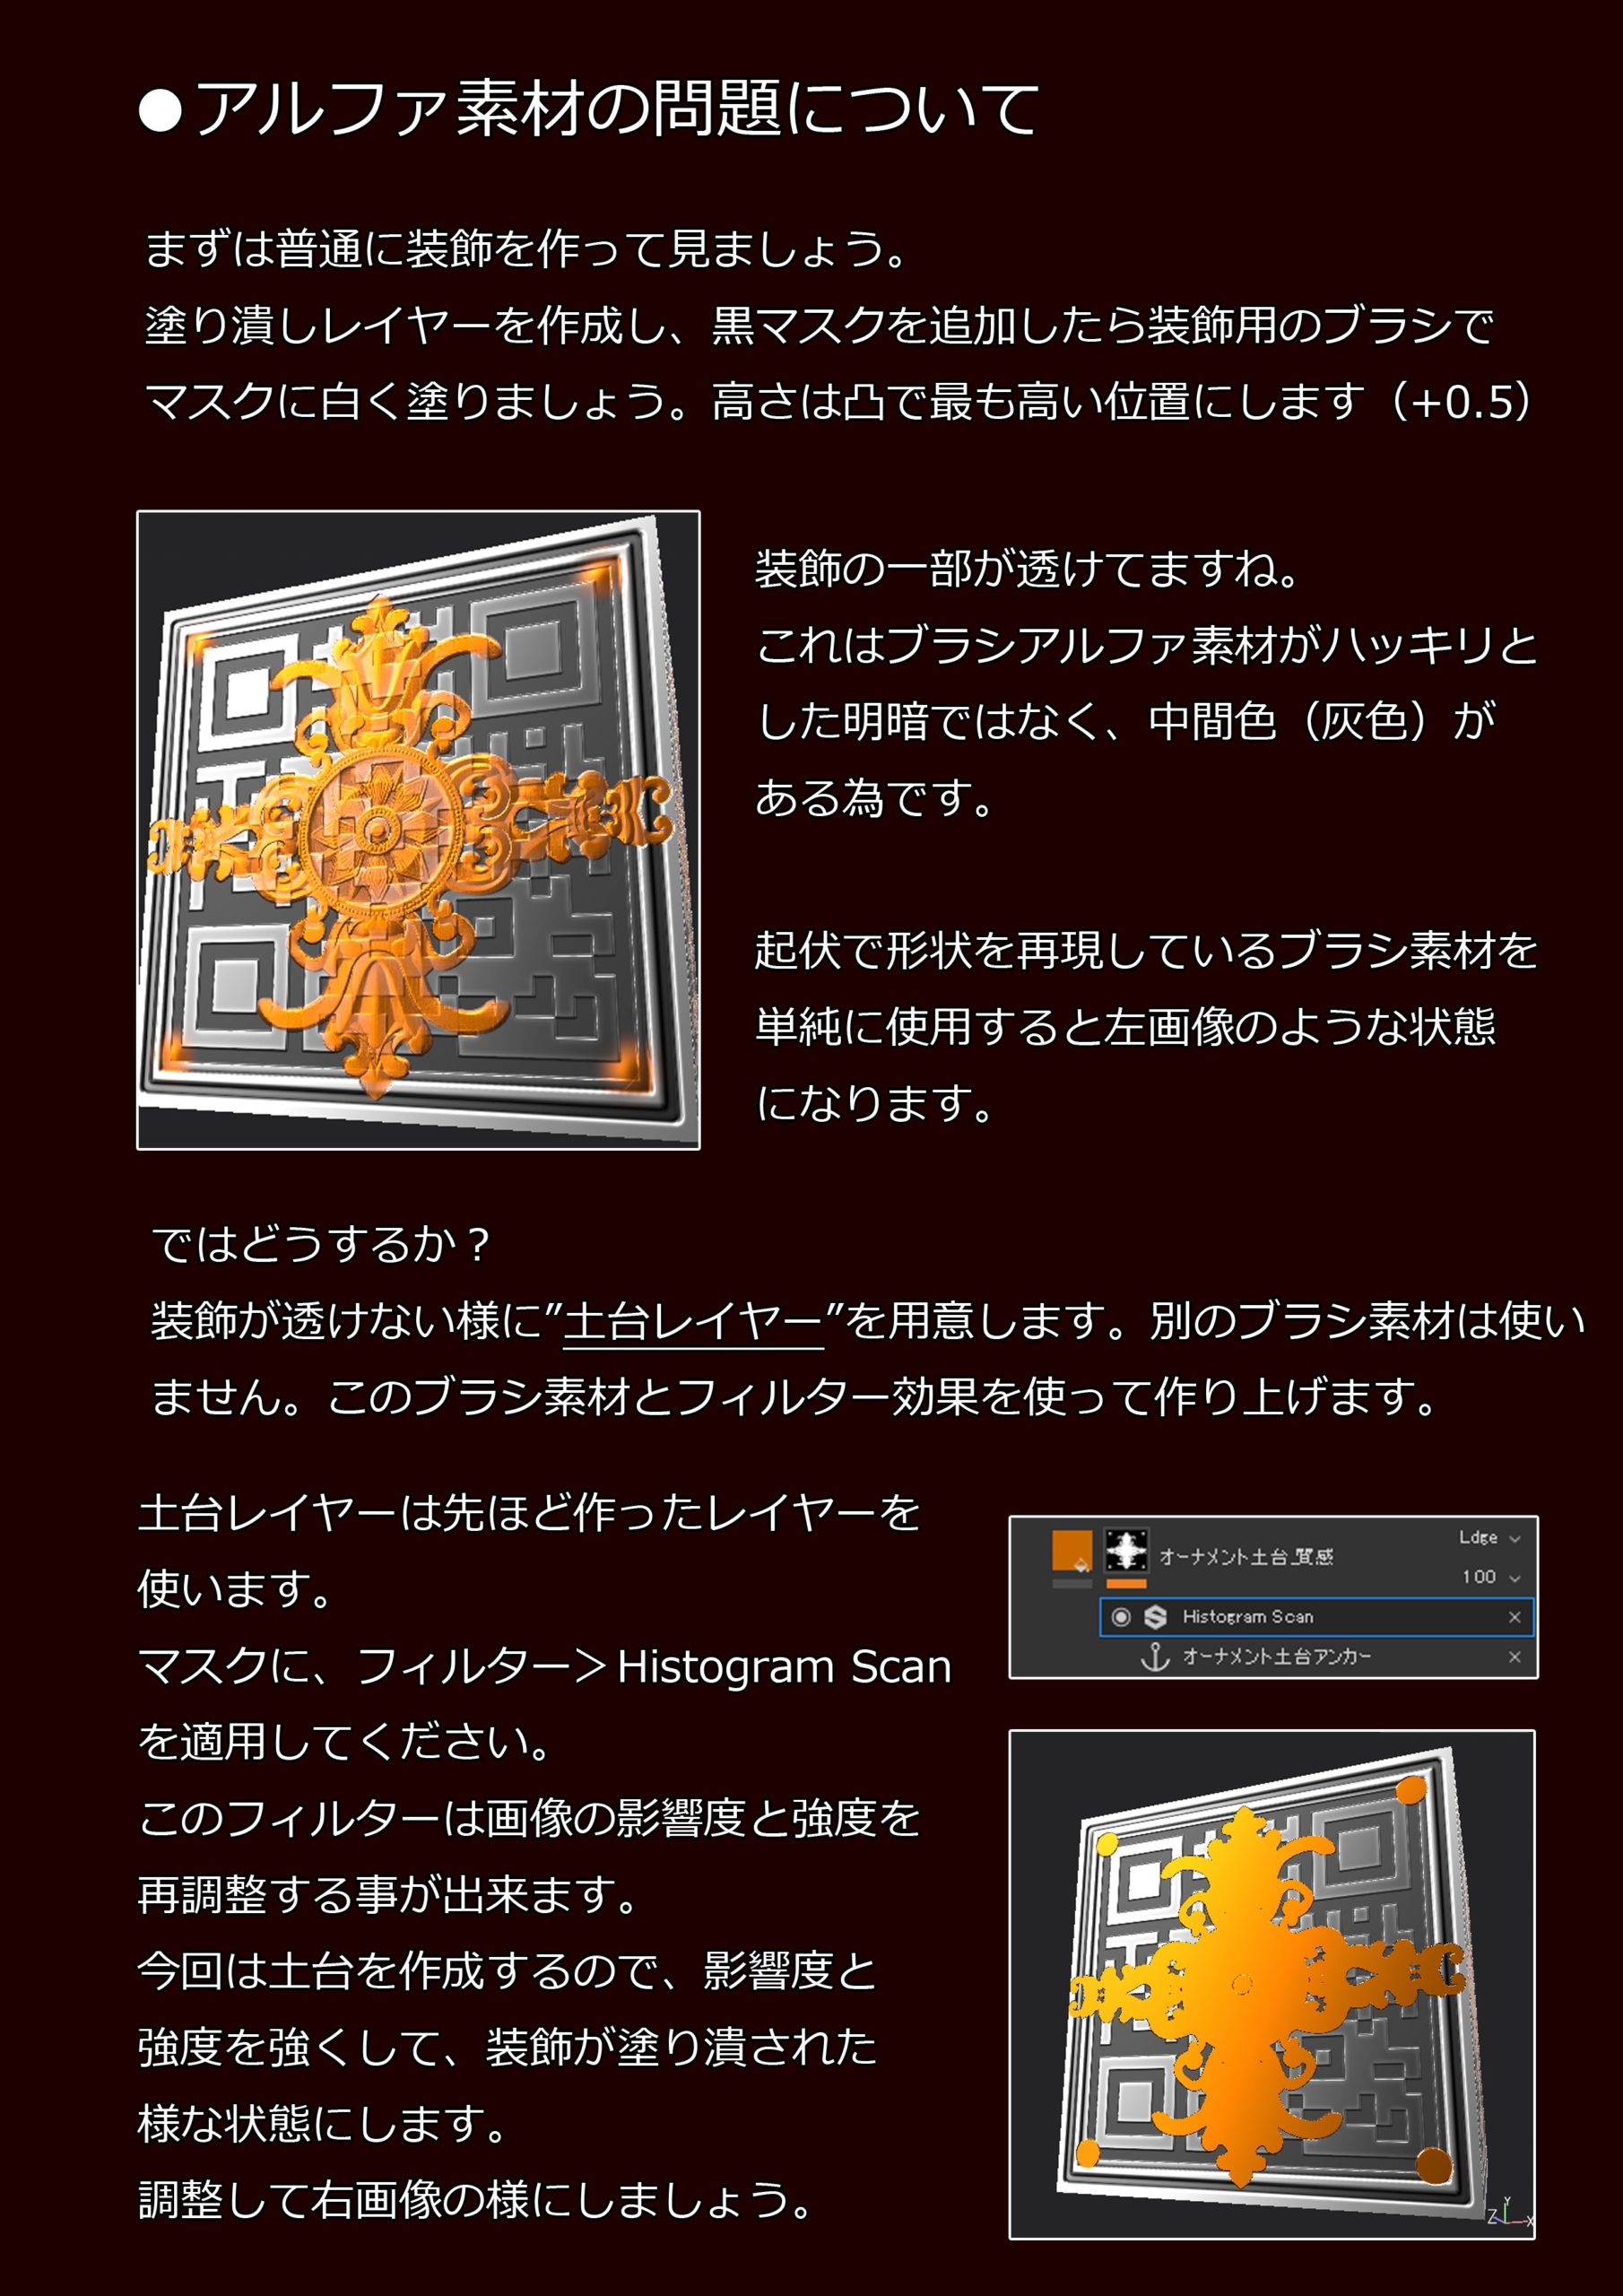


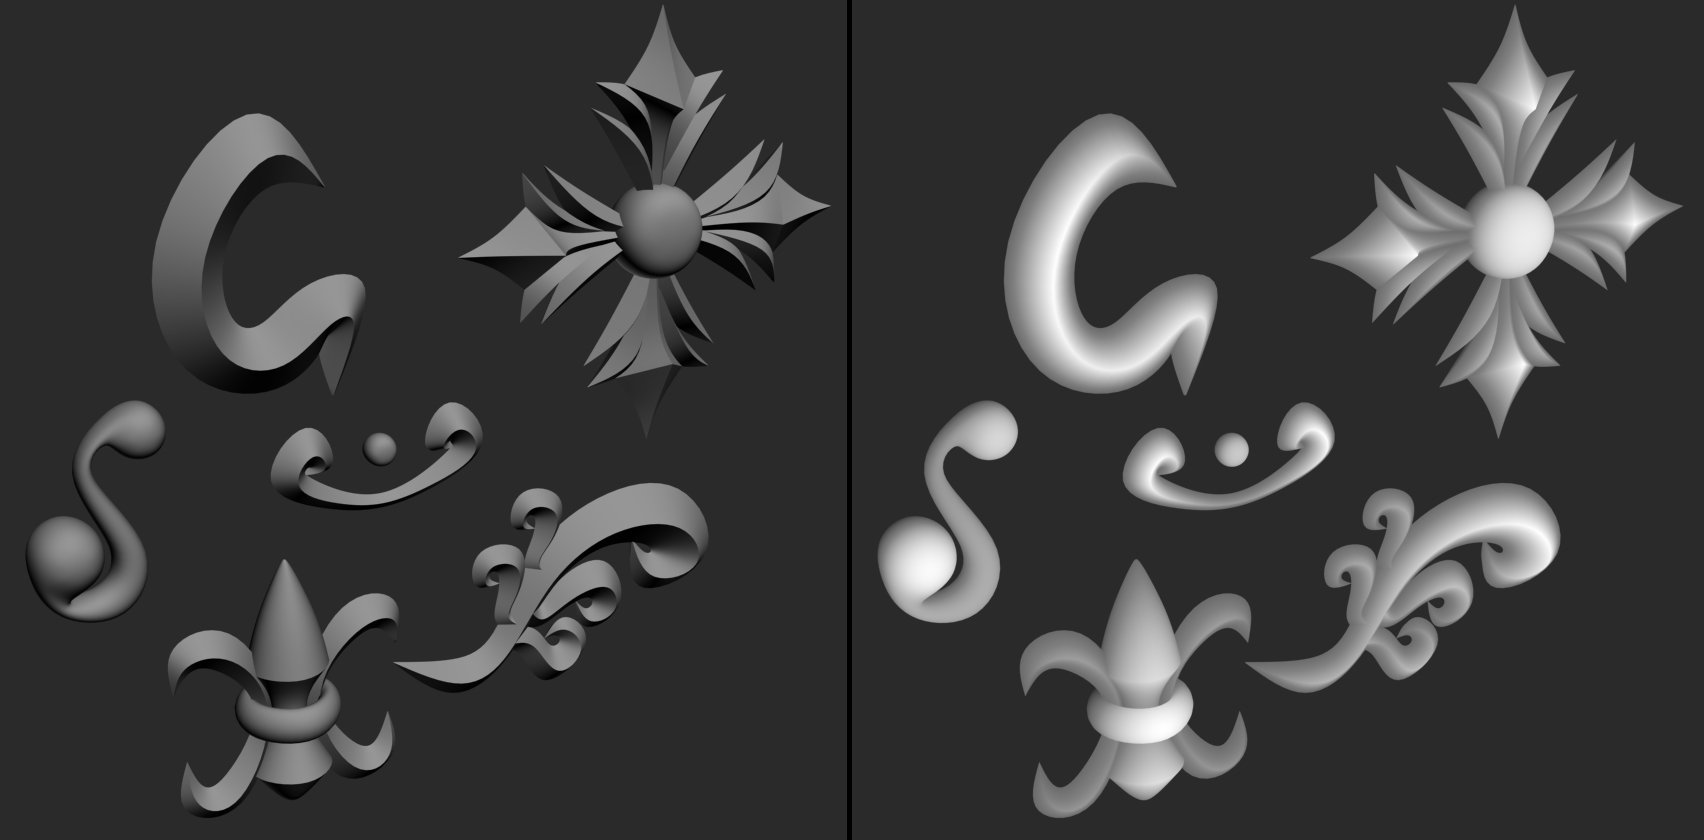
How to make an ornament model
I make ornament models for alpha materials, but I am often asked how to make it, so I will show you how to do it.
All you have to do is set the edges on the low model and apply the subdivision.
If you make a rough curve and scale the loop edge you want to emphasize, it will look like that.
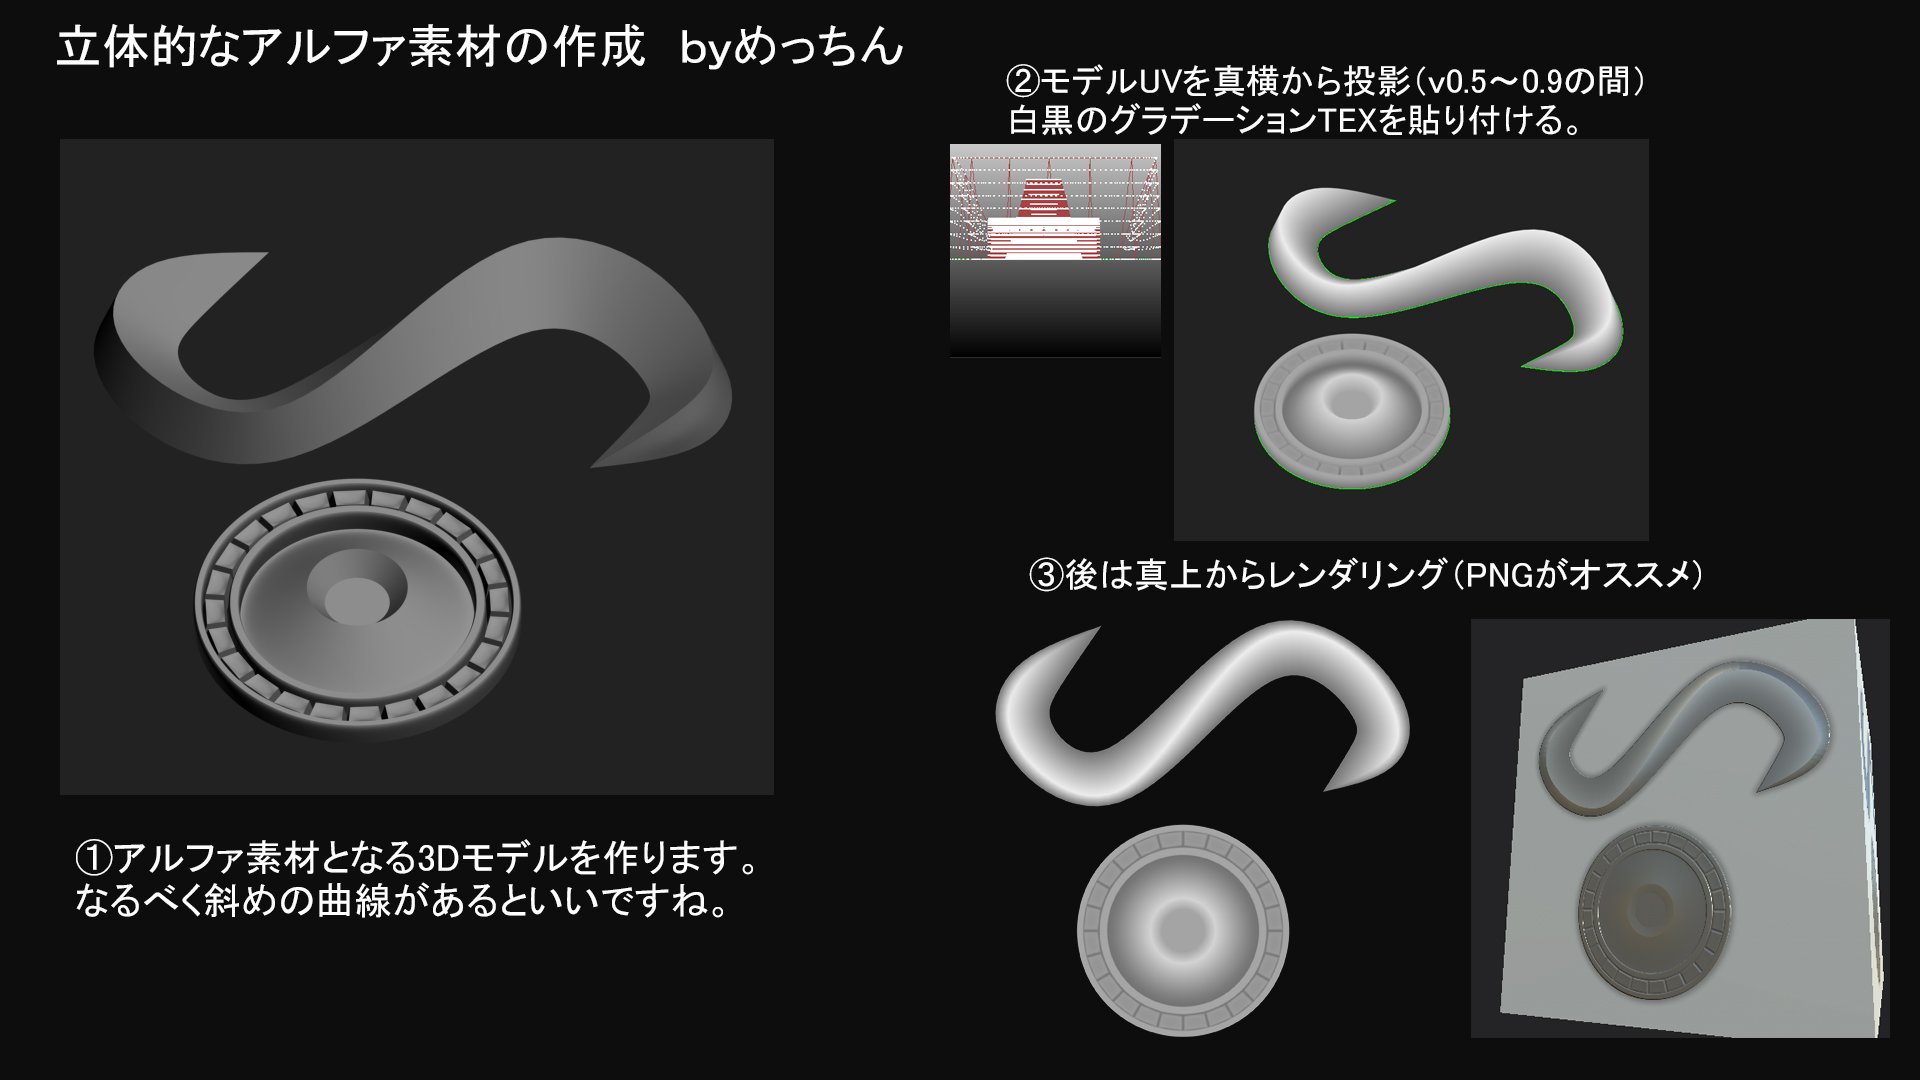
Creation of three-dimensional alpha material
In my case, I just created a model in 3D and pasted the gradation (a depth map is fine).
* If you prepare fine materials and synthesize them with PS, you will get a gorgeous alpha!
Way of thinking
Normal and height

Mr. A "What is the difference between normal and height?"
Mr. B "It's the same thing. Don't worry."
This is often asked, but the way it is reproduced is different.
As the name suggests, it is expressed in height or angle, so the influence of lighting is clearly different.
This is an example of a slope that must be reproduced at the same angle.
The idea of highlights and shadows
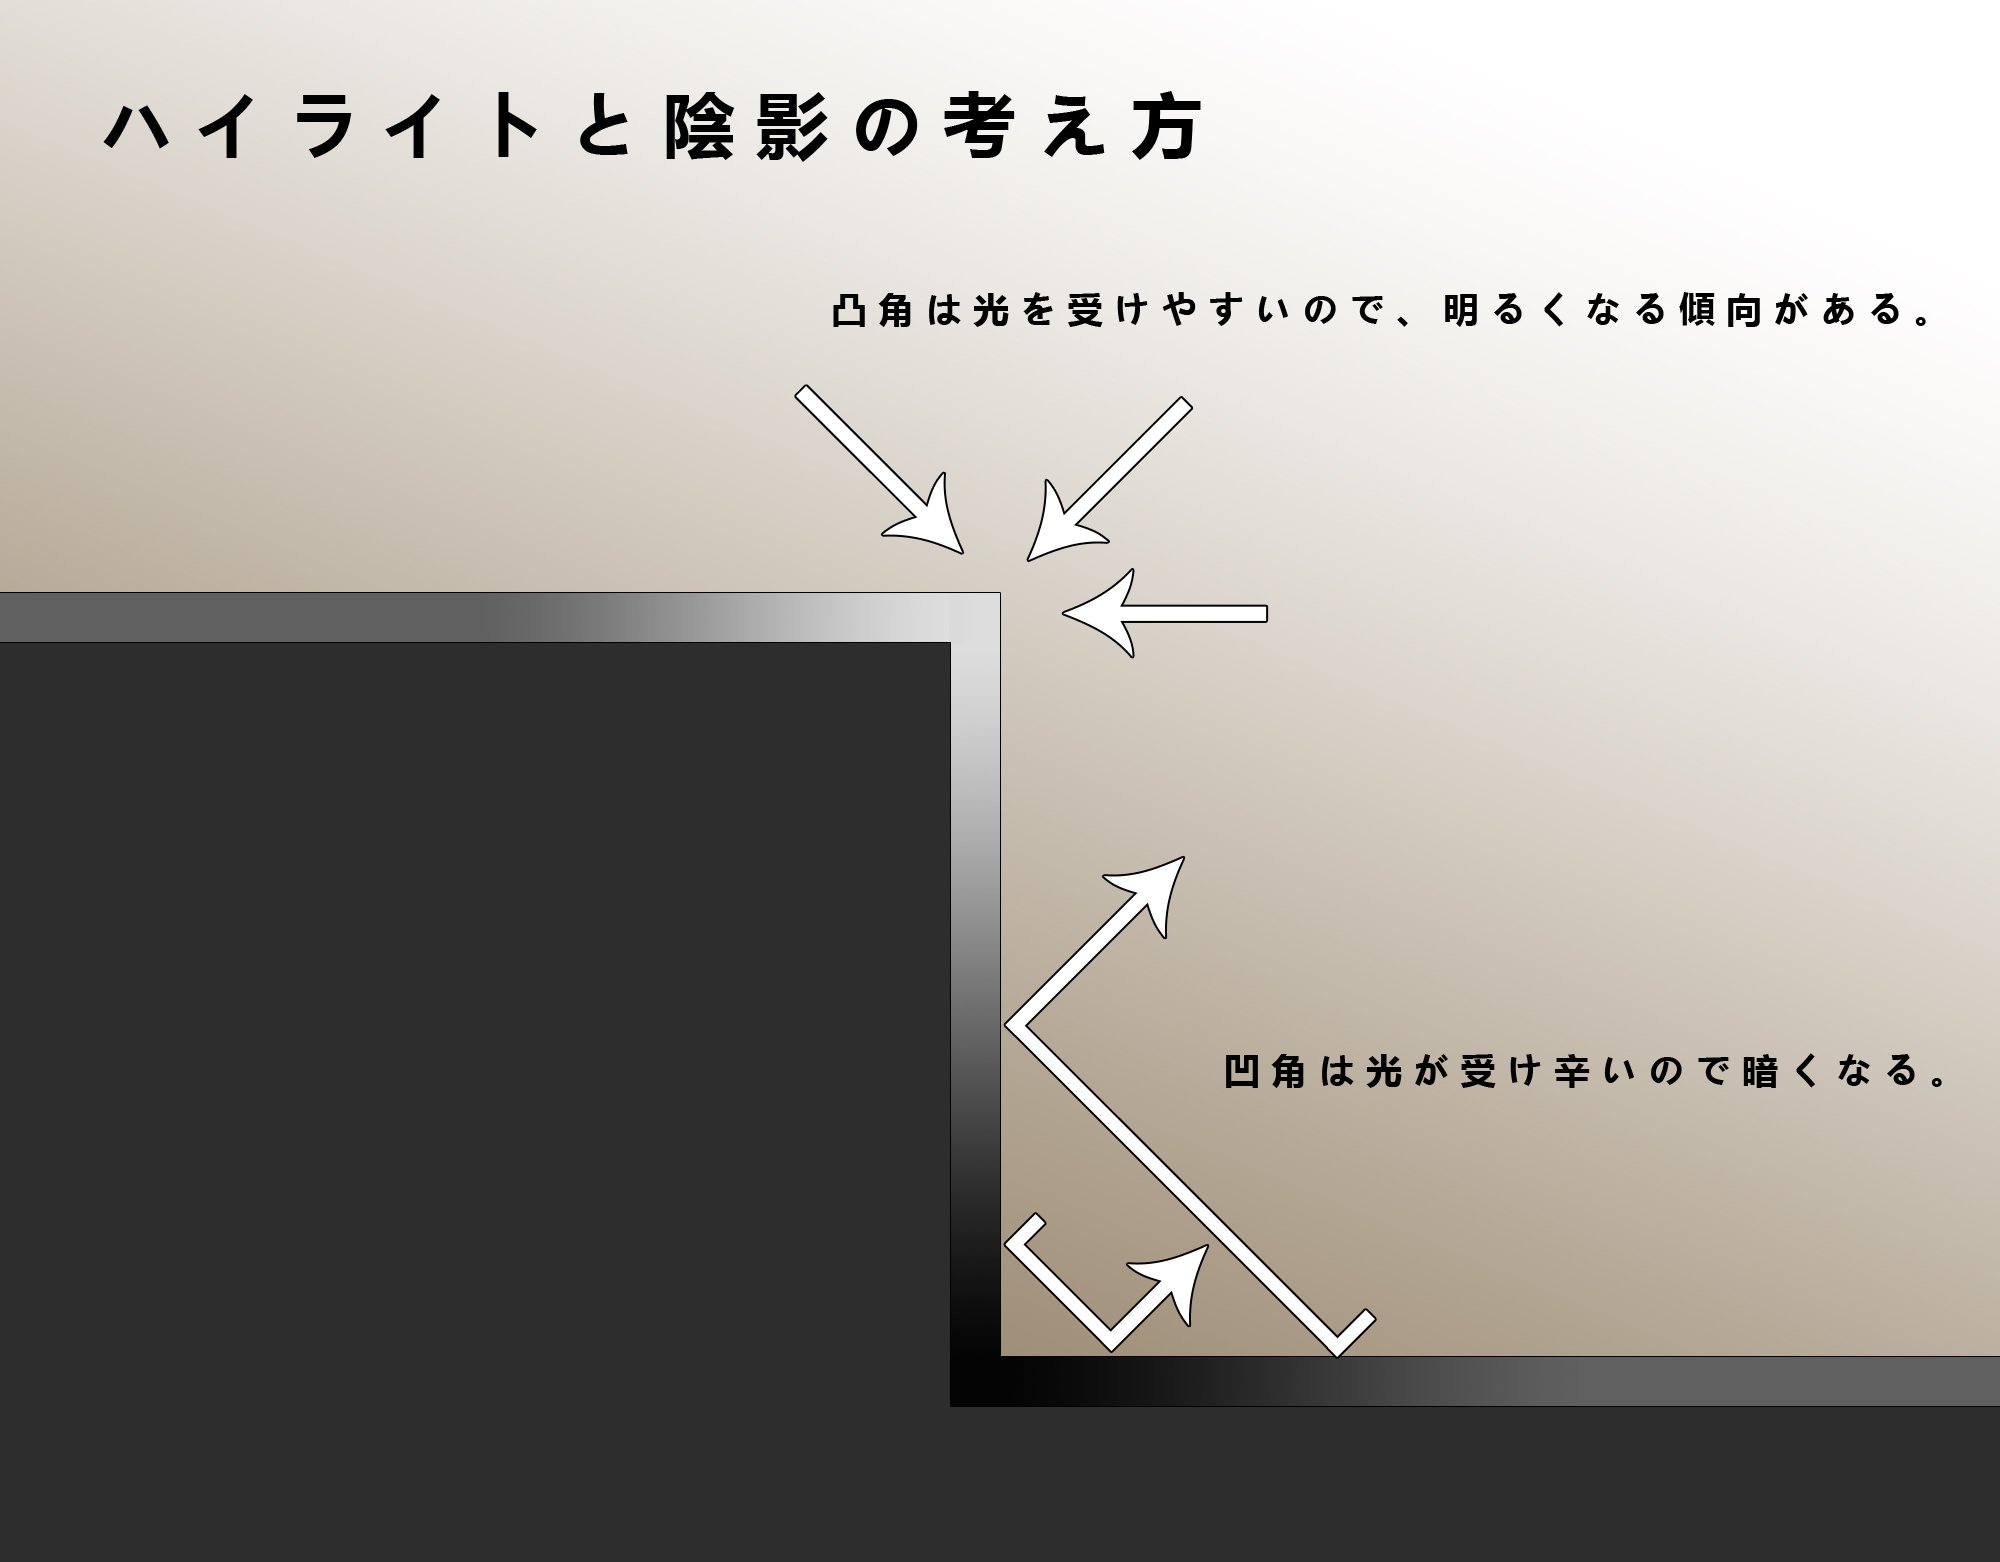
The shadow of unevenness changes depending on the angle at which light is incident and the ratio of light received (scattered light). The story says that if the convex angle is bright and the concave angle is dark, the three-dimensional effect and cognitive power will increase.
The interpretation is weak if it is simply made uneven, so it would be good to add an effect.
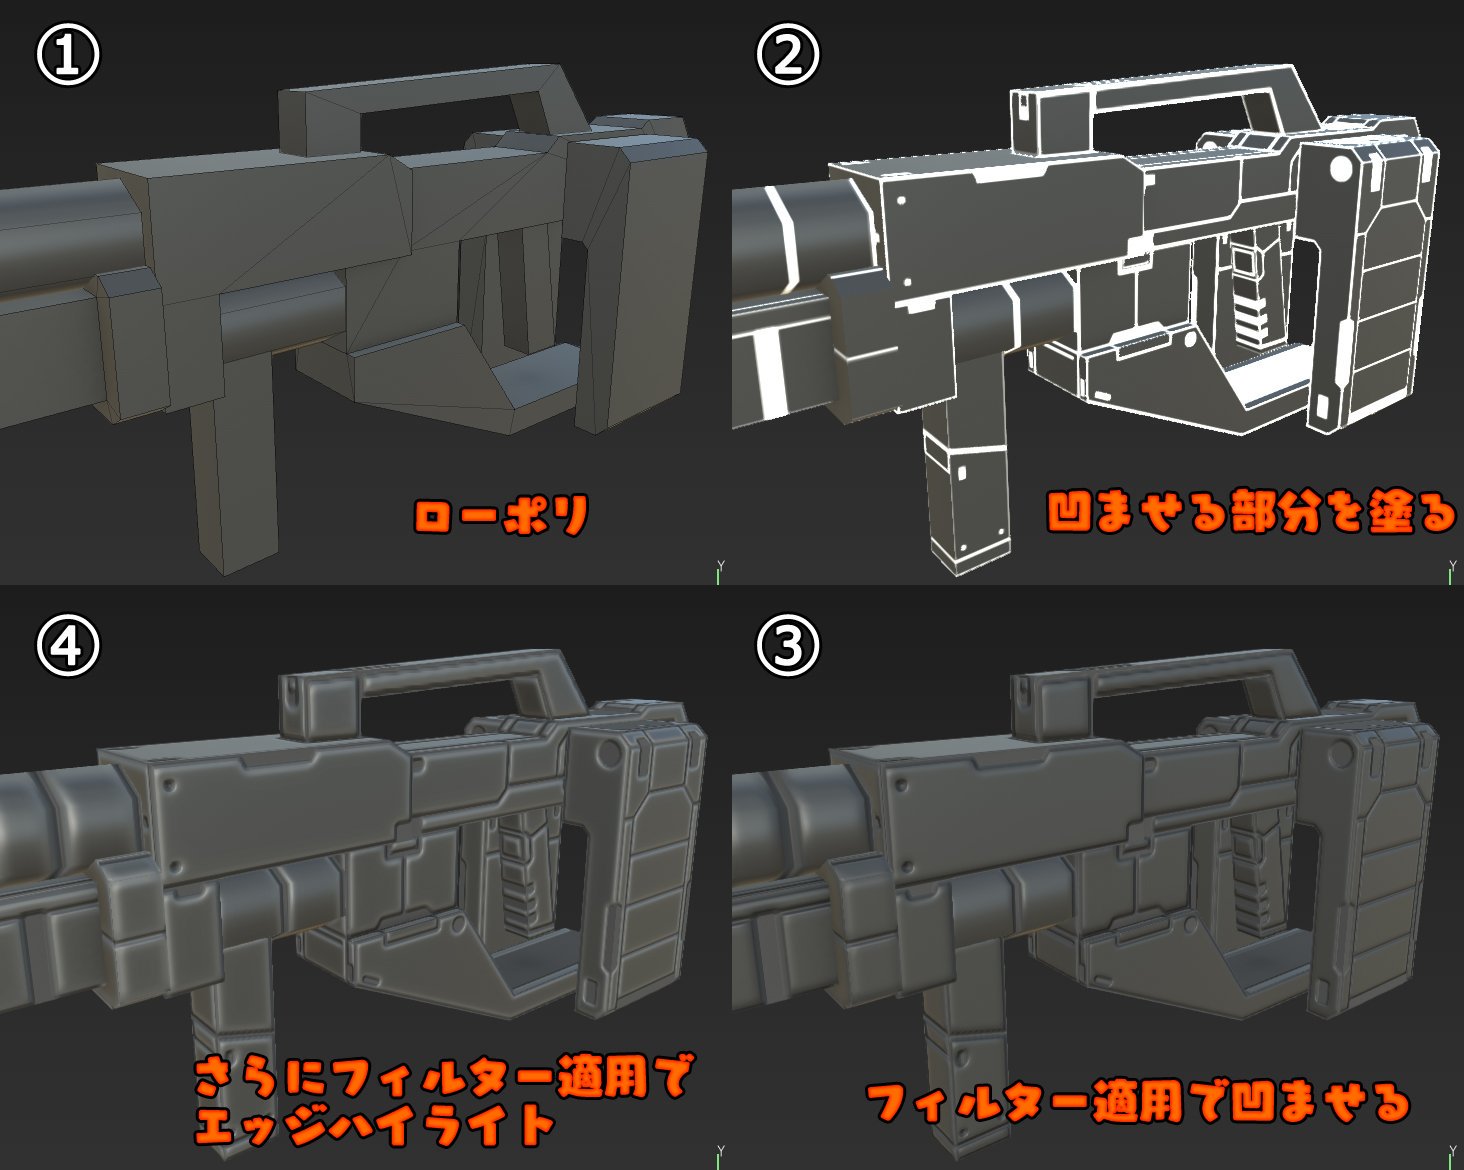
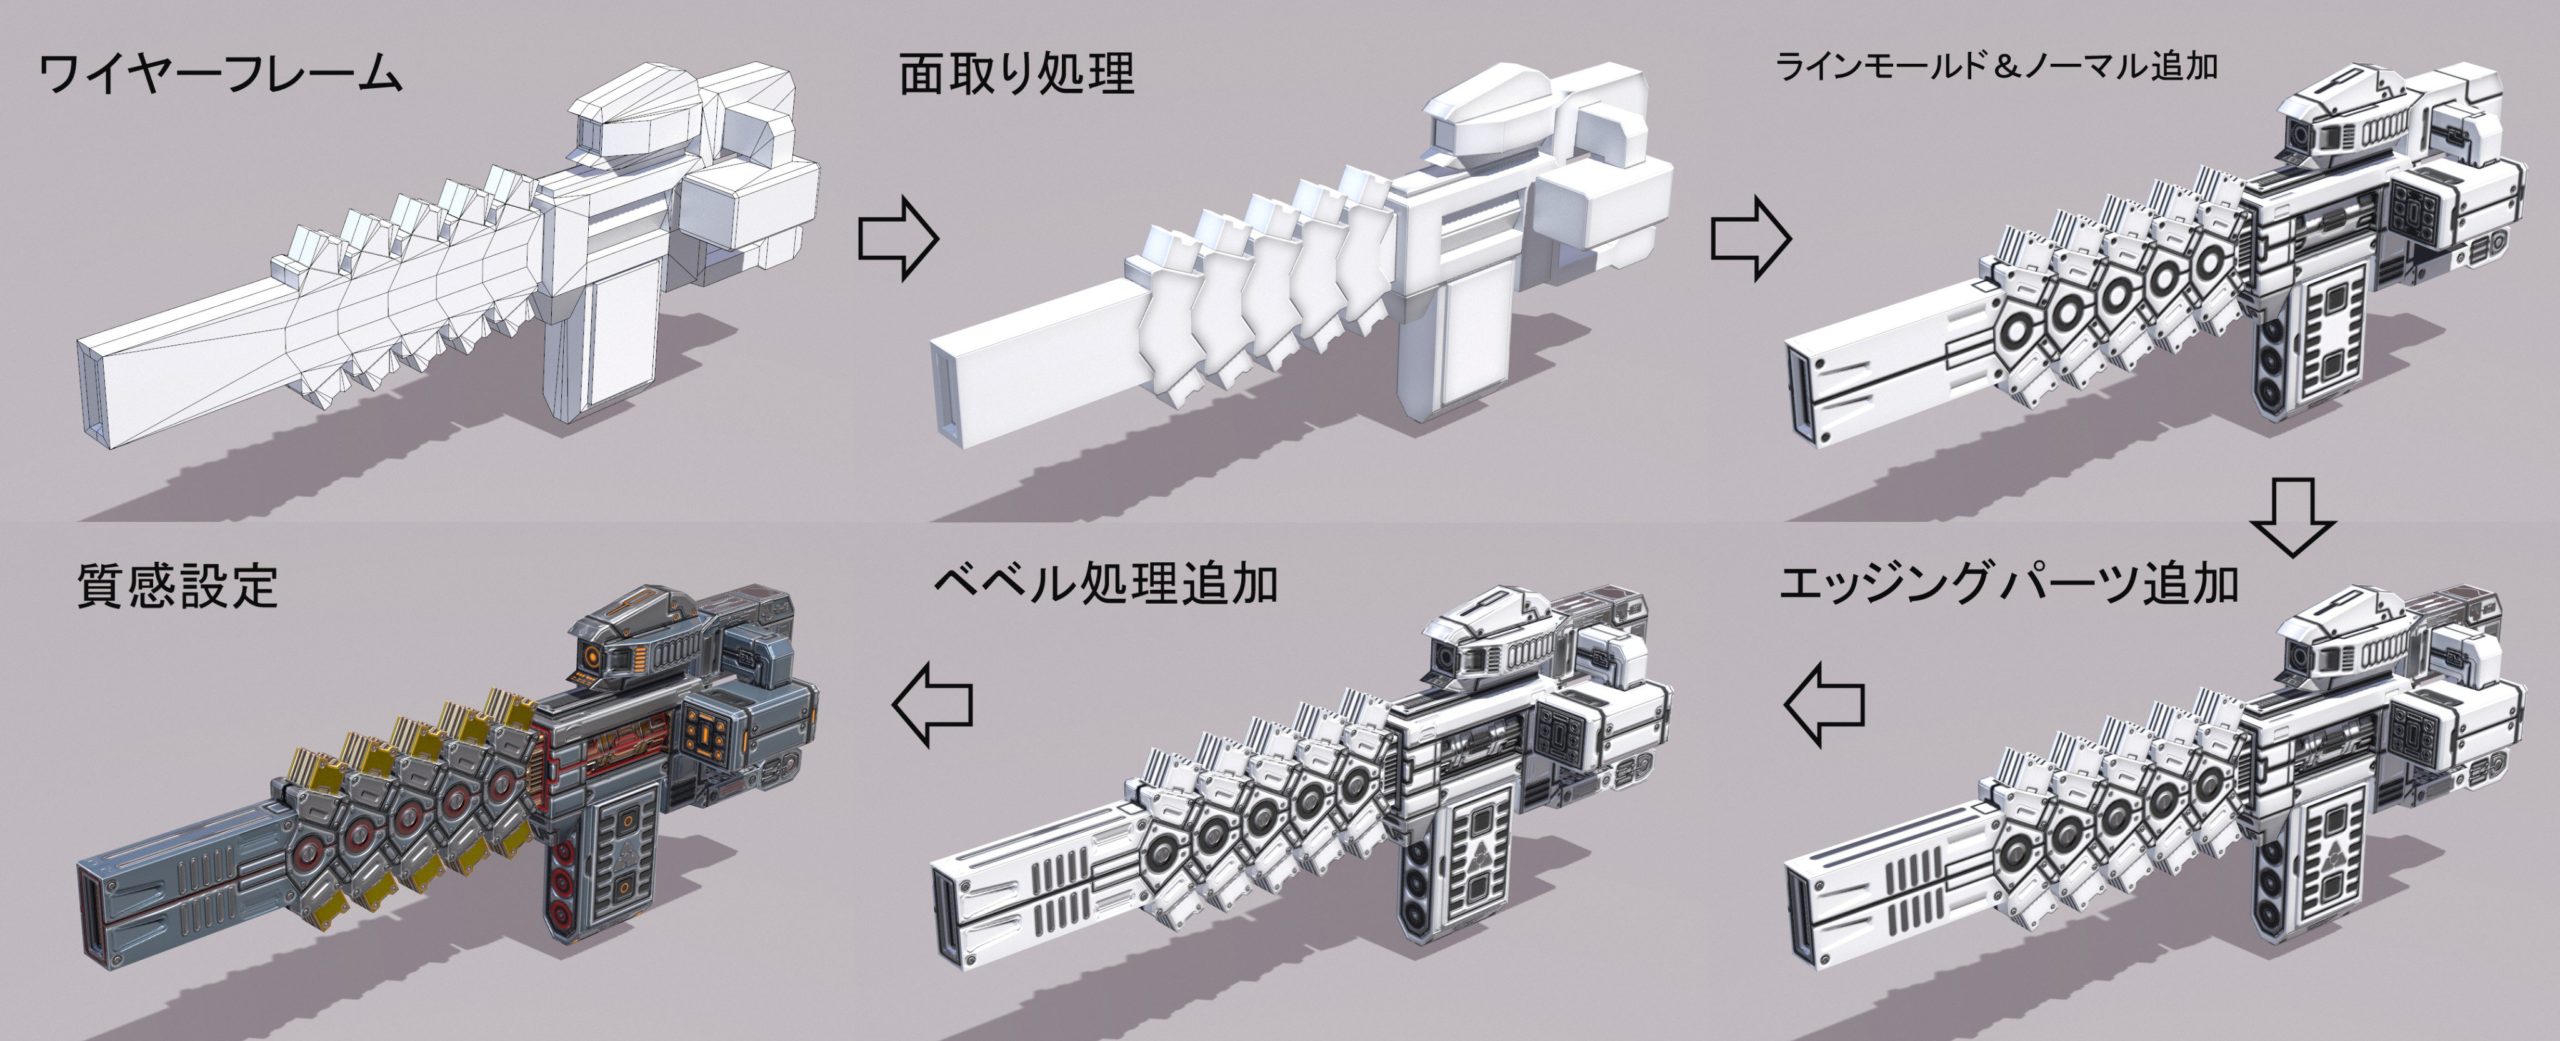
How do you get rid of the low poly odor?
I'm often asked to say that, so by saying preparation and review.
Start from the place where it disappears.
First of all, let's take the sharp corners that appear in hard edge systems.
The human eye captures information instantly, so just adding processing like that will make a big difference in your impression.
(Broken image link)
Similarly for the tangents of the model, if no processing is done, the ease will come out immediately.
The part where the object overlaps with the object should be joined for some reason, so I
will add an interpretation to that part as well. The way of thinking should be different depending on the processing method.
Left: No treatment Middle: Concave bevel Right: Welding
Other
Use the bake function to make a three-dimensional object look good

Make a scratch
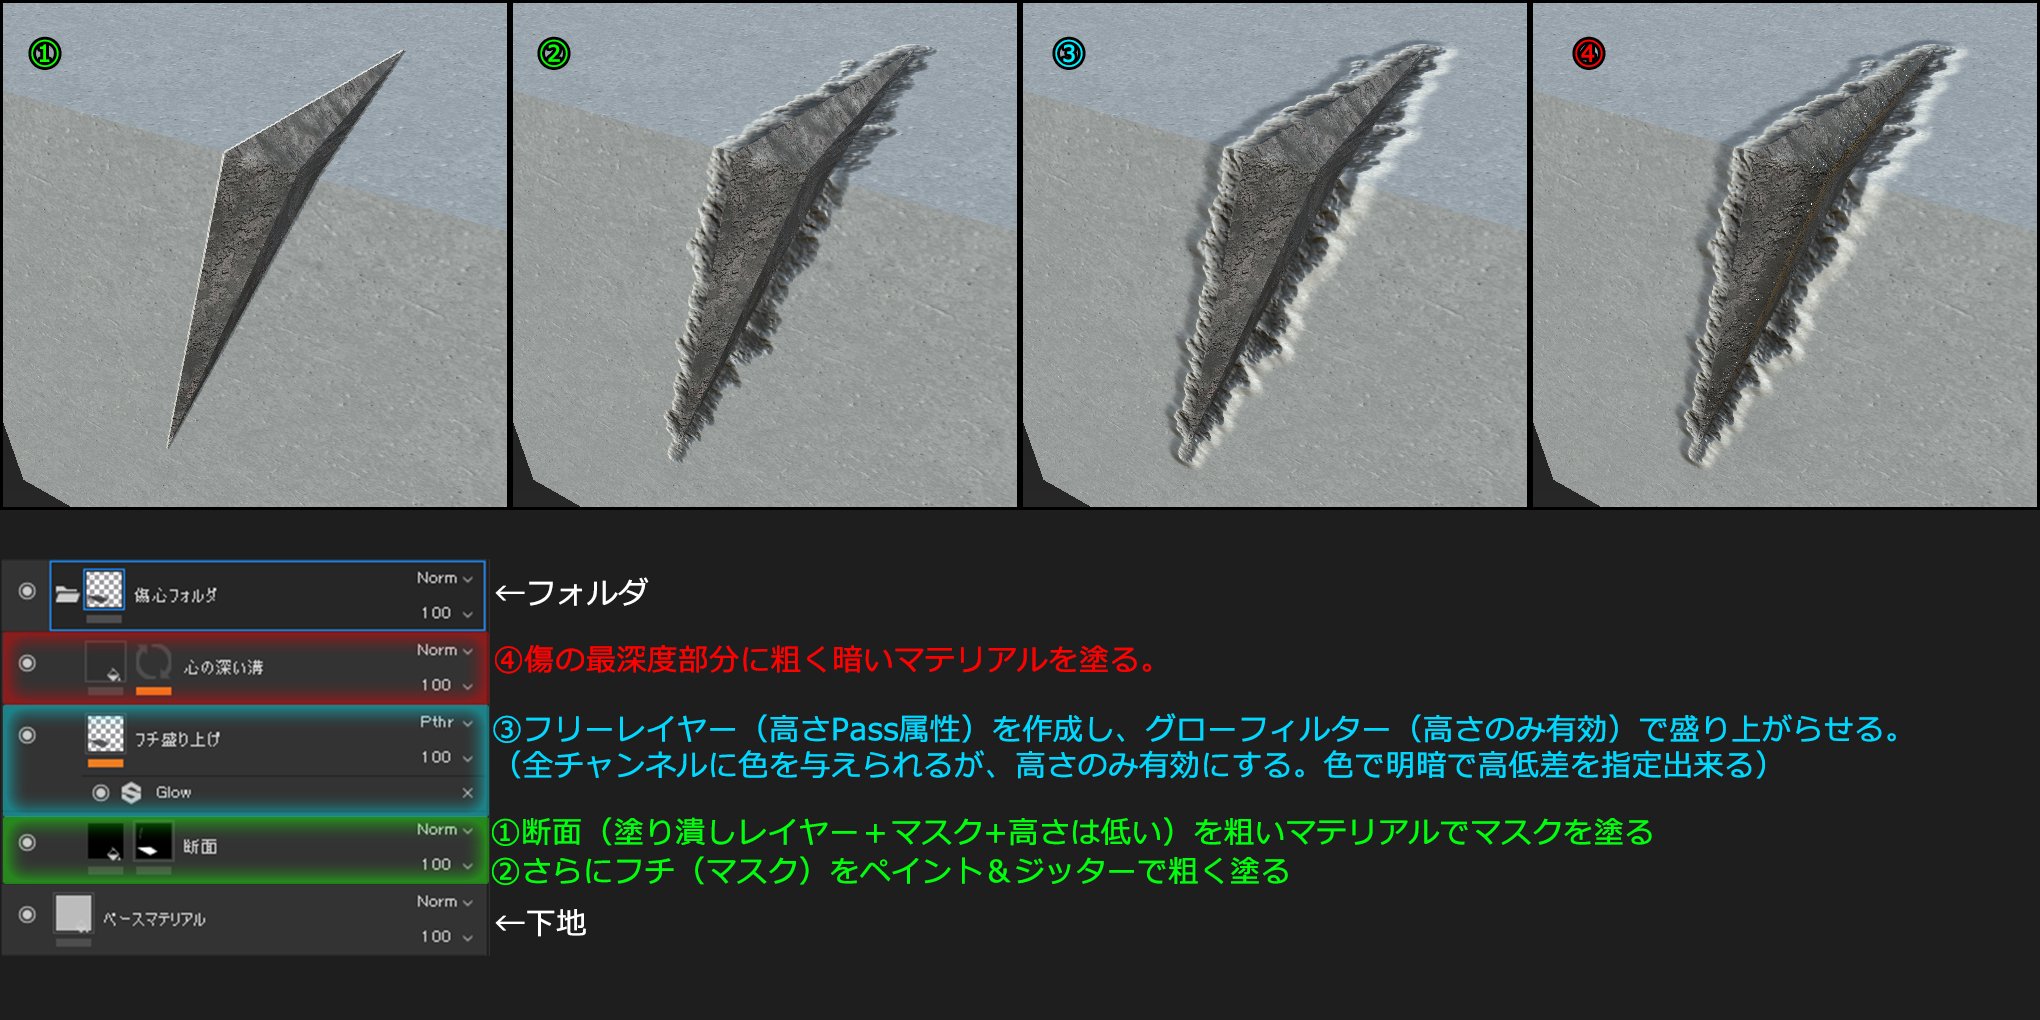
Substance Painter Gradient painting
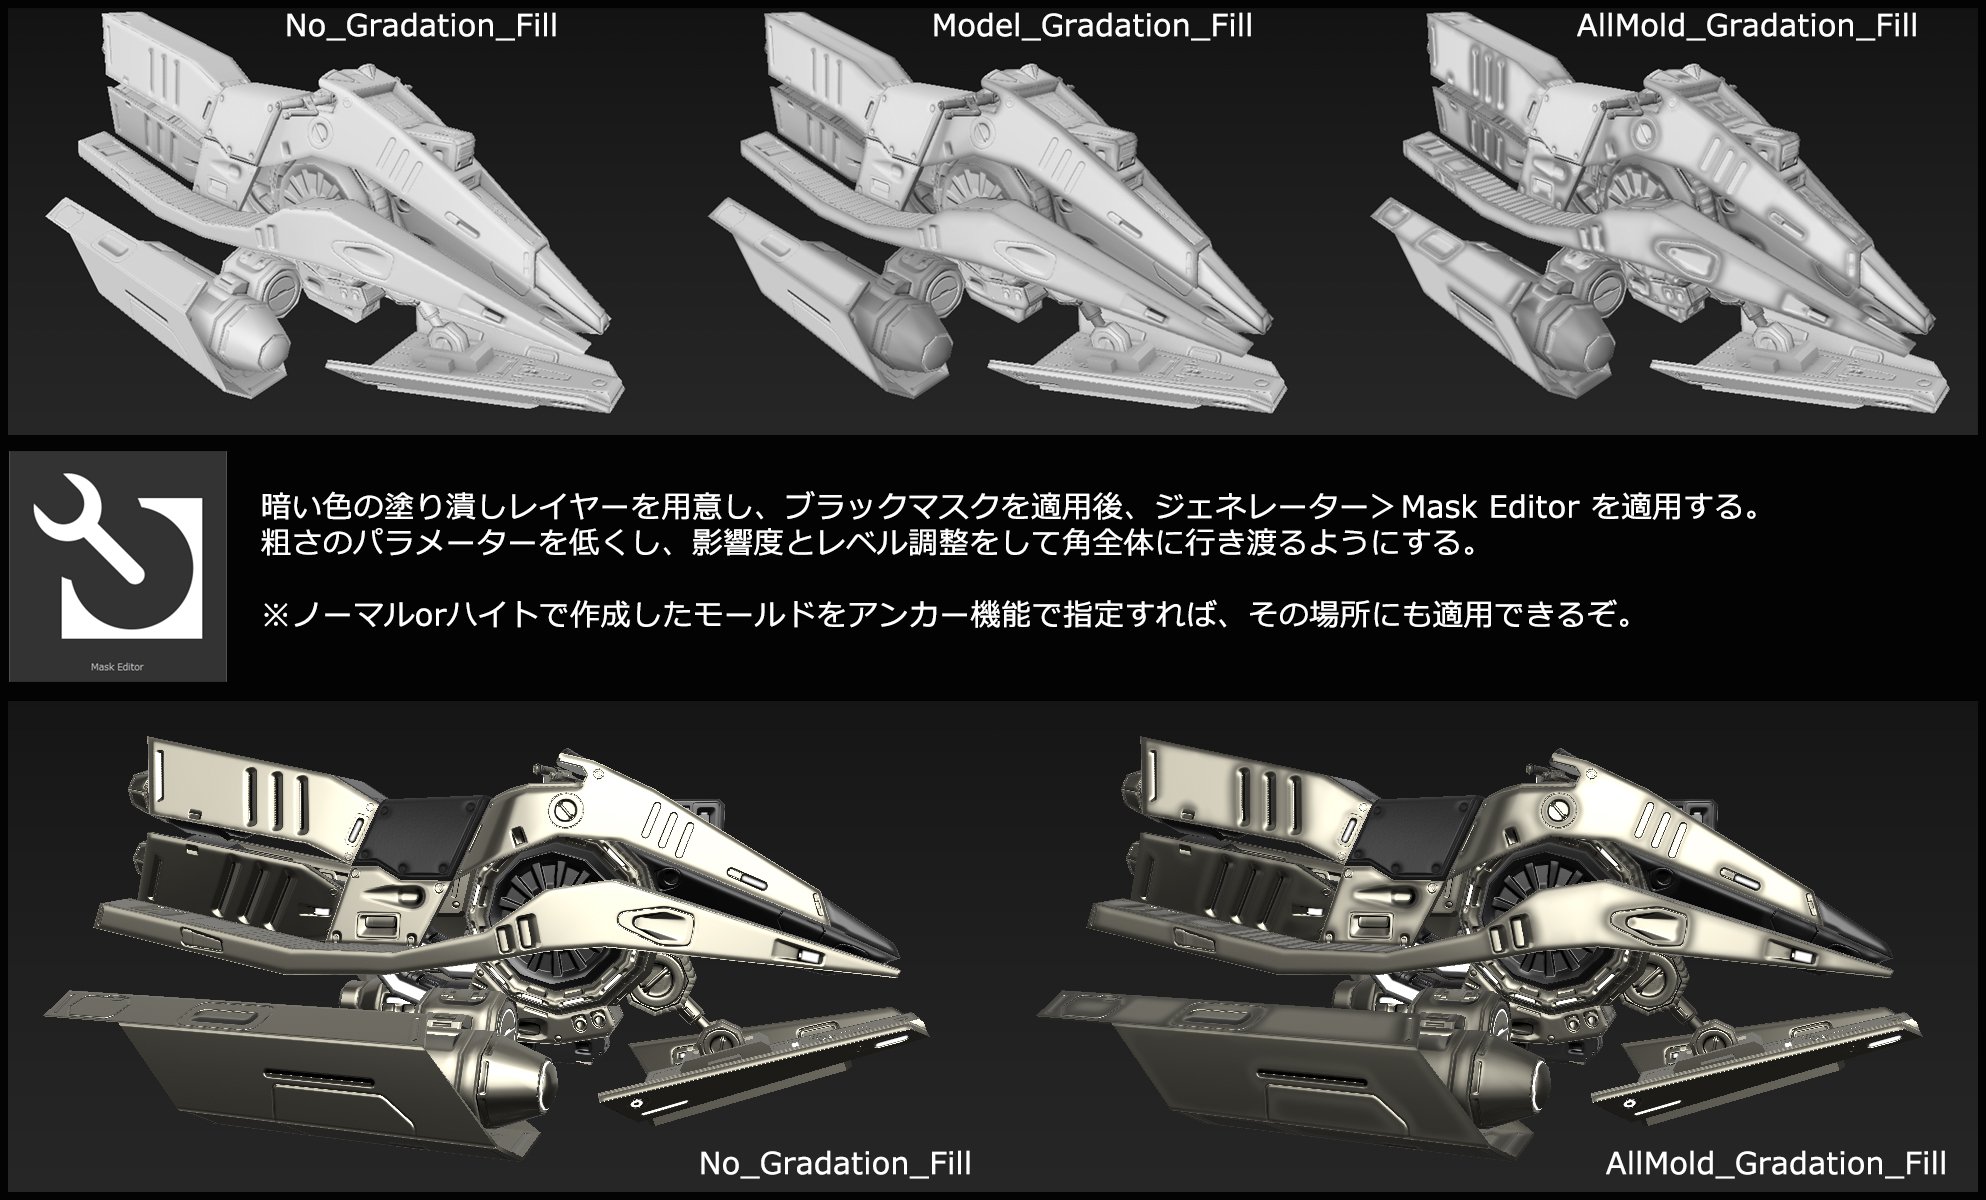
To make the texture even tighter, use the generator function to apply a gradation paint over the entire model or details. If you have created a mold with SP, you can also apply it partially using the anchor function.
The shape alone does not tighten the texture, so a trick is necessary
(Broken image link)
Sharpen the blade of the sword by changing the curvature.
This is also the same model, but the surface curvature of the blade is recessed inward, making it look like the blade is standing.
(Broken image link)
As a detailed painting of SP, if you use the glow or shadow of the filter after drawing, you can semi-automatically paint the outline (or inline) to emphasize the highlight.
Smart materials are fine, but if you build your own composition, you can get what you intended! #SubstancePainter
(Broken image link)
Substance Painter Resource Management
Substance Painter is a non-destructive paint tool that tends to make data heavy.
The reason why it becomes heavy is that the used data is enclosed and can be changed.
For example, like the image, you can switch the drawn alpha brush material in the middle. #SubstancePainter
(Broken image link)
Simple detail highlighting procedure with Substance Painter
It is convex, but concave can be reversed on the outside and inside of ⑤ ~ ⑥.
* This method is the same as the detail technique such as PS, so let's try it. If you get it, the range of expression should expand. #SubstancePainter
(Broken image link)
How to use Substance Painter anchor points (relatively simple)
Anchor point is a function that is hard to realize the effect, but if you understand it, even a layer with unevenness (height & normal) can be made to function according to the shape by combining it with a generator. #SubstancePainter
(Broken image link)
As a method of beveling with the SP standard, there is also a method of adding a chamfer on the UV boundary line.
Set the height to -0.2 on the fill layer with only the height, and apply UVBorder Distance & Blur & Histogram Scan to the mask.
Since it is a UV boundary line, it is a feature and a drawback that it appears at the joint. Paint additional if you want to fix
(Broken image link)
Substance Painter bevel filter
Bevel filter that was added before I knew it It is an
effect of narrowing down the target area
(red is divided into the base layer and blue is divided into the bevel layer part)
It may come in handy because you can get a fairly sharp angle. It seems that it is different from the SD bevel (information received from Mr. Sukune Ryo)
(Broken image link)
Substance Painter Heightmap Bevel adjustment
I think that height is often used for layer elements, but isn't it often the case that the height and angle do not come out as expected? Blur + Histogram Scan Filter is recommended for you!
You can also adjust the bevel width and shape, which was a source of trouble!
(Broken image link)
How to adjust the highlight position of the eyes with SP, etc.
Originally, the normal map specifies the normal angle with RGB values, so it is a method that takes it in reverse. Change the highlight position you want to change with the adjustment filter
If you specify it in a little more detail, you may be able to enter animation-like highlights.
Specify the size with metal & roughness
(Broken image link)
Layer filters that I often use personally with Substance Painter
I use a lot of other things, but I use them often as shown in the image.
SP can be applied non-destructively, so once you set it, it will be applied automatically.
Described as a personal memo.
(Broken image link)
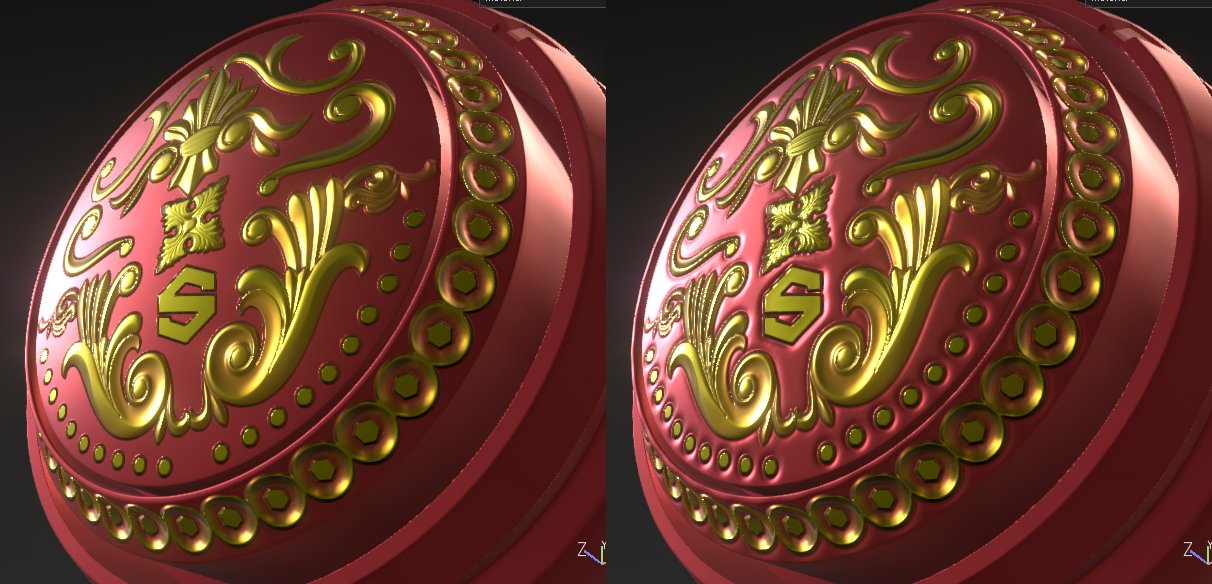
Emphasizing SP concave mold
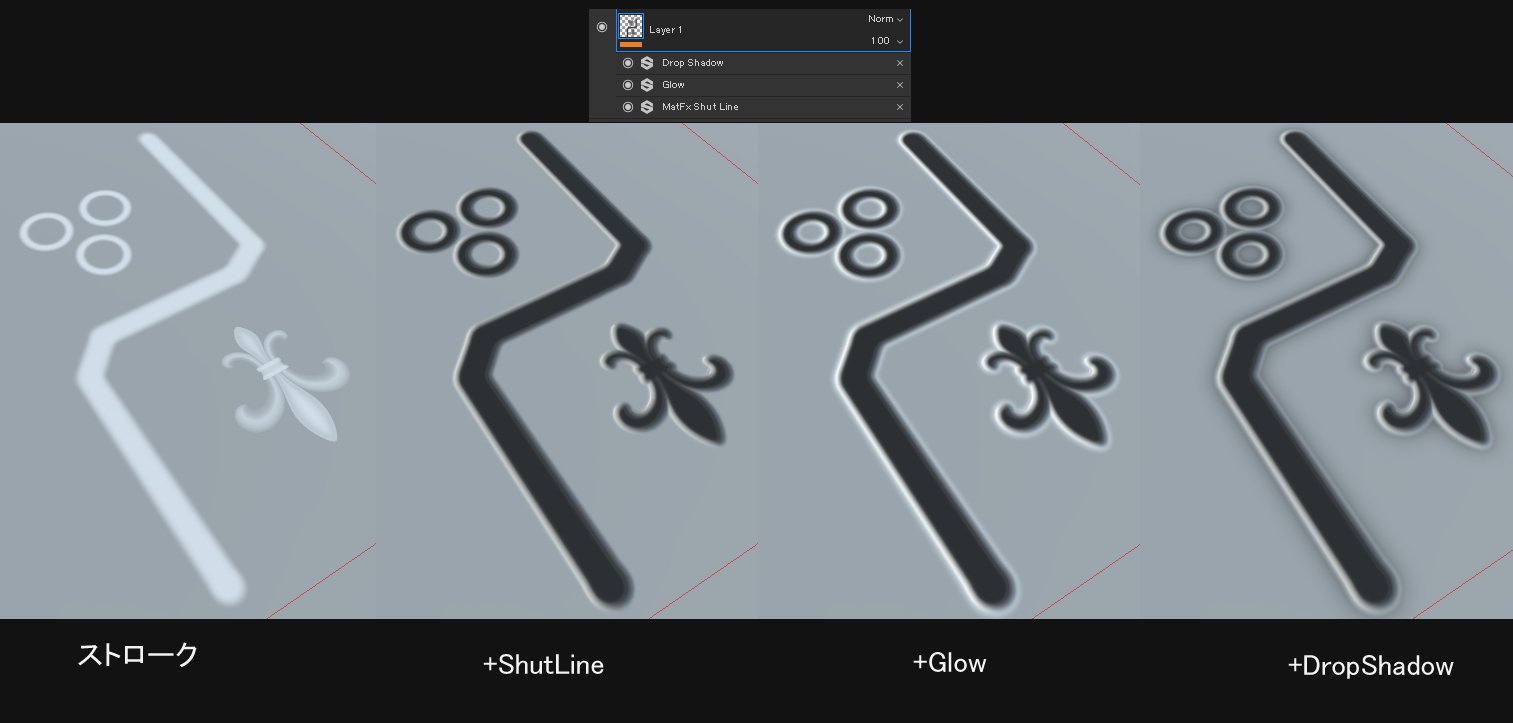
You can make a concave mold just by applying a filter to the stroke, but it
will be more emphasized when multiple filters are overlapped.
- ShutLine dent
- Glow highlight the border
- DropShadow Highlights to Gradient Shadows
It's a technique often seen in plastic model painting.
Substance Painter Whole Light Bake Settings

This is a method to bake the texture reproduced on the SP into a color map.
If you want to do it locally, you can specify the presence or absence with a mask! You can set the bake individually.
Painting technique ① Area drawing
Use the brush size characteristics to paint through the back and front within range.
Since the size includes not only the vertical and horizontal range but also the depth, you can
paint to the other side at once by maximizing the size . It will
show its true value when combined with a stencil !
(Broken image link)
Precautions when the filter effect crosses the UV border
The filtering effect of SP is very useful, but it makes a difference when crossing UVs.
This is a display problem that occurs depending on the UV ratio, angle and position.
For expressions that assume a filter effect,
connect UVs as much as possible! ????
(Broken image link)
the work
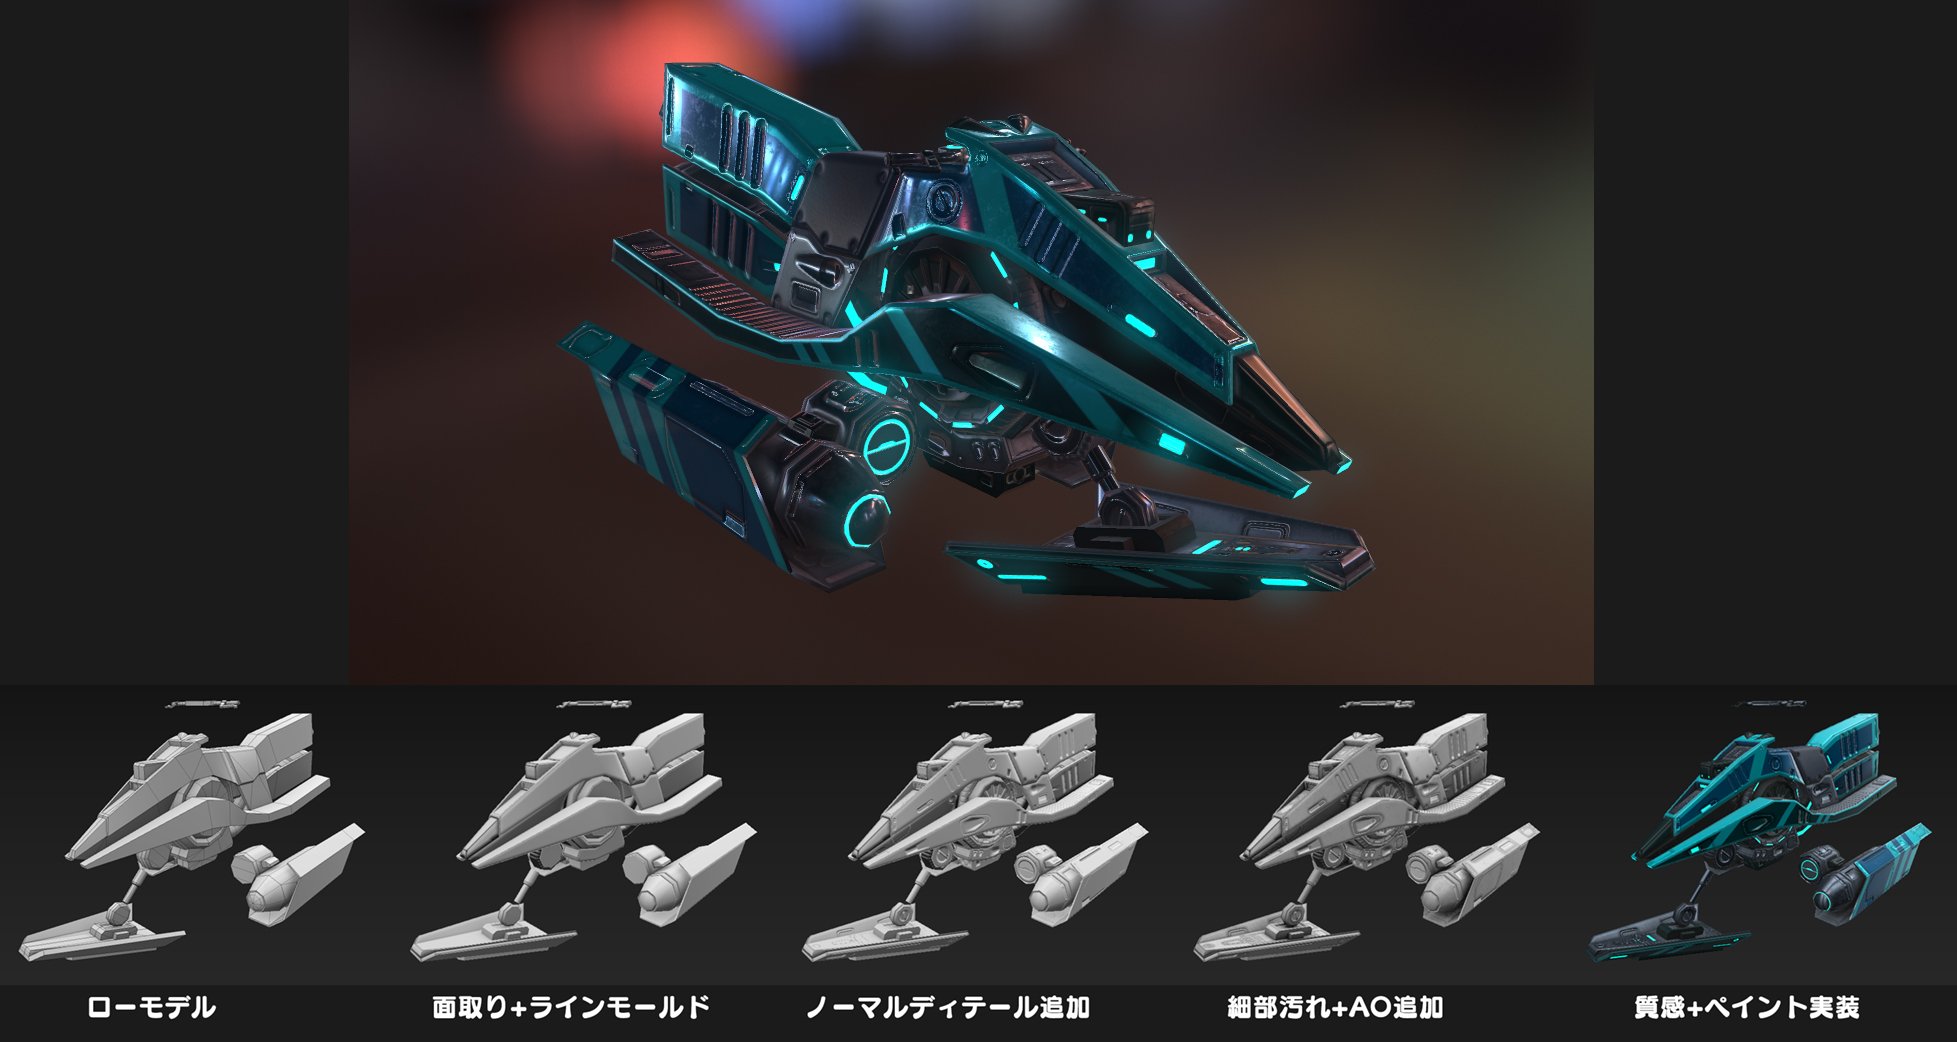
Anti-gravity bike workflow
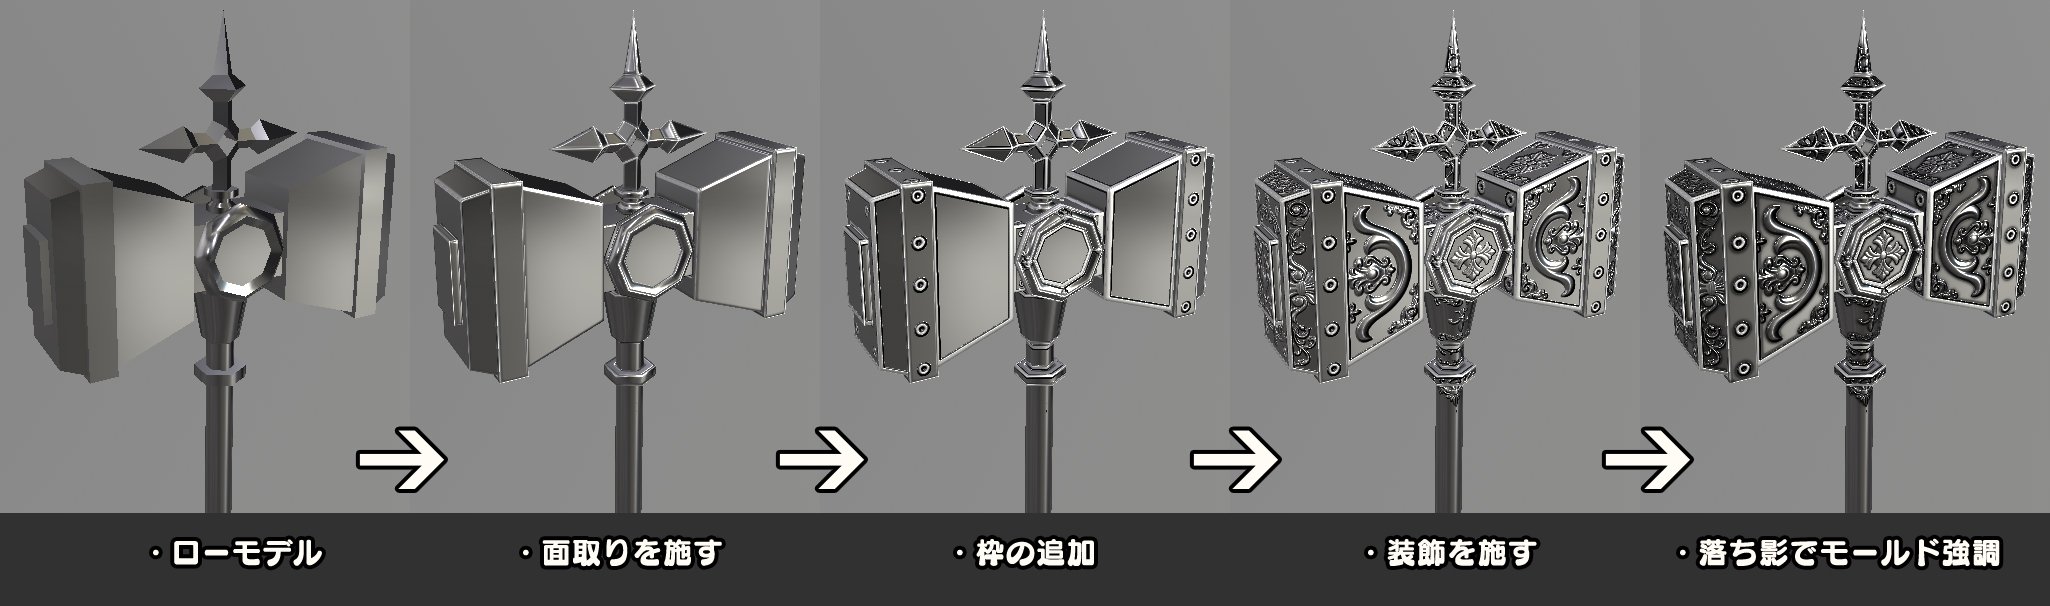
Hammer workflow