How to create GIFs with FFmpeg
High-quality animation on any platform for free
Created in 1987, GIF remains to be a widely used format for saving short and lightweight animations on the web. Despite many advantages, this file format has a number of limitations. GIFs are restricted to 256 colors palette and lose quality when the complexity of animation increases. Thus, conversion settings have to be played with to balance image quality and file size.
I used to create GIFs in Adobe Photoshop. However, long and smooth animations have to be created using workarounds, as Photoshop has a 500 frames limit. It’s time-consuming and Photoshop is not my primary design tool anyway, so I had to look for the other options. Giffox records only selected snippets of the screen but doesn’t allow to upload videos from a local folder. Also, in the free version, it puts watermark and doesn’t make GIFs longer than 10 seconds. Not to mention that it’s available only on Mac while FFmpeg is cross-platform and doesn’t have such limitations. Ezgif has an upload limit of 2000 files and max file size of 6MB each or 100MB in total. Among online converters, it is one of the best, but it limits FPS depending on the video duration. FFmpeg has good performance and can work with large files.
Preparation
Install Homebrew running the following script in Terminal.
/usr/bin/ruby -e "$(curl -fsSL https://raw.githubusercontent.com/Homebrew/install/master/install)"Install FFmpeg running the following script in Terminal.
brew install ffmpegConvert video to GIF
In Terminal navigate to the folder with the video you want to convert and run the command to create a GIF.
ffmpeg -i recording.mov result.gifThat was the simplest command, now let’s add visual filters to customize the output.
ffmpeg -i recording.mov -vf fps=5,scale=1200:-1,smartblur=ls=-0.5,crop=iw:ih-2:0:0 result.gif- -i is an input key that follows with the filename you want to convert.
- -vf is a key to set visual filters.
- fps is a string describing output framerate (default “25”).
- scale sets the width and height, “-1” preserves aspect ratio.
- smartblur blurs or sharpens the video, “ls” means “luma_strength” — one of the smartblur options. Values from -1 to 0 sharpen the image.
- crop trims pixels, “iw:ih-2:0:0” tells to trim 2 px from the bottom.
File size can be reduced by lowering the frame rate, scaling down the image, and reducing the color palette.
For some reason, QuickTime always gives the recorded video of the screen with a black line at the bottom. It’s good that the recording can be trimmed in FFmpeg without having to open an additional video editing software. Also, frame rate was reduced to 5 fps, as for this GIF animation smoothness is less important. Since the GIF is mostly text sharpness can be improved a little bit. The converted GIF is shown below.
Convert series of images to GIF
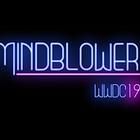
Animation can be created from the series of images, which is very useful sometimes. For example, the old version of Adobe Media Encoder doesn’t export to GIF, so animation can be created from the PNG sequence. The command below creates the GIF from images in “frames” folder that are enumerated from 000 to 999.
ffmpeg -i frames/%03d.png -vf fps=20,scale=720:-1 logo.gif
Define custom palette
The converted GIF has only three colors: white and two tints of blue, therefore, the default 256 color palette can be reduced to 16. The custom palette is created with the palettegen filter.
ffmpeg -i frames/200.png -vf palettegen=16 palette.pngAfter the palette was created it can be used in the GIF conversion.
ffmpeg -i frames/%03d.png -i palette.png -filter_complex "fps=20,scale=720:-1:flags=lanczos[x];[x][1:v]paletteuse" logo.gif- -filter_complex is used when there is more than one input and/or output.
- flags=lanczos sets the rescaling algorithm. Lanczos scaler compared to bicubic creates less blurry input.
- [x][1:v] are link labels — names given to the output filter.
- paletteuse is a filter that tells to use the custom palette.


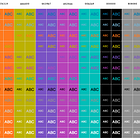
Convert video to GIF using a color palette
As was mentioned before, the GIF format stores a global palette which can be re-defined with custom colors to get better quality. Firstly, let’s create the GIF with the default color palette, it will be used for the comparison. By the way, only 2 seconds are needed from the input file, so the specific part will be converted to the GIF.
ffmpeg -ss 1:24 -i avengers.mp4 -vf fps=15,scale=720:-1 -t 2 avengers.gif- -ss seeks the specific timestamp in the input file. In this case, extraction will begin from 1 min 24 sec.
- -t limits the duration of data read from the input file. In this case, for 2 seconds.
To create the palette one frame needs to be extracted.
ffmpeg -ss 1:25 -i avengers.mp4 -vframes 1 -vf scale=720:-1 snippet.jpg- -vframes sets the number of video frames to output.
Then 256 color palette is generated using the created snippet.
ffmpeg -i snippet.jpg -vf palettegen palette.pngFinally, the color palette is used to create the GIF.
ffmpeg -ss 1:24 -i avengers.mp4 -i palette.png -filter_complex "fps=15,scale=720:-1:flags=lanczos[x];[x][1:v]paletteuse" -t 2 avengers2.gifGenerate palette per frame
It is possible to generate a palette per frame and get a better quality.
ffmpeg -ss 1:24 -t 2 -i avengers.mp4 -filter_complex "[0:v] fps=15,scale=w=720:h=-1,split [a][b];[a] palettegen=stats_mode=single [p];[b][p] paletteuse=new=1" avengers3.gifBelow two GIFs are compared, the first one is created with the default color palette and takes 2.5 MB. The second one is created with the palette per frame and takes 5.4 MB.

Extra tips
With Gifscisle you may further optimize the GIF and losslessly reduce its size. To install Gifsicle run the following script in Terminal.
brew install gifsicleOptimize GIFs using the following command.
gifsicle -O3 animation.gif -o animation_optimized.gif- -O3 is an optimization level that tries several methods for better compression. Gifsicle man page has more info.
- -o is an output key that follows with a filename.
Below is an example created with FFmpeg using the custom color palette and further optimized in Gifsicle. The size decreased from 15 MB to 14.4 MB.
All that might seem confusing at first but the installation and configuration doesn’t take more than 5 minutes. After all is set up just use the scripts and modify them in need — easy as pie. I hope this guide was useful for you. What is your preferred method of converting GIFs?
Liked the article?
Please, support the hard work and I will write more often.
BTC: 15XxW1JNDRbzZzKvNyicFFWTefXYte7cPs
ETH: 0x5f88ca7a7dfc671d1e618d1f76d05a0bf85c0d44