You have 2 free stories left this month.
Golangを理解し、Grafanaを使って監視する方法(前半)
始める前に、皆様に伝えたいことがあります。この記事には、私がgo channelについて理解することができた知識について書きました。良い方法でどのように使用することができるかをお伝えできればと思います。
What is Go Channels?
Go Channelとは何でしょうか。
Golang docsは、
「チャンネルは、同時進行のgoroutineを接続するパイプです。あるgoroutineからチャンネルに値を送信し、その値を別のgoroutineに受信することができます」としています。
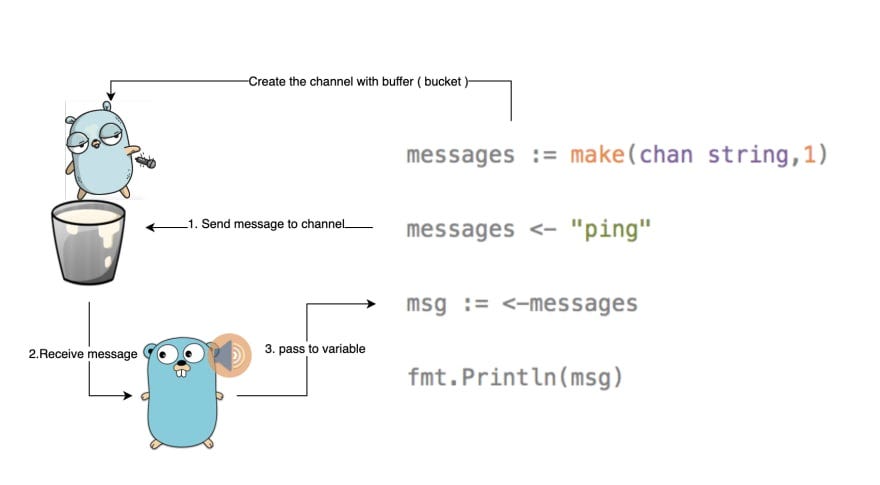
これは単純なパイプのようなものです。一方の側から送信し、もう一方の側から受信するというものです。次にメールキューをお見せしますが、 goroutinesを使えば非同期にすることができます。
How to use Channels in Go
package mainimport ("fmt")func main() {// Create the channelmessages := make(chan string)// run a go routine to send the messagego func() { messages <- "ping" }()// when you receive the message store it in msg variablemsg := <-messages// print received messagefmt.Println(msg)}
- 1行目: make を使ってチャンネルを作成しました
- 2行目: goroutineでメッセージを送りました
- 3行目: メッセージを受信し、それをmsg変数に保存します
- 4行目: メッセージをプリントします
2 行目では goroutine を使用していますが、これがないとリスナーがいないのでコードは動作しません。これをデッドロックと呼んでいます。
messages := make(chan string)messages <- "ping"msg := <-messagesfmt.Println(msg)
Output
fatal error: all goroutines are asleep - deadlock!goroutine 1 [chan send]:main.main()/tmp/sandbox676902258/prog.go:11 +0x60
これは、メッセージを直接送信するリスナーがいない場合、メッセージをどこに保存すべきかを Go が理解していないために起こります。なので、ここでのシンプルな解決策はBuffersを使うことです。
Chanel Buffer
go は make(chan string,1) を使用してバッファをチャンネルに設定することができます。二つ目のパラメータはgoにbufferの1ストリングを伴ったチャンネルを生成するように命令できるという意味です。
messages := make(chan string,1)messages <- "ping"msg := <-messagesfmt.Println(msg)
リスナーを初期化する前に2つのメッセージを送信しようとすると、2つ目のメッセージを保存する場所がないため、デッドロックが発生します。またそれを直接送るリスナーがないということも理由です。
messages <- "ping"messages <- "pong"msg := <-messagesfmt.Println(msg)
Best design to use channels for background workers
では、バックグラウンドで働く人たちにとってチャンネルを使うためのベストなデザインとは? 私たちはどのようにチャンネルを扱えばいいのでしょうか?すべてのメッセージをgoroutinesで送信するのでしょうか? すべてのチャンネルをドロップして、すべてのジョブでgoroutineを開くのはどうでしょうか?
これらの質問には次のポイントで答えようと思います。
a simple queue worker diagram can be like

シンプルなキューワーカーの図は上のようになります。
簡単に言うと、Dispatcher を作成する必要があります。Dispatcher は要件に基づいて X 個のワーカーを開き、これらのワーカーがメッセージを受信して処理します。
Create a Dispatcher
//JobQueue ... a buffered channel that we can send work requests on.var JobQueue chan Queuable//Queuable ... interface of Queuable Jobtype Queuable interface {Handle() error}//Dispatcher ... worker dispatchertype Dispatcher struct {maxWorkers intWorkerPool chan chan QueuableWorkers []Worker}
Dispatcherには、主に3つのプロパティがあります。
・Max worker:このdispatcherは何人のworkerを所有しているのでしょうか
・Worker Pool: そのプール内のすべてのworkerを登録し、Dispatcherがメッセージを送信するたびにworkerをプルすることができるようにします
・Workers:特定のものをクローズするような それらの誰にでもトークをするすべてのworkerが含まれています
では、dispatcherクリエータを作成してみましょう。
//NewDispatcher ... creates new queue dispatcherfunc NewDispatcher(maxWorkers int) *Dispatcher {// make job bucketif JobQueue == nil {JobQueue = make(chan Queuable, 10)}pool := make(chan chan Queuable, maxWorkers)return &Dispatcher{WorkerPool: pool, maxWorkers: maxWorkers}}
dispatcherは今、ジョブを開始するためにRun メソッドが必要となっています。
//Run ... starts work of dispatcher and creates the workersfunc (d *Dispatcher) Run() {// starting n number of workersfor i := 0; i < d.maxWorkers; i++ {worker := NewWorker(d.WorkerPool)worker.Start()// register in dispatcher's workersd.Workers = append(d.Workers, worker)}go d.dispatch()}
Runメソッドの終了時にDispatcherのディスパッチをスタートします。
func (d *Dispatcher) dispatch() {for {select {case job := <-JobQueue:// a job request has been receivedgo func(job Queuable) {// try to obtain a worker job channel that is available.// this will block until a worker is idlejobChannel := <-d.WorkerPool// dispatch the job to the worker job channeljobChannel <- job}(job)}}}
ディスパッチは無限ループを実行し、新しいメッセージ(job)を受け取るたびにworkerの1つをプルし、そのworkerにメッセージを送信して処理を行います。
Create Worker
//Worker … simple worker that handles queueable taskstype Worker struct {Name stringWorkerPool chan chan QueuableJobChannel chan Queuablequit chan bool}
- Name: worker nameです。ログで見られます。
- WorkerPool: それ自身を登録するdispatcherのプール
- JobChannel: dispatcherからworkerが受け取るメッセージ(ジョブ)
- quit: workerを終了します。オートスケールに役立ちます
では、dispatcherがメッセージを送信した後、ワーカーはどのように動作するのでしょうか?
//Start ... initiate worker to start listening for upcoming queueable jobsfunc (w Worker) Start() {go func() {for {// register the current worker into the worker queue.w.WorkerPool <- w.JobChannelselect {case job := <-w.JobChannel:// we have received a work request.if err := job.Handle(); err != nil {fmt.Printf("Error in job: %s\n", err.Error())}}}}()}
Start メソッドは無限ループを開始し、最初にworkerが自分自身をdispatcherの WorkerPool に登録します。そして、select範囲内のメッセージをリッスンします。一旦メッセージを受け取ると、handle() メソッドをコールしてこのチャンネルを処理します。
a simple scenario
- Dispatcher はworker2つからスタートします
- 最初のworkerは自分自身を登録し、メッセージを待ちます
- 2 番目のworkerは自分自身を登録し、メッセージを待ちます
- dispatcherはメッセージを受け取り、プールから最初のworkerを自分自身を登録した最初のworkerとしてプルします
- 最初のworkerは最初のメッセージを処理するためにすでにプールからプルされていたので、今ではプールには2番目のworkerだけがあります
- 新しいメッセージがdispatcherに来ました。dispatcherはプールから 2 番目のworkerをプルしてメッセージを処理します
- ここで、2 番目のworkerが処理を終了し、1 番目のworkerが何らかの理由でまだジョブを処理しているとします
- 2 番目のworkerは自分自身をプールに登録します
- 最初のworkerが処理を終了し、プールに再び登録します
- これでプールには2つのworkerがあって、ステップ4で同じことをすることになります。
Implement the logic with an email service
私たちのアプリケーションで、新しいユーザーにウェルカムメールを送信いたいとします。
type Email struct {To string `json:"to"`From string `json:"from"`Subject string `json:"subject"`Content string `json:"content"`}func (e Email) Handle() error {r := rand.Intn(200)time.Sleep(time.Duration(r) * time.Millisecond)return nil}
ここではhandleメソッドがSendGridのようなサードパーティを呼び出してメールを送信すると仮定してみましょう。
//EmailService ... email servicetype EmailService struct {Queue chan queue.Queuable}//NewEmailService ... returns email service to send emails :Dfunc NewEmailService(q chan queue.Queuable) *EmailService {service := &EmailService{Queue: q,}
EmailServiceはキュー可能なチャンネルとメールを送信するsendメソッドを持つようになりました。
これで、main.goファイルは次のようになります。
var QueueDispatcher *Dispatcherfunc main() {QueueDispatcher = NewDispatcher(4)QueueDispatcher.Run()mailService = emails.NewEmailService(JobQueue)r := gin.Default()r.GET("/email", sendEmailHandler)return r}func sendEmailHandler(c *gin.Context) {emailTo := c.Query("to")emailFrom := c.Query("from")emailSubject := c.Query("subject")emailContent := c.Query("content")email := emails.Email{To: emailTo,From: emailFrom,Subject: emailSubject,Content: emailContent,}mailService.Send(email)c.String(200, "Email will be sent soon :)")}
次の章(後半)では、GrafanaとPrometheusを使ってworkerと処理時間を監視し、アプリケーションのための美しいメトリクスを取得します。
Orangesys.ioでは、kuberneteの運用、DevOps、監視のお手伝いをさせていただいています。ぜひ私たちにおまかせください。