はじめに
本記事は第一章 データベース設計のつづきです。
Railsとhaml&scss記法を用いて、フリマアプリに必要となるホームページや商品登録ページなどのマークアップ作業をしていきます。
制作するアプリ
ユーザ登録、商品出品・購入の機能を備えたフリマアプリです。
メルカリ風、というかほぼメルカリです。メルカリを作ります。
ちなみに、この規模のアプリは単価50万円ほどで取引されることが多いそうです。
通常納期は30日ほどだと思いますが、慣れてくれば1週間くらいで作れたりします。
この記事を使って、Web開発を極める一助にしていただければ幸いです。
OS : macOS Catalina 10.15.3
DB : MySQL
Ruby : 2.5.1
Rails: 5.2.4.2
この章はボリューム満天です。
じっくり時間をとって集中できる環境で取組んで頂ければ幸いです。
コピペなら1時間もあれば完了するので、フロント実装はサクっと終わらせて
バックエンド中心で学びたい方はそれもアリです。
フリマアプリ開発完全ロードマップ
| 章 | 内容 | 難易度 | 所要時間 | 主要技術 |
|---|---|---|---|---|
| 序 章 | AWS自動デプロイ | ★☆☆☆☆ | ★★★☆☆ | capistrano |
| 第一章 | データベース設計 | ★☆☆☆☆ | ★☆☆☆☆ | |
| 第二章 | マークアップ作業 | ★★☆☆☆ | ★★★★★ | |
| 第三章 | ユーザ登録/ログイン機能 | ★★★★☆ | ★★☆☆☆ | devise |
| 第四章 | 商品出品/編集/詳細表示/削除 | ★★★★☆ | ★★★☆☆ | carrierwave |
| 第五章 | 商品カテゴリ機能 | ★★★★★ | ★★★☆☆ | ancestry |
| 第六章 | 商品購入機能 | ★★★★★ | ★★★★☆ | Payjp |
記事を読むにあたっての前提条件
この記事には私が作成した大量のコードが載っていますが、
コードレビューのための記事ではありませんので、「コードが汚い!」などのコメントはご遠慮願います。
リファクタリングについては、編集リクエストで私に直接お知らせ頂ければ幸いです。
ご理解のほど、何卒よろしくお願いいたします。
1.必要な機能を考える
マークアップの前に、必要なビューが何なのか考える必要があります。
今回のフリマアプリの必要機能を考え、それらの表示画面を作ればいいわけです。
必要な機能は、以下の10個になります。
| 必要な機能 | 対応アクション |
|---|---|
| ログイン画面 | devise/sessions#new |
| 新規登録(氏名) | users/registrations#new |
| 新規登録(住所) | users/registrations#new_address |
| 新規登録(完了画面) | users/registrations#create_address |
| マイページ | users#show |
| トップページ | products#index |
| 商品出品 | products#new products#create |
| 商品編集 | products#edit products#update |
| 商品詳細表示 | products#show |
| 商品削除 | products#destroy |
早速HTML/CSSのコーディングを始めたいところですが、
まずは上記を表示するためのルーティングを通しましょう。
Devise関連のビューおよびcreate update destroyは表示が面倒なので、
一旦仮アクションでルーティングしておきます。
Rails.application.routes.draw do
devise_for :users
$date = Time.now.in_time_zone('Tokyo').to_s
root "products#index"
resources :products do
# 以下はビュー表示用の仮アクション
collection do
get "product_create" ,to: 'products#create'
get "product_update" ,to: 'products#update'
get "product_destroy",to: 'products#destroy'
end
end
resources :users, only: :show do
# 以下はビュー表示用の仮アクション
collection do
get "new_session"
get "new_user"
get "new_address"
get "create_address"
end
end
end
これでビュー表示用のルーティングができました。
ここで少しだけ、コントローラを編集し、商品とユーザのIDを取得しておきます。
理由は、show editのアクションは、ビューの表示に商品もしくはユーザのIDが必要だからです。
updateについては、第四章で行う画像複数投稿の際にIDが必要になるのでついでに記載しておきます。
まずはproducts_controller.rbを編集します。
class ProductsController < ApplicationController
before_action :set_product, only: [:show, :edit, :update]
private
def set_product
@product = Product.find(params[:id])
end
end
次にusers_controller.rbです。
このコントローラはまだ作ってなかったので、作ってから編集です。
rails g controller users
class UsersController < ApplicationController
before_action :set_user, only: [:show]
private
def set_user
@user = User.find(params[:id])
end
end
あとは必要なビューを全ルーティング分作っちゃいましょう。
作るファイルのリストを全て載せておきます。
作成先がapp/views/users/以下とapp/views/prodcuts/以下で
2通りあるので注意してください。
| app/views/users/以下 | 対応URL |
|---|---|
| new_session.html.haml | http://localhost:3000/users/new_session |
| new_user.html.haml | http://localhost:3000/users/new_user |
| create_address.html.haml | http://localhost:3000/users/create_address |
| new_address.html.haml | http://localhost:3000/users/new_address |
| show.html.haml | http://localhost:3000/users/1 |
| app/views/products/以下 | 対応URL |
|---|---|
| index.html.haml | http://localhost:3000/ |
| new.html.haml | http://localhost:3000/products/new |
| create.html.haml | http://localhost:3000/products/product_create |
| edit.html.haml | http://localhost:3000/products/1/edit |
| update.html.haml | http://localhost:3000/products/product_update |
| show.html.haml | http://localhost:3000/products/1 |
| destroy.html.haml | http://localhost:3000/products/product_destroy |
これでOK!さてマークアップ作業に...といきたい所ですがもう一手間必要です。
先ほど述べたようにshow editは表示するためにidが必要です。
ということは、ダミーデータがDBに入ってなきゃ表示できませんね。
よって、以下のようにダミーデータを登録しておきます。
(今回はMySQLへのデータ挿入にSequel Proを使用しています。)
これらを作成したら、上記全ての対応URLにアクセスしてビューが表示できるか確認してください。
中身は書いていないので、全て白紙の表示になっていてOKです。
最後の準備として、便利なアイコン表示ができるfontawesomeを導入します。
gem 'font-awesome-sass'
bundle install
また、app/assets/layoutsというディレクトリにapplication.cssがあると思いますが、
scss記法というものを使っていくので、application.scssに名前を変更しておきましょう。
そして、fontawesomeを使うために以下の記述を入れておきます。
@import "font-awesome-sprockets";
@import "font-awesome";
これで準備完了です。それではマークアップ作業に入りましょう。
2.トップページ
まずはトップページであるproducts#indexから作ります。
見本があった方が作りやすいと思いますので、メルカリを見ながら作っていきましょう。
検証ツールで適宜ブロックの分け方を調べていけば、さほど大変な作業ではないと思います。
慣れてくると、検証ツールを見るより自分で考えてコーディングした方が早かったりします。
| 必要な機能 | 対応アクション |
|---|---|
| ログイン画面 | devise/sessions#new |
| 新規登録(氏名) | users/registrations#new |
| 新規登録(住所) | users/registrations#new_address |
| 新規登録(完了画面) | users/registrations#create_address |
| マイページ | users#show |
| トップページ | products#index |
| 商品出品 | products#new products#create |
| 商品編集 | products#edit products#update |
| 商品詳細表示 | products#show |
| 商品削除 | products#destroy |
おまけTips
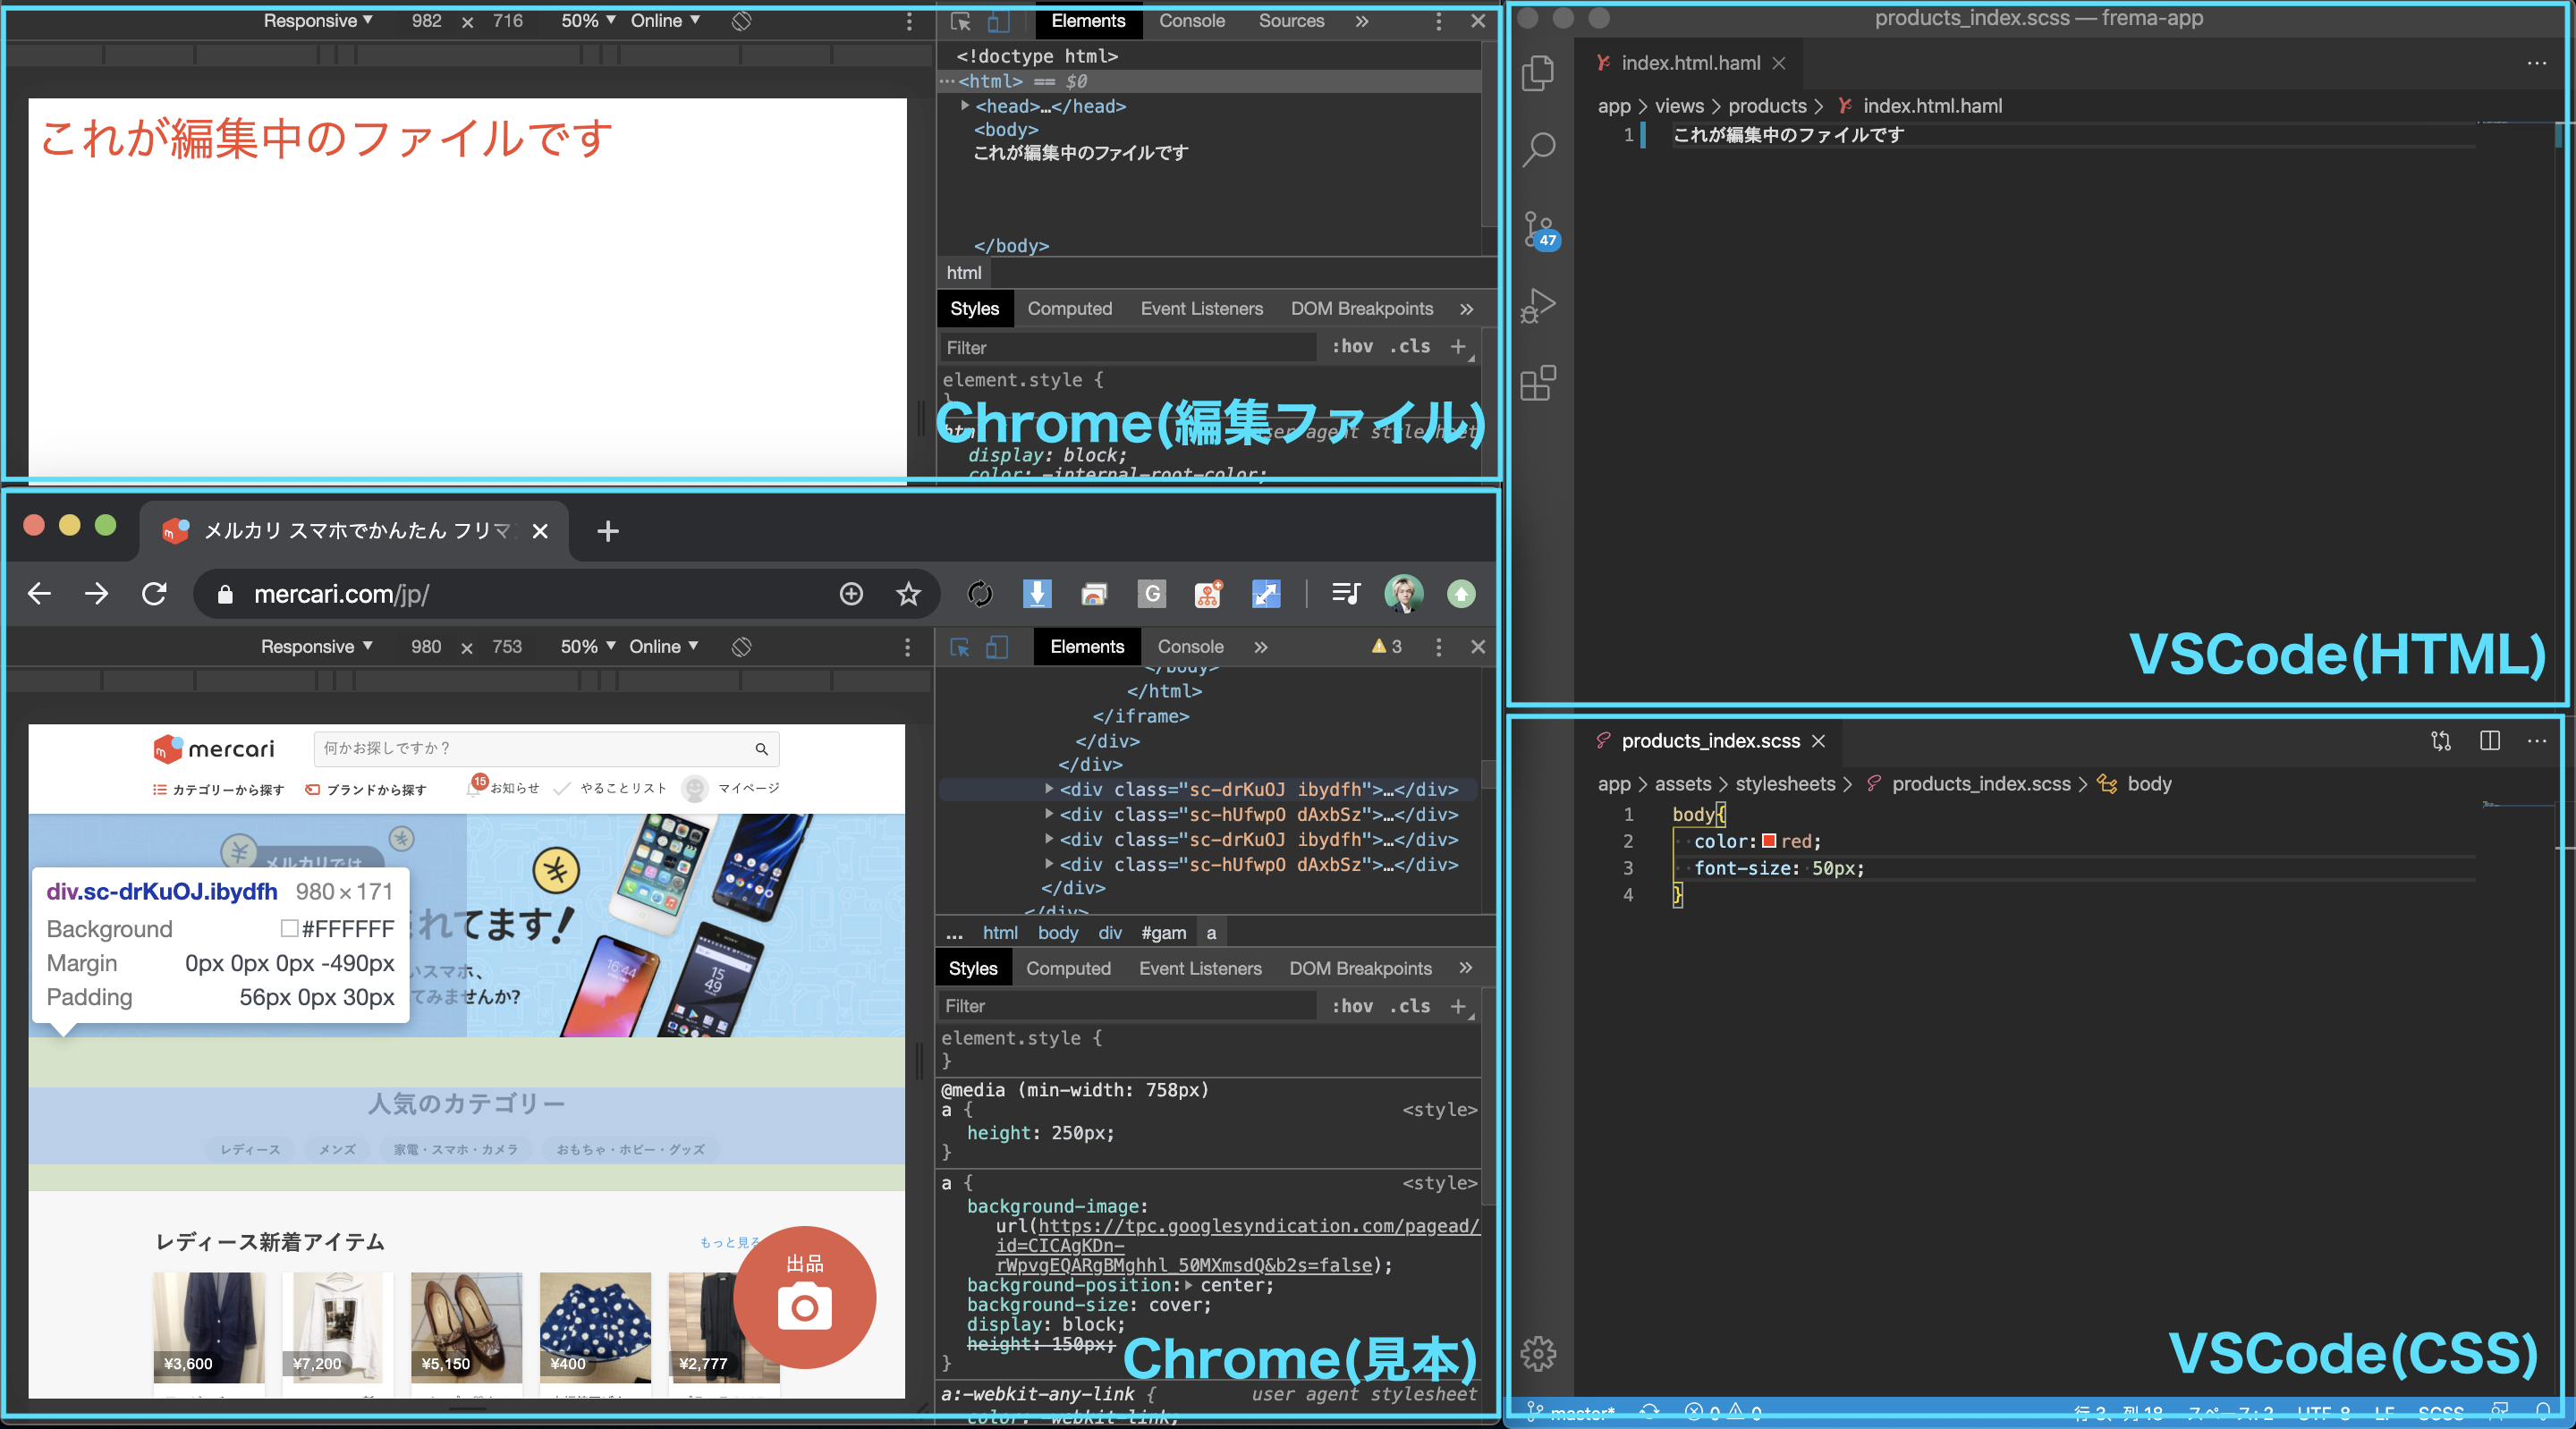
私はよくこんな感じで1画面を分割してマークアップ作業をしてます(MacBook Pro 13インチ)。
デュアルモニターなども色々試しましたが、結論、これが一番効率良く作業できてます。
ちょっと画面が狭いですが、別画面+3本指切替だと、切り替えに無駄な時間が掛かるのでこうなりました。
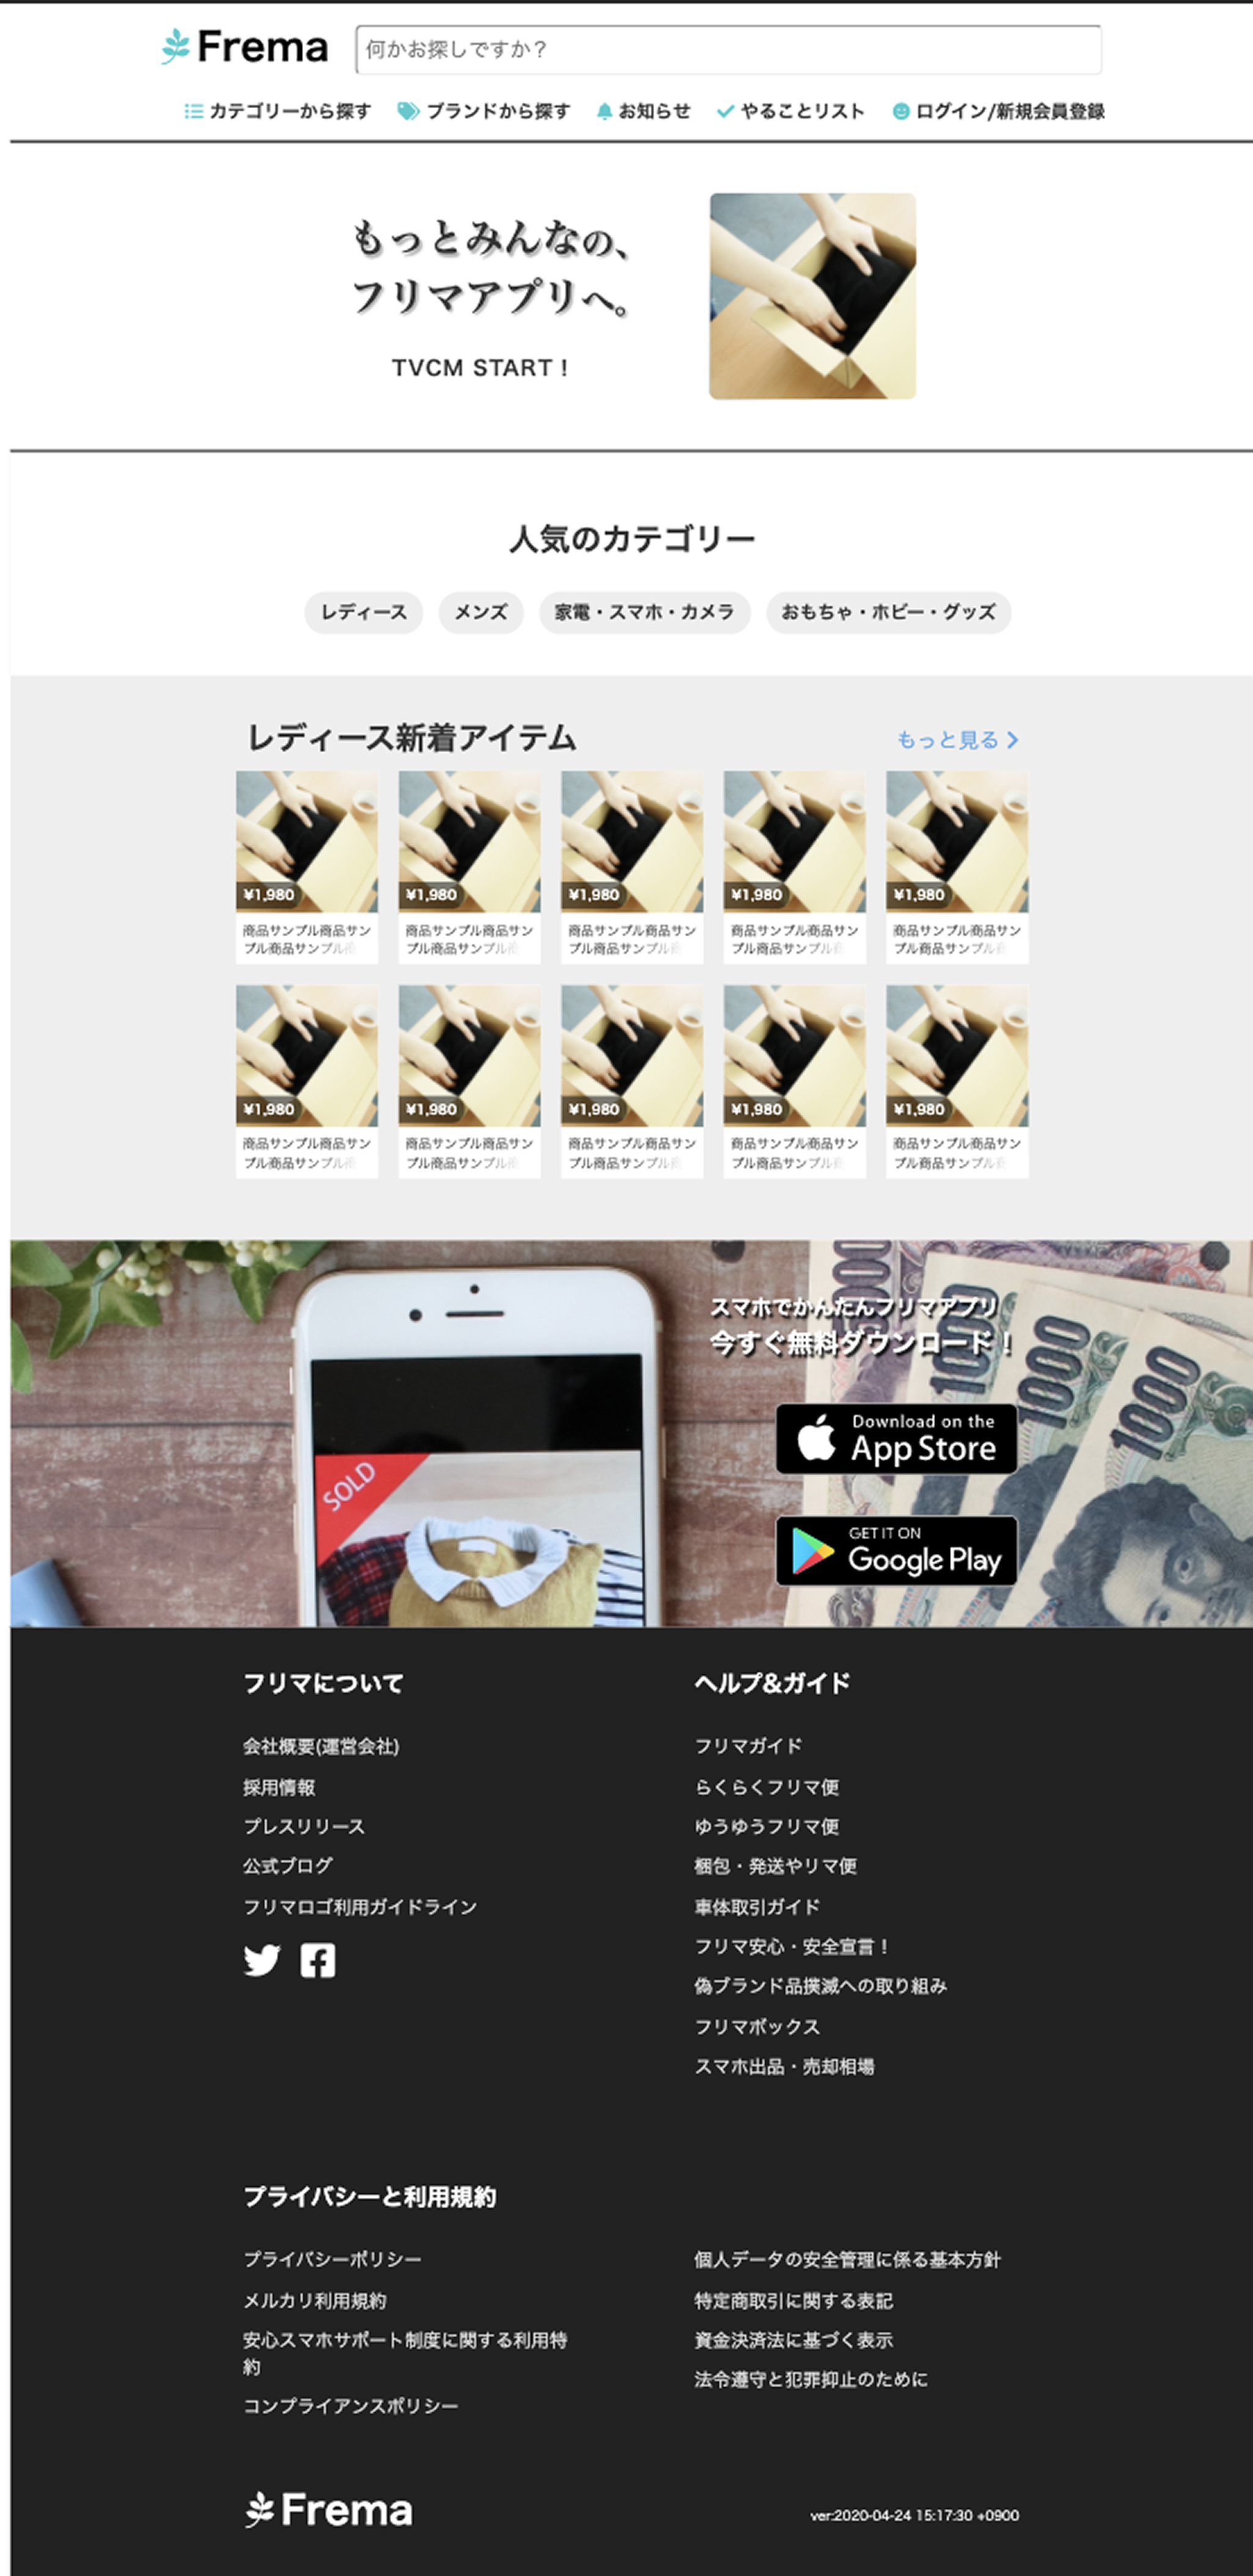
トップページは以下のような感じにマークアップしてみました。
コピペで作業を進めてもOKですが、自分でゆっくり書くのも勉強になるのでオススメです。
画像素材はこちらのサイトからDLさせて頂いてます。
トップページ ソースコード
= render "layouts/header"
.top-image
.top-image__text
.top-image__text__top
もっとみんな
%span の、
%br
フリマアプリ
%span へ。
.top-image__text__bottom
TVCM START!
.top-image__image
.top-main
.top-main__title
%h2 人気のカテゴリー
.top-main__title__tags
%ul
%li レディース
%li メンズ
%li 家電・スマホ・カメラ
%li おもちゃ・ホビー・グッズ
.top-main__contents
%h2 レディース新着アイテム
= link_to "#", class:"link-blue" do
もっと見る
%i{class: "fas fa-chevron-right"}
- for i in 1..2
.top-main__products
- for j in 1..5
.top-main__products__product
= image_tag "1069723_s.jpg"
.top-main__products__product__price
¥1,980
.top-main__products__product__text
商品サンプル商品サンプル商品サンプル商品サンプル
= render "layouts/footer"
= link_to new_product_path, data: {turbolinks: false} do
.new-product-btn
出品
%br
%i{class:"fas fa-camera"}
ヘッダーは他のビューでも使うのでapp/views/layouts/_header.html.hamlに作成しました。
フッターも同様に、app/views/layouts/_footer.html.hamlとして部分テンプレート化してます。
#request{action: request.path}
.header
.header__top
= link_to root_path do
%i{class: "fab fa-pagelines"}
%span{class: "header__top__logo"}
Frema
%input{class: "header__top__input", id: "serch-box", placeholder: "何かお探しですか?"}
.header__bottom
%ul
%li
%i{class: "fas fa-list"}
カテゴリーから探す
%li
%i{class: "fas fa-tags"}
ブランドから探す
%li
%i{class: "fas fa-bell"}
お知らせ
%li
%i{class: "fas fa-check"}
やることリスト
%li
- if user_signed_in?
= link_to user_path(current_user) do
%i{class: "fas fa-smile"}
マイページへ
- else
= link_to new_user_session_path do
%i{class: "fas fa-smile"}
ログイン/新規会員登録
.footer-image
.footer-image__text
.footer-image__text__top
スマホでかんたんフリマアプリ
.footer-image__text__bottom
今すぐ無料ダウンロード!
%a{href: "https://apps.apple.com/jp/app/firefox-%E3%82%A6%E3%82%A7%E3%83%96%E3%83%96%E3%83%A9%E3%82%A6%E3%82%B6%E3%83%BC/id989804926?mt=8", class:"app-store"}
%a{href: "https://play.google.com/store/apps/details?id=com.amazon.avod.thirdpartyclient&pcampaignid=pcampaignidMKT-Other-global-all-co-prtnr-py-PartBadge-Mar2515-1", class:"google-play"}
.footer
.footer__top
.footer__top__block
.footer__top__block__title
フリマについて
.footer__top__block__content
%ul
%li 会社概要(運営会社)
%li 採用情報
%li プレスリリース
%li 公式ブログ
%li フリマロゴ利用ガイドライン
%i{class: "fab fa-twitter"}
%i{class: "fab fa-facebook-square"}
.footer__top__block
.footer__top__block__title
ヘルプ&ガイド
.footer__top__block__content
%ul
%li フリマガイド
%li らくらくフリマ便
%li ゆうゆうフリマ便
%li 梱包・発送やリマ便
%li 車体取引ガイド
%li フリマ安心・安全宣言!
%li 偽ブランド品撲滅への取り組み
%li フリマボックス
%li スマホ出品・売却相場
.footer__top
.footer__top__block
.footer__top__block__title
プライバシーと利用規約
.footer__top__block__content
%ul
%li プライバシーポリシー
%li メルカリ利用規約
%li 安心スマホサポート制度に関する利用特約
%li コンプライアンスポリシー
.footer__top__block
.footer__top__block__title.visibility-none
プライバシーと利用規約
.footer__top__block__content
%ul
%li 個人データの安全管理に係る基本方針
%li 特定商取引に関する表記
%li 資金決済法に基づく表示
%li 法令遵守と犯罪抑止のために
.footer__bottom
%i{class: "fab fa-pagelines"}
%span{class: "footer__bottom__logo"}
Frema
%span{class: "update-ver"}
= "ver:#{$date}"
続いて、scssファイルです。
$frema: #3CCACE;
@import "font-awesome-sprockets";
@import "font-awesome";
@import "products_index";
@import "products_new";
@import "products_show";
@import "users";
@import "users_show";
*{
background-repeat: no-repeat;
box-sizing: border-box;
color: #333;
}
body{
padding: 0;
margin: 0;
}
a{
text-decoration: none;
color: #eee;
&:hover{
text-decoration: underline;
opacity: 0.5;
}
}
.link-blue{
color: #62A6E6;
}
h1,h2,h3,h4,h5{
margin: 0;
}
li{
list-style: none;
}
.header{
height: 100px;
border-bottom: 2px solid #333;
&__top{
height: 50px;
padding: 0 40px;
display: flex;
align-items: center;
justify-content: center;
.fa-pagelines{
font-size: 30px;
color: $frema;
}
a{
&:hover{
text-decoration: none;
}
}
&__logo{
font-size: 30px;
font-weight: bold;
color: black;
}
&__input{
height: 40px;
width: 580px;
font-size: 16px;
margin-top: 6px;
margin-left: 20px;
padding-left: 6px;
border-radius: 6px;
}
}
&__bottom{
height: 50px;
display: flex;
justify-content: center;
ul{
display: flex;
li{
font-size: 14px;
font-weight: bold;
padding-right: 20px;
i{
color: $frema;
}
}
}
}
}
.top-image{
height: 240px;
display: flex;
align-items: center;
justify-content: center;
border-bottom:2px solid #333;
&__text{
font-weight: bold;
text-align: center;
&__top{
font-size: 30px;
font-family: serif;
position: relative;
text-shadow: 2px 2px 2px rgba(0,0,0,.3);
span{
font-size: 26px;
padding-top: 6px;
position: absolute;
}
}
&__bottom{
padding-top: 20px;
padding-left: 30px;
letter-spacing: 1px;
}
}
&__image{
width: 160px;
height: 160px;
margin-left: 100px;
border-radius: 6px;
background-size: cover;
background-image: image_url("1069723_s.jpg");
}
}
.top-main{
padding-bottom: 40px;
background-color: #eee;
&__title{
padding-top: 50px;
background-color: white;
&__tags{
padding-bottom: 10px;
ul{
display: flex;
justify-content: center;
li{
margin: 6px;
font-size: 14px;
font-weight: bold;
padding: 6px 12px;
border-radius: 18px;
background-color: #eee;
}
}
}
text-align: center;
}
&__contents{
width: 600px;
display: flex;
margin: 0 auto;
padding-top: 30px;
justify-content: space-between;
a{
padding-top: 8px;
.fa-chevron-right{
color: #62A6E6;
}
}
}
&__products{
display: flex;
justify-content: center;
&__product{
margin: 8px;
width: 110px;
height: 150px;
position: relative;
background-color: white;
img{
width: 110px;
height: 110px;
object-fit: cover;
}
&__price{
position: absolute;
top: 86px;
left: 0;
font-size: 10px;
color: white;
padding: 3px 6px;
font-weight: bold;
border-radius: 0 18px 18px 0;
background-color: rgba(0,0,0,.5);
}
&__text{
width: 100%;
height: 32px;
padding: 0 2px;
font-size: 10px;
overflow: hidden;
text-align: center;
position: relative;
&:after{
content: '';
display: block;
position: absolute;
bottom: 0;
right: 0;
width: 50%;
height: 1.5em;
background: linear-gradient(to right, rgba(255,255,255,0), #fff 72%);
}
}
}
}
}
.footer-image{
width: 100%;
height: 300px;
background-size: 1440px;
-webkit-box-pack: justify;
background-position: center -140px;
text-shadow: 2px 2px 2px rgba(0,0,0,.9);
background-image: image_url("2615001_m.jpg");
&__text{
width: 600px;
margin: 0 auto;
padding-top: 40px;
padding-left: 360px;
&__top{
color: white;
font-weight: 800;
}
&__bottom{
color: white;
font-size: 20px;
font-weight: bold;
}
.app-store{
height:65px;
width:190px;
overflow:hidden;
margin-top: 32px;
margin-left: 50px;
display:inline-block;
background-size:contain;
background:url("https://web-jp-assets.mercdn.net/_next/static/images/app-store-a5c17948c6fd6d5b60b13d421cd60b35.svg") no-repeat;
}
.google-play{
height:65px;
width:190px;
overflow:hidden;
margin-top: 16px;
margin-left: 50px;
display:inline-block;
background-size:contain;
background:url("https://web-jp-assets.mercdn.net/_next/static/images/google-play-495575abb895b405aa6336b2a4304958.svg") no-repeat;
}
}
}
.footer{
background-color: #222;
&__top{
display: flex;
justify-content: center;
&__block{
width: 350px;
padding:30px 5%;
&__title{
color: white;
font-size: 18px;
font-weight: bold;
}
&__content{
.fab{
color: white;
font-size: 30px;
padding-right: 10px;
}
ul{
padding: 0;
li{
color: #ddd;
font-size: 14px;
padding-top: 10px;
}
}
}
}
}
&__bottom{
width: 600px;
margin: 0 auto;
padding-bottom: 30px;
.fa-pagelines{
color: white;
font-size: 30px;
}
&__logo{
color: white;
font-size: 30px;
font-weight: bold;
}
.update-ver{
float: right;
font-size: 6px;
color: white;
padding-top: 20px;
}
}
}
.visibility-none{
opacity: 0;
cursor: default;
visibility: none;
}
.new-product-btn{
z-index: 11;
position: fixed;
bottom: 30px;
right:30px;
background-color: $frema;
display: inline-block;
height: 140px;
width: 140px;
border-radius: 140px;
padding-top: 10px;
color: #fff;
font-weight: bold;
background-size: 80px;
text-align: center;
background-position: center center;
.fa-camera{
color: white;
font-size: 70px;
}
}
以上がトップページのマークアップ作業です。普通に丸1日かかりますね...。
マークアップを爆速でできる方は、コメント欄でやり方を教えてくれるとめっちゃ有り難いです。
3.商品出品
続けて、商品出品のマークアップに入ります。
この機能についてはnewとcreateの2つのビューを作成します。
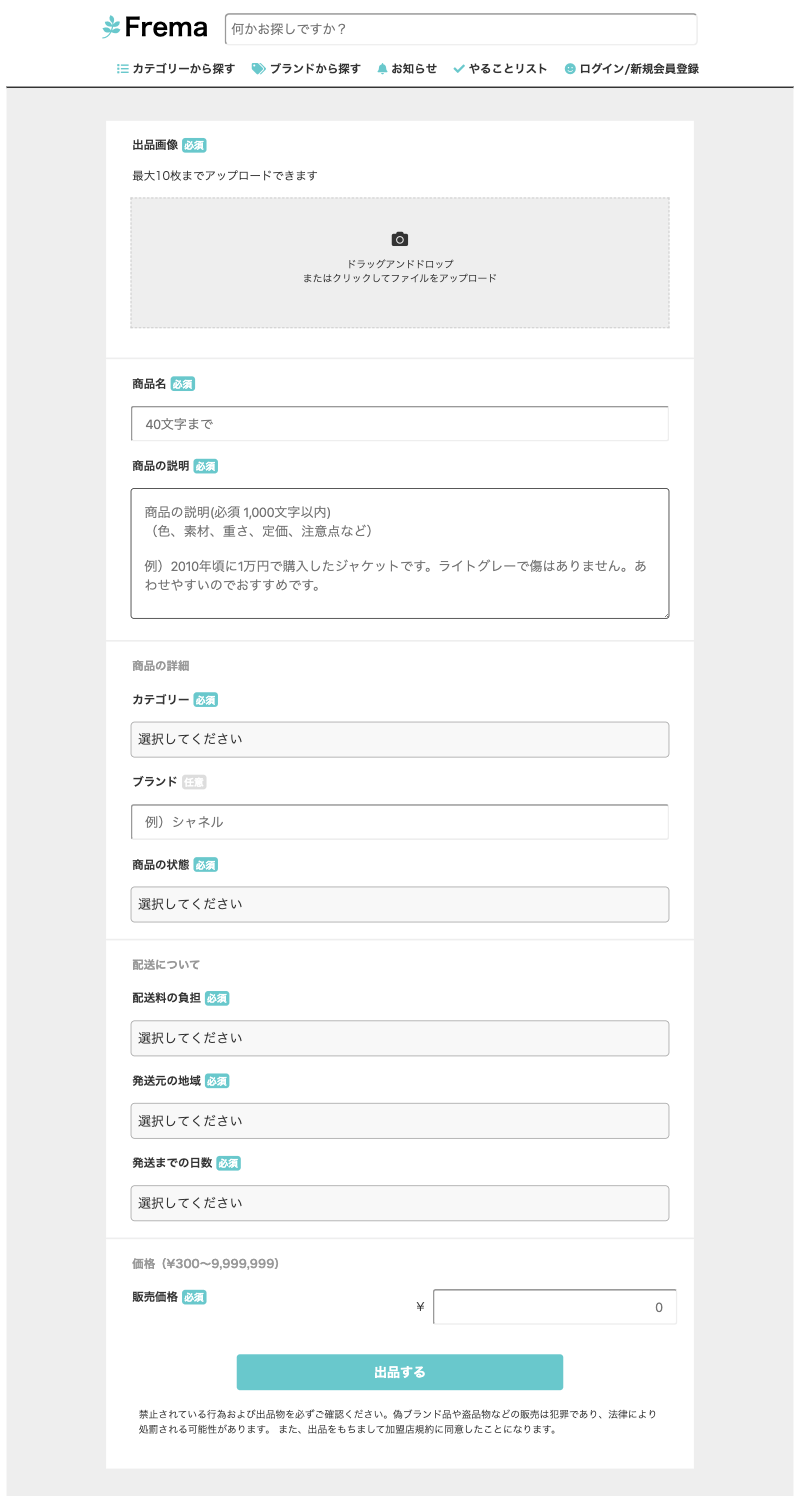
newは商品名とかの入力欄がズラーっと並んでいるやつです。
入力欄は、商品出品機能の章でform_withに書き換えますが、一旦全部inputタグとselectタグで作ります。
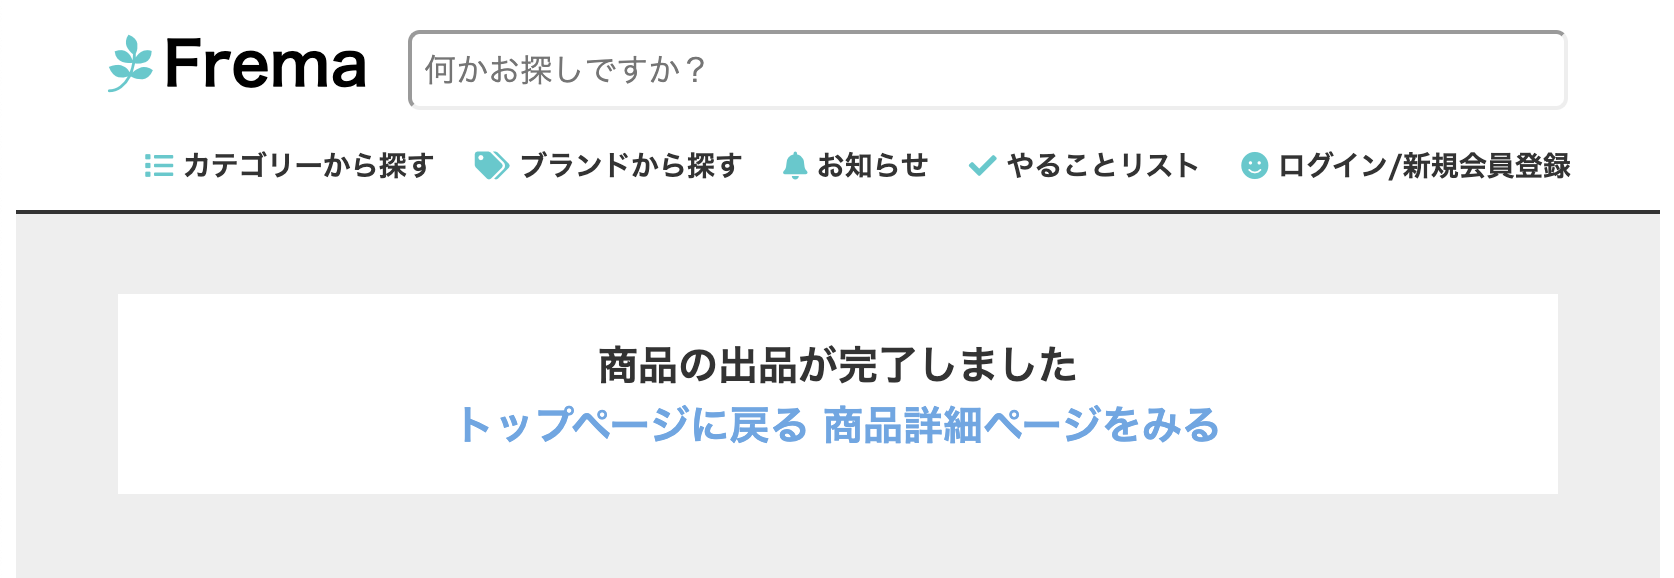
createは「出品が完了しました」って表示するやつです。こっちは簡単。
トップページに戻るボタンと商品詳細を見るボタンが2つ搭載されてると親切ですね。
| 必要な機能 | 対応アクション |
|---|---|
| ログイン画面 | devise/sessions#new |
| 新規登録(氏名) | users/registrations#new |
| 新規登録(住所) | users/registrations#new_address |
| 新規登録(完了画面) | users/registrations#create_address |
| マイページ | users#show |
| [完了] |
[完了] |
| 商品出品 |
products#new products#create |
| 商品編集 | products#edit products#update |
| 商品詳細表示 | products#show |
| 商品削除 | products#destroy |
商品出品 ソースコード
= render "layouts/header"
.new-wrapper
.new-wrapper__main
.new-wrapper__main__title
出品画像
%span{class: "require"} 必須
.new-wrapper__main__text
最大10枚までアップロードできます
.new-wrapper__main__image-field
%i{class: "fas fa-camera"}
.new-wrapper__main__image-field__text
ドラッグアンドドロップ
%br
またはクリックしてファイルをアップロード
.new-wrapper__main
.new-wrapper__main__title
商品名
%span{class: "require"} 必須
%input{class: "new-wrapper__main__input-text", placeholder: "40文字まで"}
.new-wrapper__main__title.spacing
商品の説明
%span{class: "require"} 必須
%textarea{class: "new-wrapper__main__input-textarea", placeholder: "商品の説明(必須 1,000文字以内)\n(色、素材、重さ、定価、注意点など)\n\n例)2010年頃に1万円で購入したジャケットです。ライトグレーで傷はありません。あわせやすいのでおすすめです。"}
.new-wrapper__main
.new-wrapper__main__subtitle
商品の詳細
.new-wrapper__main__title
カテゴリー
%span{class: "require"} 必須
%select{class: "new-wrapper__main__input-select"}
%option{value: "0"} 選択してください
%option{value: "1"} 選択肢1
%option{value: "2"} 選択肢2
%option{value: "3"} 選択肢3
.new-wrapper__main__title.spacing
ブランド
%span{class: "any"} 任意
%input{class: "new-wrapper__main__input-text", placeholder: "例)シャネル"}
.new-wrapper__main__title.spacing
商品の状態
%span{class: "require"} 必須
%select{class: "new-wrapper__main__input-select"}
%option{value: "0"} 選択してください
%option{value: "1"} 選択肢1
%option{value: "2"} 選択肢2
%option{value: "3"} 選択肢3
.new-wrapper__main
.new-wrapper__main__subtitle
配送について
.new-wrapper__main__title
配送料の負担
%span{class: "require"} 必須
%select{class: "new-wrapper__main__input-select"}
%option{value: "0"} 選択してください
%option{value: "1"} 選択肢1
%option{value: "2"} 選択肢2
.new-wrapper__main__title.spacing
発送元の地域
%span{class: "require"} 必須
%select{class: "new-wrapper__main__input-select"}
%option{value: "0"} 選択してください
%option{value: "1"} 選択肢1
%option{value: "2"} 選択肢2
.new-wrapper__main__title.spacing
発送までの日数
%span{class: "require"} 必須
%select{class: "new-wrapper__main__input-select"}
%option{value: "0"} 選択してください
%option{value: "1"} 選択肢1
%option{value: "2"} 選択肢2
.new-wrapper__main
.new-wrapper__main__subtitle
価格(¥300〜9,999,999)
.new-wrapper__main__title.float-left
販売価格
%span{class: "require"} 必須
.new-wrapper__main__input-price.float-right
¥
%input{class: "new-wrapper__main__input-price__input", placeholder: 0}
.spacing
.spacing
%input{type: "submit", value: "出品する", class:"new-wrapper__main__submit"}
.new-wrapper__main__caution
禁止されている行為および出品物を必ずご確認ください。偽ブランド品や盗品物などの販売は犯罪であり、法律により処罰される可能性があります。 また、出品をもちまして加盟店規約に同意したことになります。
= render "layouts/footer"
次はcreateのhamlです。短いです。11行。
ヘッダーフッターはいらないかもですね。お好みでどうぞ。
= render "layouts/header"
.new-wrapper
.new-wrapper__main
.new-wrapper__main__create
商品の出品が完了しました
%br
= link_to root_path,class: "link-blue" do
トップページに戻る
= link_to product_path(1),class: "link-blue" do
商品詳細ページをみる
= render "layouts/footer"
続いてscssです。createのスタイルも5行だけなのでproducts_new.scssの中にまとめました。
.new-wrapper{
background-color: #eee;
padding: 40px 0;
&__main{
width: 720px;
padding:20px;
margin: 0 auto;
font-size: 14px;
margin-bottom: 2px;
background-color: white;
.spacing{
padding-top: 20px;
}
.require{
padding: 3px;
color: white;
font-size: 12px;
border-radius: 4px;
background-color: $frema;
}
.any{
padding: 3px;
color: white;
font-size: 12px;
border-radius: 4px;
background-color: #ddd;
}
&__title{
font-weight: bold;
padding: 0 12px;
padding-bottom: 16px;
}
&__subtitle{
color: #999;
padding: 0 12px;
font-weight: bold;
padding-bottom: 20px;
}
&__text{
padding: 0 12px;
}
&__image-field{
width: 660px;
height: 160px;
margin: 16px auto;
background-color: #eee;
border: 1px dashed #ccc;
display: flex;
justify-content: center;
align-items: center;
font-size: 12px;
text-align: center;
position: relative;
.fa-camera{
position: absolute;
top: 40px;
font-size: 20px;
}
&__text{
padding-top: 20px;
}
}
&__input-text{
height: 44px;
line-height: 44px;
font-size: 16px;
padding: 0 16px;
width: 660px;
margin-left: 10px;
border-radius: 4px;
}
&__input-textarea{
height: 160px;
font-size: 16px;
padding: 16px;
width: 660px;
margin-left: 10px;
border-radius: 4px;
}
&__input-select{
height: 44px;
line-height: 44px;
font-size: 16px;
padding: 0 16px;
width: 660px;
margin-left: 10px;
border-radius: 4px;
}
&__input-price{
display: flex;
justify-content: flex-end;
align-items: center;
&__input{
text-align: end;
height: 44px;
line-height: 44px;
font-size: 16px;
padding: 0 16px;
width: 300px;
margin-left: 10px;
border-radius: 4px;
}
}
.float-left{
float: left;
}
.float-right{
float: right;
}
&__submit{
border-radius: 4px;
display: block;
margin: 0 auto;
margin-top: 40px;
width: 400px;
height: 44px;
background-color: $frema;
color: white;
font-weight: bold;
font-size: 16px;
border: 0px solid #000;
}
&__caution{
font-size: 12px;
padding: 20px;
}
&__create{
text-align: center;
font-size: 20px;
font-weight: bold;
}
}
}
以上で商品出品は完了です。
4.商品編集
続けて、商品編集のマークアップ...と言いたいところですが、この作業、実はすでに完了してます。
なぜなら、出品機能と使うビューが一緒だから。
| 必要な機能 | 対応アクション |
|---|---|
| ログイン画面 | devise/sessions#new |
| 新規登録(氏名) | users/registrations#new |
| 新規登録(住所) | users/registrations#new_address |
| 新規登録(完了画面) | users/registrations#create_address |
| マイページ | users#show |
| [完了] |
[完了] |
| [完了] |
[完了] [完了] |
| 商品編集 | products#edit products#update |
| 商品詳細表示 | products#show |
| 商品削除 | products#destroy |
まずは、new.html.hamlのコードをコピーし、edit.html.hamlの中に貼り付けです。
同様に、create.html.hamlのコードをコピーし、update.html.hamlの中に貼り付け。
こちらは「商品の出品が完了しました」を「商品の編集が完了しました」に書き換えておきましょう。
以上で商品編集は完了です。
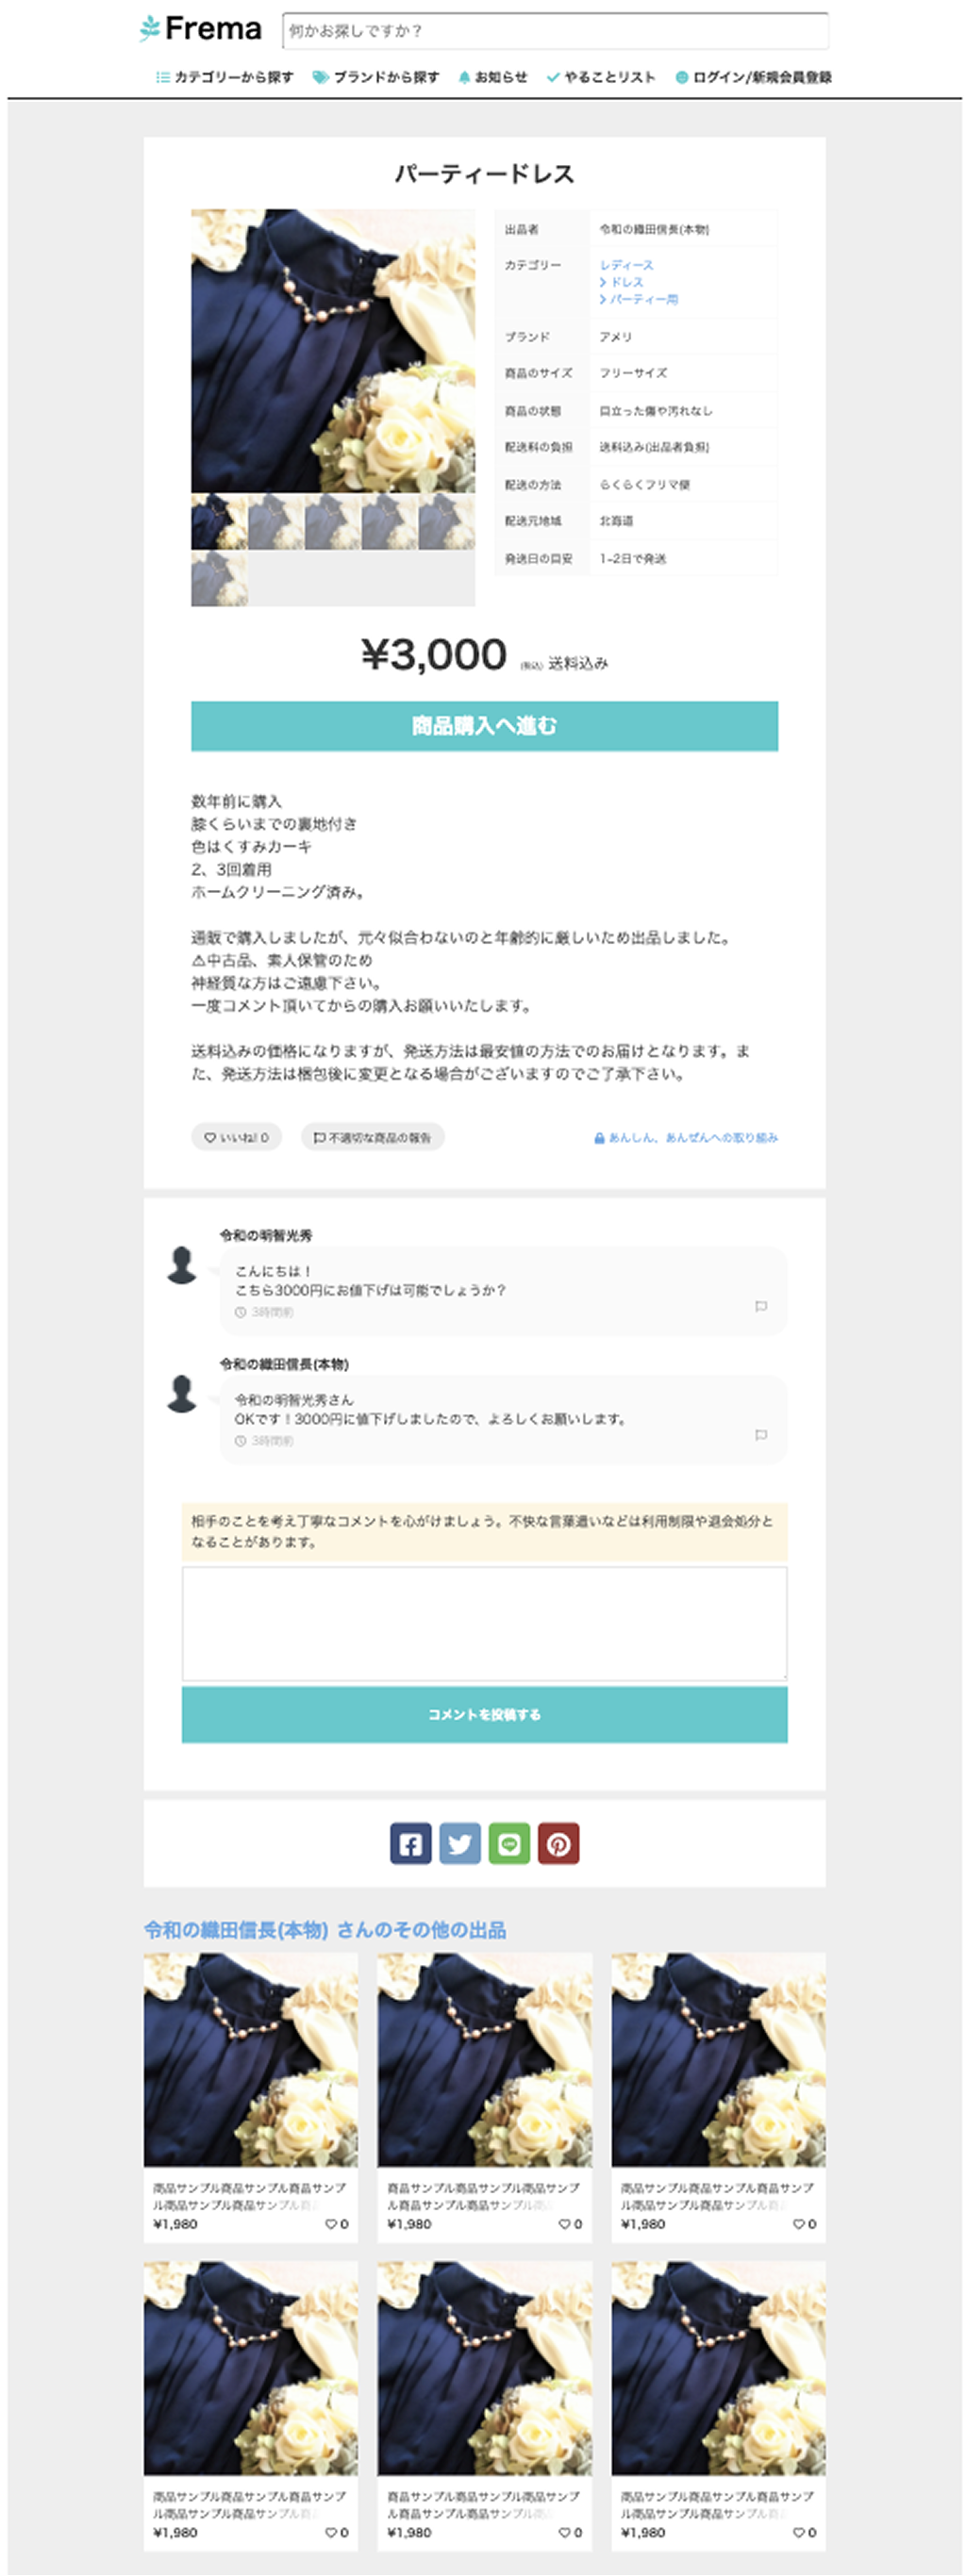
5.商品詳細表示
商品詳細表示とは何かというと、商品の個別ページですね。
商品のアイコンをクリックしたときの遷移先です。
| 必要な機能 | 対応アクション |
|---|---|
| ログイン画面 | devise/sessions#new |
| 新規登録(氏名) | users/registrations#new |
| 新規登録(住所) | users/registrations#new_address |
| 新規登録(完了画面) | users/registrations#create_address |
| マイページ | users#show |
| [完了] |
[完了] |
| [完了] |
[完了] [完了] |
| [完了] |
[完了] [完了] |
| 商品詳細表示 | products#show |
| 商品削除 | products#destroy |
以下のような感じにしてみました。
商品詳細表示 ソースコード
= render "layouts/header"
.show-wrapper
.show-wrapper__main
.show-wrapper__main__product-name
%h2 パーティードレス
.show-wrapper__main__contents
.show-wrapper__main__contents__left
= image_tag "1616794_s.jpg", class:"show-wrapper__main__contents__left__image"
.show-wrapper__main__contents__left__icons
- for num in 1..6
- if num == 1
= image_tag "1616794_s.jpg", class:"show-wrapper__main__contents__left__icons__icon"
- else
= image_tag "1616794_s.jpg", class:"show-wrapper__main__contents__left__icons__icon non-active"
.show-wrapper__main__contents__right
.show-wrapper__main__contents__right__table
.show-wrapper__main__contents__right__table__left
出品者
.show-wrapper__main__contents__right__table__right
令和の織田信長(本物)
.show-wrapper__main__contents__right__table
.show-wrapper__main__contents__right__table__left
カテゴリー
.show-wrapper__main__contents__right__table__right
= link_to "#", class: "link-blue" do
レディース
%br
= link_to "#", class: "link-blue" do
%i{class: "fas fa-chevron-right"}
ドレス
%br
= link_to "#", class: "link-blue" do
%i{class: "fas fa-chevron-right"}
パーティー用
.show-wrapper__main__contents__right__table
.show-wrapper__main__contents__right__table__left
ブランド
.show-wrapper__main__contents__right__table__right
アメリ
.show-wrapper__main__contents__right__table
.show-wrapper__main__contents__right__table__left
商品のサイズ
.show-wrapper__main__contents__right__table__right
フリーサイズ
.show-wrapper__main__contents__right__table
.show-wrapper__main__contents__right__table__left
商品の状態
.show-wrapper__main__contents__right__table__right
目立った傷や汚れなし
.show-wrapper__main__contents__right__table
.show-wrapper__main__contents__right__table__left
配送料の負担
.show-wrapper__main__contents__right__table__right
送料込み(出品者負担)
.show-wrapper__main__contents__right__table
.show-wrapper__main__contents__right__table__left
配送の方法
.show-wrapper__main__contents__right__table__right
らくらくフリマ便
.show-wrapper__main__contents__right__table
.show-wrapper__main__contents__right__table__left
配送元地域
.show-wrapper__main__contents__right__table__right
北海道
.show-wrapper__main__contents__right__table
.show-wrapper__main__contents__right__table__left
発送日の目安
.show-wrapper__main__contents__right__table__right
1~2日で発送
.show-wrapper__main__price
%h1
= "¥#{3000.to_s(:delimited)}"
%span{class: "show-wrapper__main__price__tax"} (税込)
送料込み
= link_to "#", class:"show-wrapper__main__buy-button" do
商品購入へ進む
.show-wrapper__main__explanation
= br("数年前に購入\n膝くらいまでの裏地付き\n色はくすみカーキ\n2、3回着用\nホームクリーニング済み。\n\n通販で購入しましたが、元々似合わないのと年齢的に厳しいため出品しました。\n⚠️中古品、素人保管のため\n神経質な方はご遠慮下さい。\n一度コメント頂いてからの購入お願いいたします。\n\n送料込みの価格になりますが、発送方法は最安値の方法でのお届けとなります。また、発送方法は梱包後に変更となる場合がございますのでご了承下さい。")
.show-wrapper__main__bottom
.show-wrapper__main__bottom__btn-wrapper
.show-wrapper__main__bottom__btn-wrapper__btn
%i{class: "far fa-heart"}
いいね!
0
.show-wrapper__main__bottom__btn-wrapper__btn
%i{class: "far fa-flag"}
不適切な商品の報告
= link_to "#", class:"show-wrapper__main__bottom__link link-blue" do
%i{class: "fas fa-lock"}
あんしん、あんぜんへの取り組み
.show-wrapper__main
.show-wrapper__main__comment-wrapper
.show-wrapper__main__comment-wrapper__name
令和の明智光秀
.show-wrapper__main__comment-wrapper__icon
= image_tag "user_icon.png"
.show-wrapper__main__comment-wrapper__comment
= image_tag "bubble.png"
= br("こんにちは!\nこちら3000円にお値下げは可能でしょうか?")
%br
%i{class: "far fa-clock"} 3時間前
%i{class: "far fa-flag"}
.show-wrapper__main__comment-wrapper
.show-wrapper__main__comment-wrapper__name
令和の織田信長(本物)
.show-wrapper__main__comment-wrapper__icon
= image_tag "user_icon.png"
.show-wrapper__main__comment-wrapper__comment
= image_tag "bubble.png"
= br("令和の明智光秀さん\nOKです!3000円に値下げしましたので、よろしくお願いします。")
%br
%i{class: "far fa-clock"} 3時間前
%i{class: "far fa-flag"}
.show-wrapper__main__comment-input
.show-wrapper__main__comment-input__caution
相手のことを考え丁寧なコメントを心がけましょう。不快な言葉遣いなどは利用制限や退会処分となることがあります。
%textarea{class: "show-wrapper__main__comment-input__textfield"}
%input{type: "submit", class: "show-wrapper__main__comment-input__submit", value: "コメントを投稿する"}
.show-wrapper__main
.show-wrapper__main__sns-icons
%i{class: "fab fa-facebook-square"}
%i{class: "fab fa-twitter"}
%i{class: "fab fa-line"}
%i{class: "fab fa-pinterest"}
.show-wrapper__others
= link_to "#", class: "show-wrapper__others__title link-blue" do
= "令和の織田信長(本物)"
さんのその他の出品
.show-wrapper__others__products
- for num in 1..6
.show-wrapper__others__products__product
= image_tag "1616794_s.jpg", class: "show-wrapper__others__products__product__image"
.show-wrapper__others__products__product__bottom
.show-wrapper__others__products__product__bottom__text
商品サンプル商品サンプル商品サンプル商品サンプル商品サンプル商品サンプル商品サンプル
.show-wrapper__others__products__product__bottom__price
= "¥#{1980.to_s(:delimited)}"
%span{class: "show-wrapper__others__products__product__bottom__price__like"}
%i{class: "far fa-heart"}
0
= render "layouts/footer"
商品説明と商品コメントの表示にはbr()という自作ヘルパーメソッドを使っています。
これはデータベースに改行を含むテキストデータが挿入された際、改行できるようにするメソッドです。
以下のようにapp/helpers/application_helper.rbに記載すると使用できますので、
是非以下のようにヘルパーファイルに追記して使ってみてください。
module ApplicationHelper
def br(str)
html_escape(str).gsub(/\r\n|\r|\n/, "<br />").html_safe
end
end
続いてscssです。
.show-wrapper{
background-color: #eee;
padding: 40px 0;
&__main{
width: 720px;
margin: 0 auto;
margin-bottom: 10px;
padding:20px 0;
background-color: white;
&__product-name{
text-align: center;
padding-bottom: 20px;
font-size: 20px;
font-weight: bold;
}
&__contents{
display: flex;
justify-content: center;
&__left{
width: 300px;
height: 420px;
background-color: #eee;
&__image{
width: 300px;
height: 300px;
object-fit: cover;
display: block;
}
&__icons{
width: 300px;
height: 120px;
display: flex;
flex-wrap: wrap;
&__icon{
display: block;
width: 60px;
height: 60px;
cursor: pointer;
}
.non-active{
opacity: .5;
&:hover{
opacity: 1;
}
}
}
}
&__right{
width: 300px;
font-size: 12px;
border-top : 1px solid #f6f6f6;
margin-left: 20px;
height: 0;
&__table{
display: flex;
border-bottom: 1px solid #f6f6f6;
&__left{
width: 100px;
padding: 10px;
background-color: #fafafa;
border-left : 1px solid #f6f6f6;
}
&__right{
width: 200px;
padding: 10px;
border-left : 1px solid #f6f6f6;
border-right: 1px solid #f6f6f6;
.fa-chevron-right{
color:#62A6E6;
}
}
}
}
}
&__price{
padding: 20px 0;
text-align: center;
h1{
font-size: 40px;
display: inline;
}
&__tax{
font-size: 9px;
}
}
&__buy-button{
padding: 10px 0;
font-size: 22px;
font-weight: bold;
background-color: $frema;
color: white;
display: block;
text-align: center;
width: 620px;
margin: 0 auto;
}
&__explanation{
padding: 40px 0;
width: 620px;
margin: 0 auto;
}
&__bottom{
width: 620px;
display: flex;
margin: 0 auto;
padding-bottom: 20px;
justify-content: space-between;
&__btn-wrapper{
display: flex;
&__btn{
cursor: pointer;
font-size: 12px;
padding: 6px 14px;
border-radius: 18px;
background-color: #eee;
margin-right: 20px;
}
}
&__link{
padding-top: 6px;
font-size: 12px;
.fa-lock{
color: #62A6E6;
}
}
}
&__comment-wrapper{
width: 620px;
margin: 0 auto;
padding: 10px 30px;
position: relative;
font-size: 14px;
&__name{
font-weight: bold;
}
&__icon{
position: absolute;
left: -30px;
img{
width: 40px;
height: 40px;
object-fit: cover;
border-radius: 40px;
}
}
&__comment{
width: 600px;
background-color: #fafafa;
padding: 16px;
position: relative;
border-radius: 20px;
img{
width: 20px;
height: 20px;
position: absolute;
left: -20px;
}
i{
color: #aaa;
font-size: 12px;
&::before{
padding-right: 6px;
}
}
.fa-flag{
float: right;
cursor: pointer;
}
}
}
&__comment-input{
width: 640px;
margin: 0 auto;
padding: 30px 0;
&__caution{
background-color: #FEF6E1;
padding: 10px;
font-size: 14px;
}
&__textfield{
width: 640px;
margin: 0 auto;
margin-top: 6px;
height: 120px;
border: 1px solid #ccc;
}
&__submit{
display: inline-block;
width: 640px;
margin: 0 auto;
height: 60px;
border: 0px solid #000;
background-color: $frema;
color: white;
font-weight: bold;
}
}
&__sns-icons{
display: flex;
justify-content: center;
.fab{
margin: 4px;
border-radius: 6px;
font-size: 26px;
color: white;
line-height: 44px;
text-align: center;
width: 44px;
height: 44px;
}
.fa-facebook-square{
background-color: #3C517F;
}
.fa-twitter{
background-color: #6B9CC5;
}
.fa-line{
background-color: #57BD4D;
}
.fa-pinterest{
background-color: #9D3230;
}
}
}
&__others{
width: 720px;
margin: 0 auto;
margin-bottom: 10px;
padding:20px 0;
&__title{
font-size: 20px;
font-weight: bold;
}
&__products{
display: flex;
justify-content: space-between;
flex-wrap: wrap;
&__product{
margin: 10px 0;
width: 226px;
height: 306px;
background-color: white;
&__image{
width: 226px;
height: 226px;
object-fit: cover;
}
&__bottom{
padding: 6px 10px;
&__text{
font-size: 12px;
height: 38px;
overflow: hidden;
position: relative;
&:after{
content: '';
display: block;
position: absolute;
bottom: 0;
right: 0;
width: 50%;
height: 1.5em;
background: linear-gradient(to right, rgba(255,255,255,0), #fff 72%);
}
}
&__price{
font-size: 12px;
font-weight: bold;
&__like{
float: right;
}
}
}
}
}
}
}
以上が商品詳細表示です。
5.商品削除
おまけパートです。休憩タイムとも言います。
createのコードをコピペして、削除が完了しましたに書き換えると終わります。
| 必要な機能 | 対応アクション |
|---|---|
| ログイン画面 | devise/sessions#new |
| 新規登録(氏名) | users/registrations#new |
| 新規登録(住所) | users/registrations#new_address |
| 新規登録(完了画面) | users/registrations#create_address |
| マイページ | users#show |
| [完了] |
[完了] |
| [完了] |
[完了] [完了] |
| [完了] |
[完了] [完了] |
| [完了] |
[完了] |
| 商品削除 | products#destroy |
= render "layouts/header"
.new-wrapper
.new-wrapper__main
.new-wrapper__main__create
商品の削除が完了しました
%br
= link_to root_path,class: "link-blue" do
トップページに戻る
= render "layouts/footer"
scssはnewと共通なので、これで終わりです。
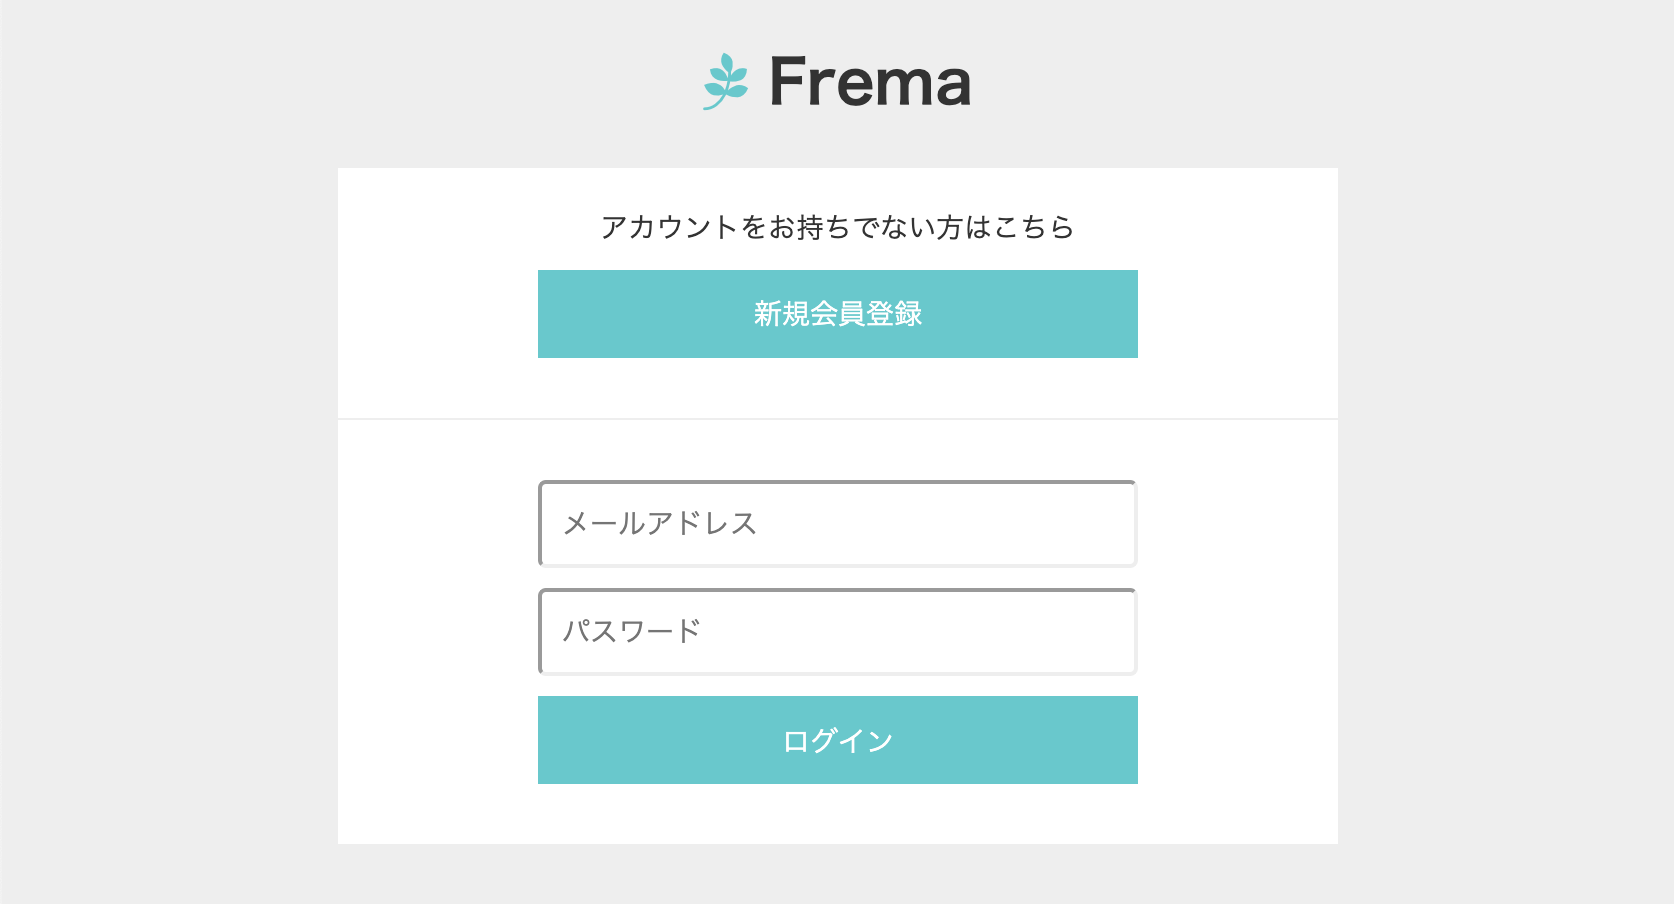
6.ログイン画面
今まではProductモデル関連のビューでしたが、ここから先はUserモデル関連になります。
まずはログイン画面。ログインしてないユーザが最初にアクセスするページです。
| 必要な機能 | 対応アクション |
|---|---|
| ログイン画面 | devise/sessions#new |
| 新規登録(氏名) | users/registrations#new |
| 新規登録(住所) | users/registrations#new_address |
| 新規登録(完了画面) | users/registrations#create_address |
| マイページ | users#show |
| [完了] |
[完了] |
| [完了] |
[完了] [完了] |
| [完了] |
[完了] [完了] |
| [完了] |
[完了] |
| [完了] |
[完了] |
記述するコードは少ないです。雑魚敵ですね。
ログイン画面 ソースコード
.new_session-wrapper
.new_session-wrapper__logo
= link_to root_path do
%i{class: "fab fa-pagelines"}
%span{class: "new_session-wrapper__logo__text"}
Frema
.new_session-wrapper__main
アカウントをお持ちでない方はこちら
= link_to new_user_users_path, class: "new_session-wrapper__main__btn" do
新規会員登録
.new_session-wrapper__main
%input{class: "new_session-wrapper__main__text",placeholder: "メールアドレス"}
%input{class: "new_session-wrapper__main__text",placeholder: "パスワード"}
%input{type:"submit", class: "new_session-wrapper__main__btn", value: "ログイン"}
短いですね。ここまで頑張った方なら楽勝と思います。
続いてscssです。商品の方でやったようにアクションごとのscssを分けてもいいですが、
使いまわせる部分が多いのでusers.scssに全部まとめちゃいます。
.new_session-wrapper{
padding: 20px 0;
font-size: 14px;
background-color: #eee;
min-height: 100vh;
&__logo{
font-size: 30px;
text-align: center;
margin-bottom: 20px;
.fa-pagelines{
color: $frema;
}
&__text{
font-weight: bold;
}
&__title,&__title-done{
font-size: 12px;
padding-left: 20px;
position: relative;
display: inline-block;
vertical-align: top;
&::after{
content: "";
position: absolute;
top: 20px;
left: 38px;
width: 12px;
height: 12px;
border-radius: 20px;
display: inline-block;
background-color: #ddd;
}
}
&__title{
&::before{
content: "";
position: absolute;
top: 25px;
left: 50px;
width: 66px;
height: 2px;
display: inline-block;
background-color: #ddd;
}
}
.title-active{
font-weight: bold;
}
.after-active{
&::after{
background-color: $frema;
}
}
.before-active{
&::before{
background-color: $frema;
}
}
}
&__main{
width: 500px;
padding: 20px;
margin: 0 auto;
margin-bottom: 1px;
background-color: white;
&__head{
text-align: center;
font-size: 22px;
font-weight: bold;
}
&__btn{
width: 300px;
height: 44px;
display: block;
color: white;
font-size: 14px;
line-height: 44px;
margin: 10px auto;
border: 0px solid #000;
text-align: center;
background-color: $frema;
}
&__text{
width: 300px;
height: 44px;
display: block;
font-size: 14px;
line-height: 44px;
margin: 10px auto;
border-radius: 4px;
padding-left: 10px;
}
.flexbox{
display: flex;
align-items: center;
}
.text-half{
width: 148px;
}
&__title{
width: 300px;
margin: 0 auto;
font-weight: bold;
.require{
padding: 3px;
color: white;
font-size: 12px;
border-radius: 4px;
background-color: $frema;
}
.any{
padding: 3px;
color: white;
font-size: 12px;
border-radius: 4px;
background-color: #ddd;
}
}
.text-align-center{
text-align: center;
font-weight: normal;
}
&__select{
width: 300px;
height: 44px;
font-size: 12px;
line-height: 44px;
margin: 10px auto;
border-radius: 4px;
padding-left: 10px;
}
.three-select{
width: 80px;
}
&__caution{
padding: 10px 0;
width: 300px;
margin: 0 auto;
}
}
}
以上でログイン画面は完了。
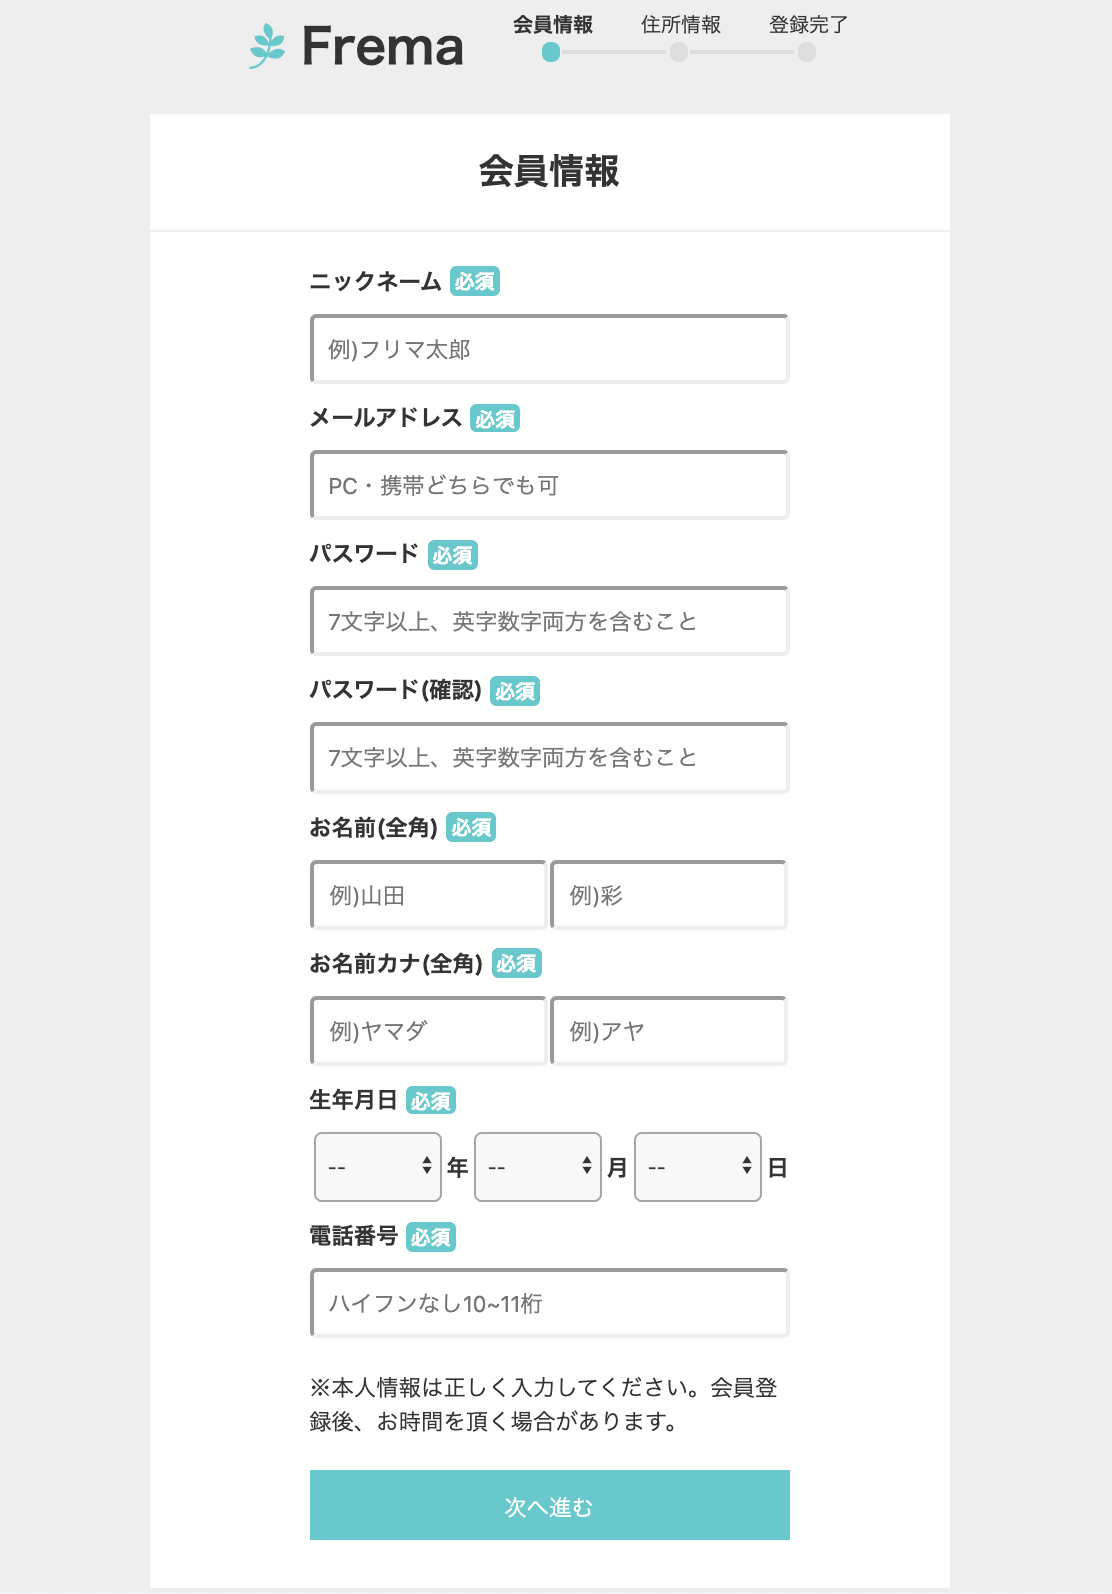
7.新規登録(氏名)
ユーザの氏名などを入力してもらうページです。
氏名情報→住所情報→完了画面の3段階に分けて表示します。
このように段階を分けて入力させる方式をウィザード方式とか言うそうです。
マークアップは簡単です。User関連は全部ボーナスステージ。サクサク進めましょう。
| 必要な機能 | 対応アクション |
|---|---|
| [完了] |
[完了] |
| 新規登録(氏名) | users/registrations#new |
| 新規登録(住所) | users/registrations#new_address |
| 新規登録(完了画面) | users/registrations#create_address |
| マイページ | users#show |
| [完了] |
[完了] |
| [完了] |
[完了] [完了] |
| [完了] |
[完了] [完了] |
| [完了] |
[完了] |
| [完了] |
[完了] |
新規登録(氏名) ソースコード
.new_session-wrapper
.new_session-wrapper__logo
= link_to root_path do
%i{class: "fab fa-pagelines"}
%span{class: "new_session-wrapper__logo__text"}
Frema
%span{class: "new_session-wrapper__logo__title title-active after-active"}
会員情報
%span{class: "new_session-wrapper__logo__title"}
住所情報
%span{class: "new_session-wrapper__logo__title-done"}
登録完了
.new_session-wrapper__main
.new_session-wrapper__main__head
会員情報
.new_session-wrapper__main
.new_session-wrapper__main__title
ニックネーム
%span{class: "require"} 必須
%input{class: "new_session-wrapper__main__text", placeholder: "例)フリマ太郎"}
.new_session-wrapper__main__title
メールアドレス
%span{class: "require"} 必須
%input{class: "new_session-wrapper__main__text", placeholder: "PC・携帯どちらでも可"}
.new_session-wrapper__main__title
パスワード
%span{class: "require"} 必須
%input{class: "new_session-wrapper__main__text", placeholder: "7文字以上、英字数字両方を含むこと"}
.new_session-wrapper__main__title
パスワード(確認)
%span{class: "require"} 必須
%input{class: "new_session-wrapper__main__text", placeholder: "7文字以上、英字数字両方を含むこと"}
.new_session-wrapper__main__title
お名前(全角)
%span{class: "require"} 必須
.flexbox
%input{class: "new_session-wrapper__main__text text-half", placeholder: "例)山田"}
%input{class: "new_session-wrapper__main__text text-half", placeholder: "例)彩"}
.new_session-wrapper__main__title
お名前カナ(全角)
%span{class: "require"} 必須
.flexbox
%input{class: "new_session-wrapper__main__text text-half", placeholder: "例)ヤマダ"}
%input{class: "new_session-wrapper__main__text text-half", placeholder: "例)アヤ"}
.new_session-wrapper__main__title
生年月日
%span{class: "require"} 必須
.flexbox
%select{class: "new_session-wrapper__main__select three-select"}
%option{value: "0"} --
%option{value: "1"} 選択肢1
%option{value: "2"} 選択肢2
%option{value: "3"} 選択肢3
年
%select{class: "new_session-wrapper__main__select three-select"}
%option{value: "0"} --
%option{value: "1"} 選択肢1
%option{value: "2"} 選択肢2
%option{value: "3"} 選択肢3
月
%select{class: "new_session-wrapper__main__select three-select"}
%option{value: "0"} --
%option{value: "1"} 選択肢1
%option{value: "2"} 選択肢2
%option{value: "3"} 選択肢3
日
.new_session-wrapper__main__title
電話番号
%span{class: "require"} 必須
%input{class: "new_session-wrapper__main__text", placeholder: "ハイフンなし10~11桁"}
.new_session-wrapper__main__caution
※本人情報は正しく入力してください。会員登録後、お時間を頂く場合があります。
%input{type: "submit",class: "new_session-wrapper__main__btn", value: "次へ進む"}
scssはログイン画面の時に作成したusers.scssに全部入ってるので、そちらをご参考ください。
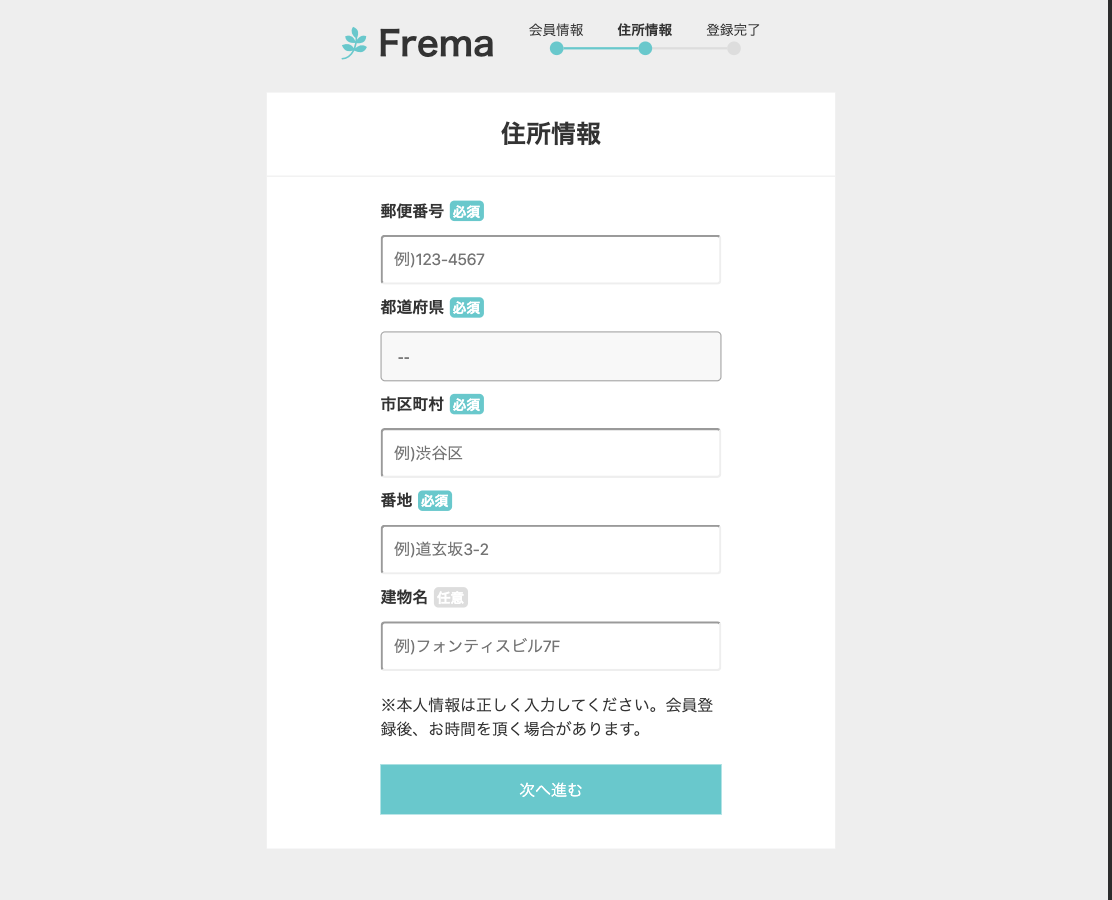
8.新規登録(住所)
氏名登録に続いて、住所登録ページを作ります。
ほぼ上記のビューを使いまわせます。瞬殺です。
| 必要な機能 | 対応アクション |
|---|---|
| [完了] |
[完了] |
| [完了] |
[完了] |
| 新規登録(住所) | users/registrations#new_address |
| 新規登録(完了画面) | users/registrations#create_address |
| マイページ | users#show |
| [完了] |
[完了] |
| [完了] |
[完了] [完了] |
| [完了] |
[完了] [完了] |
| [完了] |
[完了] |
| [完了] |
[完了] |
新規登録(住所) ソースコード
.new_session-wrapper
.new_session-wrapper__logo
= link_to root_path do
%i{class: "fab fa-pagelines"}
%span{class: "new_session-wrapper__logo__text"}
Frema
%span{class: "new_session-wrapper__logo__title before-active after-active"}
会員情報
%span{class: "new_session-wrapper__logo__title title-active after-active"}
住所情報
%span{class: "new_session-wrapper__logo__title-done"}
登録完了
.new_session-wrapper__main
.new_session-wrapper__main__head
住所情報
.new_session-wrapper__main
.new_session-wrapper__main__title
郵便番号
%span{class: "require"} 必須
%input{class: "new_session-wrapper__main__text", placeholder: "例)123-4567"}
.new_session-wrapper__main__title
都道府県
%span{class: "require"} 必須
.flexbox
%select{class: "new_session-wrapper__main__select"}
%option{value: "0"} --
%option{value: "1"} 選択肢1
%option{value: "2"} 選択肢2
%option{value: "3"} 選択肢3
.new_session-wrapper__main__title
市区町村
%span{class: "require"} 必須
%input{class: "new_session-wrapper__main__text", placeholder: "例)渋谷区"}
.new_session-wrapper__main__title
番地
%span{class: "require"} 必須
%input{class: "new_session-wrapper__main__text", placeholder: "例)道玄坂3-2"}
.new_session-wrapper__main__title
建物名
%span{class: "any"} 任意
%input{class: "new_session-wrapper__main__text", placeholder: "例)フォンティスビル7F"}
.new_session-wrapper__main__caution
※本人情報は正しく入力してください。会員登録後、お時間を頂く場合があります。
%input{type: "submit",class: "new_session-wrapper__main__btn", value: "次へ進む"}
9.新規登録(完了画面)
登録が完了しましたと表示するだけです。
終わりが見えてきました。もう一踏ん張りです。
| 必要な機能 | 対応アクション |
|---|---|
| [完了] |
[完了] |
| [完了] |
[完了] |
| [完了] |
[完了] |
| 新規登録(完了画面) | users/registrations#create_address |
| マイページ | users#show |
| [完了] |
[完了] |
| [完了] |
[完了] [完了] |
| [完了] |
[完了] [完了] |
| [完了] |
[完了] |
| [完了] |
[完了] |
新規登録(完了画面) ソースコード
.new_session-wrapper
.new_session-wrapper__logo
= link_to root_path do
%i{class: "fab fa-pagelines"}
%span{class: "new_session-wrapper__logo__text"}
Frema
%span{class: "new_session-wrapper__logo__title before-active after-active"}
会員情報
%span{class: "new_session-wrapper__logo__title before-active after-active"}
住所情報
%span{class: "new_session-wrapper__logo__title-done title-active after-active"}
登録完了
.new_session-wrapper__main
.new_session-wrapper__main__head
登録が完了しました
= link_to root_path, class: "new_session-wrapper__main__head link-blue" do
トップページに戻る
10.マイページ
ラスボスです。ユーザごとの詳細ページですね。
| 必要な機能 | 対応アクション |
|---|---|
| [完了] |
[完了] |
| [完了] |
[完了] |
| [完了] |
[完了] |
| [完了] |
[完了] |
| マイページ | users#show |
| [完了] |
[完了] |
| [完了] |
[完了] [完了] |
| [完了] |
[完了] [完了] |
| [完了] |
[完了] |
| [完了] |
[完了] |
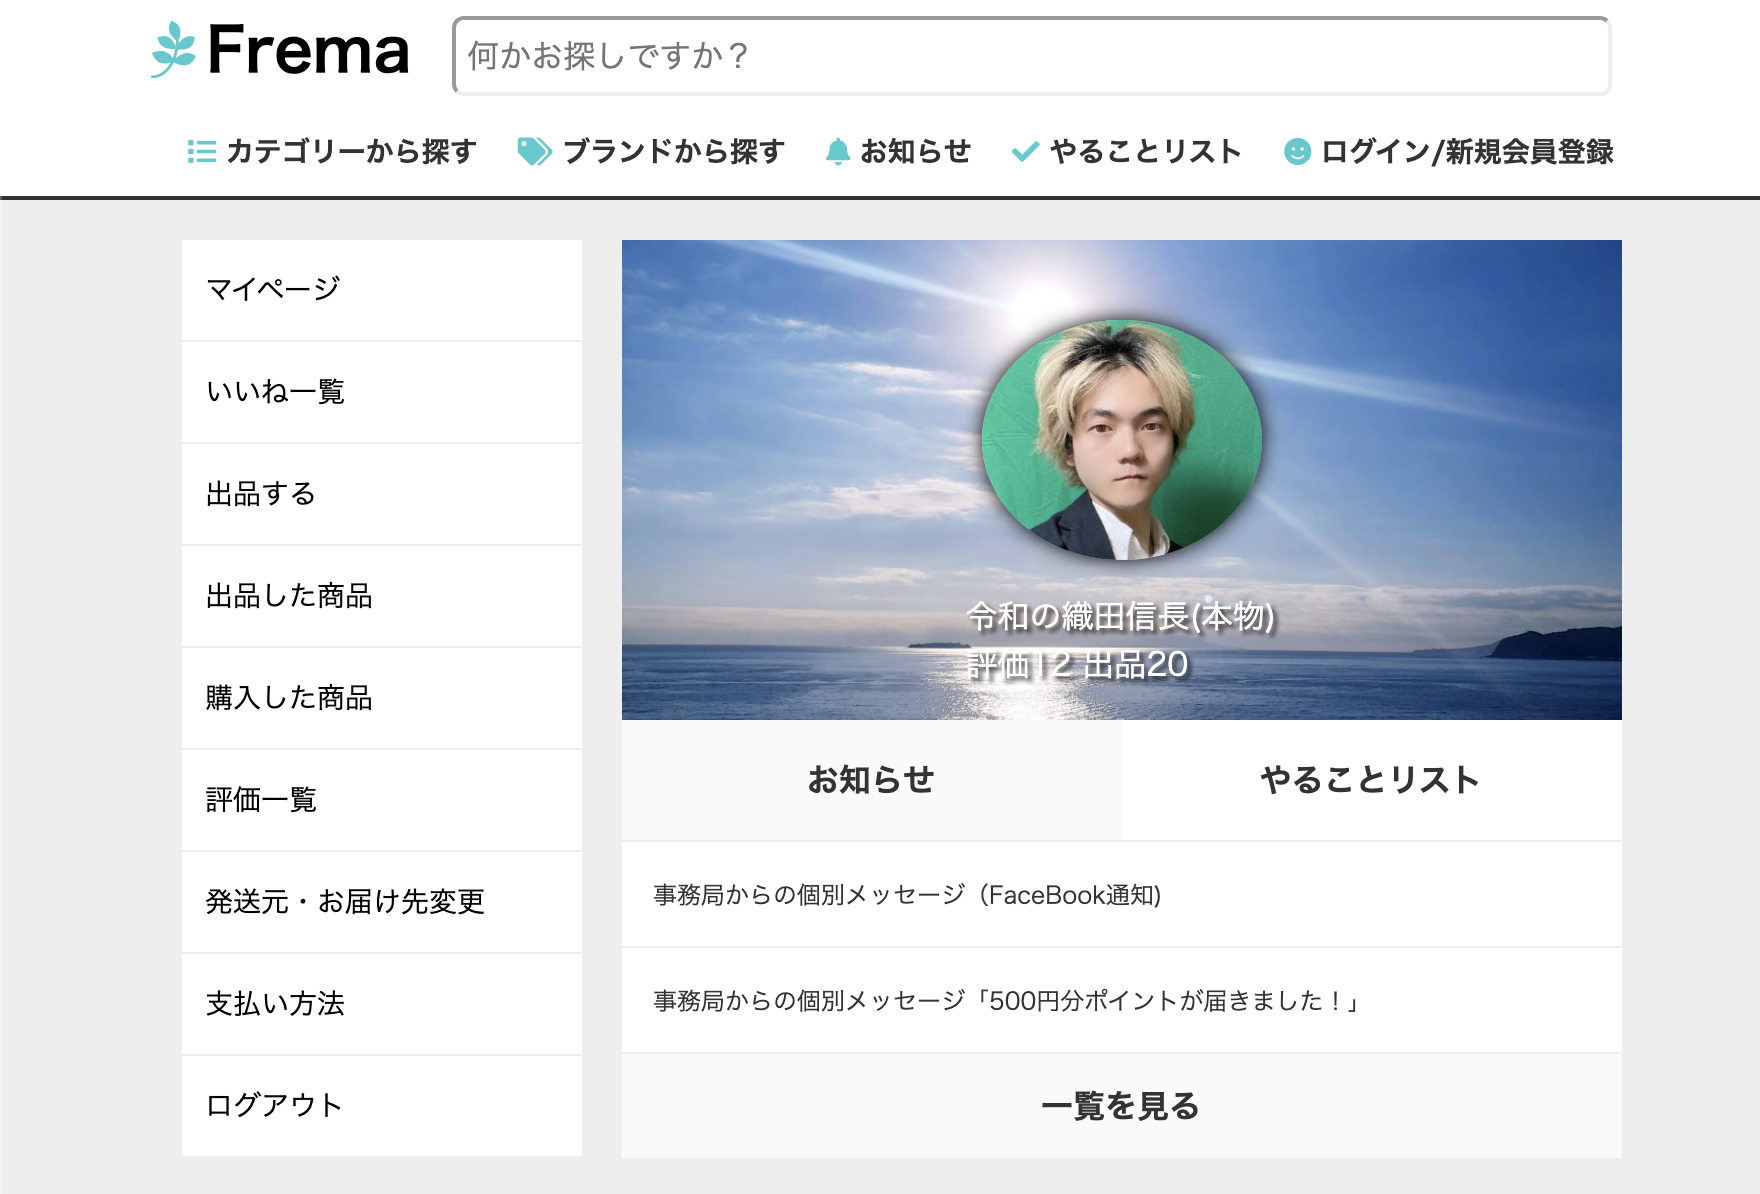
以下のような感じにマークアップしてみました。
マイページ ソースコード
- contents = ["マイページ" ,"いいね一覧","出品する" ,"出品した商品","購入した商品","評価一覧","発送元・お届け先変更","支払い方法","ログアウト" ]
- links = [user_path(1),"" ,new_product_path,"" ,"" ,"" ,"" ,"" ,destroy_user_session_path]
- method = ["get" ,"" ,"get" ,"" ,"" ,"" ,"" ,"" ,"delete" ]
= render "layouts/header"
.show-users-wrapper
.show-users-wrapper__center
.show-users-wrapper__center__left-content
- contents.each.with_index(0) do |content,i|
= link_to links[i], method: method[i],class: "show-users-wrapper__center__left-content__box" do
= content
.show-users-wrapper__center__right-content
= image_tag "2999105_m.jpg", class:"show-users-wrapper__center__right-content__image"
= image_tag "u4vzSnv__400x400.jpg", class:"show-users-wrapper__center__right-content__user-image"
.show-users-wrapper__center__right-content__user-name
令和の織田信長(本物)
%div
評価12
出品20
.show-users-wrapper__center__right-content__title-wrapper
.show-users-wrapper__center__right-content__title-wrapper__title.active
お知らせ
.show-users-wrapper__center__right-content__title-wrapper__title
やることリスト
.show-users-wrapper__center__right-content__contents
事務局からの個別メッセージ(FaceBook通知)
.show-users-wrapper__center__right-content__contents
事務局からの個別メッセージ「500円分ポイントが届きました!」
.show-users-wrapper__center__right-content__view-list
一覧を見る
= render "layouts/footer"
左側のリンク一覧はeach文で作成してみました。
コードが短くなるのでおすすめです。
each文についての解説はこちらの記事に載せていますので、ご参考ください。
【爆速実装】夢と魔法のeach文【Rails-haml】
.show-users-wrapper{
background-color: #eee;
&__center{
width: 720px;
margin: 0 auto;
display: flex;
&__left-content{
padding: 20px 10px;
display: flex;
flex-direction: column;
&__box{
width: 200px;
height: 50px;
color: black;
padding: 0 12px;
font-size: 14px;
line-height: 50px;
margin-bottom: 1px;
background-color: white;
}
}
&__right-content{
background-color: white;
width: 500px;
margin: 20px 10px;
position: relative;
&__image{
width: 500px;
height: 240px;
display: block;
object-fit: cover;
}
&__user-image{
box-shadow: 0 0 10px black;
border-radius: 100%;
width: 140px;
height: 120px;
object-fit: cover;
position: absolute;
top: 100px;
left: 50%;
transform: translate(-50%, -50%);
-ms-transform: translate(-50%, -50%);
-webkit-transform: translate(-50%, -50%);
text-shadow: 2px 2px 2px rgba(0,0,0,.7);
}
&__user-name{
color: white;
margin: 0 auto;
position: absolute;
top: 200px;
left: 50%;
transform: translate(-50%, -50%);
-ms-transform: translate(-50%, -50%);
-webkit-transform: translate(-50%, -50%);
text-shadow: 2px 2px 2px rgba(0,0,0,.7);
div{
color: white;
}
}
&__title-wrapper{
display: flex;
border-bottom: 1px solid #eee;
&__title{
width: 250px;
height: 60px;
line-height: 60px;
font-weight: bold;
text-align: center;
cursor: pointer;
}
.active{
cursor: default;
background-color: #fafafa;
}
}
&__contents{
height: 53px;
cursor: pointer;
padding: 0 16px;
font-size: 12px;
overflow: hidden;
line-height: 53px;
border-bottom: 1px solid #eee;
}
&__view-list{
height: 53px;
cursor: pointer;
padding: 0 16px;
text-align: center;
font-weight: bold;
line-height: 53px;
background-color: #fafafa;
border-bottom: 1px solid #eee;
}
}
}
}
以上がマイページのマークアップ作業です。
お疲れ様でした!
以上で第二章 マークアップ作業は終了です。
次の章からはついに機能実装に入ります。
かなり難易度が上がってきますので、詳しく解説していきます。
第三章 ユーザ登録/ログイン機能に続きます。
| 章 | 内容 | 難易度 | 所要時間 | 主要技術 |
|---|---|---|---|---|
| 序 章 | AWS自動デプロイ | ★☆☆☆☆ | ★★★☆☆ | capistrano |
| 第一章 | データベース設計 | ★☆☆☆☆ | ★☆☆☆☆ | |
| 第二章 | マークアップ作業 | ★★☆☆☆ | ★★★★★ | |
| 第三章 | ユーザ登録/ログイン機能 | ★★★★☆ | ★★☆☆☆ | devise |
| 第四章 | 商品出品/編集/詳細表示/削除 | ★★★★☆ | ★★★☆☆ | carrierwave |
| 第五章 | 商品カテゴリ機能 | ★★★★★ | ★★★☆☆ | ancestry |
| 第六章 | 商品購入機能 | ★★★★★ | ★★★★☆ | Payjp |


