はじめに
本記事は第三章 ユーザ登録/ログイン機能のつづきです。
Railsでフリマアプリの根幹機能である商品出品/編集/詳細表示/削除といった機能を実装します。
画像の複数投稿機能が一番の難関です。gem"carrierwave"を使用します。
制作するアプリ
ユーザ登録、商品出品・購入の機能を備えたフリマアプリです。
メルカリ風、というかほぼメルカリです。メルカリを作ります。
ちなみに、この規模のアプリは単価50万円ほどで取引されることが多いそうです。
通常納期は30日ほどだと思いますが、慣れてくれば1週間くらいで作れたりします。
この記事を使って、Web開発を極める一助にしていただければ幸いです。
OS : macOS Catalina 10.15.3
DB : MySQL
Ruby : 2.5.1
Rails: 5.2.4.2
フリマアプリ開発完全ロードマップ
| 章 | 内容 | 難易度 | 所要時間 | 主要技術 |
|---|---|---|---|---|
| 序 章 | AWS自動デプロイ | ★☆☆☆☆ | ★★★☆☆ | capistrano |
| 第一章 | データベース設計 | ★☆☆☆☆ | ★☆☆☆☆ | |
| 第二章 | マークアップ作業 | ★★☆☆☆ | ★★★★★ | |
| 第三章 | ユーザ登録/ログイン機能 | ★★★★☆ | ★★☆☆☆ | devise |
| 第四章 | 商品出品/編集/詳細表示/削除 | ★★★★☆ | ★★★☆☆ | carrierwave |
| 第五章 | 商品カテゴリ機能 | ★★★★★ | ★★★☆☆ | ancestry |
| 第六章 | 商品購入機能 | ★★★★★ | ★★★★☆ | Payjp |
記事を読むにあたっての前提条件
この記事には私が作成した大量のコードが載っていますが、
コードレビューのための記事ではありませんので、「コードが汚い!」などのコメントはご遠慮願います。
リファクタリングについては、編集リクエストで私に直接お知らせ頂ければ幸いです。
ご理解のほど、何卒よろしくお願いいたします。
1.出品可能にする
画像投稿は一旦置いといて、画像なしで商品を出品できるようにします。
products_controller.rbにnewアクションとcreateアクションを定義します。
class ProductsController < ApplicationController
before_action :set_product, only: [:show, :edit]
before_action :set_params, only: :create
def new
@product = Product.new
end
def create
@product = Product.new(set_params)
if @product.valid?
@product.save
else
redirect_to new_product_path
end
end
private
def set_product
@product = Product.find(params[:id])
end
def set_params
params.require(:product).permit(:name, :explanation, :category, :brand, :condition, :size, :postage, :region, :shipping_days, :price).merge(user_id: current_user.id)
end
end
これでビュー上でform_withが使用可能になるので、書き換えていきます。
products/new.html.hamlを以下のように編集します。
= render "layouts/header"
= form_with model: @product, url: products_path, local: true do |f|
.new-wrapper
.new-wrapper__main
.new-wrapper__main__title
出品画像
%span{class: "require"} 必須
.new-wrapper__main__text
最大10枚までアップロードできます
.new-wrapper__main__image-field
%i{class: "fas fa-camera"}
.new-wrapper__main__image-field__text
ドラッグアンドドロップ
%br
またはクリックしてファイルをアップロード
.new-wrapper__main
.new-wrapper__main__title
商品名
%span{class: "require"} 必須
= f.text_field :name, {class: "new-wrapper__main__input-text", placeholder: "40文字まで"}
.new-wrapper__main__title.spacing
商品の説明
%span{class: "require"} 必須
= f.text_area :explanation, {class: "new-wrapper__main__input-textarea", placeholder: "商品の説明(必須 1,000文字以内)\n(色、素材、重さ、定価、注意点など)\n\n例)2010年頃に1万円で購入したジャケットです。ライトグレーで傷はありません。あわせやすいのでおすすめです。"}
.new-wrapper__main
.new-wrapper__main__subtitle
商品の詳細
.new-wrapper__main__title
カテゴリー
%span{class: "require"} 必須
= f.select :category, [["選択してください",""],"レディース","メンズ","その他"], {}, class: "new-wrapper__main__input-select"
.new-wrapper__main__title.spacing
ブランド
%span{class: "any"} 任意
= f.text_field :brand, {class: "new-wrapper__main__input-text", placeholder: "例)シャネル"}
.new-wrapper__main__title.spacing
商品の状態
%span{class: "require"} 必須
= f.select :condition, [["選択してください",""],"新品、未使用","未使用に近い","目立った傷や汚れなし","やや傷や汚れあり","傷や汚れあり","全体的に状態が悪い"], {}, class: "new-wrapper__main__input-select"
.new-wrapper__main
.new-wrapper__main__subtitle
配送について
.new-wrapper__main__title
配送料の負担
%span{class: "require"} 必須
= f.select :postage, [["選択してください",""],"送料込み(出品者負担)","着払い(購入者負担)"], {}, class: "new-wrapper__main__input-select"
.new-wrapper__main__title.spacing
発送元の地域
%span{class: "require"} 必須
= f.select :region, [["選択してください",""],"北海道","青森県","岩手県","宮城県","秋田県","山形県","福島県","茨城県","栃木県","群馬県","埼玉県","千葉県","東京都","神奈川県","新潟県","富山県","石川県","福井県","山梨県","長野県","岐阜県","静岡県","愛知県","三重県","滋賀県","京都府","大阪府","兵庫県","奈良県","和歌山県","鳥取県","島根県","岡山県","広島県","山口県","徳島県","香川県","愛媛県","高知県","福岡県","佐賀県","長崎県","熊本県","大分県","宮崎県","鹿児島県","沖縄県"], {}, class: "new-wrapper__main__input-select"
.new-wrapper__main__title.spacing
発送までの日数
%span{class: "require"} 必須
= f.select :shipping_days, [["選択してください",""],"1~2日で発送","2~3日で発送","4~7日で発送"], {}, class: "new-wrapper__main__input-select"
.new-wrapper__main
.new-wrapper__main__subtitle
価格(¥300〜9,999,999)
.new-wrapper__main__title.float-left
販売価格
%span{class: "require"} 必須
.new-wrapper__main__input-price.float-right
¥
= f.text_field :price, {class: "new-wrapper__main__input-price__input", placeholder: 0}
.spacing
.spacing
= f.submit "出品する", {class:"new-wrapper__main__submit"}
.new-wrapper__main__caution
禁止されている行為および出品物を必ずご確認ください。偽ブランド品や盗品物などの販売は犯罪であり、法律により処罰される可能性があります。 また、出品をもちまして加盟店規約に同意したことになります。
= render "layouts/footer"
それでは、実際に商品を登録してみましょう。
ログイン状態でないとエラーになるので、ログインしてからダミーデータを入力し、商品が登録できることを確認してください。
2.画像つきで出品可能にする
まずはとにかく複数の画像つきで出品ができる状態を目指します。
Gemfileを編集します。
gem 'carrierwave'
gem 'mini_magick'
gem 'jquery-rails'
#control+C でサーバを停止
bundle install
rails g uploader image
rails s
続いてモデルファイルに以下を追記します。
accepts_nested_attributes_for :images, allow_destroy: true
mount_uploader :image, ImageUploader
次にproducts_controller.rbのnewアクションを以下のように編集します。
def new
@product = Product.new
@product.images.new
end
この記述によってproducts/new.html.hamlのform_with内で
fields_forというメソッドが使用可能になり、画像を商品と同時に投稿できます。
fields_forを使うことで、Productモデルのform_withから
Imageモデルの情報を保存できるようになります。
また、同コントローラのcreateアクションのストロングパラメータを以下のように編集します。
private
def set_params
params.require(:product).permit(:name, :explanation, :category, :brand, :condition, :size, :postage, :region, :shipping_days, :price, images_attributes: [:image, :_destroy, :id]).merge(user_id: current_user.id)
end
images_attributes: [:image, :_destroy, :id]という記述についても、
fields_forを使用するのに必要となる記述です。
それでは、ビューにfields_forを書いていきましょう。
= render "layouts/header"
= form_with model: @product, url: products_path, local: true do |f|
.new-wrapper
.new-wrapper__main
.new-wrapper__main__title
出品画像
%span{class: "require"} 必須
.new-wrapper__main__text
最大10枚までアップロードできます
-# 編集箇所ここから
%label{class: "flexbox"}
.new-wrapper__main__image-field
%i{class: "fas fa-camera"}
.new-wrapper__main__image-field__text
ドラッグアンドドロップ
%br
またはクリックしてファイルをアップロード
= f.fields_for :images do |i|
= i.file_field :image, {class: "file-field"}
= f.fields_for :images do |i|
= i.file_field :image, {class: "file-field"}
-# 編集箇所ここまで
.new-wrapper__main
.new-wrapper__main__title
商品名
%span{class: "require"} 必須
= f.text_field :name, {class: "new-wrapper__main__input-text", placeholder: "40文字まで"}
.new-wrapper__main__title.spacing
商品の説明
%span{class: "require"} 必須
= f.text_area :explanation, {class: "new-wrapper__main__input-textarea", placeholder: "商品の説明(必須 1,000文字以内)\n(色、素材、重さ、定価、注意点など)\n\n例)2010年頃に1万円で購入したジャケットです。ライトグレーで傷はありません。あわせやすいのでおすすめです。"}
.new-wrapper__main
.new-wrapper__main__subtitle
商品の詳細
.new-wrapper__main__title
カテゴリー
%span{class: "require"} 必須
= f.select :category, [["選択してください",""],"レディース","メンズ","その他"], {}, class: "new-wrapper__main__input-select"
.new-wrapper__main__title.spacing
ブランド
%span{class: "any"} 任意
= f.text_field :brand, {class: "new-wrapper__main__input-text", placeholder: "例)シャネル"}
.new-wrapper__main__title.spacing
商品の状態
%span{class: "require"} 必須
= f.select :condition, [["選択してください",""],"新品、未使用","未使用に近い","目立った傷や汚れなし","やや傷や汚れあり","傷や汚れあり","全体的に状態が悪い"], {}, class: "new-wrapper__main__input-select"
.new-wrapper__main
.new-wrapper__main__subtitle
配送について
.new-wrapper__main__title
配送料の負担
%span{class: "require"} 必須
= f.select :postage, [["選択してください",""],"送料込み(出品者負担)","着払い(購入者負担)"], {}, class: "new-wrapper__main__input-select"
.new-wrapper__main__title.spacing
発送元の地域
%span{class: "require"} 必須
= f.select :region, [["選択してください",""],"北海道","青森県","岩手県","宮城県","秋田県","山形県","福島県","茨城県","栃木県","群馬県","埼玉県","千葉県","東京都","神奈川県","新潟県","富山県","石川県","福井県","山梨県","長野県","岐阜県","静岡県","愛知県","三重県","滋賀県","京都府","大阪府","兵庫県","奈良県","和歌山県","鳥取県","島根県","岡山県","広島県","山口県","徳島県","香川県","愛媛県","高知県","福岡県","佐賀県","長崎県","熊本県","大分県","宮崎県","鹿児島県","沖縄県"], {}, class: "new-wrapper__main__input-select"
.new-wrapper__main__title.spacing
発送までの日数
%span{class: "require"} 必須
= f.select :shipping_days, [["選択してください",""],"1~2日で発送","2~3日で発送","4~7日で発送"], {}, class: "new-wrapper__main__input-select"
.new-wrapper__main
.new-wrapper__main__subtitle
価格(¥300〜9,999,999)
.new-wrapper__main__title.float-left
販売価格
%span{class: "require"} 必須
.new-wrapper__main__input-price.float-right
¥
= f.text_field :price, {class: "new-wrapper__main__input-price__input", placeholder: 0}
.spacing
.spacing
= f.submit "出品する", {class:"new-wrapper__main__submit"}
.new-wrapper__main__caution
禁止されている行為および出品物を必ずご確認ください。偽ブランド品や盗品物などの販売は犯罪であり、法律により処罰される可能性があります。 また、出品をもちまして加盟店規約に同意したことになります。
= render "layouts/footer"
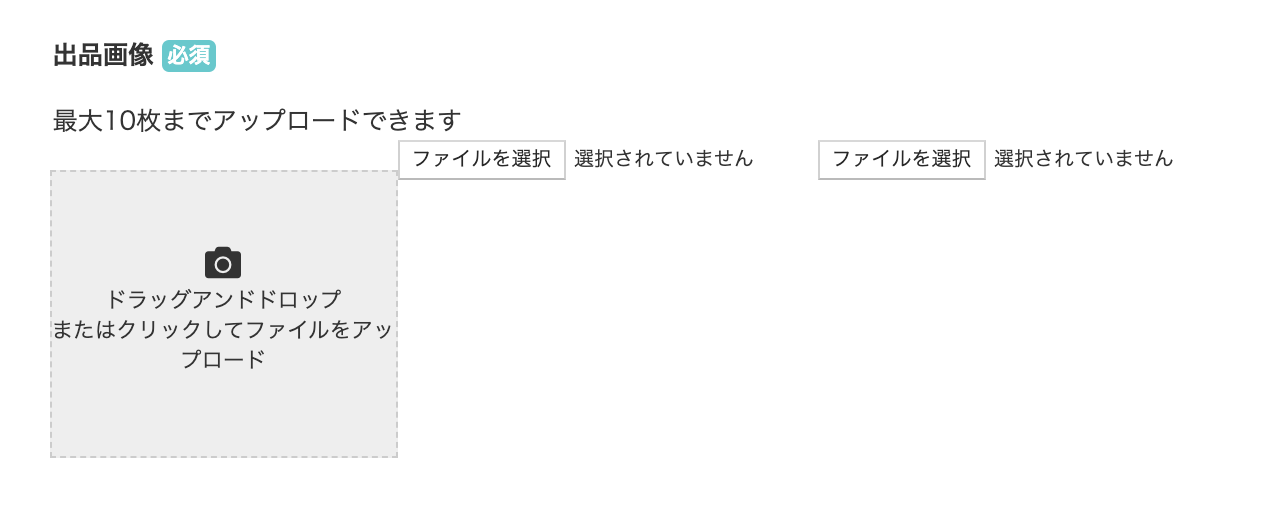
上記のような感じでビューが崩れますが、2つの画像入力欄が出てきます。
これを使って実際に2枚の画像付きで出品をしてみましょう。
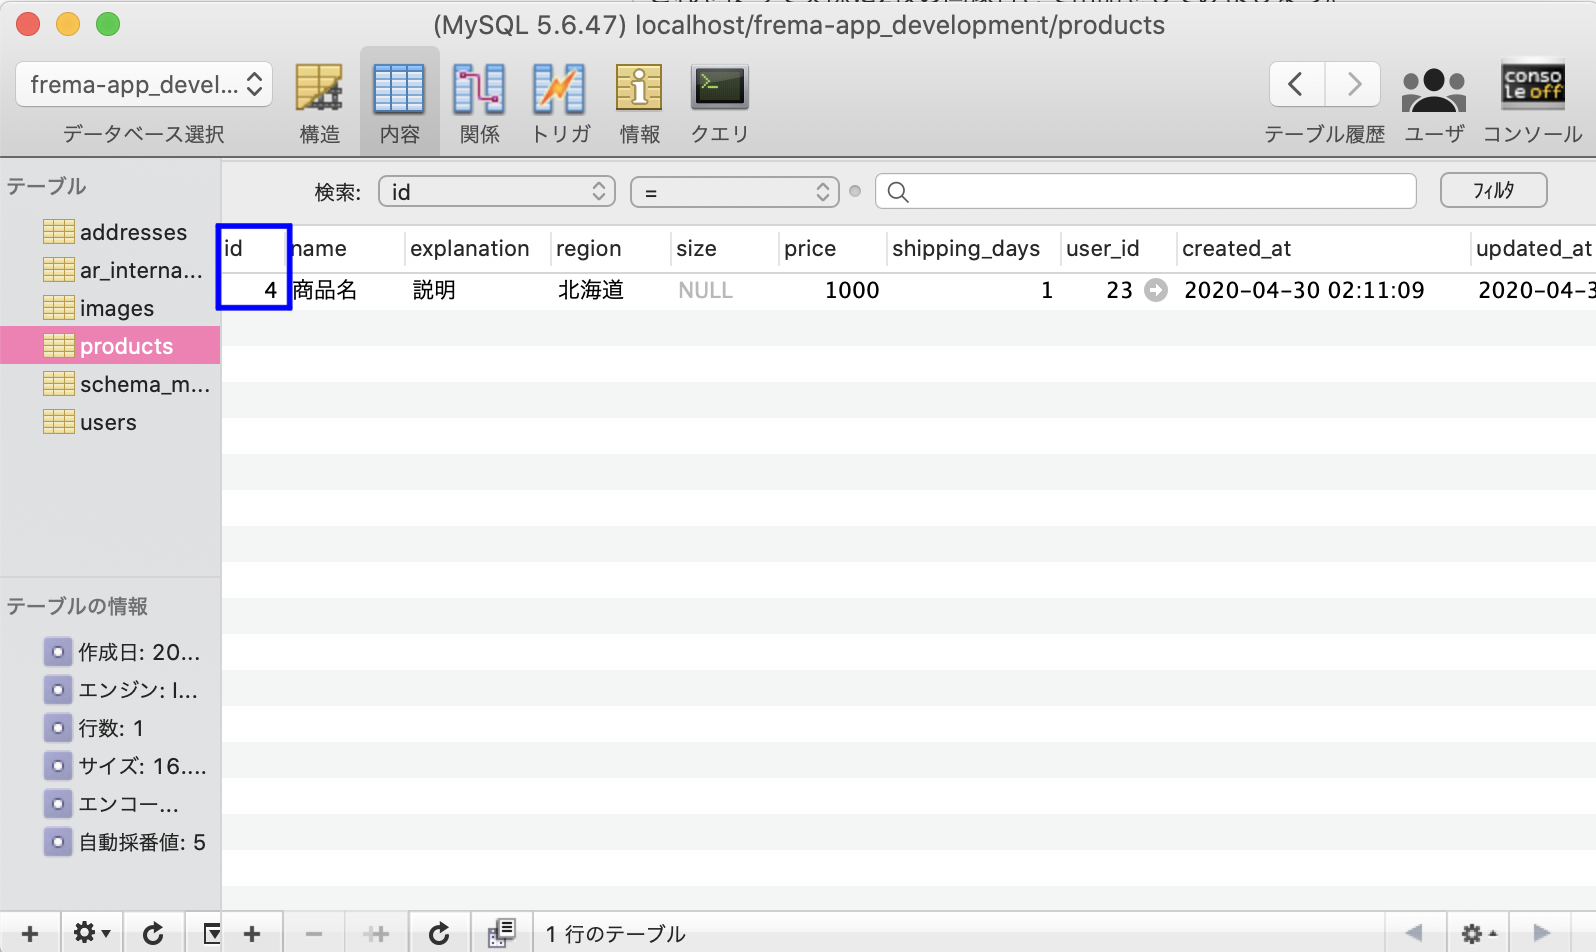
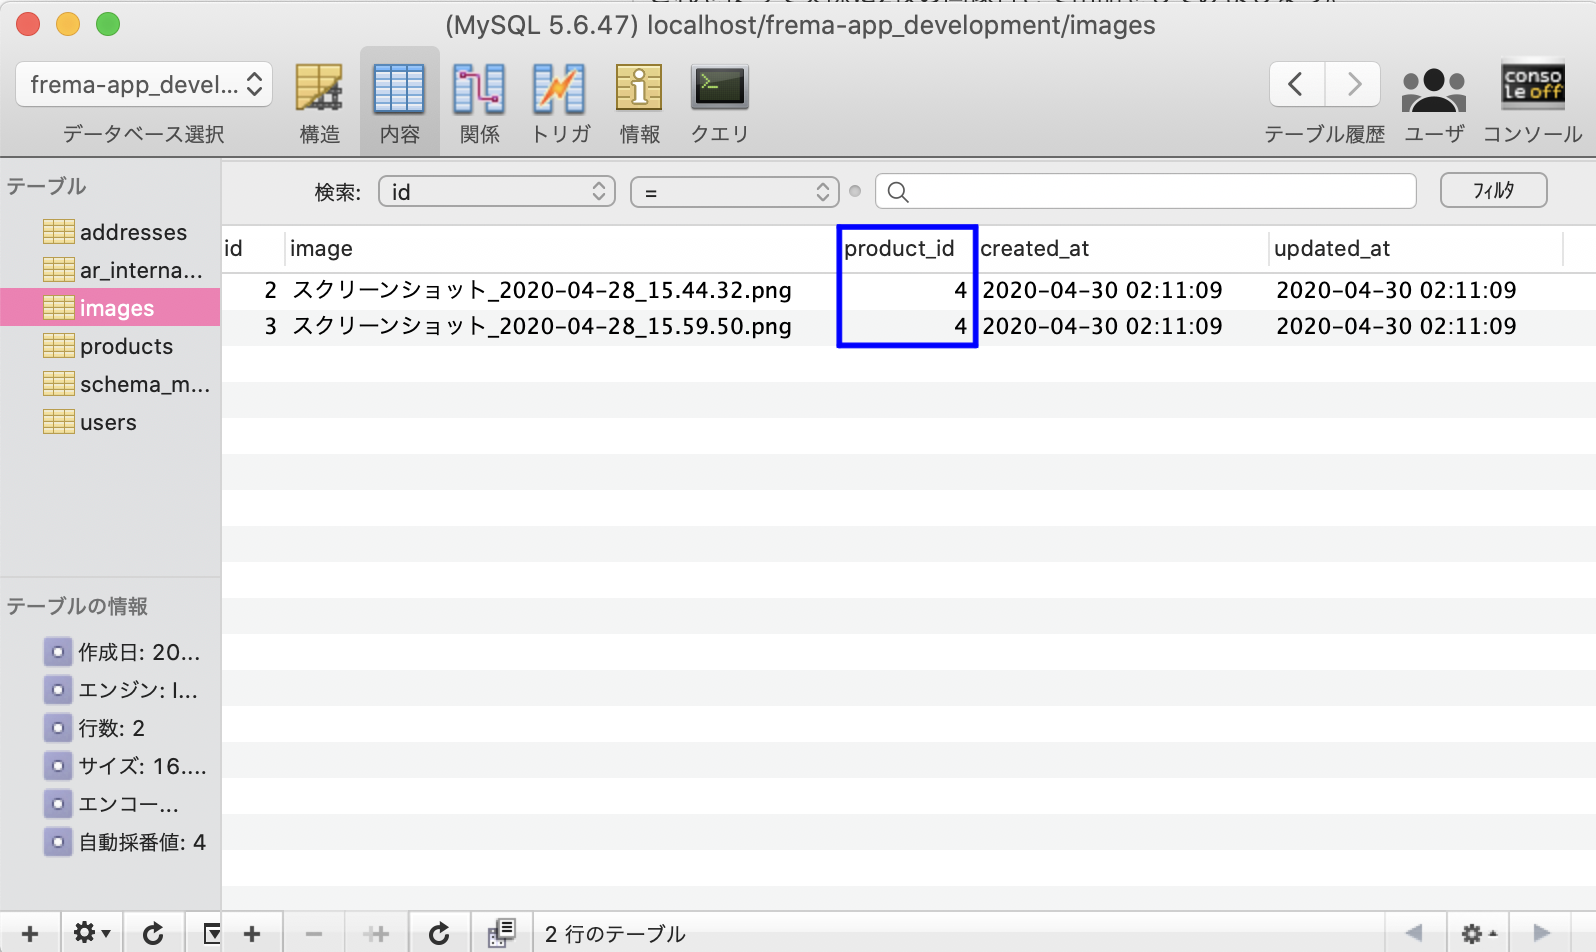
データベースのimagesテーブルを確認して、product_idが出品した商品のIDと一致していればOKです。
デバッグのために画像の入力欄を2つ書きましたが、
form_forは1つで十分なので、以下のようにビューを修正します。
-# 編集箇所ここから
%label{class: "flexbox"}
.new-wrapper__main__image-field
%i{class: "fas fa-camera"}
.new-wrapper__main__image-field__text
ドラッグアンドドロップ
%br
またはクリックしてファイルをアップロード
= f.fields_for :images do |i|
= i.file_field :image, {class: "file-field"}
-# 編集箇所ここまで
これで画像複数投稿の機能自体は完成です!
あとは入力欄をイケてる感じにするために、JavaScript(jQuery)を書いていきます。
3.画像入力欄をイケてる感じにする
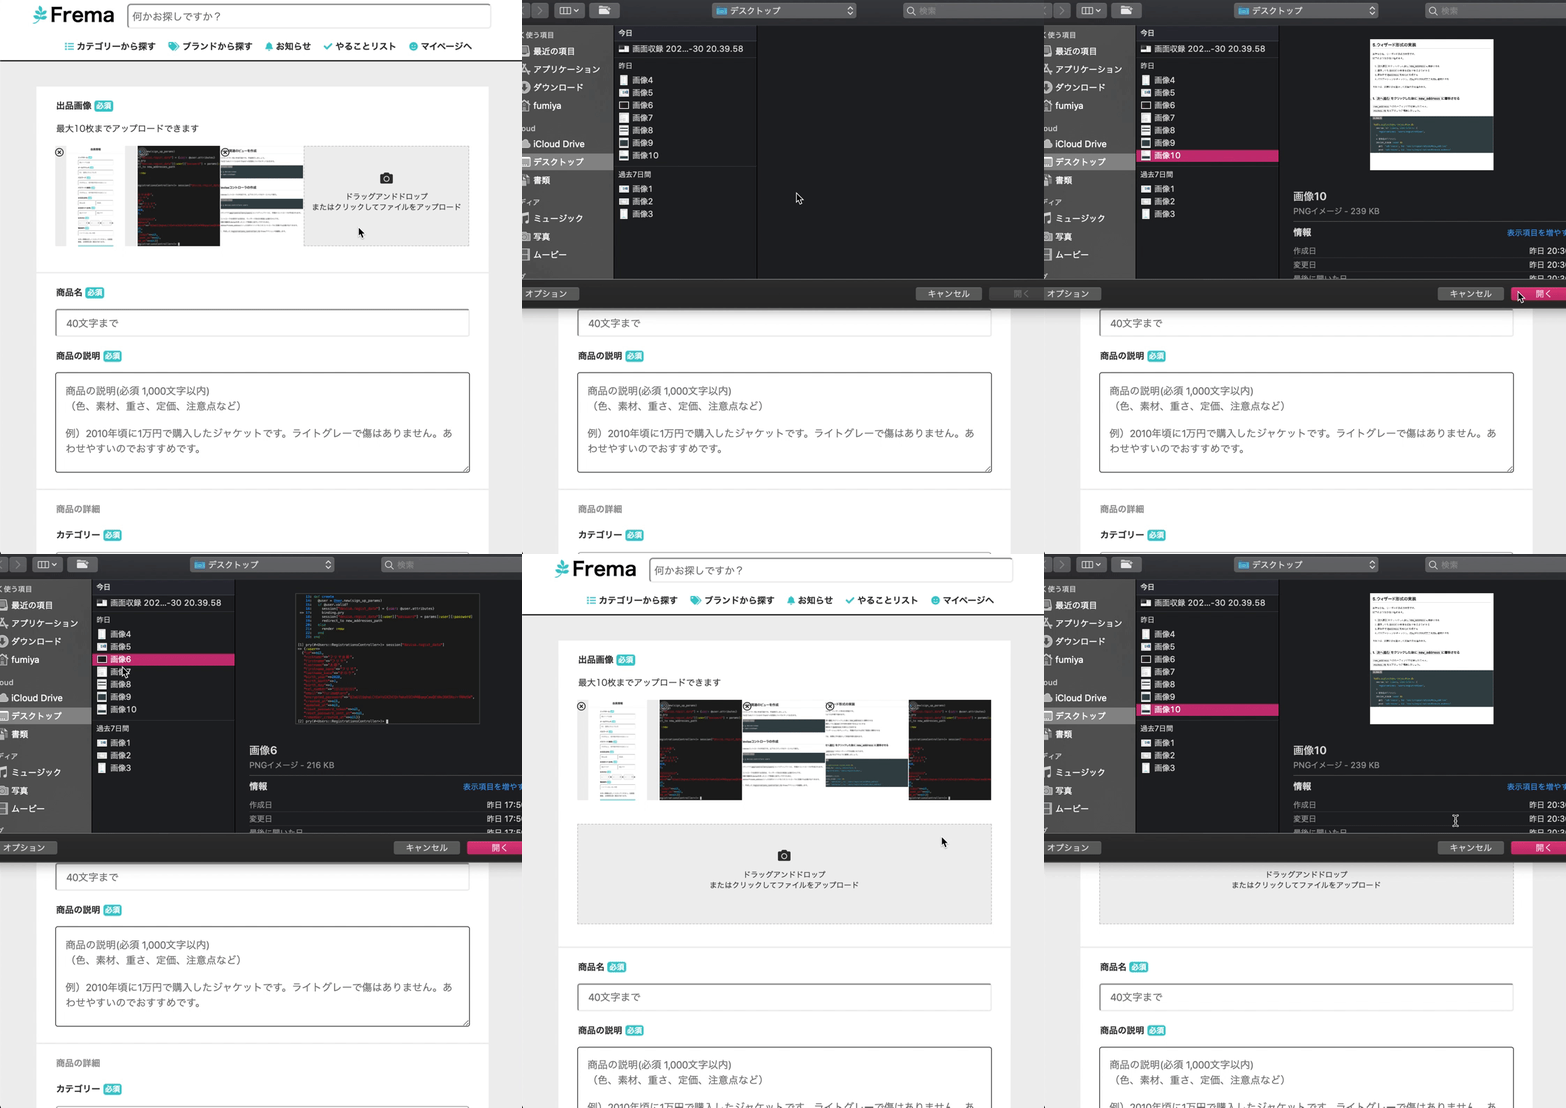
イケてる感じの入力欄とは、以下のようなものです。
画像を載せるごとに入力欄がトランスフォームするイケイケ機能を作ります。
まずはjQueryを使えるようにしたいので、下記ファイルを編集します。
//= require turbolinks
//= require jquery
//= require jquery_ujs
//= require_tree .
これでjQueryが使えます。続けて、jQueryで使用するためのidをビューに割り当てていきます。
また、ファイルを選択 選択されていませんという表示は必要ないので、CSSで消しておきます。
その他、この後使用するjsなどに対応した変更もこちらで行っておきます。
(後付けflexboxでBEM崩しちゃったので、気になる方は直してみて下さい...!)
.new-wrapper{
background-color: #eee;
padding: 40px 0;
&__main{
width: 720px;
padding:20px;
margin: 0 auto;
font-size: 14px;
margin-bottom: 2px;
background-color: white;
// 編集箇所ここから
.flexbox{
display: flex;
flex-wrap: wrap;
margin: 0 auto;
width: 660px;
.file-field{
display: none;
}
.new-wrapper__main__preview,.new-wrapper__main__preview-first{
margin: 16px 0;
display: flex;
flex-wrap: wrap;
&__image{
position: relative;
&__img{
width: 131px;
margin-right: 1px;
height: 160px;
object-fit: cover;
}
&__delete-btn{
text-shadow: 0 0 2px white;
cursor: pointer;
position: absolute;
top: 0px;
}
}
}
}
// 編集箇所ここまで
.spacing{
padding-top: 20px;
}
.require{
padding: 3px;
color: white;
font-size: 12px;
border-radius: 4px;
background-color: $frema;
}
.any{
padding: 3px;
color: white;
font-size: 12px;
border-radius: 4px;
background-color: #ddd;
}
&__title{
font-weight: bold;
padding: 0 12px;
padding-bottom: 16px;
}
&__subtitle{
color: #999;
padding: 0 12px;
font-weight: bold;
padding-bottom: 20px;
}
&__text{
padding: 0 12px;
}
&__image-field{
width: 660px;
height: 160px;
margin: 16px auto;
background-color: #eee;
border: 1px dashed #ccc;
display: flex;
justify-content: center;
align-items: center;
font-size: 12px;
text-align: center;
position: relative;
.fa-camera{
position: absolute;
top: 40px;
font-size: 20px;
}
&__text{
padding-top: 20px;
}
}
&__input-text{
height: 44px;
line-height: 44px;
font-size: 16px;
padding: 0 16px;
width: 660px;
margin-left: 10px;
border-radius: 4px;
}
&__input-textarea{
height: 160px;
font-size: 16px;
padding: 16px;
width: 660px;
margin-left: 10px;
border-radius: 4px;
}
&__input-select{
height: 44px;
line-height: 44px;
font-size: 16px;
padding: 0 16px;
width: 660px;
margin-left: 10px;
border-radius: 4px;
}
&__input-price{
display: flex;
justify-content: flex-end;
align-items: center;
&__input{
text-align: end;
height: 44px;
line-height: 44px;
font-size: 16px;
padding: 0 16px;
width: 300px;
margin-left: 10px;
border-radius: 4px;
}
}
.float-left{
float: left;
}
.float-right{
float: right;
}
&__submit{
border-radius: 4px;
display: block;
margin: 0 auto;
margin-top: 40px;
width: 400px;
height: 44px;
background-color: $frema;
color: white;
font-weight: bold;
font-size: 16px;
border: 0px solid #000;
}
&__caution{
font-size: 12px;
padding: 20px;
}
&__create{
text-align: center;
font-size: 20px;
font-weight: bold;
}
}
}
それでは、app/assets/javascriptsにproducts.jsというファイルを作成しましょう。
まずは、画像の入力領域に変更があった場合のイベントを定義します。
$(function(){
var index = [1,2,3,4,5,6,7,8,9,10];
var buildImage = function(url){
if(index.length != 0){
$(".new-wrapper__main__preview").append(`
<div class="new-wrapper__main__preview__image">
<img class="new-wrapper__main__preview__image__img" src="${url}">
<div class="delete-btn" index=${index[0]}><i class="far fa-times-circle"></i></div>
`);
$(".flexbox").append(`<input class="file-field" type="file" name="product[images_attributes][${index[1]}][image]" id="product_images_attributes_${index[1]}_image">`);
$("#image-wrapper").attr("for",`product_images_attributes_${index[1]}_image`);
index.shift();
if(index.length > 5){
$("#image-field-second").remove();
$(".new-wrapper__main__image-field").css("display","flex");
$(".new-wrapper__main__image-field").css("width",(index.length-5)*132);
}else if(index.length == 5){
$(".new-wrapper__main__image-field").css("display","none");
$("#image-wrapper").append(`
<div class="new-wrapper__main__image-field" id="image-field-second">
<i class="fas fa-camera"></i>
<div class="new-wrapper__main__image-field__text">
ドラッグアンドドロップ
<br>
またはクリックしてファイルをアップロード
</div>
</div>
`);
$(".new-wrapper__main__preview").attr("class", "new-wrapper__main__preview-first");
$(".new-wrapper__main__preview-first").after(`<div class="new-wrapper__main__preview"></div>`);
}else if(index.length == 0){
$("#image-field-second").css("display","none");
}
$("#image-field-second").css("width",index.length*132);
}
}
$(".flexbox").on("change", function(e){
var blob = window.URL.createObjectURL(e.target.files[0]);
buildImage(blob);
})
})
そして、ビューを上記のjsに対応した形で書き換えます。
-# 編集箇所ここから
.flexbox
.new-wrapper__main__preview
%label{id: "image-wrapper", action: request.path}
.new-wrapper__main__image-field
%i{class: "fas fa-camera"}
.new-wrapper__main__image-field__text
ドラッグアンドドロップ
%br
またはクリックしてファイルをアップロード
= f.fields_for :images do |i|
= i.file_field :image, {class: "file-field"}
-# 編集箇所ここまで
これでイケイケ10枚画像投稿機能が完成です!
あとは、画像の左上についてくる×マークをクリックしたときのイベントを定義すればOKです。
$(function(){
var index = [0,1,2,3,4,5,6,7,8,9];
// 編集箇所ここから
$(".flexbox").on("click", ".delete-btn", function(){
var targetIndex = Number($(this).attr("index"));
index.push(targetIndex);
if($(this).parent().parent().attr("class") == "new-wrapper__main__preview-first"){
$(".new-wrapper__main__preview .new-wrapper__main__preview__image:first").appendTo(".new-wrapper__main__preview-first");
}
if(index.length > 6){
$(".new-wrapper__main__image-field").css("width",(index.length-5)*132);
}else if(index.length == 6){
$("#image-field-second").remove();
$(".new-wrapper__main__preview").remove();
$(".new-wrapper__main__preview-first").attr("class", "new-wrapper__main__preview");
$(".new-wrapper__main__image-field").css("display","flex");
}else if(index.length == 1){
$("#image-field-second").css("display","flex");
$("#image-field-second").css("width",index.length*132);
}else{
$("#image-field-second").css("width",index.length*132);
}
$("#image-wrapper").attr("for",`product_images_attributes_${targetIndex}_image`);
$(this).parent().remove();
$(`#product_images_attributes_${targetIndex}_image`).remove();
$(".flexbox").append(`<input class="file-field" type="file" name="product[images_attributes][${targetIndex}][image]" id="product_images_attributes_${targetIndex}_image">`);
})
// 編集箇所ここまで
var buildImage = function(url){
if(index.length != 0){
$(".new-wrapper__main__preview").append(`
<div class="new-wrapper__main__preview__image">
<img class="new-wrapper__main__preview__image__img" src="${url}">
<div class="delete-btn" index=${index[0]}><i class="far fa-times-circle"></i></div>
`);
$(".flexbox").append(`<input class="file-field" type="file" name="product[images_attributes][${index[1]}][image]" id="product_images_attributes_${index[1]}_image">`);
$("#image-wrapper").attr("for",`product_images_attributes_${index[1]}_image`);
index.shift();
if(index.length > 5){
$("#image-field-second").remove();
$(".new-wrapper__main__image-field").css("display","flex");
$(".new-wrapper__main__image-field").css("width",(index.length-5)*132);
}else if(index.length == 5){
$(".new-wrapper__main__image-field").css("display","none");
$("#image-wrapper").append(`
<div class="new-wrapper__main__image-field" id="image-field-second">
<i class="fas fa-camera"></i>
<div class="new-wrapper__main__image-field__text">
ドラッグアンドドロップ
<br>
またはクリックしてファイルをアップロード
</div>
</div>
`);
$(".new-wrapper__main__preview").attr("class", "new-wrapper__main__preview-first");
$(".new-wrapper__main__preview-first").after(`<div class="new-wrapper__main__preview"></div>`);
}else if(index.length == 0){
$("#image-field-second").css("display","none");
}
$("#image-field-second").css("width",index.length*132);
}
}
$(".flexbox").on("change", function(e){
var blob = window.URL.createObjectURL(e.target.files[0]);
buildImage(blob);
})
})
BEMのせいでクラス名が長くてコードが冗長かもですね。
動作自体は結構シンプルなので、内容を理解できるように頑張ってみて下さい!
4.商品を編集可能にする
まずはedit.html.hamlにnew.html.hamlのコードをコピペします。
そして、編集したい商品のidで以下にアクセスします(以下はidが15の場合)。
http://localhost:3000/products/15/edit
アクセスしてみると、画像だけ拾ってこれないことがわかると思います。
なので、画像を拾ってこれるようにします。Ajax(非同期通信)を使います。
まずは、コントローラに自作アクションを定義したいので、routes.rbを編集します。
また、この時点でproducts関連の仮ルーティングは不要なので削除します。
Rails.application.routes.draw do
devise_for :users, controllers: {
registrations: 'users/registrations',
}
devise_scope :user do
get 'addresses', to: 'users/registrations#new_address'
post 'addresses', to: 'users/registrations#create_address'
end
$date = Time.now.in_time_zone('Tokyo').to_s
root "products#index"
resources :products do
collection do
# 仮ルーティング3つを削除し、これを追記
get "set_images"
end
end
resources :users, only: :show
end
続いて、products_controller.rbを以下のように編集します。
def set_images
@images = Image.where(product_id: params[:id])
end
あとはこれをjsから呼び出します。
呼び出しにjbuilderを使いますので、app/views/productsの中に
set_images.json.jbuilderを新規作成して以下のように編集します。
json.images @images
続けて、以下をvar index = [0,1,2,3,4,5,6,7,8,9];の真下に追記します。
var index = [0,1,2,3,4,5,6,7,8,9];
var request = $("#image-wrapper").attr("action");
if(request != undefined && request.indexOf("edit") != -1){
$.ajax({
url: "/products/set_images",
data: {id:request.replace(/[^0-9]/g, '')},
dataType: "json"
}).done(function(data){
data.images.forEach(function(d){
buildImage(d.image.url);
})
})
}
これで画像の読み込みは可能になりますが、このままだと画像を減らすことができません。
画像を減らすにはfiels_forの中に:_destroyというカラム情報を持った、
見えないチェックボックスを定義するのが手っ取り早いです。
まずは、このチェックボックスが生成されるようにビューを編集します。
= i.check_box :_destroy, {class: "hidden"}を追記しましょう。
-# 編集箇所ここから
= f.fields_for :images do |i|
= i.file_field :image, {class: "file-field"}
= i.check_box :_destroy, {class: "hidden"}
-# 編集箇所ここまで
そして、js側でチェックボックスを非表示にしつつ、×ボタンがクリックされた際に
チェックボックスにチェックを入れるように指定します。
var index = [0,1,2,3,4,5,6,7,8,9];
var request = $("#image-wrapper").attr("action");
if(request != undefined && request.indexOf("edit") != -1){
$.ajax({
url: "/products/set_images",
data: {id:request.replace(/[^0-9]/g, '')},
dataType: "json"
}).done(function(data){
data.images.forEach(function(d){
buildImage(d.image.url);
})
$(".hidden").hide();
$(".flexbox").on("click", ".delete-btn", function(){
var targetDeleteIndex = Number($(this).attr("index"));
$(`#product_images_attributes_${targetDeleteIndex}__destroy`).prop('checked', true);
})
})
}
最後に、編集するためのupdateアクションをコントローラに定義します。
画像が0枚で商品を編集完了してしまうとまずいので、
画像の枚数と削除枚数が一致してない時だけ保存するように処理しています。
def update
imageLength = 0
deleteImage = 0
params[:product][:images_attributes].each do |p|
imageLength += 1
end
for num in 0..9
if params[:product][:images_attributes][num.to_s] != nil
if params[:product][:images_attributes][num.to_s][:_destroy] == "1"
deleteImage += 1
end
end
end
if @product.valid? && !@product.images.empty? && imageLength != deleteImage
@product.update(set_params)
else
redirect_to edit_product_path(@product)
end
end
以上で商品の編集機能が完成です!
5.出品した商品の詳細を表示する
出品した商品の詳細を見れるようにしていきましょう。
商品の情報を表示すべきビューはindexとshowの2つです。
まずはindexに表示をしていきます。
products_controller.rbに以下を記述しておきましょう。
def index
@products = Product.all.order(created_at: :desc)
end
orderというのは並び替えのメソッドで、取得した商品を最新順で並び替えしてます。
続いて、ビューを以下のように編集します。
= render "layouts/header"
.top-image
.top-image__text
.top-image__text__top
もっとみんな
%span の、
%br
フリマアプリ
%span へ。
.top-image__text__bottom
TVCM START!
.top-image__image
.top-main
.top-main__title
%h2 人気のカテゴリー
.top-main__title__tags
%ul
%li レディース
%li メンズ
%li 家電・スマホ・カメラ
%li おもちゃ・ホビー・グッズ
.top-main__contents
%h2 レディース新着アイテム
= link_to "#", class:"link-blue" do
もっと見る
%i{class: "fas fa-chevron-right"}
-# 編集箇所ここから
- if @products[0] != nil
.top-main__products
- @products[0..4].each do |product|
= link_to product_path(product.id) do
.top-main__products__product
- product.images.each.with_index(1) do |image,i|
- if i == 1
= image_tag("#{image.image}")
.top-main__products__product__price
= "¥#{product.price.to_s(:delimited)}"
.top-main__products__product__text
= product.name
- if @products[5] != nil
.top-main__products
- @products[5..9].each do |product|
= link_to product_path(product.id) do
.top-main__products__product
- product.images.each.with_index(1) do |image,i|
- if i == 1
= image_tag("#{image.image}")
.top-main__products__product__price
= "¥#{product.price.to_s(:delimited)}"
.top-main__products__product__text
= product.name
-# 編集箇所ここまで
= render "layouts/footer"
= link_to new_product_path, data: {turbolinks: false} do
.new-product-btn
出品
%br
%i{class:"fas fa-camera"}
これで最新10件が表示されるようになります。以下のように表示できていれば成功です。
(6件登録した場合の例です)
また、商品画像をクリックすればshowに飛ぶように設定したので、
引き続きshowを以下のように編集しましょう。
= render "layouts/header"
.show-wrapper{action: request.path}
.show-wrapper__main
.show-wrapper__main__product-name
= @product.name
%br
- if @product.user_id == current_user.id
= link_to edit_product_path(@product), class:"link-blue", data: {turbolinks: false} do
商品を編集する
- if @product.user_id == current_user.id
= link_to product_path(@product), method: "delete", class:"link-blue" do
商品を削除する
.show-wrapper__main__contents
.show-wrapper__main__contents__left
- @product.images.each.with_index do |image,i|
- if i == 0
= image_tag "#{image.image}", class:"show-wrapper__main__contents__left__image"
.show-wrapper__main__contents__left__icons
- @product.images.each.with_index do |image,i|
- if i == 0
= image_tag "#{image.image}", class:"show-wrapper__main__contents__left__icons__icon", index: i
- else
= image_tag "#{image.image}", class:"show-wrapper__main__contents__left__icons__icon non-active", index: i
.show-wrapper__main__contents__right
.show-wrapper__main__contents__right__table
.show-wrapper__main__contents__right__table__left
出品者
.show-wrapper__main__contents__right__table__right
= User.find(@product.user_id).nickname
.show-wrapper__main__contents__right__table
.show-wrapper__main__contents__right__table__left
カテゴリー
.show-wrapper__main__contents__right__table__right
= link_to "#", class: "link-blue" do
= @product.category
.show-wrapper__main__contents__right__table
.show-wrapper__main__contents__right__table__left
ブランド
.show-wrapper__main__contents__right__table__right
- unless @product.brand.blank?
= @product.brand
.show-wrapper__main__contents__right__table
.show-wrapper__main__contents__right__table__left
商品のサイズ
.show-wrapper__main__contents__right__table__right
- unless @product.size.blank?
= @product.size
.show-wrapper__main__contents__right__table
.show-wrapper__main__contents__right__table__left
商品の状態
.show-wrapper__main__contents__right__table__right
= @product.condition
.show-wrapper__main__contents__right__table
.show-wrapper__main__contents__right__table__left
配送料の負担
.show-wrapper__main__contents__right__table__right
= @product.postage
.show-wrapper__main__contents__right__table
.show-wrapper__main__contents__right__table__left
配送の方法
.show-wrapper__main__contents__right__table__right
らくらくフリマ便
.show-wrapper__main__contents__right__table
.show-wrapper__main__contents__right__table__left
配送元地域
.show-wrapper__main__contents__right__table__right
= @product.region
.show-wrapper__main__contents__right__table
.show-wrapper__main__contents__right__table__left
発送日の目安
.show-wrapper__main__contents__right__table__right
= @product.shipping_days
.show-wrapper__main__price
%h1
= "¥#{@product.price.to_s(:delimited)}"
%span{class: "show-wrapper__main__price__tax"} (税込)
- if @product.postage == "送料込み(出品者負担)"
送料込み
- else
送料別
= link_to "#", class:"show-wrapper__main__buy-button" do
商品購入へ進む
.show-wrapper__main__explanation
= br(@product.explanation)
.show-wrapper__main__bottom
.show-wrapper__main__bottom__btn-wrapper
.show-wrapper__main__bottom__btn-wrapper__btn
%i{class: "far fa-heart"}
いいね!
0
.show-wrapper__main__bottom__btn-wrapper__btn
%i{class: "far fa-flag"}
不適切な商品の報告
= link_to "#", class:"show-wrapper__main__bottom__link link-blue" do
%i{class: "fas fa-lock"}
あんしん、あんぜんへの取り組み
.show-wrapper__main
.show-wrapper__main__comment-wrapper
.show-wrapper__main__comment-wrapper__name
令和の明智光秀
.show-wrapper__main__comment-wrapper__icon
= image_tag "user_icon.png"
.show-wrapper__main__comment-wrapper__comment
= image_tag "bubble.png"
= br("こんにちは!\nこちら3000円にお値下げは可能でしょうか?")
%br
%i{class: "far fa-clock"} 3時間前
%i{class: "far fa-flag"}
.show-wrapper__main__comment-wrapper
.show-wrapper__main__comment-wrapper__name
令和の織田信長(本物)
.show-wrapper__main__comment-wrapper__icon
= image_tag "user_icon.png"
.show-wrapper__main__comment-wrapper__comment
= image_tag "bubble.png"
= br("令和の明智光秀さん\nOKです!3000円に値下げしましたので、よろしくお願いします。")
%br
%i{class: "far fa-clock"} 3時間前
%i{class: "far fa-flag"}
.show-wrapper__main__comment-input
.show-wrapper__main__comment-input__caution
相手のことを考え丁寧なコメントを心がけましょう。不快な言葉遣いなどは利用制限や退会処分となることがあります。
%textarea{class: "show-wrapper__main__comment-input__textfield"}
%input{type: "submit", class: "show-wrapper__main__comment-input__submit", value: "コメントを投稿する"}
.show-wrapper__main
.show-wrapper__main__sns-icons
%i{class: "fab fa-facebook-square"}
%i{class: "fab fa-twitter"}
%i{class: "fab fa-line"}
%i{class: "fab fa-pinterest"}
.show-wrapper__others
= link_to "#", class: "show-wrapper__others__title link-blue" do
= "令和の織田信長(本物)"
さんのその他の出品
.show-wrapper__others__products
- for num in 1..6
.show-wrapper__others__products__product
= image_tag "1616794_s.jpg", class: "show-wrapper__others__products__product__image"
.show-wrapper__others__products__product__bottom
.show-wrapper__others__products__product__bottom__text
商品サンプル商品サンプル商品サンプル商品サンプル商品サンプル商品サンプル商品サンプル
.show-wrapper__others__products__product__bottom__price
= "¥#{1980.to_s(:delimited)}"
%span{class: "show-wrapper__others__products__product__bottom__price__like"}
%i{class: "far fa-heart"}
0
= render "layouts/footer"
また、showについては画像プレビューの切り替え機能が必要になるので、
以下のようにproducts_show.jsを作成しましょう。
$(function(){
var request = $(".show-wrapper").attr("action");
$.ajax({
url: "/products/set_images",
data: {id:request.replace(/[^0-9]/g, '')},
dataType: "json"
}).done(function(data){
$(".show-wrapper__main__contents__left__icons__icon").on("click", function(){
$(".show-wrapper__main__contents__left__icons__icon").addClass("non-active");
$(this).removeClass("non-active");
$(".show-wrapper__main__contents__left__image").attr("src", data.images[$(this).attr("index")].image.url);
})
})
})
6.商品を削除する
コントローラにdestroyアクションを定義します。
エラーハンドリング用に一応、before_action :set_productにdestroyも追加しておきます。
before_action :set_product, only: [:show, :edit, :update, :destroy]
def destroy
unless @product.destroy
redirect_to product_path(@product)
end
end
showに削除ボタンを作ったので、クリックして削除できるかどうか確認しましょう。
お疲れ様でした!
これにて商品出品/編集/詳細表示/削除の全機能が完成しました。
第五章 商品カテゴリ機能に続きます。
| 章 | 内容 | 難易度 | 所要時間 | 主要技術 |
|---|---|---|---|---|
| 序 章 | AWS自動デプロイ | ★☆☆☆☆ | ★★★☆☆ | capistrano |
| 第一章 | データベース設計 | ★☆☆☆☆ | ★☆☆☆☆ | |
| 第二章 | マークアップ作業 | ★★☆☆☆ | ★★★★★ | |
| 第三章 | ユーザ登録/ログイン機能 | ★★★★☆ | ★★☆☆☆ | devise |
| 第四章 | 商品出品/編集/詳細表示/削除 | ★★★★☆ | ★★★☆☆ | carrierwave |
| 第五章 | 商品カテゴリ機能 | ★★★★★ | ★★★☆☆ | ancestry |
| 第六章 | 商品購入機能 | ★★★★★ | ★★★★☆ | Payjp |
あとがき
この記事のここをもっと解説してほしい!などありましたら、コメント欄でお伝えください。
また、コメント欄での暴言や誹謗中傷の書き込み等はご遠慮ください。マジで凹むので。
いつも記事を読んで頂いている皆さま、LGTMを押していただいている皆さま、本当にありがとうございます!!
有益な記事を執筆するモチベーションに繋がりますので、この記事が役に立ったなと思って頂けたら、
是非LGTMボタンのクリックやSNSでのシェアをよろしくお願いします。


