はじめに
本記事は序章 AWS自動デプロイのつづきです。
RailsとMySQLを用いて、フリマアプリに必要となるデータベースを設計していきます。
制作するアプリ
ユーザ登録、商品出品・購入の機能を備えたフリマアプリです。
メルカリ風、というかほぼメルカリです。メルカリを作ります。
ちなみに、この規模のアプリは単価50万円ほどで取引されることが多いそうです。
通常納期は30日ほどだと思いますが、慣れてくれば1週間くらいで作れたりします。
この記事を使って、Web開発を極める一助にしていただければ幸いです。
OS   : macOS Catalina 10.15.3
DB   : MySQL
Ruby : 2.5.1
Rails: 5.2.4.2
フリマアプリ開発完全ロードマップ
| 章 | 内容 | 難易度 | 所要時間 | 主要技術 |
|---|---|---|---|---|
| 序 章 | AWS自動デプロイ | ★☆☆☆☆ | ★★★☆☆ | capistrano |
| 第一章 | データベース設計 | ★☆☆☆☆ | ★☆☆☆☆ | |
| 第二章 | マークアップ作業 | ★★☆☆☆ | ★★★★★ | |
| 第三章 | ユーザ登録/ログイン機能 | ★★★★☆ | ★★☆☆☆ | devise |
| 第四章 | 商品出品/編集/詳細表示/削除 | ★★★★☆ | ★★★☆☆ | carrierwave |
| 第五章 | 商品カテゴリ機能 | ★★★★★ | ★★★☆☆ | ancestry |
| 第六章 | 商品購入機能 | ★★★★★ | ★★★★☆ | Payjp |
記事を読むにあたっての前提条件
この記事には私が作成した大量のコードが載っていますが、
コードレビューのための記事ではありませんので、「コードが汚い!」などのコメントはご遠慮願います。
リファクタリングについては、編集リクエストで私に直接お知らせ頂ければ幸いです。
ご理解のほど、何卒よろしくお願いいたします。
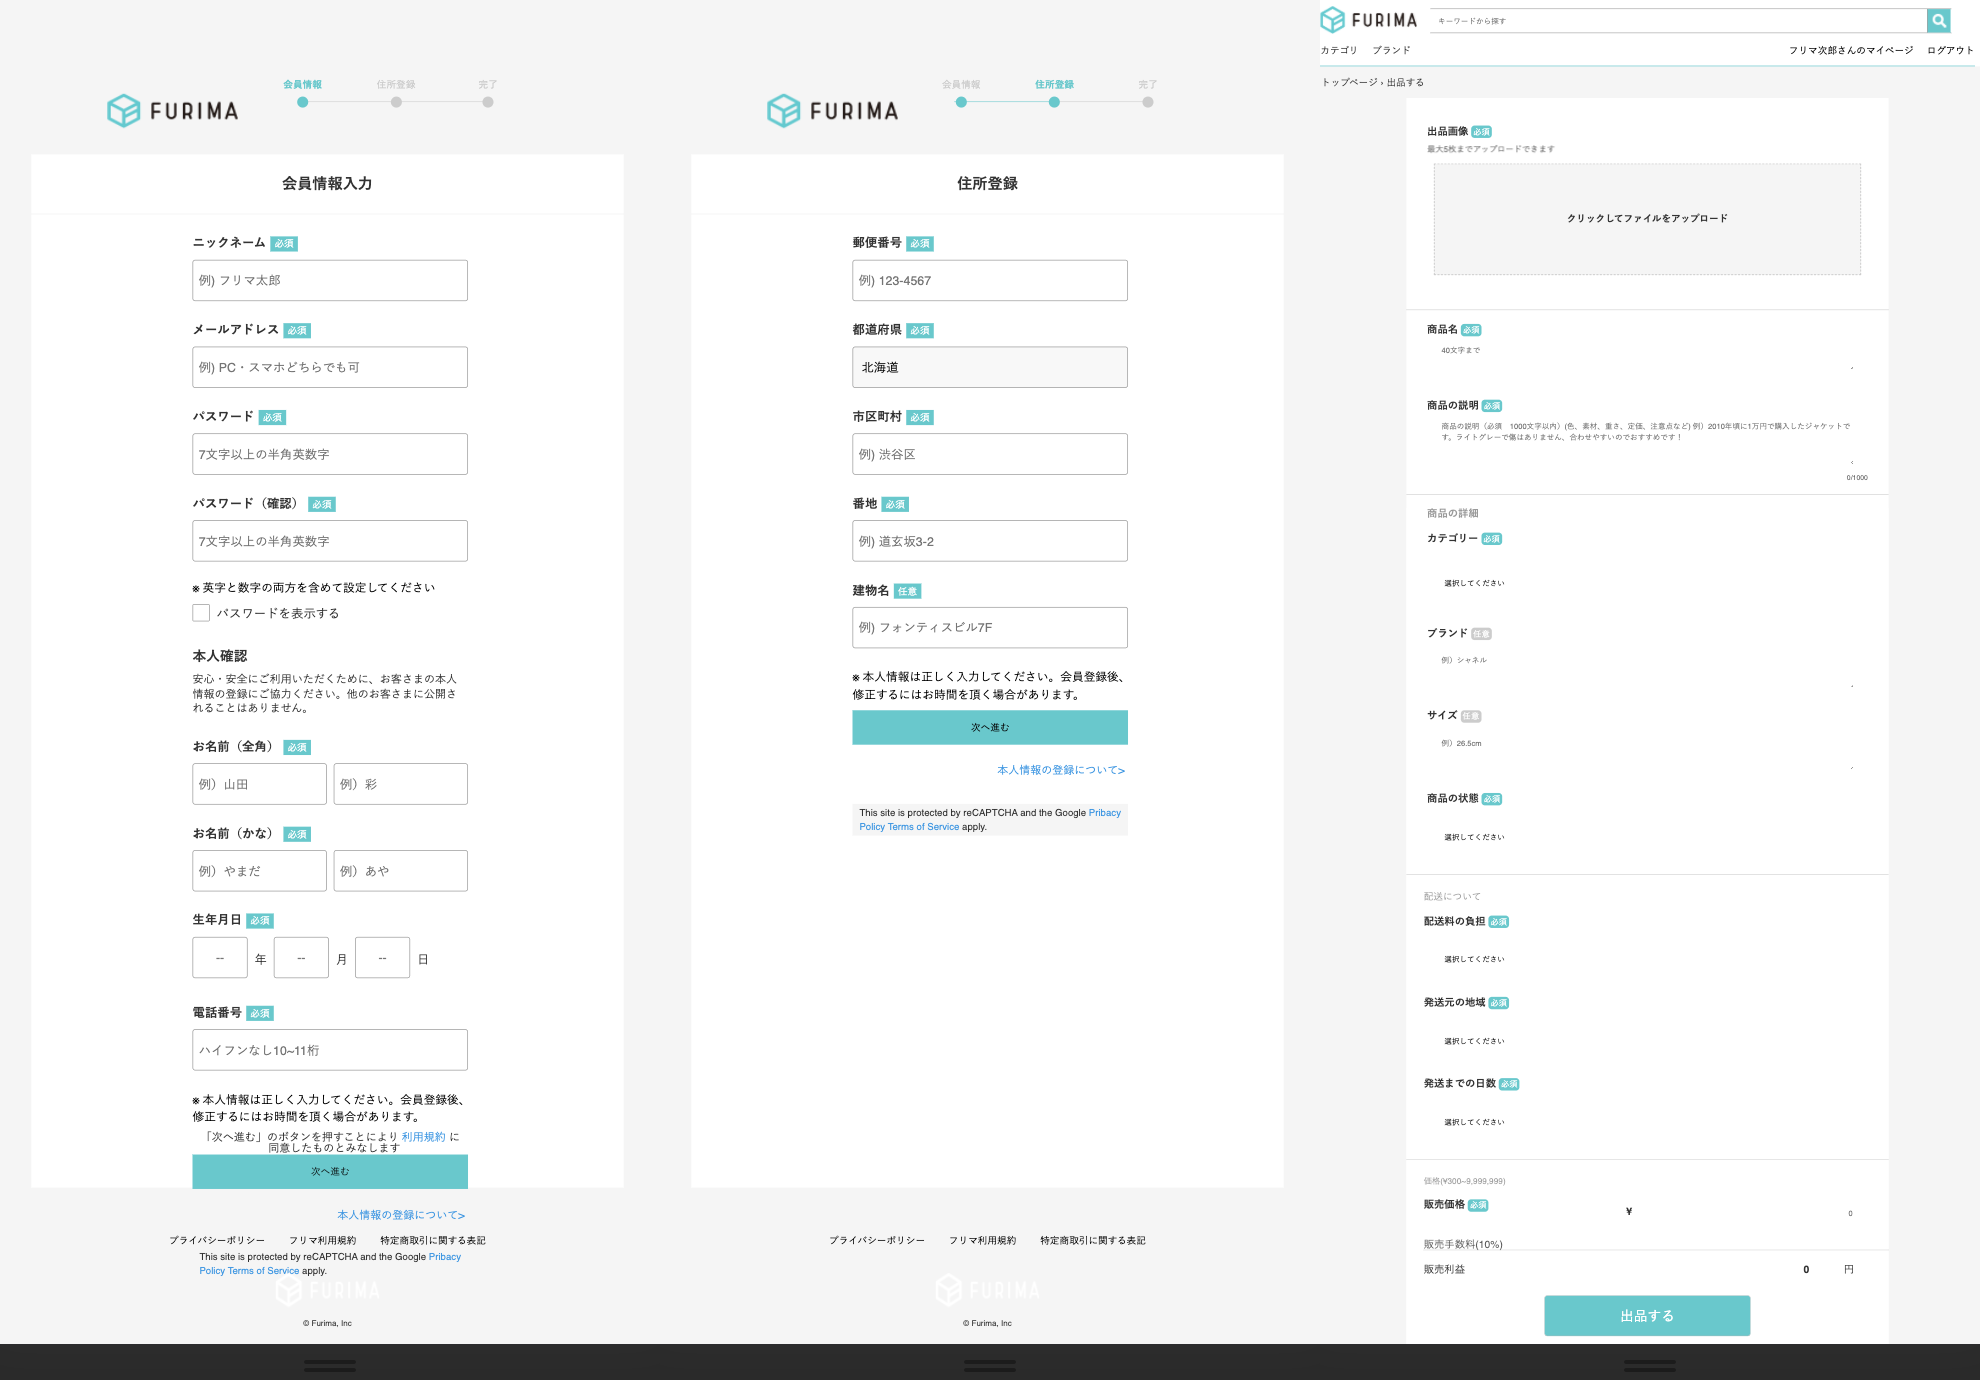
1.入力欄を考える
データベースとは、要するに「入力欄」のことです。
今回作りたいのはフリマアプリ、つまりメルカリなので、「メルカリの入力欄」をパクります。
入力する必要があるのは下記の2つです。
① ユーザ登録に必要な情報
② 商品出品に必要な情報
上の画像に存在する入力欄を全てカラムとして書き出して、以下4つのモデルに分けてみます。
Userモデル Addressモデル
Productモデル Imageモデル
UserモデルとAddressモデルを分けるのは、1人のユーザが複数の住所を登録できるようにするためです。
ProductモデルとImageモデルを分けるのも、1つの商品に複数の画像を投稿したいからです。
1つのモデルの中に「1対多」の関係を見出したら、モデルを分けましょう。
それでは実際にモデルを作成していきます。
2.rails g modelする
上記6つのモデルをrails g model モデル名で作ります。
ユーザだけはdeviseというログイン機能らくらく作成gemで作ります。
早速、Gemfileの末尾に以下を書き、ターミナルでコマンドを実行。
gem 'devise'
bundle install
rails g devise:install
rails g devise user
Userモデルを以下のように作成します。
Userモデル
class User < ApplicationRecord
  has_many   :products  , dependent: :destroy
  has_many   :addresses , dependent: :destroy

  devise :database_authenticatable, :registerable,
         :recoverable, :rememberable, :validatable

  validates :firstname , :lastname, :firstname_kana, :lastname_kana, :nickname, :birth_year, :birth_month, :birth_day, :tel_number, presence: true
  validates :tel_number, uniqueness: true

  validates :firstname     , format: {with: /\A[ぁ-んァ-ン一-龥]/}
  validates :lastname      , format: {with: /\A[ぁ-んァ-ン一-龥]/}
  validates :firstname_kana, format: {with: /\A[ァ-ンー-]+\z/}
  validates :lastname_kana , format: {with: /\A[ァ-ンー-]+\z/}
  validates :birth_year    , format: {with: /\A\d{4}\z/}
  validates :birth_month   , numericality: { only_integer: true , greater_than: 0, less_than: 13 }
  validates :birth_day     , numericality: { only_integer: true , greater_than: 0, less_than: 32 }
  validates :tel_number    , numericality: { only_integer: true }, length: { in: 10..11 }
end
validatesについて
1つ目は必須項目を入力しないとエラーを返すよう設定してます。
2つ目は同じ電話番号で複数回登録するのを防いでます。
3つ目以降は名前に数字が入ってないか等の確認です。
次、マイグレーションファイルです。
class DeviseCreateUsers < ActiveRecord::Migration[5.2]
  def change
    create_table :users do |t|
      t.string   :nickname          , null: false
      t.string   :firstname         , null: false
      t.string   :lastname          , null: false
      t.string   :firstname_kana    , null: false
      t.string   :lastname_kana     , null: false
      t.integer  :birth_year        , null: false
      t.integer  :birth_month       , null: false
      t.integer  :birth_day         , null: false
      t.string   :tel_number        , null: false
      t.string   :email             , null: false, default: ""
      t.string   :encrypted_password, null: false, default: ""
      t.string   :reset_password_token
      t.datetime :reset_password_sent_at
      t.datetime :remember_created_at
      t.timestamps                    null: false
    end
    add_index :users, :email, unique: true
    add_index :users, :reset_password_token, unique: true
  end
end
以上がUserモデルです。
他3つのモデルも一気に作っていきます。ターミナルで以下のコマンドを実行して下さい。
rails g model address
rails g model product
rails g model image
Addressモデル
class Address < ApplicationRecord
  belongs_to :user
end
class CreateAddresses < ActiveRecord::Migration[5.2]
  def change
    create_table :addresses do |t|
      t.references :user       , null: false, foreign_key: true
      t.string     :post_number, null: false
      t.string     :prefecture , null: false
      t.string     :city       , null: false
      t.string     :address     , null: false
      t.string     :apartment
      t.timestamps
    end
  end
end
Productモデル
class Product < ApplicationRecord
  belongs_to :user
  has_many   :images, dependent: :destroy
  validates :name, :explanation, :category, :condition, :postage, :region, :shipping_days, :price, presence: true
  validates :price, numericality: { only_integer: true , greater_than: 0, less_than: 9999999 }
end
class CreateProducts < ActiveRecord::Migration[5.2]
  def change
    create_table :products do |t|
      t.string     :name         , null: false
      t.text       :explanation  , null: false
      t.string     :category     , null: false
      t.string     :brand        , null: false
      t.string     :condition    , null: false
      t.string     :region       , null: false
      t.string     :size
      t.integer    :price        , null: false
      t.integer    :shipping_days, null: false
      t.string     :postage      , null: false
      t.references :user         , null: false, foreign_key: true
      t.timestamps
    end
  end
end
Imageモデル
class Image < ApplicationRecord
  belongs_to :product, optional: true
end
class CreateImages < ActiveRecord::Migration[5.2]
  def change
    create_table :images do |t|
      t.string     :image  , null: false
      t.references :product, null: false, foreing_key: true
      t.timestamps
    end
  end
end
ここまで作成できたらrails db:migrateです。
rails db:migrate
これでDB設計は完了です!お疲れ様でした。
上記で説明した4つのモデルの他にも商品をカテゴライズするためのCategoryモデル、商品を購入するためのクレジットカード登録で必要となるCardモデルの2つが必須ですが、それらは別の章で説明するので今回は割愛します。また、商品のお気に入り機能ではLikeモデル、コメント機能ではCommentモデルが必要になります。これらも同様に、副章にて扱います。
以上がデータベースについての解説でした。
第二章 マークアップ作業に続きます。
| 章 | 内容 | 難易度 | 所要時間 | 主要技術 |
|---|---|---|---|---|
| 序 章 | AWS自動デプロイ | ★☆☆☆☆ | ★★★☆☆ | capistrano |
| 第一章 | データベース設計 | ★☆☆☆☆ | ★☆☆☆☆ | |
| 第二章 | マークアップ作業 | ★★☆☆☆ | ★★★★★ | |
| 第三章 | ユーザ登録/ログイン機能 | ★★★★☆ | ★★☆☆☆ | devise |
| 第四章 | 商品出品/編集/詳細表示/削除 | ★★★★☆ | ★★★☆☆ | carrierwave |
| 第五章 | 商品カテゴリ機能 | ★★★★★ | ★★★☆☆ | ancestry |
| 第六章 | 商品購入機能 | ★★★★★ | ★★★★☆ | Payjp |

