Step by Step Introduction to Basic Concept of Kubernetes
Understanding the concept of Kubernetes by creating the Kubernetes Cluster in your local environment

Have you heard Kubernetes? You must be interested in that topic. That’s why you open this article. This article is about the basic concept of Kubernetes and how to use it. In the end, we will run docker containers using Kubernetes that run on Minikube. It doesn’t require any cloud paid account.
What is Kubernetes?
Kubernetes is an open-source platform/tool created by Google. It is written in GO-Lang. So currently Kubernetes is an open-source project under Apache 2.0 license. Sometimes in the industry, Kubernetes is also known as “K8s”. With Kubernetes, you can run any Linux container across private, public, and hybrid cloud environments. Kubernetes provides some edge functions, such as Loadbalancer, Service discovery, and Roled Based Access Control(RBAC).
Why we need Kubernetes?
The answer is to help us manage containers. When we run our production environments using a microservice pattern with many containers, we need to make sure many things. Such as health check, version control, scaling, and rollback mechanism. It will be very frustrating to make sure all of these things still be ok. Kubernetes gives you the orchestration and management capabilities required to deploy containers, at scale. Kubernetes orchestration allows you to build application services that span multiple containers, schedule those containers across a cluster, scale those containers, and manage the health of those containers over time. In nutshell, I can say Kubernetes is more like a manager that has many subordinates(containers). What manager does is maintain what subordinates need to do.
Before used Kubernetes, you need to prepare your infrastructure to deploy a new microservice. I believe it cost you a few days or weeks. Without Kubernetes, large teams would have to manually script the deployment workflows. With Kubernetes, you don’t need to create your deployment script manually and it will reduce the amount of time and resources spent on DevOps.
Key feature of Kubernetes:
- Horizontal Scaling
- Auto Scaling
- Health check & Self-healing
- Load Balancer
- Service Discovery
- Automated rollbacks & rollouts
- Canary Deployment
How Kubernetes Works?
When you start the Kubernetes by reading the official documentation, you might be overwhelmed to encounter a lot of terminologies. Sometimes we need the overview to get a better understanding of the concept. Here I show you the complete overview diagram of Kubernetes Architecture. I hope this helps.
The sequence of deployment:
DevOps -> API Server -> Scheduler -> Cluster ->Nodes -> Kubelet -> Container Engine -> Spawn Container in Pod
The sequence of App user request:
App user -> Kube proxy -> Pod -> Container(Your app is run here)

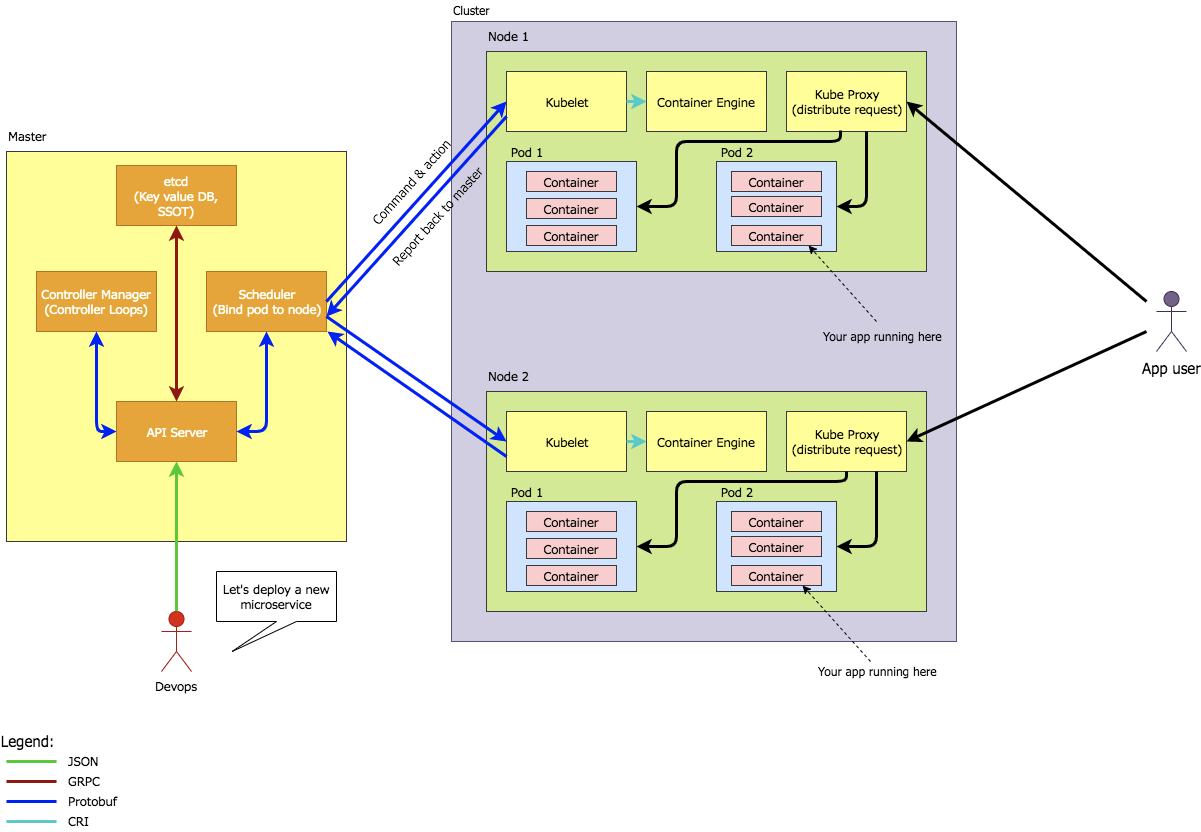
As you can see in the diagram, there is a lot of terms that you don’t understand. I will explain it one by one.
Master
Master is the controlling element of the cluster. Master has 3 parts:
- API Server: The application that serves Kubernetes functionality through a RESTful interface and stores the state of the cluster.
- Scheduler: Scheduler watches API server for new Pod requests. It communicates with Nodes to create new pods and to assign work to nodes while allocating resources or imposing constraints.
- Controller Manager: Component on the master that runs controllers. Includes Node controller, Endpoint Controller, Namespace Controller, etc.
Slave(Nodes)
These machines perform the requested, assigned tasks. The Kubernetes master controls them. There 4 component inside Nodes:
- Pod: All containers will run in a pod. Pods abstract the network and storage away from the underlying containers. Your app will run here.
- Kubelet: Kubectl registering the nodes with the cluster, watches for work assignments from the scheduler, instantiate new Pods, report back to the master.
- Container Engine: Responsible for managing containers, image pulling, stopping the container, starting the container, destroying the container, etc.
- Kube Proxy: Responsible for forwarding app user requests to the right pod.
I’m not going to describe the detailed concept here, cause it will lead to a boring situation. This article should be more dirty and fun. You can read the official documentation for more details information. Click here.
Hands-On With Docker and Kubernetes
It’s time to get our hands dirty. In this section, I will use the existing docker project on Github and will more focus on the Kubernetes. We will use Minikube. Minikube is a tool that makes it easy to run Kubernetes locally.
- Installing Minkube
Try this Minikube official installation doc. - Follow Instruction Below
Start Minikube and create a cluster
minikube startClone this repo in your local workspace
git clone https://github.com/buildkite/nodejs-docker-example.gitPoint your Docker client to your MinikubeDocker daemon
eval $(minikube docker-env)Move your directory into cloned repo above. Create a Docker image using this command and make sure can run locally.
cd the-example-app.nodejs
docker build -t example-node-app .
Make sure you have successfully created the Docker image.
docker imagesLet’s create a Kubernetes Deployment using an existing image named example-node-app, which is a simple Node HTTP server and expose it on port 3000.
Create a file and named it deployment-script.yaml.
kind: DeploymentapiVersion: extensions/v1beta1metadata: name: kubernetes-deployment namespace: default labels: app: node-app spec: replicas: 1 selector: matchLabels: app: node-app template: metadata: labels: app: node-app spec: containers: - name: node-app-container image: example-node-app resources: {} imagePullPolicy: IfNotPresent restartPolicy: Always terminationGracePeriodSeconds: 30terminationGracePeriodSeconds: 30
Then
kubectl apply -f deployment-script.yamlThe node-app Pod is now launched and your node-app container will run inside the pod, but you have to wait until the Pod is up before accessing it via the exposed Service.
Check if the Pod is up and running:
kubectl get podThe pod is up and running:
NAME                              READY     STATUS    RESTARTS   AGE
node-app-3383150820-vctvh         1/1       Running   0          13s
Please don’t happy too fast. We’re not ending here. You need a service proxy to access your pod. We will create a LoadBalancer service with targetPort: 3000 and exposing port 8000 to the user.
Create a file called node-app-service.yaml with the text below.
kind: ServiceapiVersion: v1metadata: name: node-app-service namespace: default labels: app: node-servicespec: ports: - protocol: TCP port: 8000 targetPort: 3000 selector: app: node-app type: LoadBalancer sessionAffinity: None externalTrafficPolicy: Clusterstatus: loadBalancer: {}
Execute:
kubectl apply -f node-app-service.yamlTo get information about your service:
kubectl get serviceWill show this:
NAME             Type         EXTERNAL-IP  PORT(S)         AGE
node-app-service LoadBalancer <pending>    8000:31386/TCP  36m
After you create the service, it takes time for the cloud infrastructure to create the load balancer and write its IP address into the Service object. Well, All the time passes why the external IP is still pending?
If Kubernetes is running in an environment that doesn’t support LoadBalancer services, the load balancer will not be provisioned.
In that case, you need an IP that can be attached to your service. You can use Minikube IP.
minikube ipCopy the displayed Minikube IP and attach it to your EXTERNAL-IP service.
kubectl patch svc node-app-service -p '{"spec": {"type": "LoadBalancer", "externalIPs":["YOUR_MINIKUBE_IP"]}}'Displaying information about the service:
kubectl get serviceResult:
NAME             Type         EXTERNAL-IP      PORT(S)         AGE
node-app-service LoadBalancer 192.168.99.100   8000:31386/TCP  36m
So you can now access the service at that IP address or access it via the web browser:
curl 192.168.99.100:8000Bonus
You need an Interactive UI to display your Kubernetes cluster?

The Dashboard UI is not deployed by default. To deploy it:
kubectl apply -f https://raw.githubusercontent.com/kubernetes/dashboard/v2.0.0-beta4/aio/deploy/recommended.yamlBy default, the Kubernetes dashboard user has limited permissions. In this section, you create an eks-admin service account and cluster role binding that you can use to securely connect to the dashboard with admin-level permissions.
Create a file called eks-admin-service-account.yaml with the text below. This manifest defines a service account and cluster role binding called eks-admin.
apiVersion: v1
kind: ServiceAccount
metadata:
  name: eks-admin
  namespace: kube-system
---
apiVersion: rbac.authorization.k8s.io/v1beta1
kind: ClusterRoleBinding
metadata:
  name: eks-admin
roleRef:
  apiGroup: rbac.authorization.k8s.io
  kind: ClusterRole
  name: cluster-admin
subjects:
- kind: ServiceAccount
  name: eks-admin
  namespace: kube-system
Apply the service account and cluster role binding to your cluster.
kubectl apply -f eks-admin-service-account.yamlYou need an authentication token for the eks-admin service account. Copy the <authentication_token> value from the output. Use this token to connect to the dashboard.
kubectl -n kube-system describe secret $(kubectl -n kube-system get secret | grep eks-admin | awk '{print $1}')output:
Name:         eks-admin-token-b5zv4
Namespace:    kube-system
Labels:       <none>
Annotations:  kubernetes.io/service-account.name=eks-admin               kubernetes.io/service-account.uid=bcfe66ac-39be-11e8-97e8-026dce96b6e8
Type:  kubernetes.io/service-account-token
Data
====
ca.crt:     1025 bytes
namespace:  11 bytes
token:      <authentication_token>
You can access the Dashboard using the kubectl command-line tool by running the following command:
kubectl proxyYou can access http://localhost:8001/api/v1/namespaces/kubernetes-dashboard/services/https:kubernetes-dashboard:/proxy/#!/login
Choose Token, paste the <authentication_token> output from the previous command into the Token field, and choose SIGN IN.

Reference
Hooray it ends here 🤗
I hope you enjoyed it. Leave a comment down below. If you faced any issue, leave a comment, I’ll help 😉.
I would say thanks to the guy who created this repo https://github.com/contentful/the-example-app.nodejs, cause I can use it for the example app in this article.

