Contents
- Original / Generic tool comparison
- Why to not solder terminals
- FCI/Berg/DuPont Mini-PV
- JST PH
- JST XH
- Molex Picoblade
- Molex KK 254 / KK .100
- SL (Molex)
- Molex KK 396 / KK .156
- Molex Mini-Fit Sr
- Molex Mini-Fit Jr
- Molex Micro-Fit
- Molex Milligrid
- Molex Disk Drive Power Connection System
- AMP E.I.
- Molex 90331/8619 series
Introduction

As someone who builds a lot of electrical things, one of the perhaps most unexciting yet fundamental subject areas is connectors. The range of connectors available and in-use today is trully astonishing. Big sellers like Digi-key/Farnell/Mouser literally have tens of thousands of product lines in their connectors category!
With so many different types of connectors available, it’s often difficult to know what to buy, especially when you’re buying for general use or “personal stock”. On this page I’ll cover some of the most common connectors in use today, and detail crimping/tooling considerations.
Every connector system ever conceived has its own official crimp tool, in most cases the cost of these is over and above what any hobbyist could and would want to pay for a crimp tool.

I personally own many of the official tools but for cost reasons don’t necessarily recommend them. Throughout this page I’ll demonstrate the use of two inexpensive generic crimping tools: the Engineer PA-09 and PA-21, and compare them against the genuine parts.
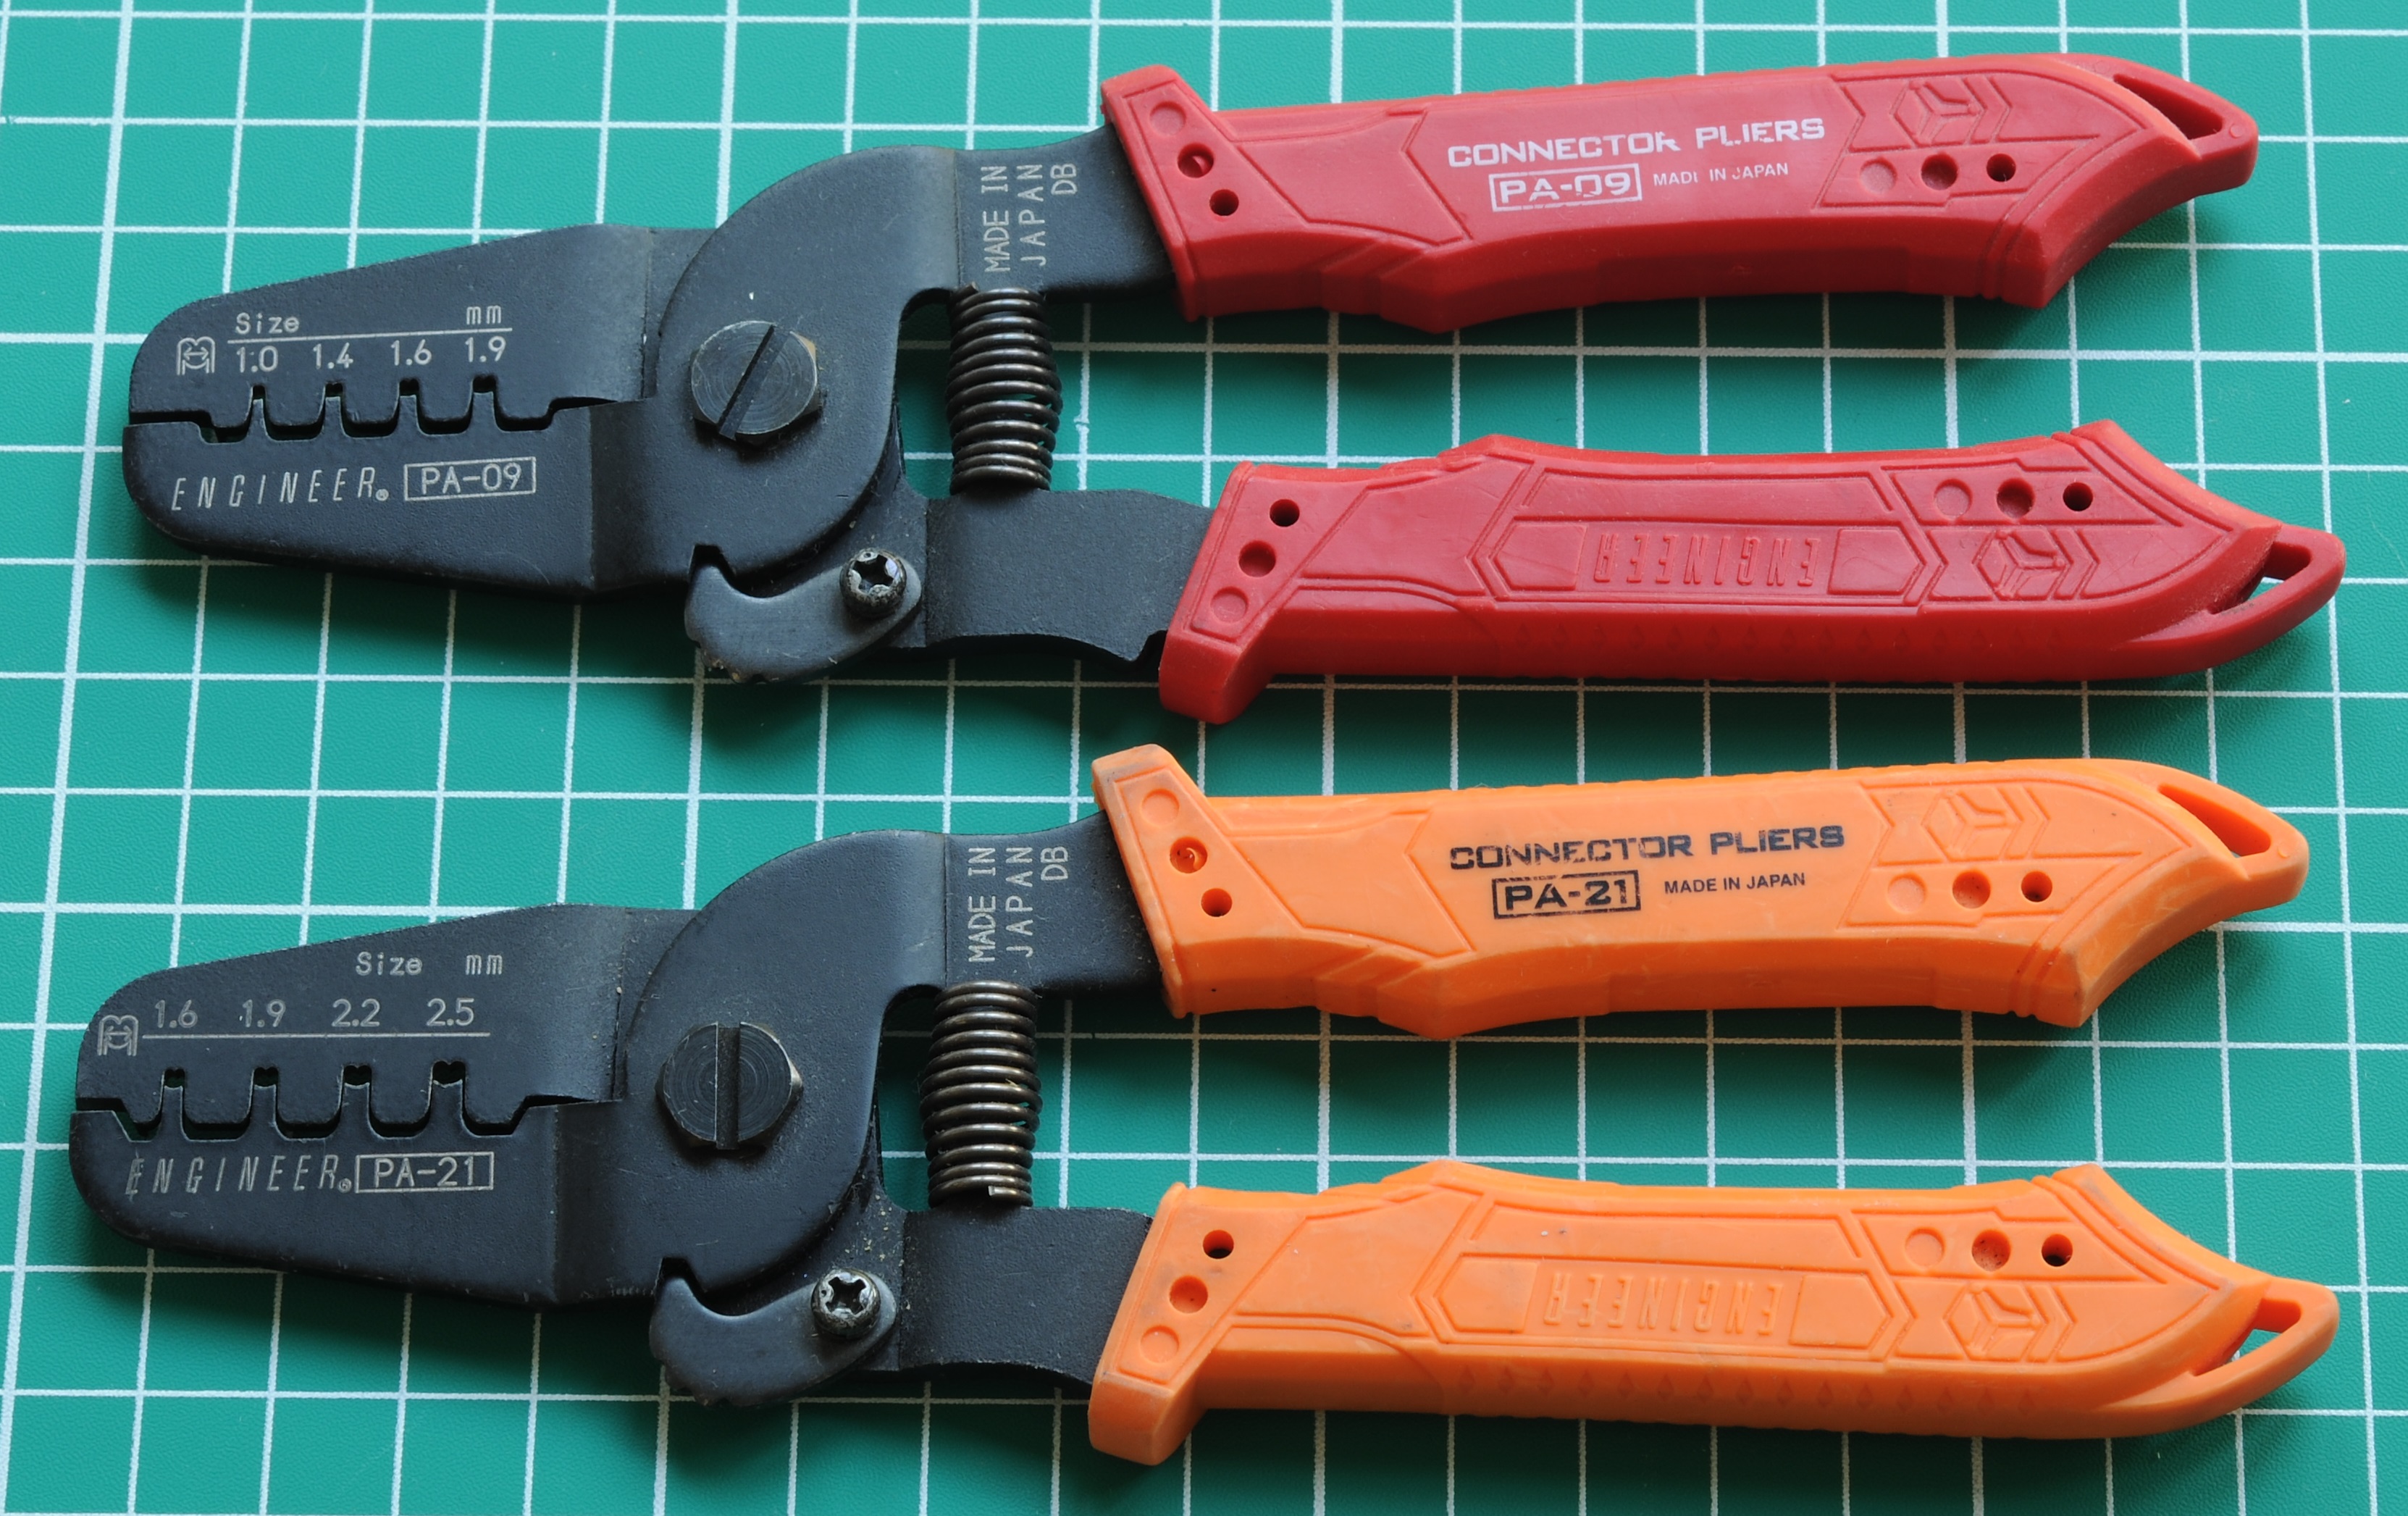
What differences can I expect using original tools versus generic tools?
These are four main differences:
- Single action: All original tools allow insertion of the contact and crimping in one go. Generic tools will often require the insulation and wire crimp to be performed as separate actions
- Correct crimping force: When using generic tools, it can often be difficult to get sufficient crimping force, especially when crimping thin / small gauge wire into terminals. It is also equally easy to over crimp terminals, damaging the wire in the process.
- Locator: All original tools have a ‘locator’ which holds the terminal in place during crimping, this means that your crimps are perfect every time. Using generic tools, it can be frustrating trying to line the terminal up correctly.
- Insulation crimp accuracy: Original tools are designed to not piece the insulation, whereas generic tools do most of the time. This means that terminations subject to continual mechanical stress are going to last a lot longer.
- Cost: Original tools are all extremely expensive. Unless like me you’re happy to prowl eBay looking for deals on second hand original tools, expect to be paying hundreds to over a thousand dollars (USD) / £ (GBP) for an original tool, only to have it work on a single connector family!
What’s wrong with just soldering terminals?
Before I even get started, let’s cover this one briefly with a simple diagram:

When crimped properly, the strands remain individual even upon entering the insulation crimp, making the chances of strands breaking low.
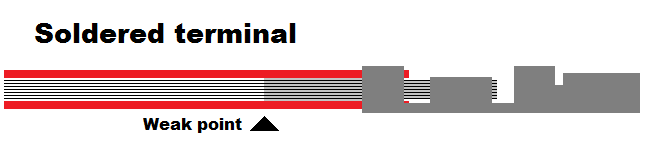
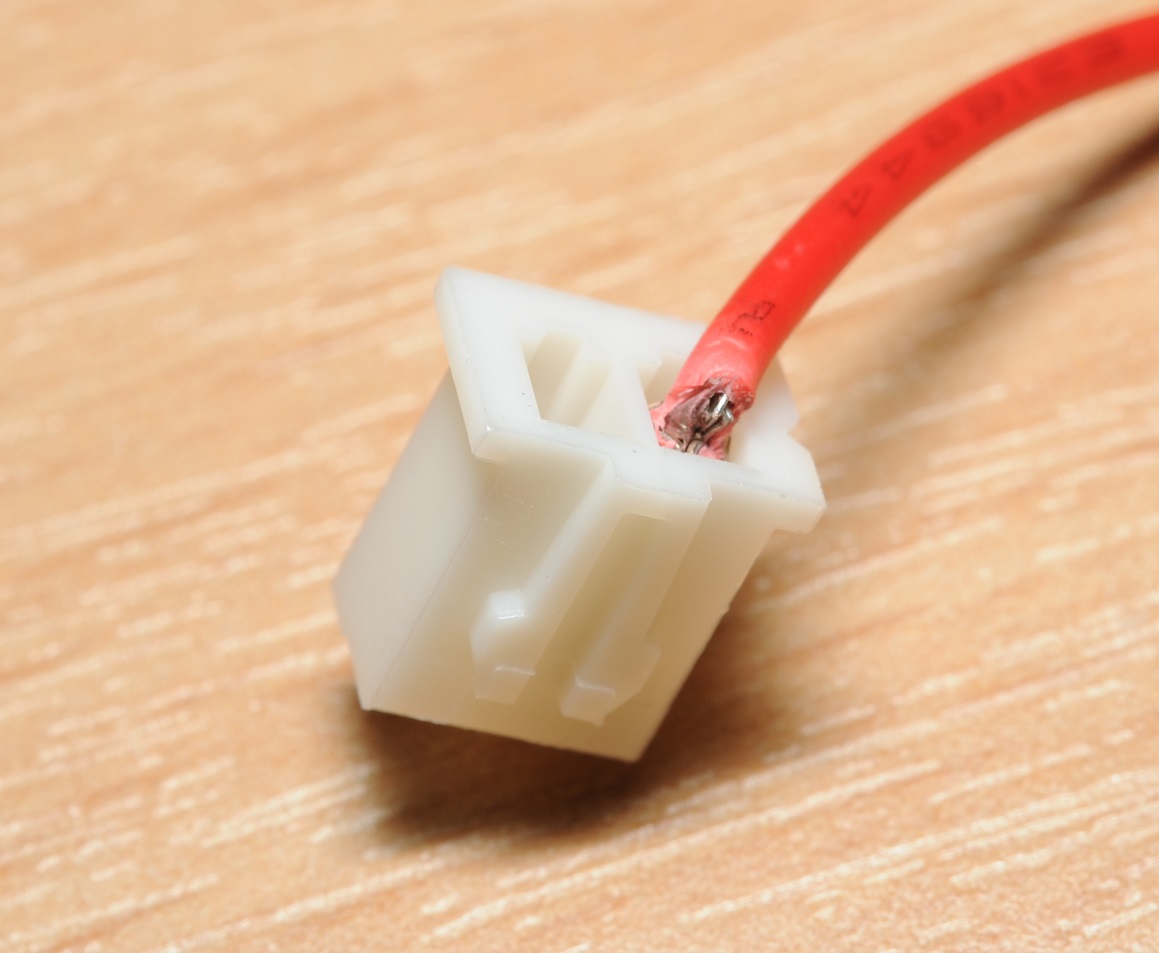
When soldering, there is a very high chance that the solder will wick up the wire, beyond the insulation crimp, making it very vulnerable to mechanical damage. In this situation, it only takes a small amount of movement to start snapping the strands at the invisible weak point.
Soldering doesn’t have any disadvantage in electrical terms, only mechanical. That make this method non-viable for production use; except under very controlled conditions with connectors that are designed for soldering.
Gold plated vs Tin plated terminals
Back when I first started using crimp terminals, almost everything I built made use of cheap (often off-brand) Tin plated terminals. Why waste money on gold plated terminals when Tin plated terminals work just fine?
Fast forward a few years, and I find that some of that equipment I built 3-5 years ago begins to malfunction. This turns out to be those knock-off Tin terminals I used, which have gradually corroded over the years. It doesn’t seem to be an issue so much for connectors carrying power, but I have had failure after failure in signal carrying connectors.
Attempts to save a few quid back then have now resulted in hours of profanities as all of those connectors have had to be re-crimped with gold terminals, because as I now know, when it comes to own-built gizmos which are a part of your day-to-day life, those crappy eBay connectors you bought 4 years ago are going to fail at the most inconvenient time.
If you are not on a tight budget, and building something that has to be reliable, and last – go straight for manufacturer original gold plated terminals. If buying Molex: 0.38µm “Selective” plated terminals are good enough (unless your creation is a life support system, or going to the moon).
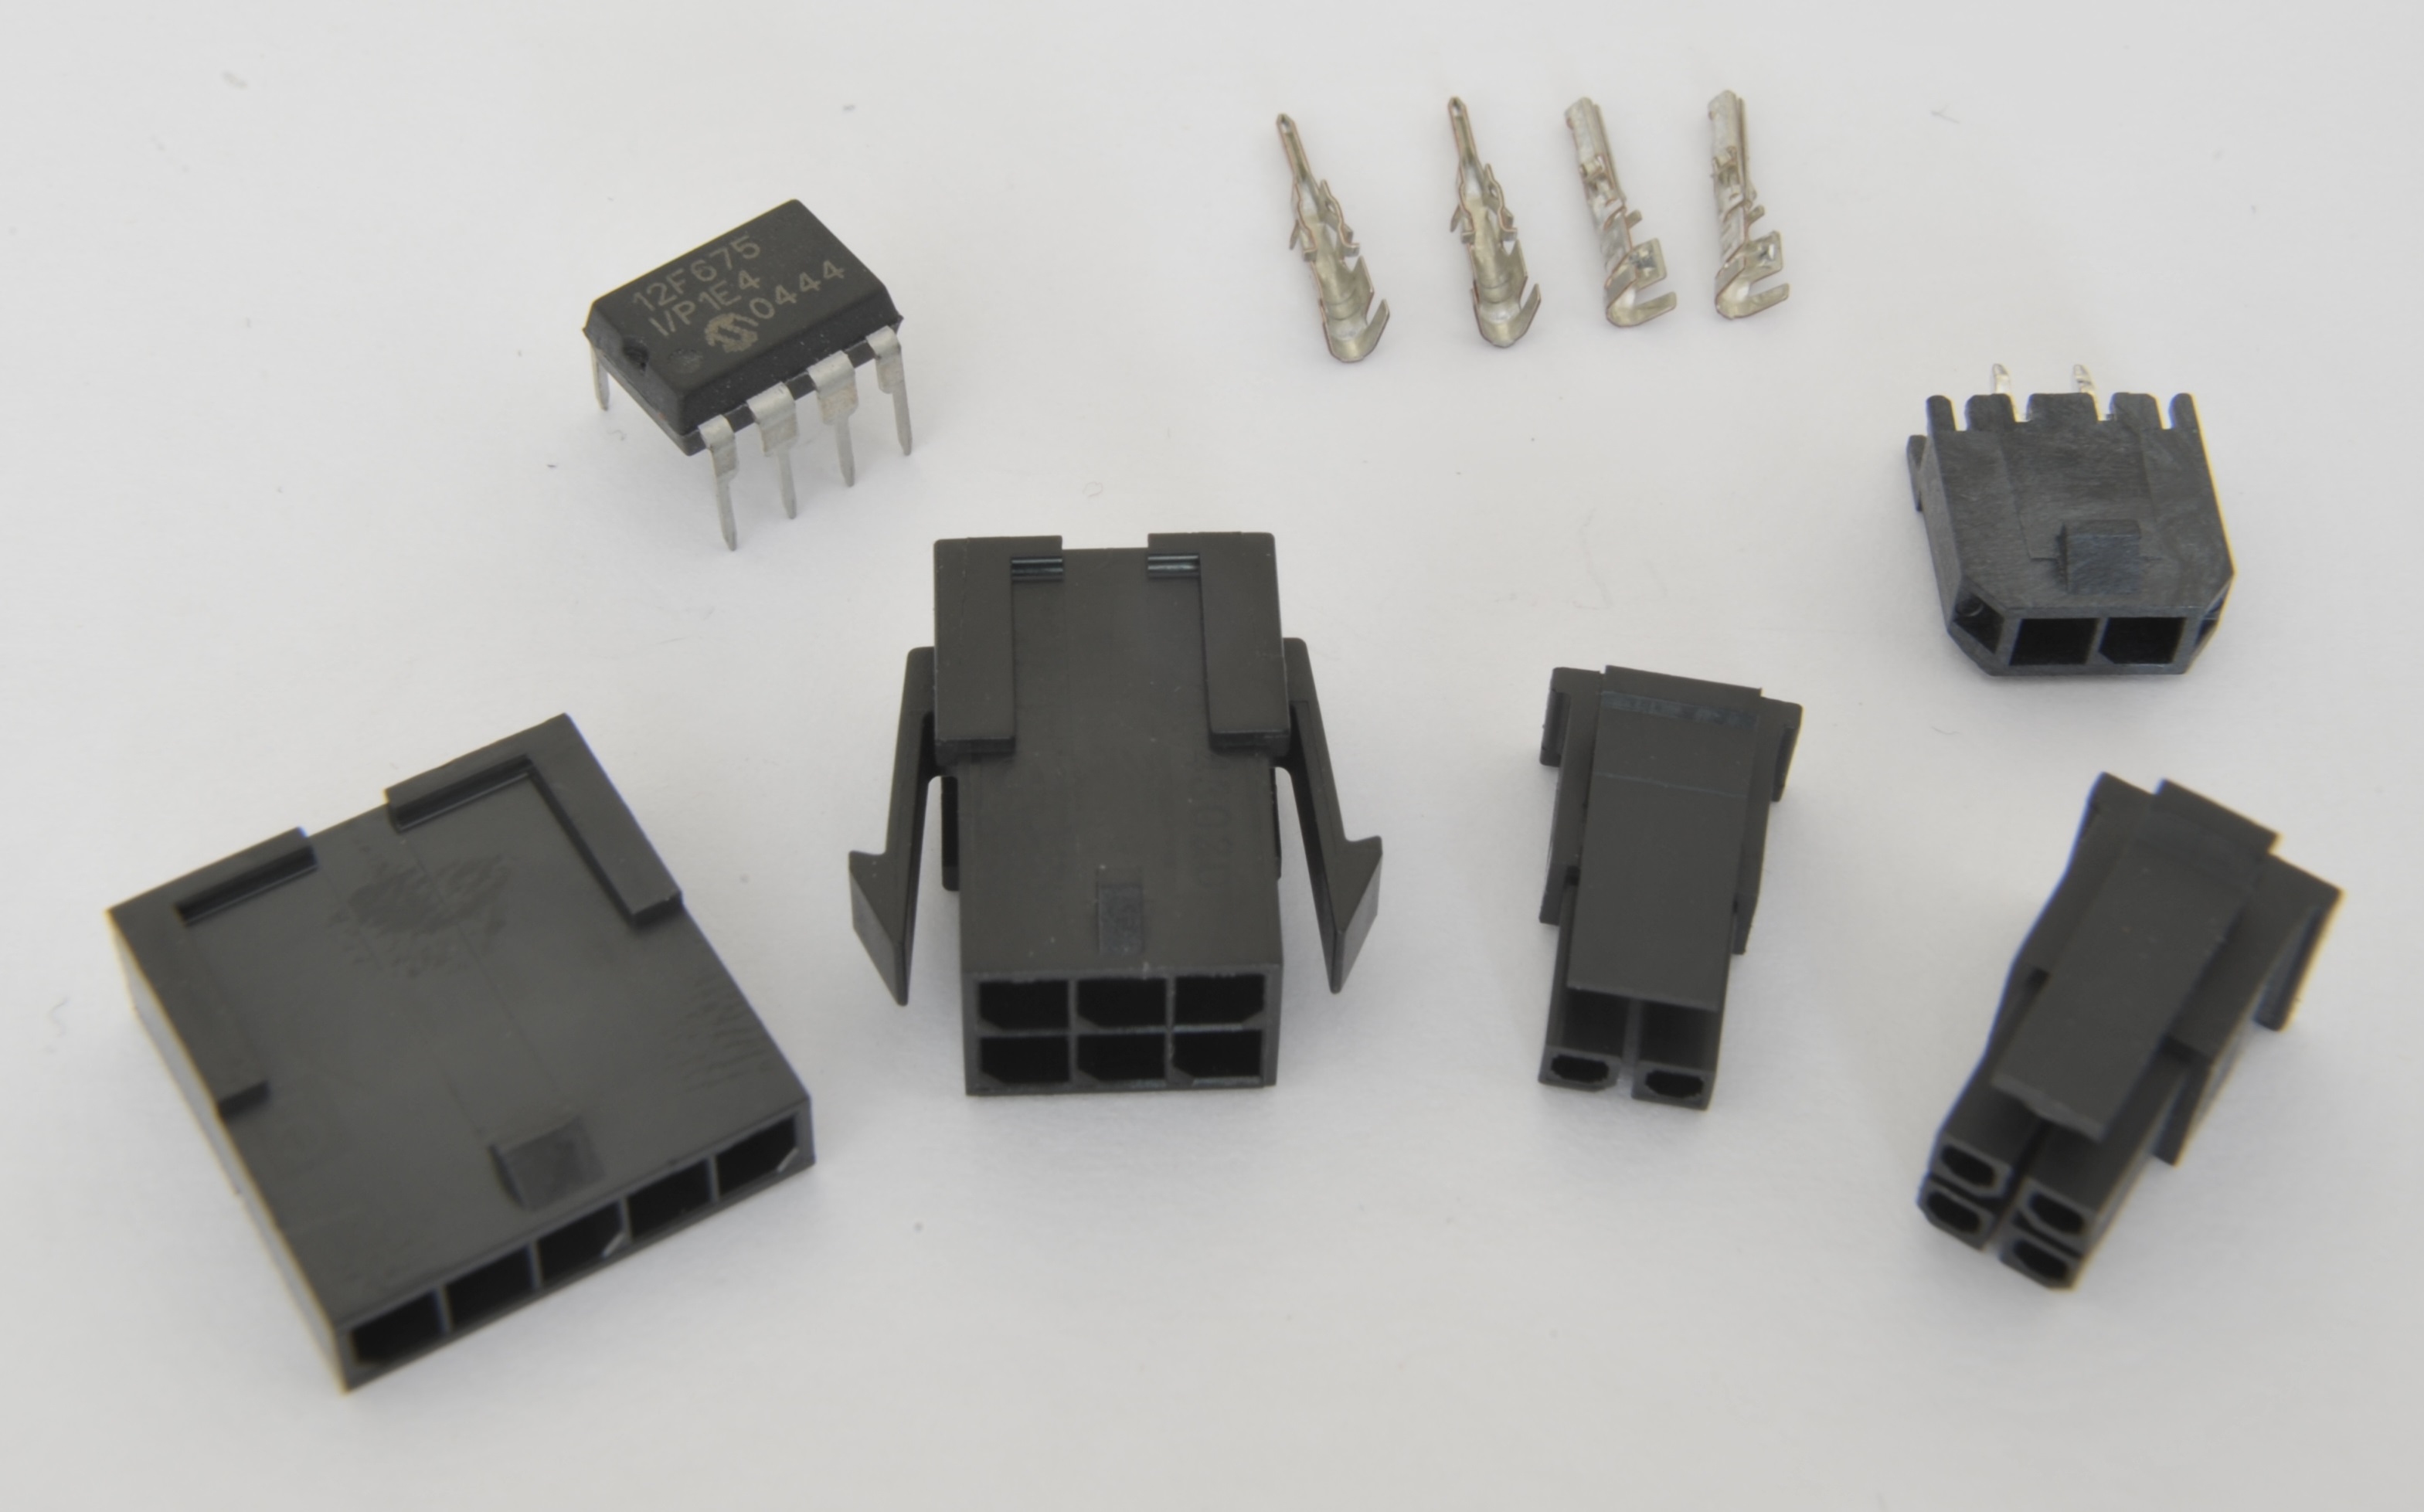
Mini-PV – (Amphenol – formerly FCI, formerly Berg, formerly DuPont Connector Systems)
These are often referred to as “DuPont” connectors. This is not an ideal name for two reasons: DuPont Connector Systems made many families of connectors, and the ones we commonly refer to as such aren’t quite the same as DuPont’s original “Mini-PV” design.
So what should we call these connectors then? Quite frankly – I have no idea.

The top three housings are clones, and the larger is an original. Can you spot the difference? Stuffed if I could have at first!

The headers Mini-PV mate with are sold under the trademark “Bergstik”. Top left and bottom right are original Amphenol parts, not that it really matters for headers, as they’re both of identical 2.54mm spacing.
Original Mini-PV connectors and terminals are rarely seen, perhaps not surprisingly (not least due to cost considerations), despite looking almost identical to common clones, Mini-PV terminals/housings and clone terminals/housings are surprisingly not interchangeable.

It’s barely visible, but you can make out the differences in the image above. The Mini-PV housing has just a tad less room for the contact, stopping you in your tracks when you go trying to stuff clone terminals into them.

Original terminals (left) are ever so slightly slimmer. This is somewhat of a bummer when you consider that the range of original housings is more extensive, better quality and more reliably obtainable than clones, and that genuine Mini-PV terminals (especially gold-plated) are eyebrow-raisingly expensive.
In terms of Amphenol’s tools – I’m aware of three official parts:
- HT-95 (HT-0095): The current Mini-PV crimp tool. This is a large, expensive, clumsy tool, which despite being heavy as all heck and not particularly easy to use, does do the best job of crimping.
- HT-100 (HT-0100): This tool is apparently identical to the HT-95. Another one to watch out for on eBay if you are wanting to buy original.
After a brief interlude of selling for circa $800 – this tool has now been hiked back up to its previous ridiculous price of $1600. These tools will continue to only be purchased by those who don’t need to bother looking at the price.

My one is an old DuPont branded tool, identical to the current one, which I paid one hell of a lot less for second hand.
I also removed the ratchet mechanism (and added a piece of string to hold it shut) as it has no manual release, meaning if you get a contact stuck in the wrong way during crimping, the inevitable result is a busted crimp jaw, which does not cost under £100 to fix.
There are two other tools for this series:
- HT-208A: Historic tool for crimping 22-26AWG wire
- HT-213A: Historic tool for crimping 28-32AWG wire
If setup properly, They’re much nicer to use than HT-95, but fairly rare. Can only be had second hand these days. If attempting to purchase one of these tools – I would recommend focusing your search on an HT-213A as AWG 28-32 is a more useful wire size for this type of connector.

All three tools crimp both original and clone terminals just fine.
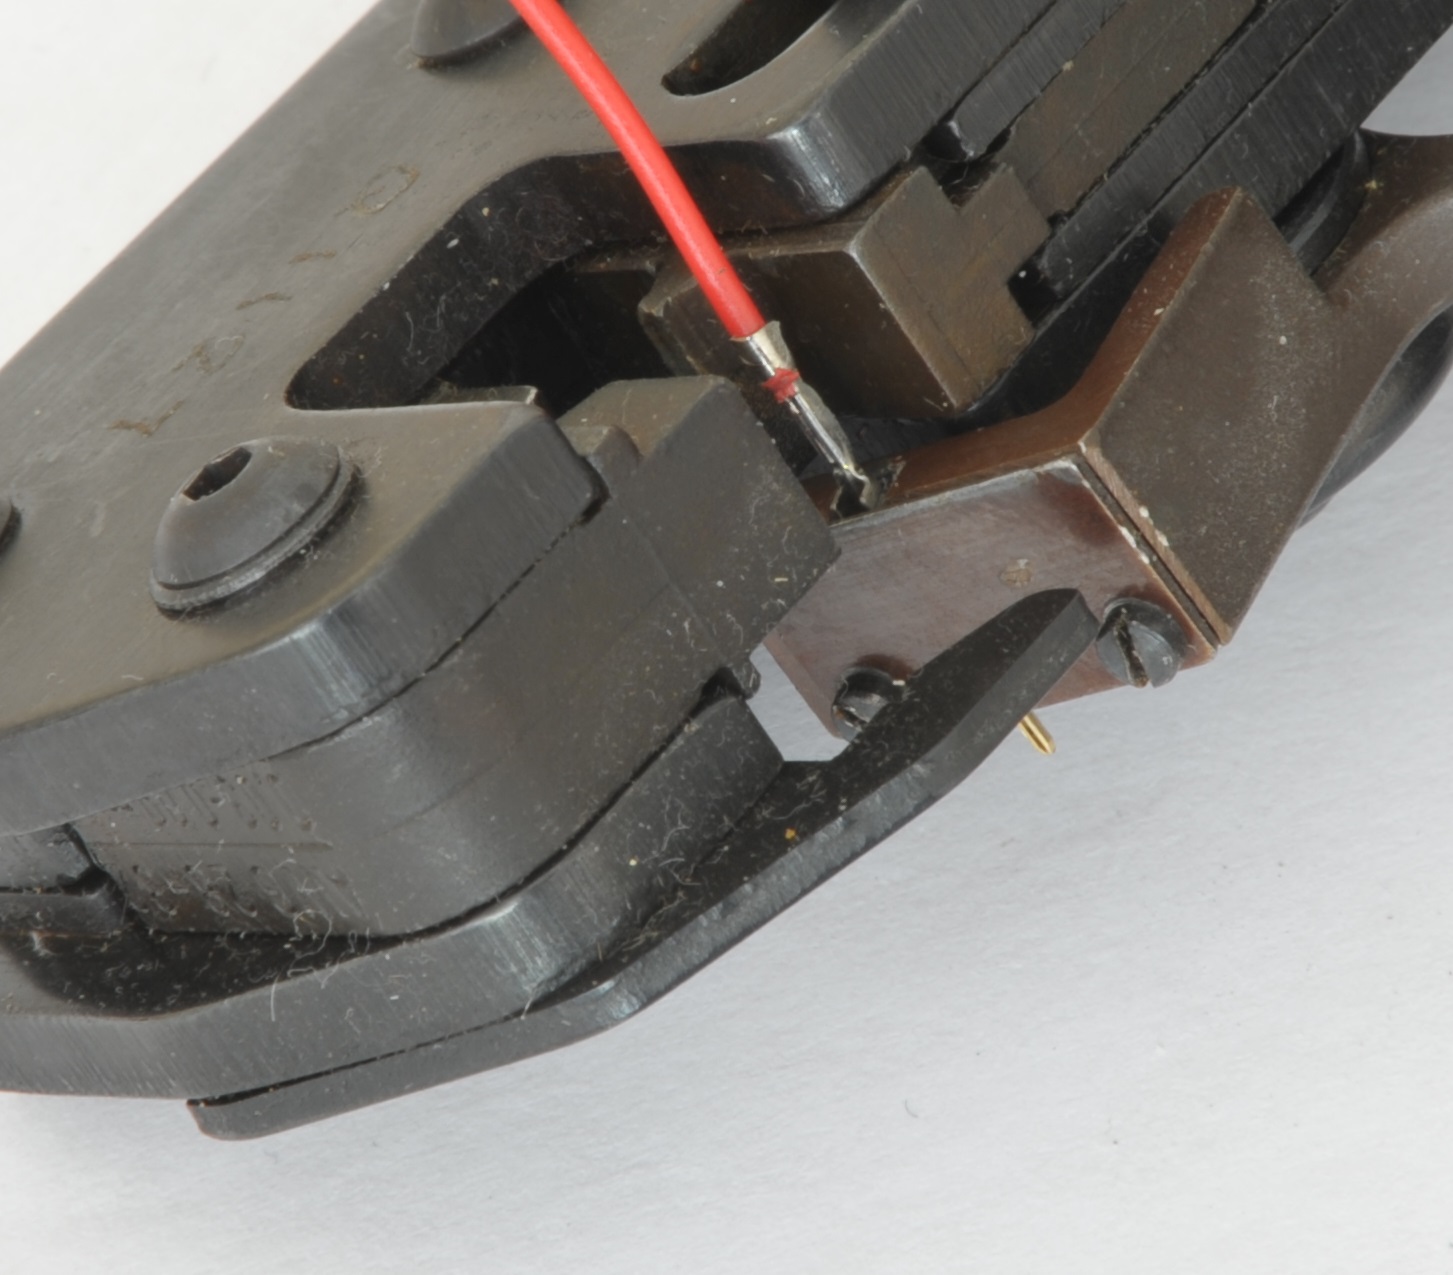
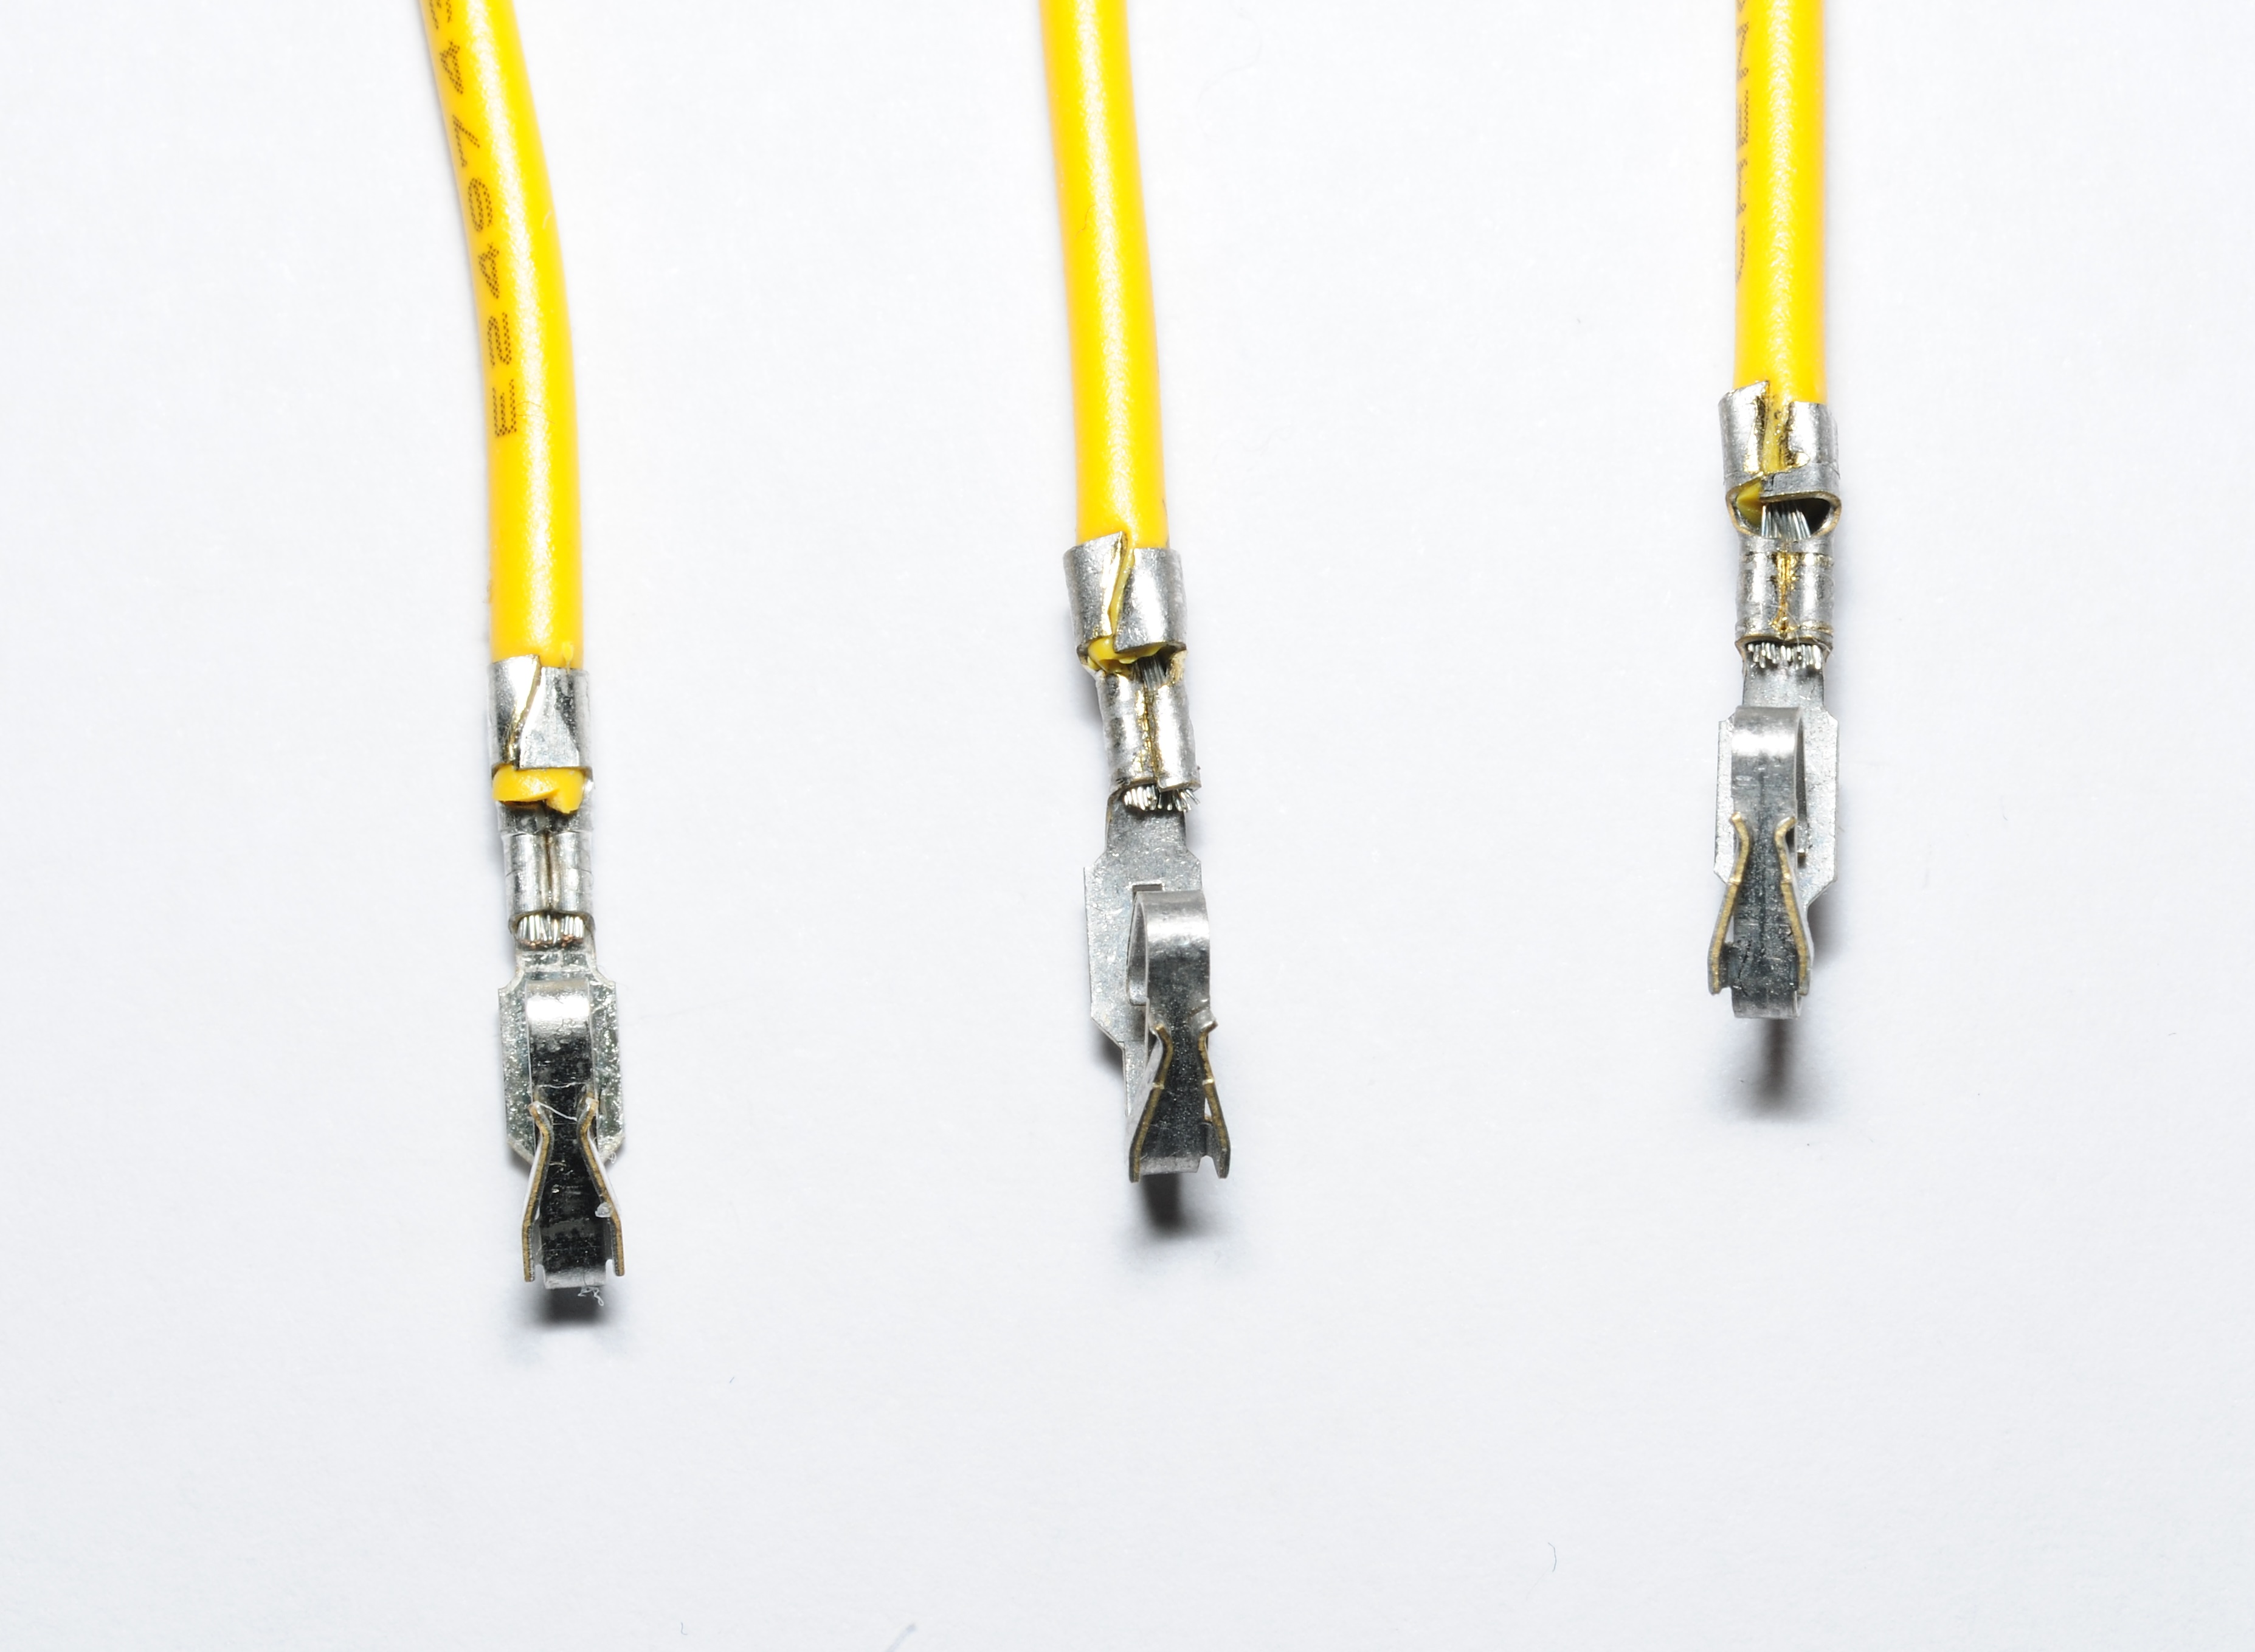
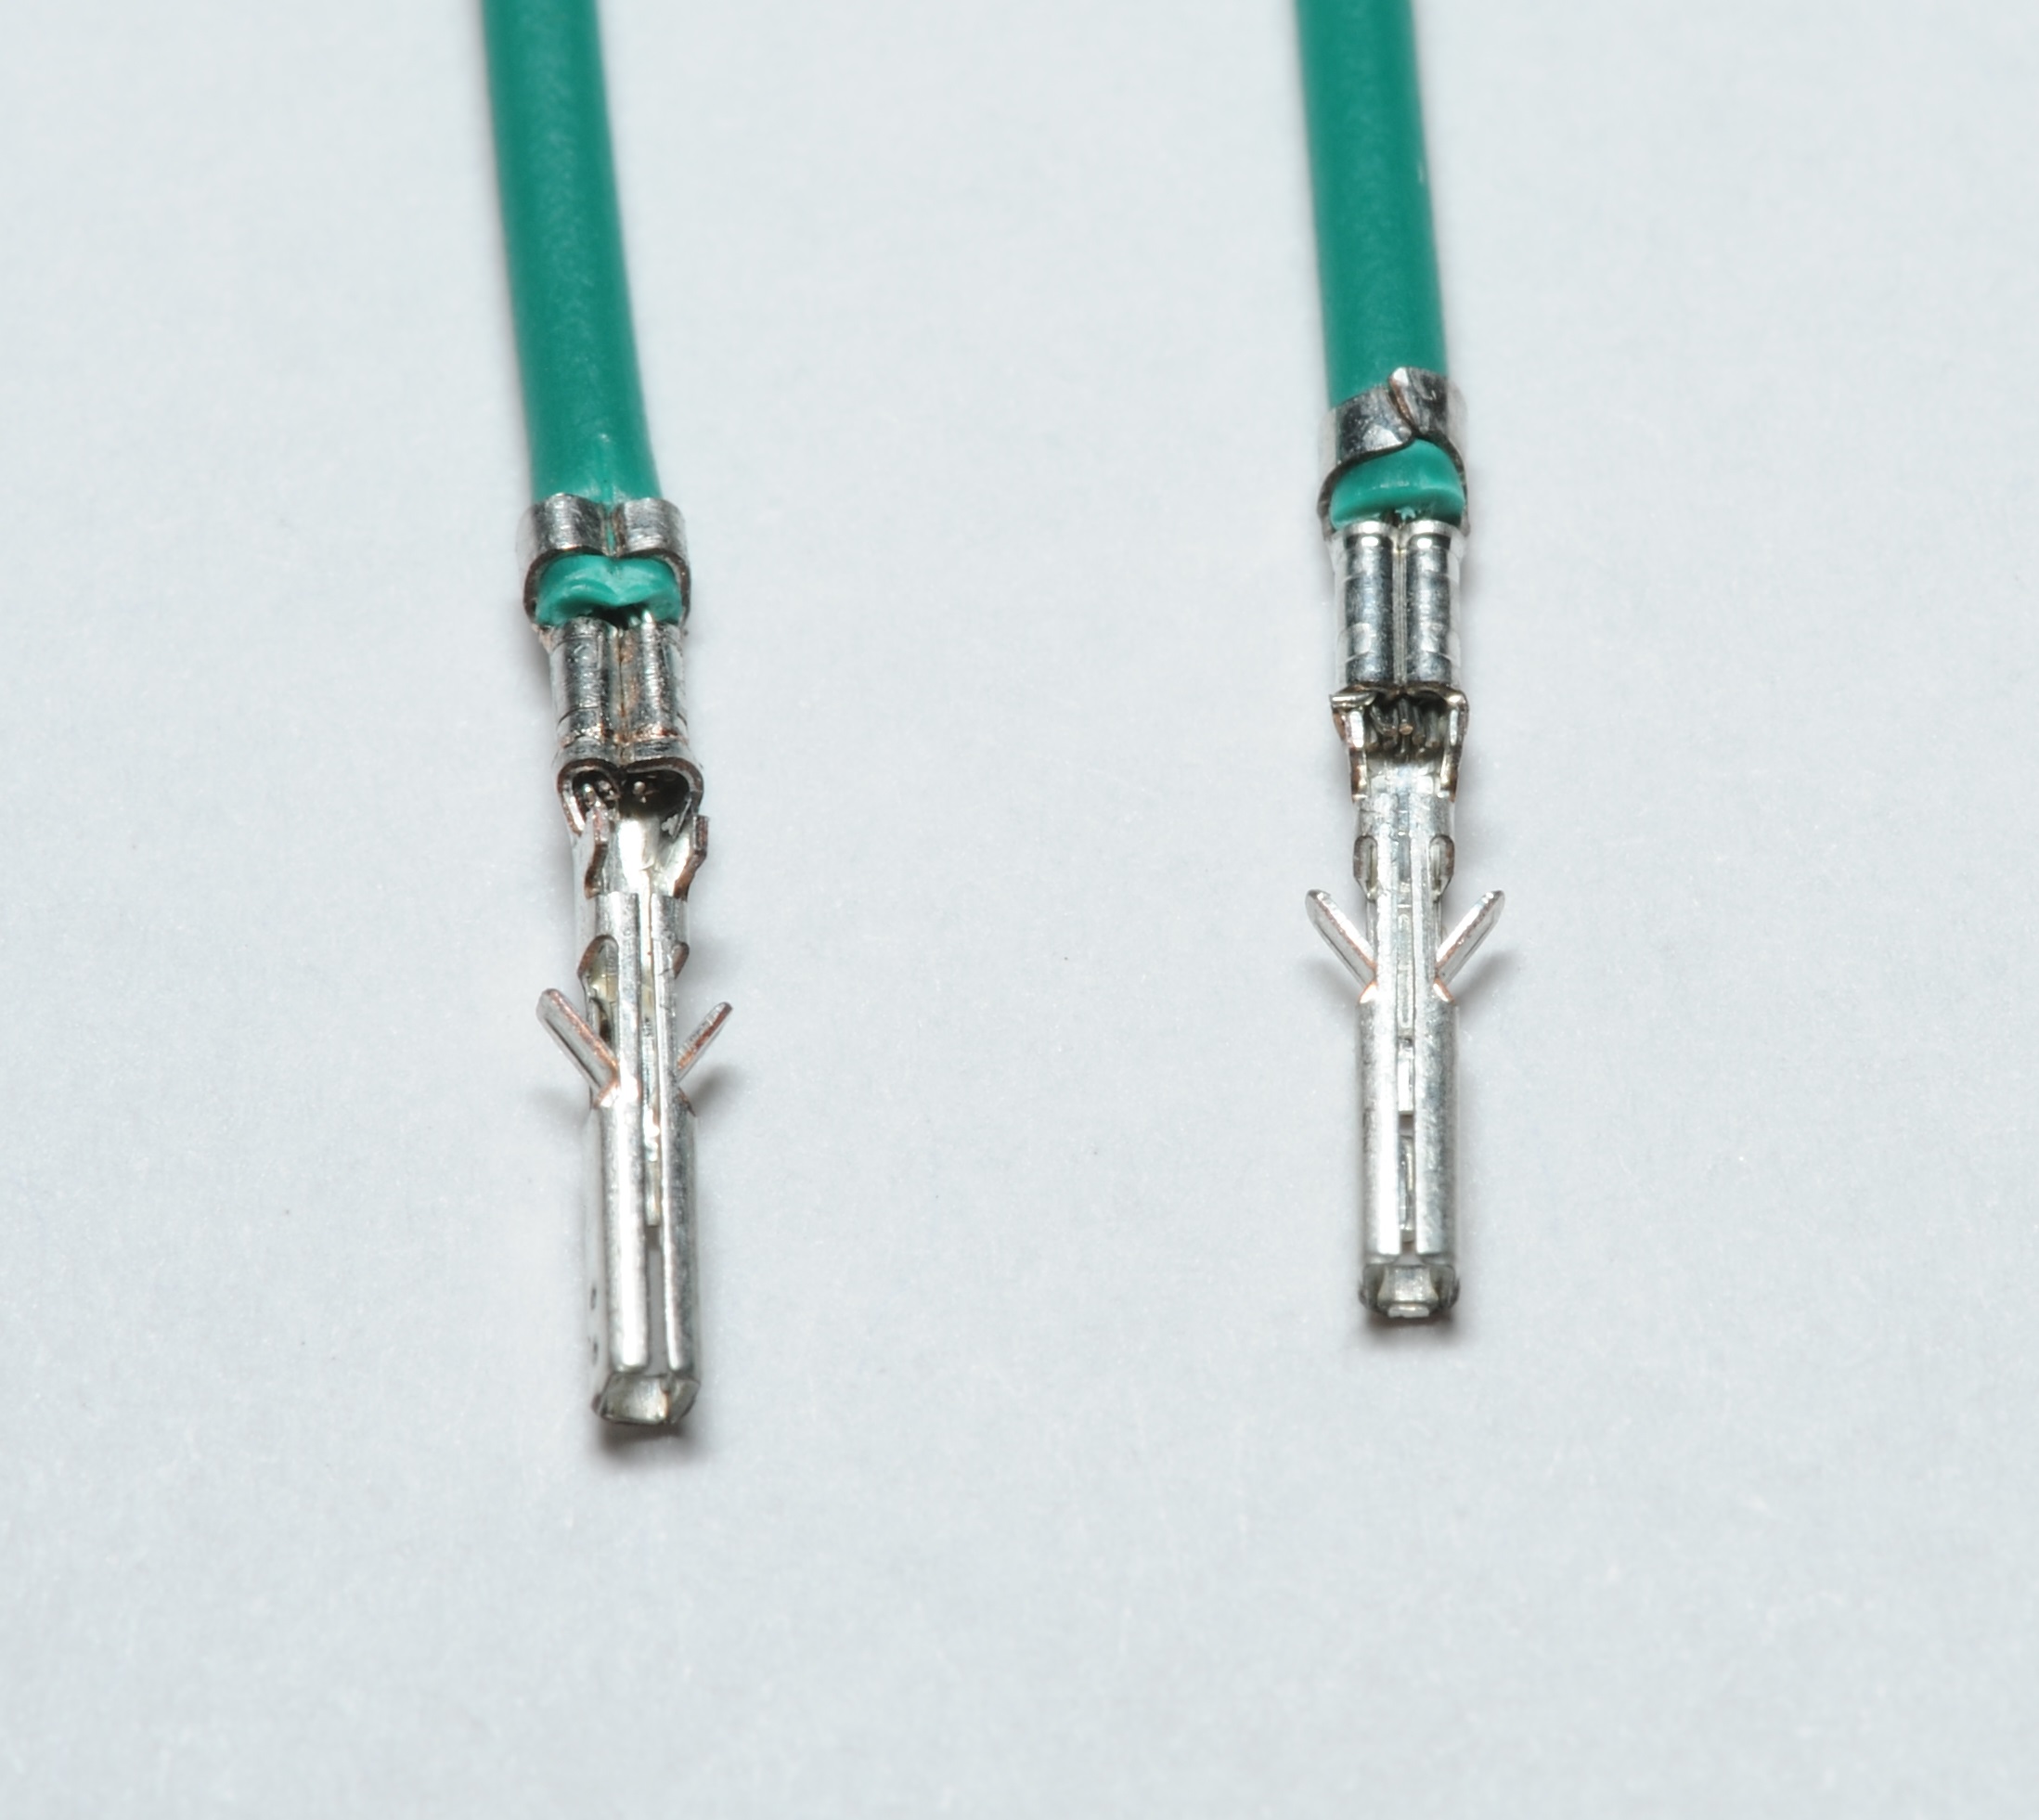
Crimping with unofficial tools
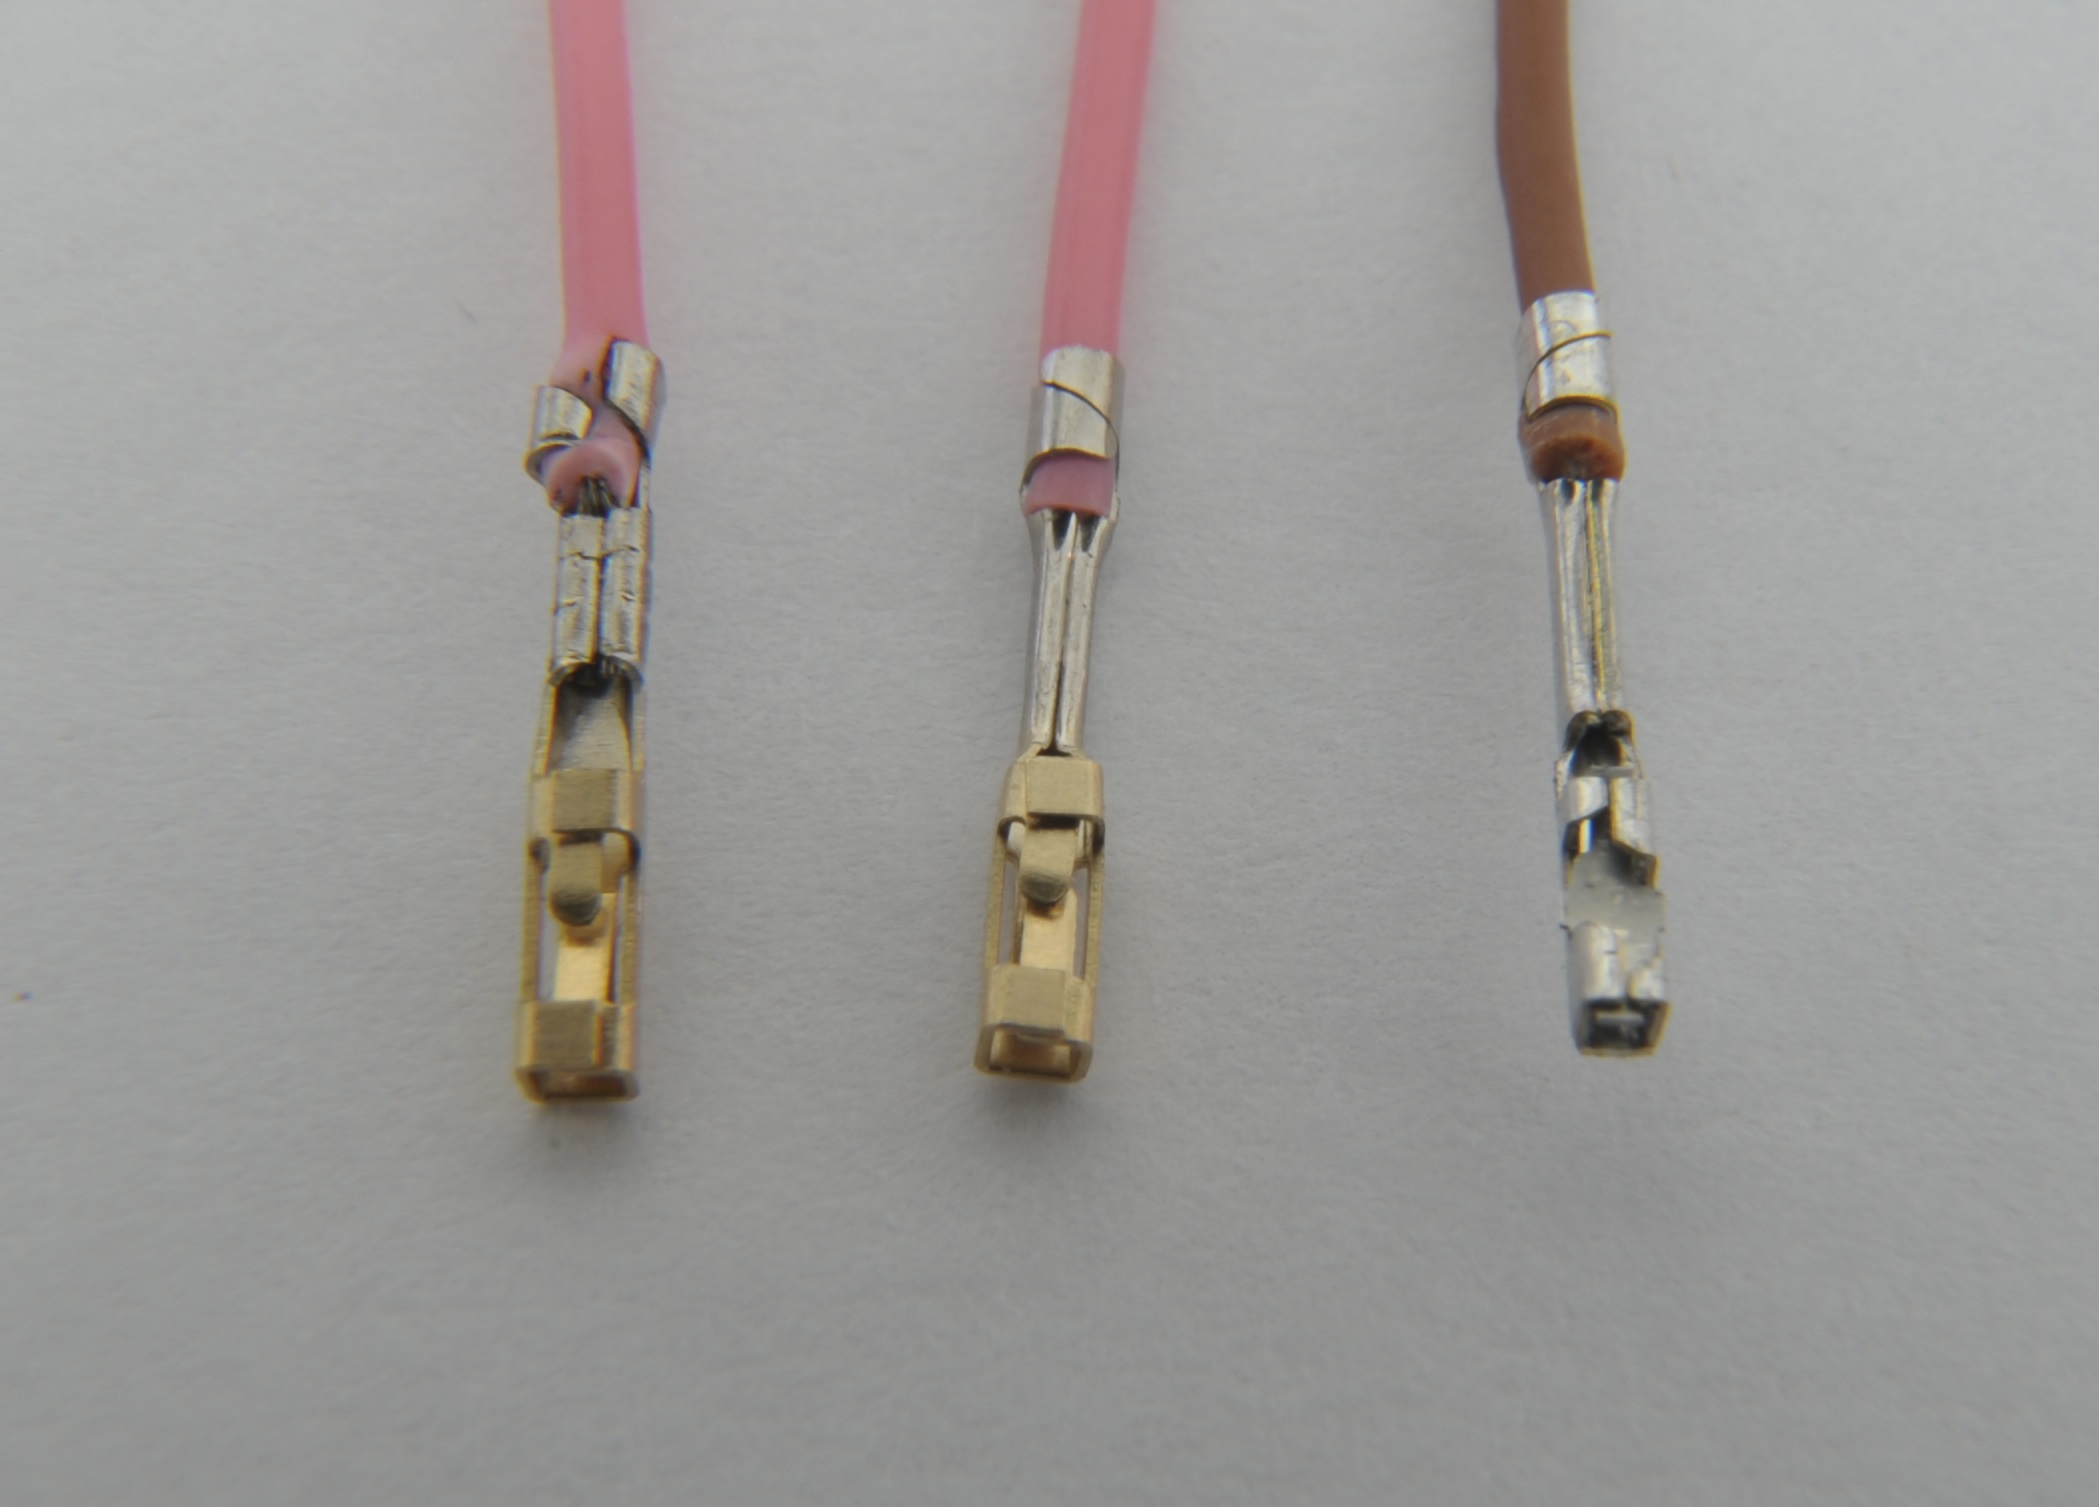
From left to right: Generic terminal crimped with PA-09, Generic terminal crimped with HT-95, Original terminal crimped with HT-95
Mini-PV is the one and only light terminal family I’ve encountered which generic tools such as PA-09 suck at crimping. As can be clearly seen above, the insulation crimp is a mess, often these won’t even fit into the housing.

The problem is apparent when we examine the upper half of the crimp jaw. The original tool is clearly cylindrical, whereas the generic is split, with the intention of curling each side around and back down into the wire again, which is most certainly not what we want for this type of terminal.
I have never seen a generic tool with a jaw like this. If you find one, tell me about it! I find myself wondering if it may be possible to attack a cheap tool with a Dremel to fix this. I have now. See below.
This is a shame because these are the terminals most likely to be used by hobbyists on a budget, who don’t want to fork out a months pay to buy a better tool.
Update 04/2018
Despite all of terminal families I have covered on this page, the one that consistently generates most interest is Mini-PV. This is understandable considering the cost-effectiveness and versatility, yet despite this I have been lost for good inexpensive crimping recommendations, as noted above. One reader suggested a tool: “Hozan P-707” which looks like it’ll do the trick, but it’s still quite expensive.
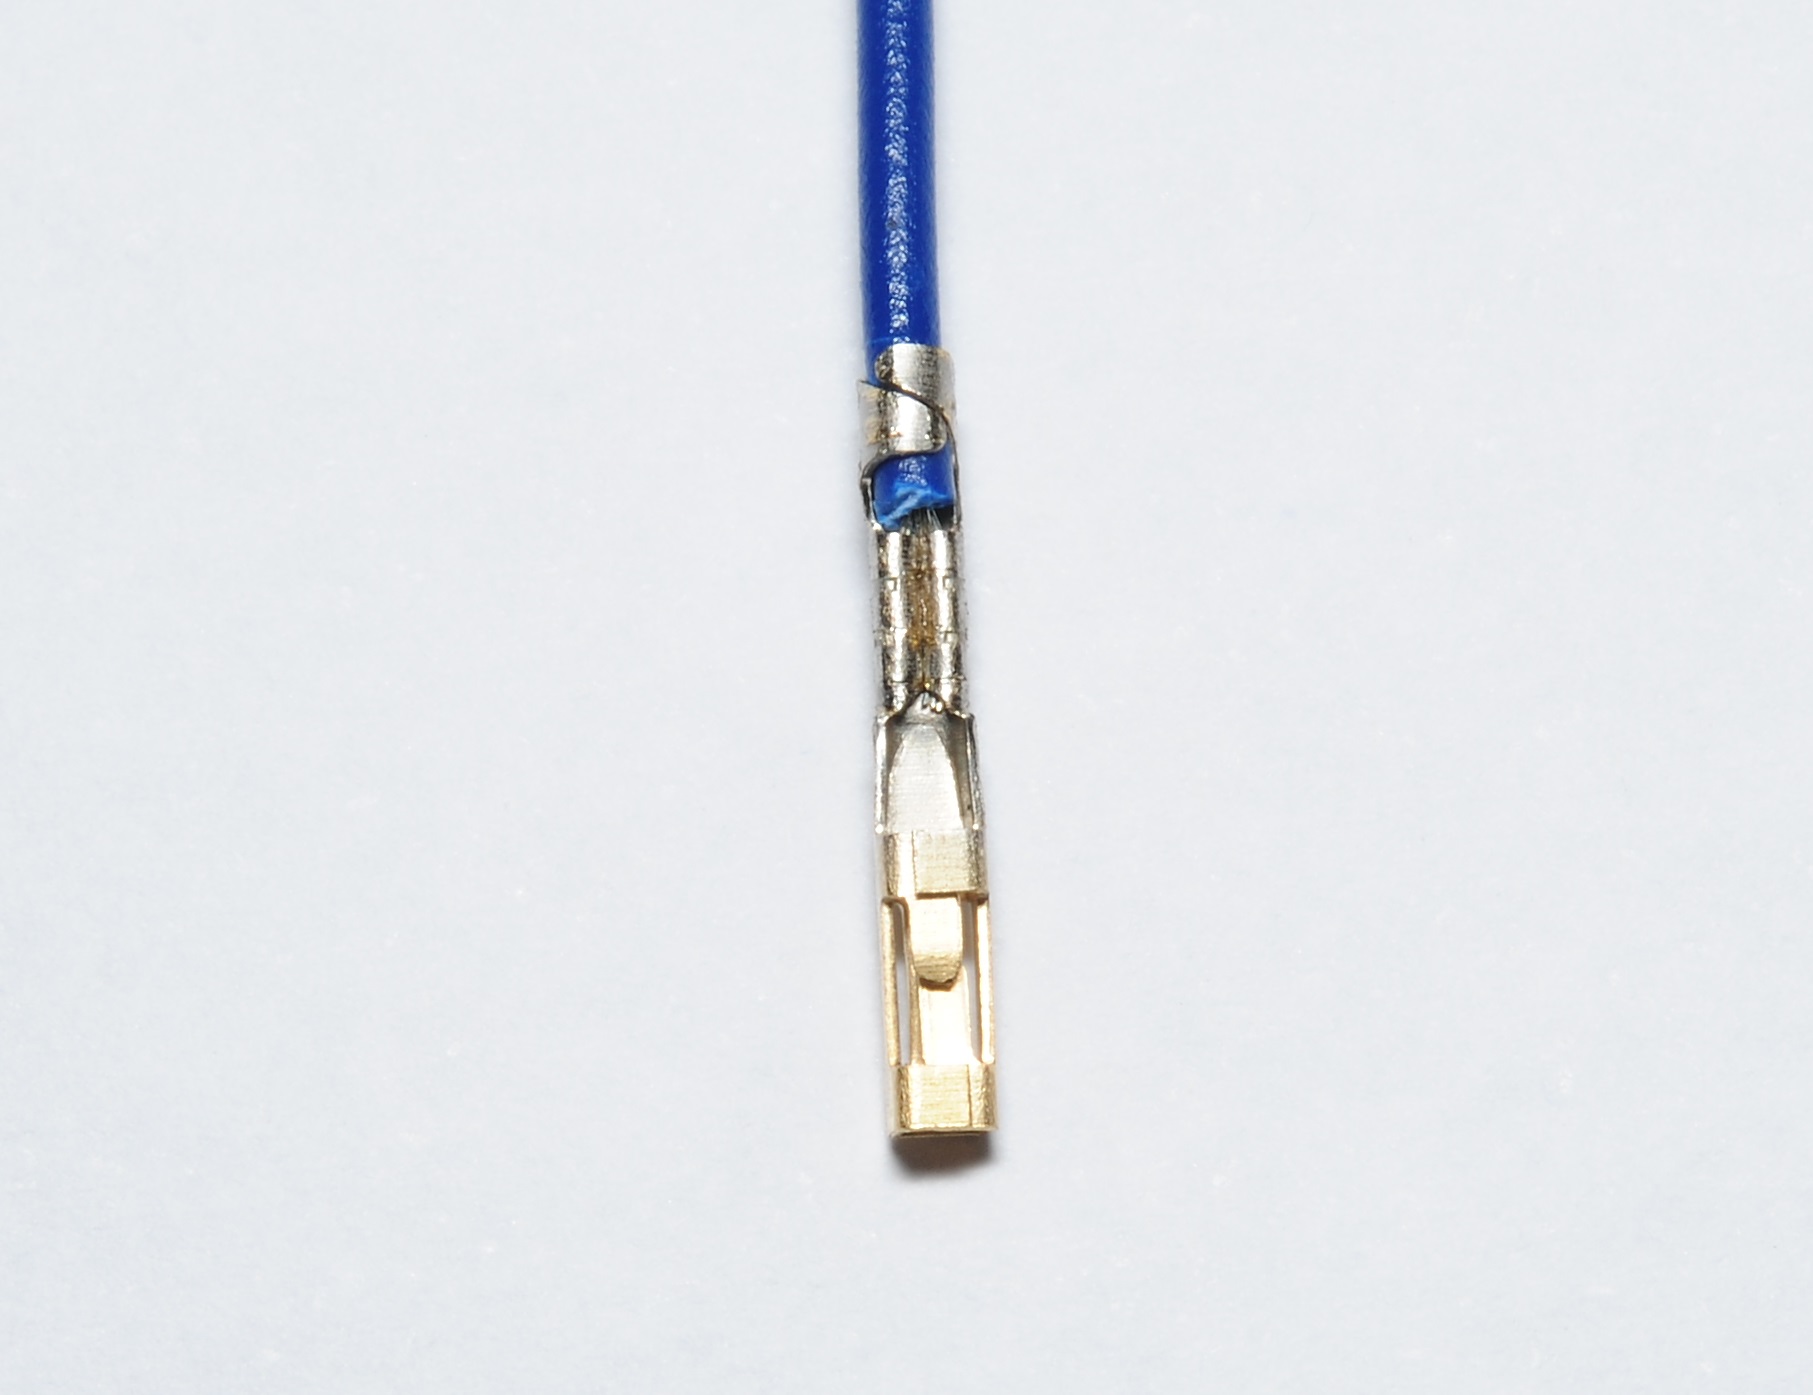
I recently accidentally came across a very inexpensive tool – YTH-202B which has a cylindrical jaw on on its AWG 26-28 position (!!!), which happens to do near perfect Mini-PV crimps (on the insulation part at least).
One downside is that is has no suitable jaw for the wire crimp, so you still need both the YTH-202B and Engineer PA-09 (or something like it) to do crimps like the one below. The other downside is that it only covers AWG26-28 wires. AWG 24 is a little fat for this tool. Not that this matters, as AWG 24 is generally a little large for these connectors anyway.
If you want a single tool, the Hozan P-707 likely does both insulation and wire crimps, but I do not own it nor have I tested it.

Male terminals
While similar families like Molex SL have male connectors, Mini-PV is a strictly wire-to-board connector family, so no official male terminal or housing has been produced, But as always, if there’s a market, there’ll be a product.
I stand corrected, there apparently is an official male terminal. See comments on this post.
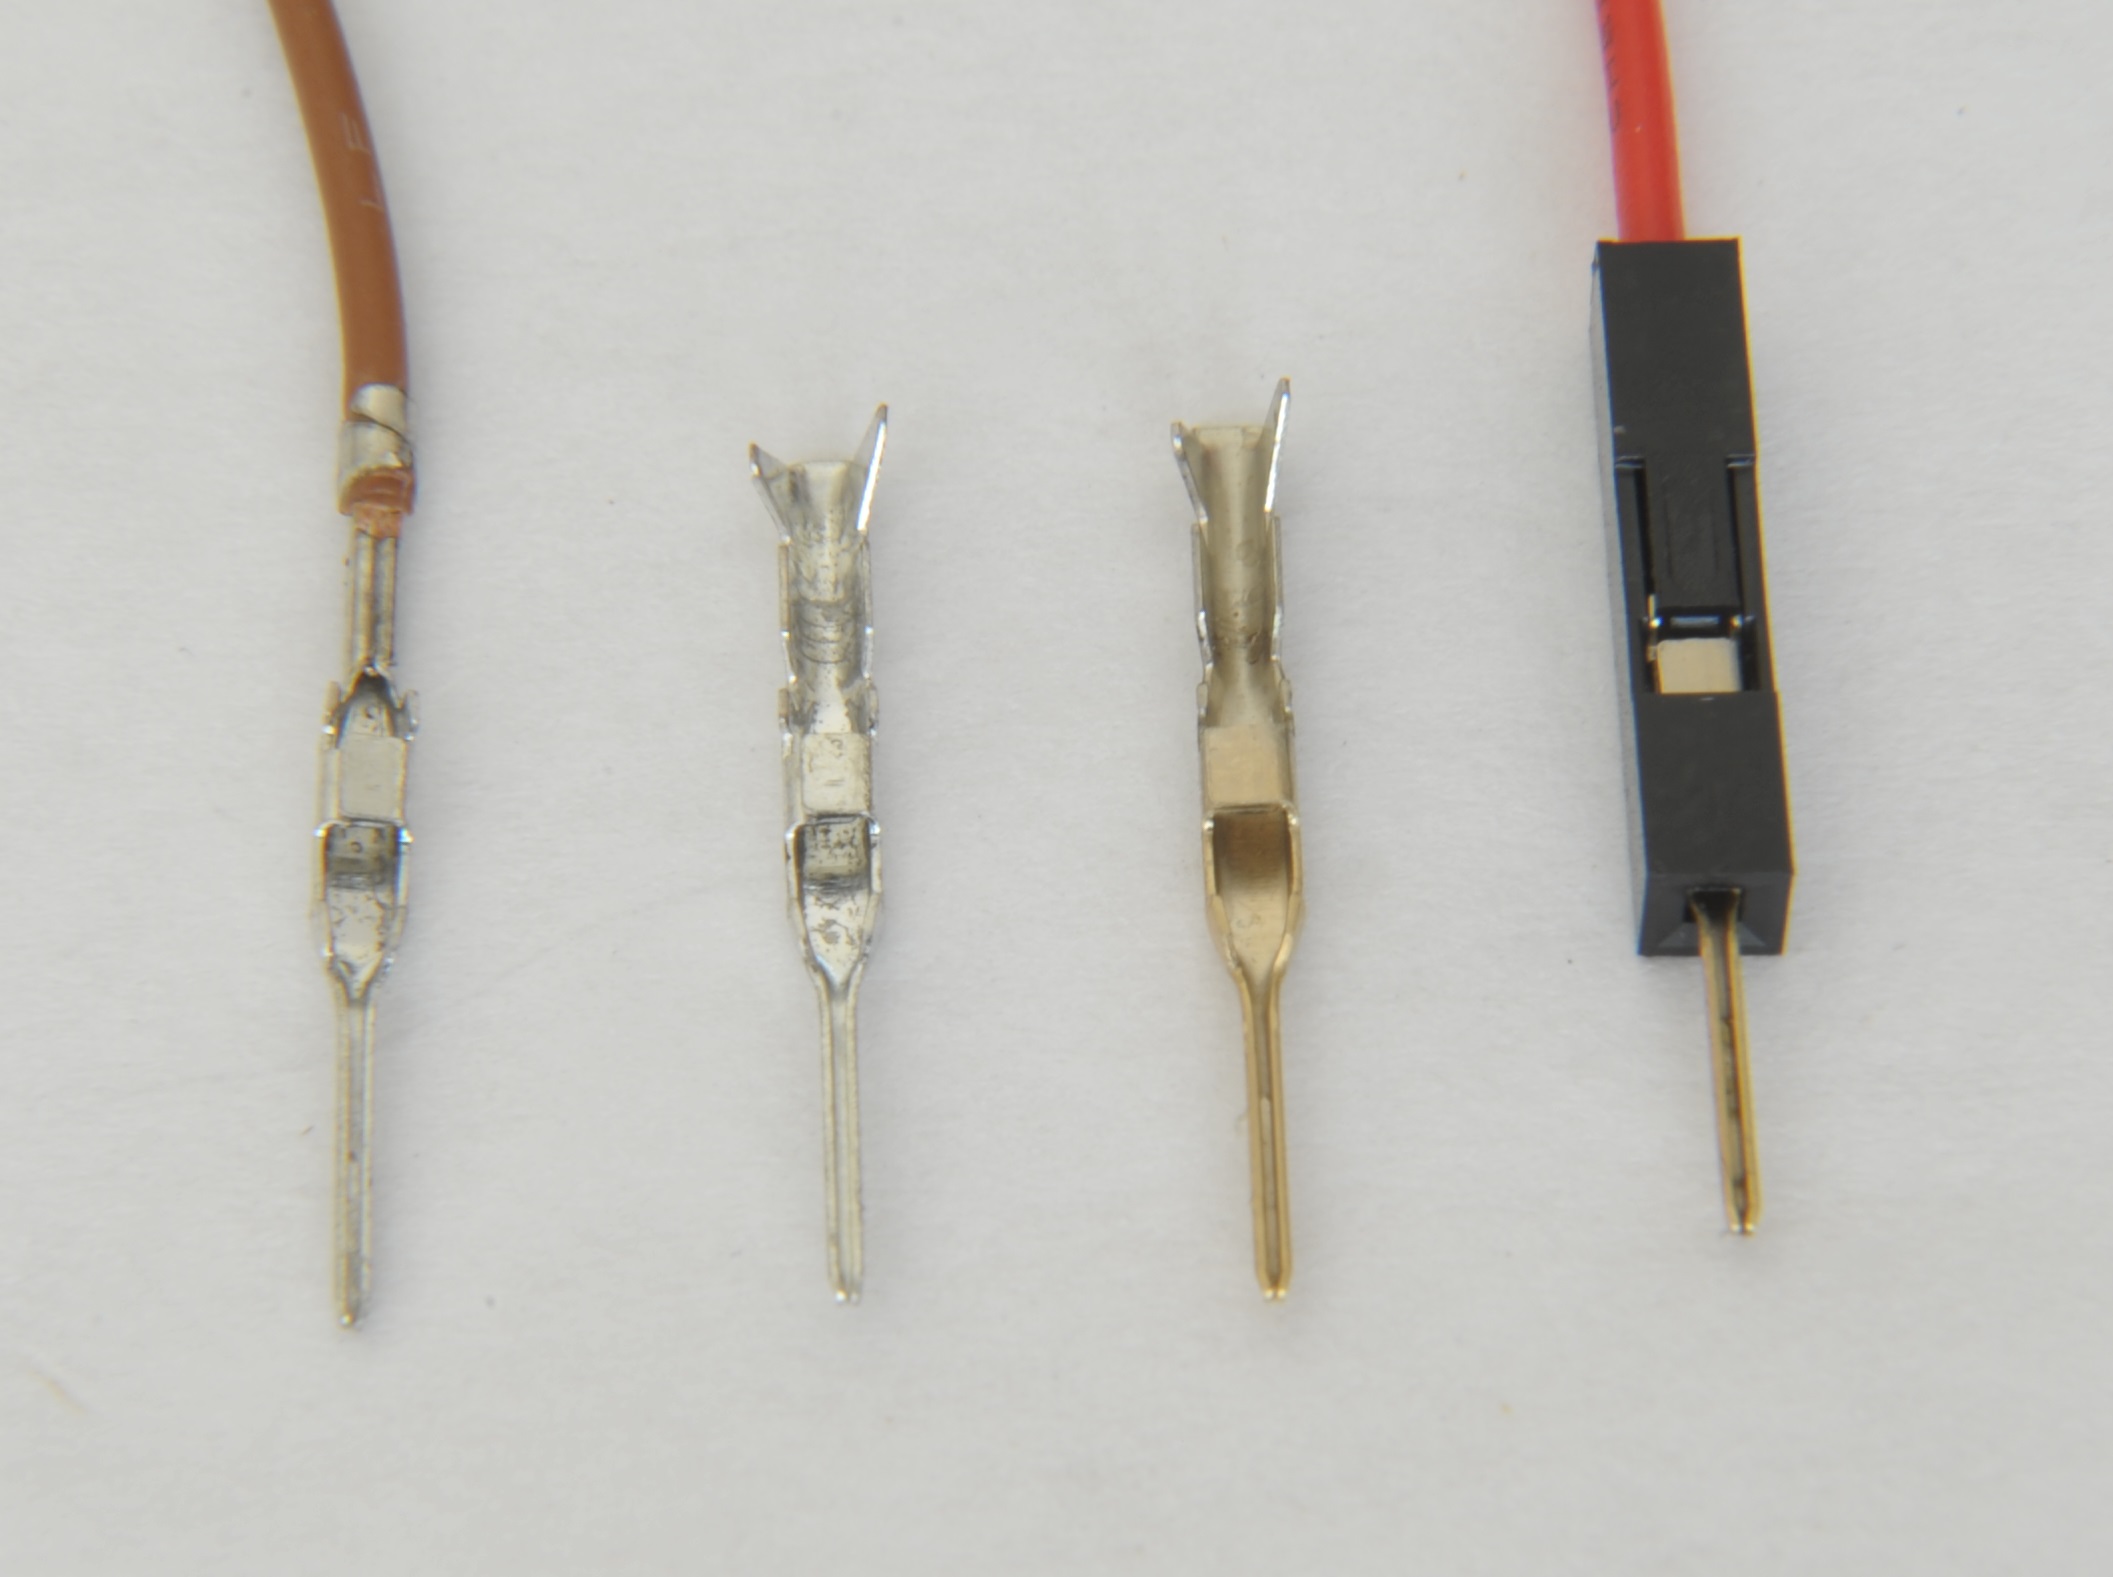
Above is a couple of types of eBay purchased male terminals. The DuPont designed tools do not take male terminals, so either they have to be modified or generic tools must be used.
I’ve modified my HT-2xx tools to crimp these, by adding a 1×1 housing to the locator mechanism:
PH – (JST – Japan Solderless Terminal)
This 2.0mm pitch connector is very commonly seen in consumer electronics. They’re dirt cheap, reasonably compact but not so great in terms of robustness.
The official tool is WC-240.
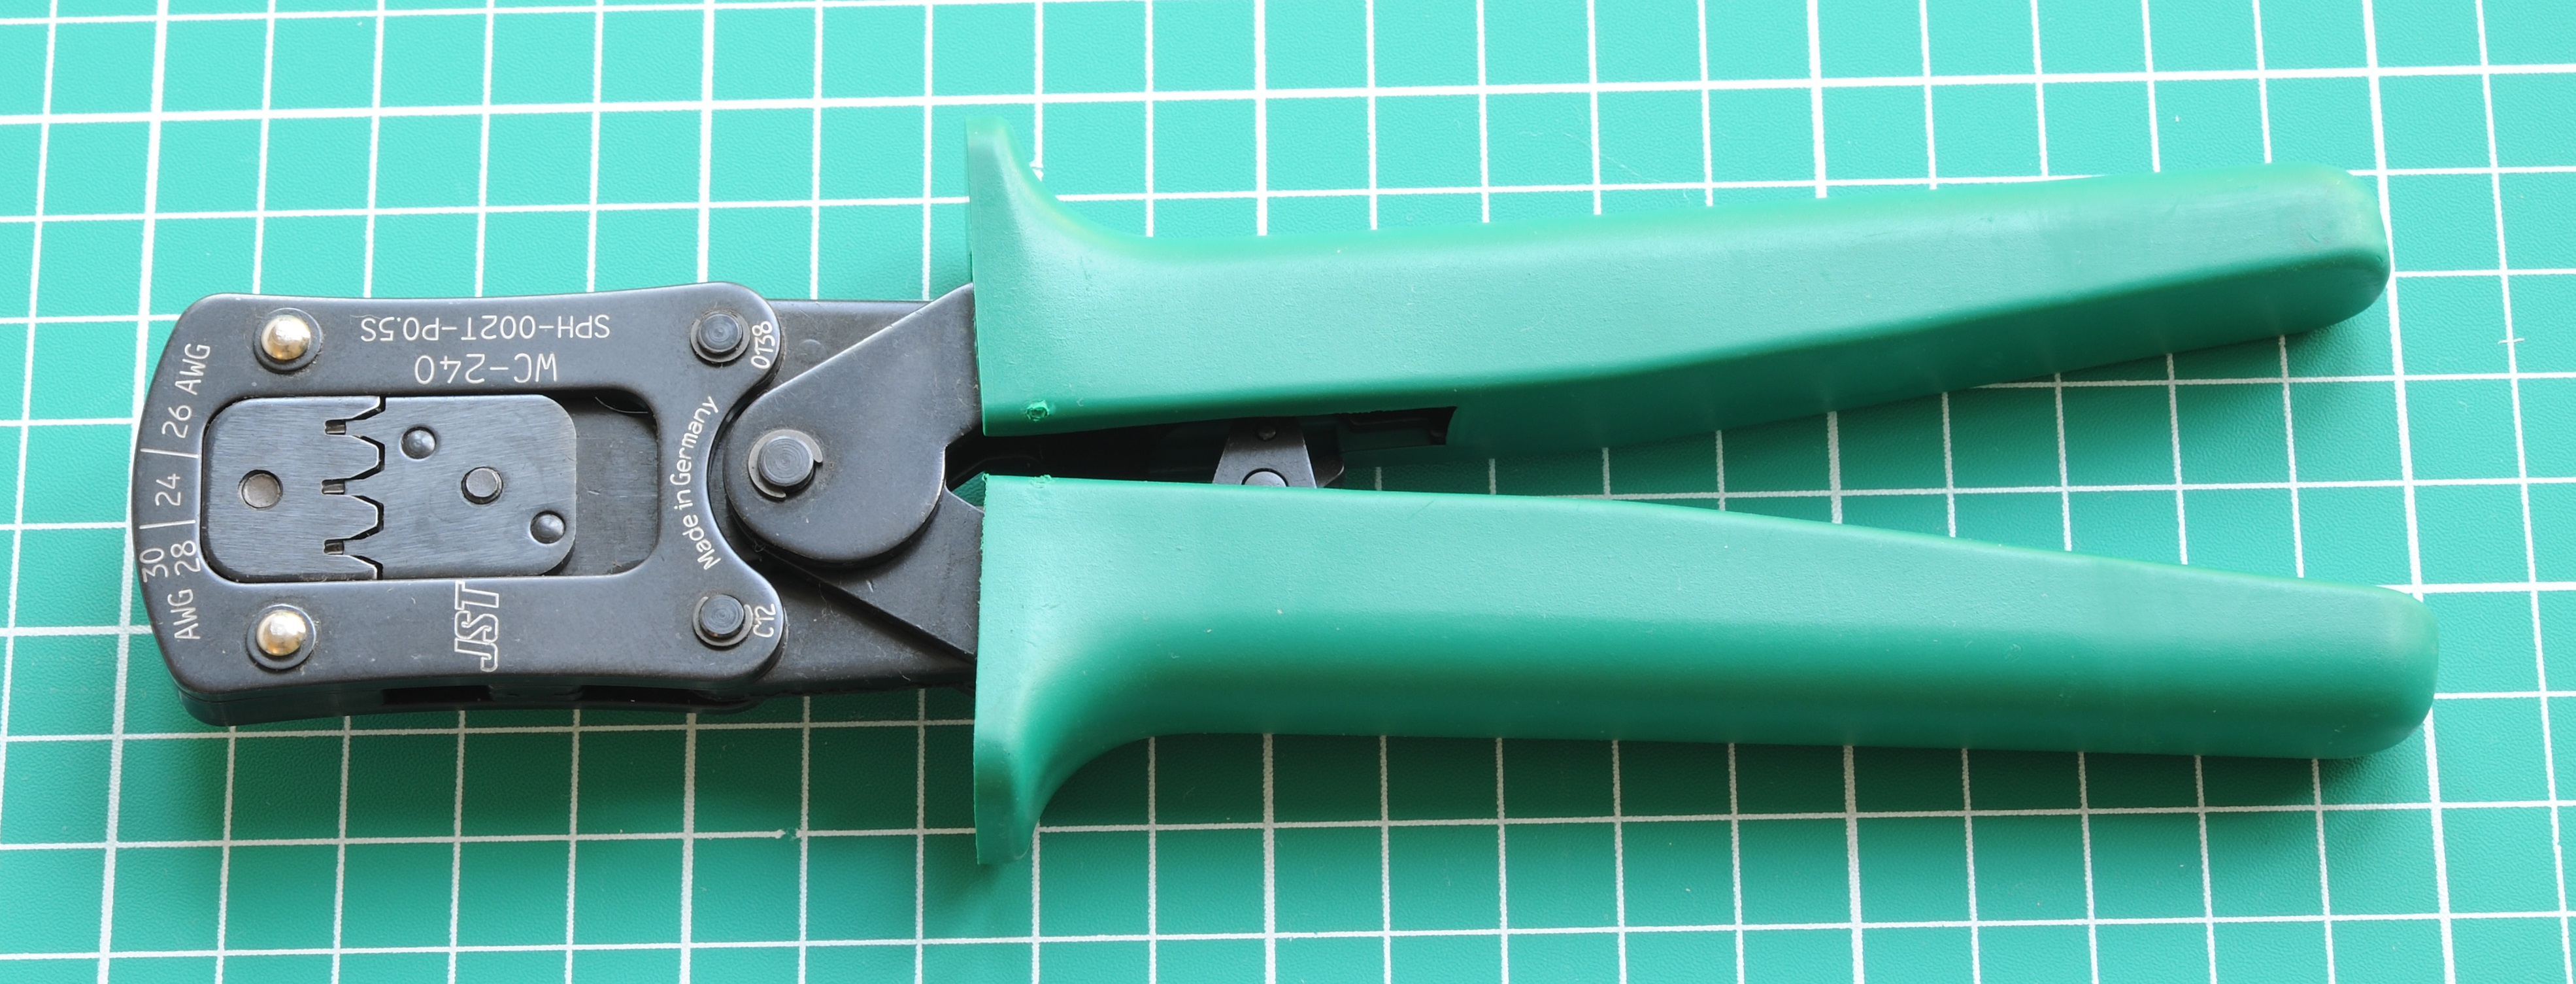
The WC-240 is nice to use, but there’s not a lot to set it apart from generic tools for occasional use. I personally crimp a large amount of PH, hence the investment in the official tool.
Left: Terminal crimped with PA-09. Right: Terminal crimped with Original tool (WC-240).
XH – (JST – Japan Solderless Terminal)

This is a slightly larger edition of the PH connector, except with 2.5mm pitch, and slightly larger terminals. Once again, mostly found in low cost consumer electronics.
I don’t use these very much but one advantage of them is height. The mated assembly is considerably slimmer than any other type of connector I use. It’s a shame the pitch isn’t 2.54mm – I would use them a lot more otherwise. That said, you can usually jam 2 or 3 (maybe even 4) position headers onto strip board if needed.
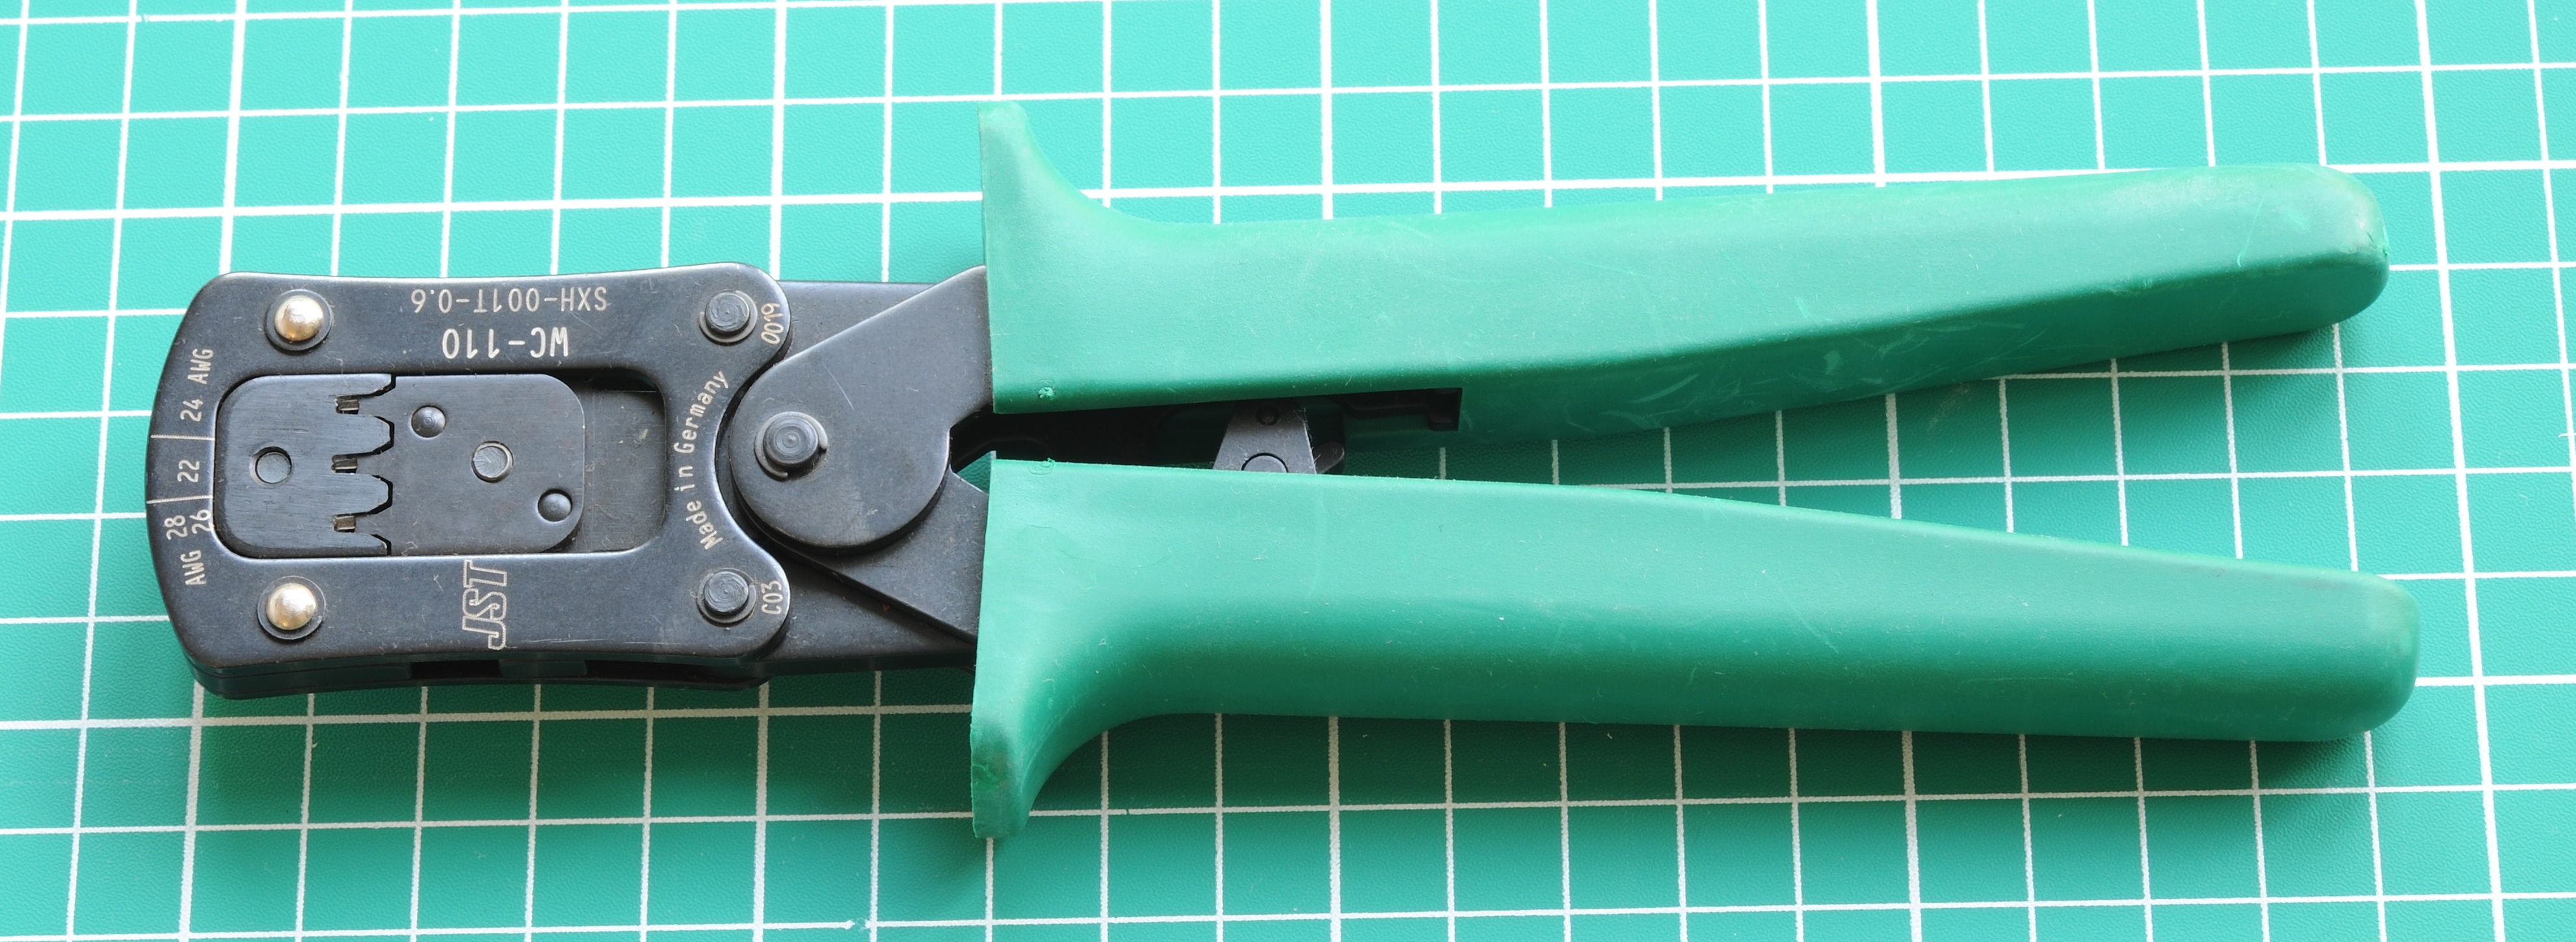
The official tool is WC-110
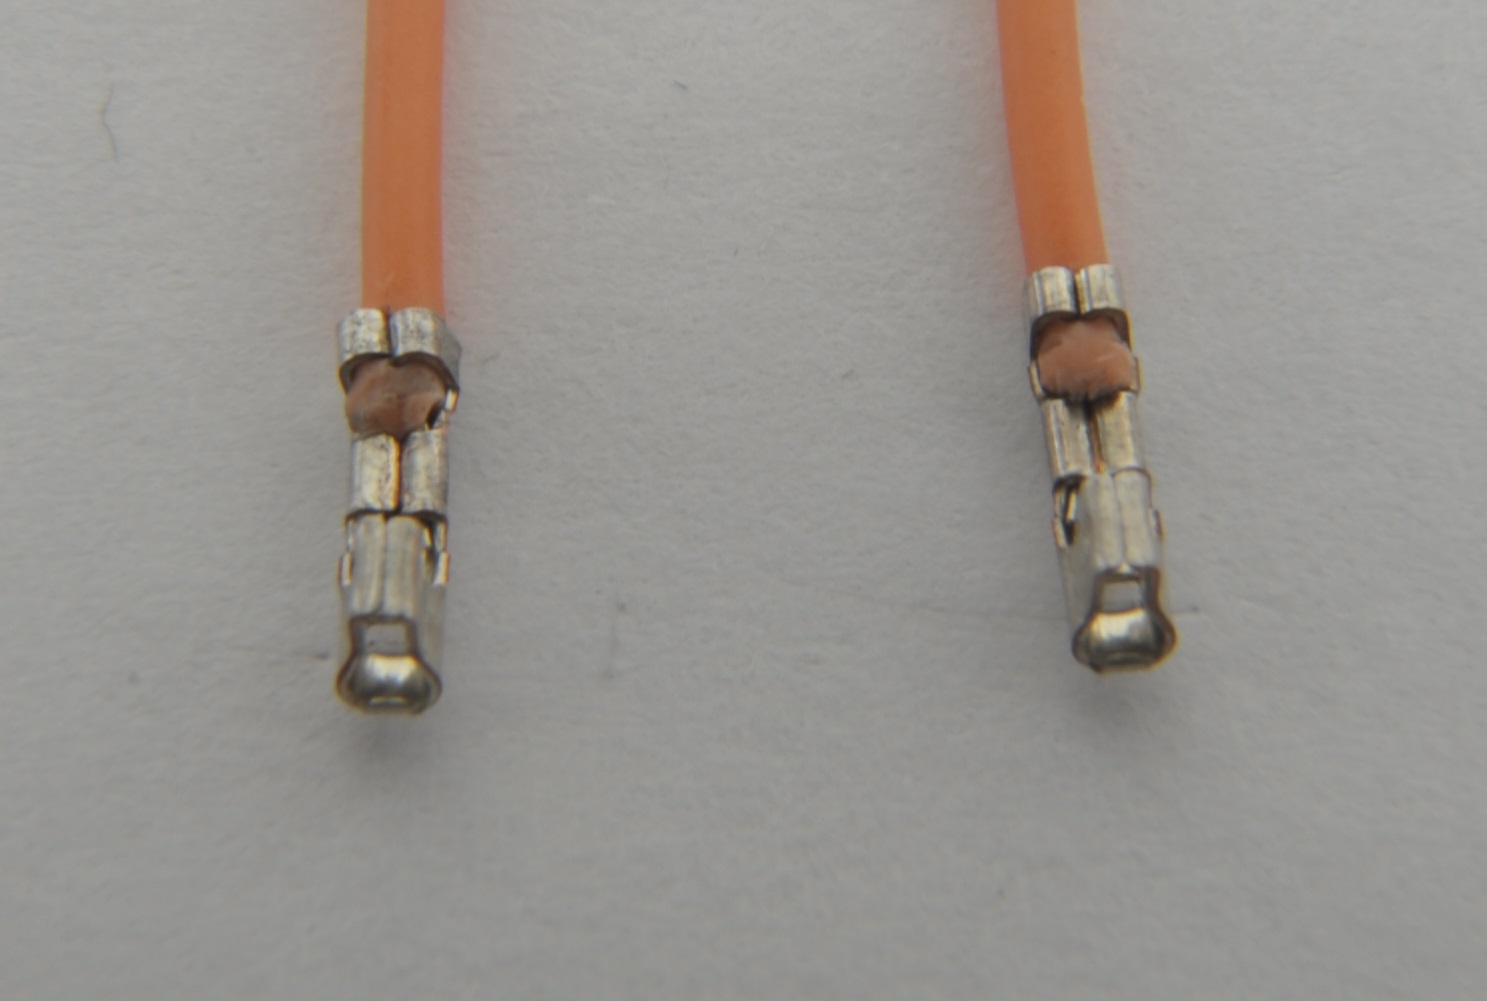
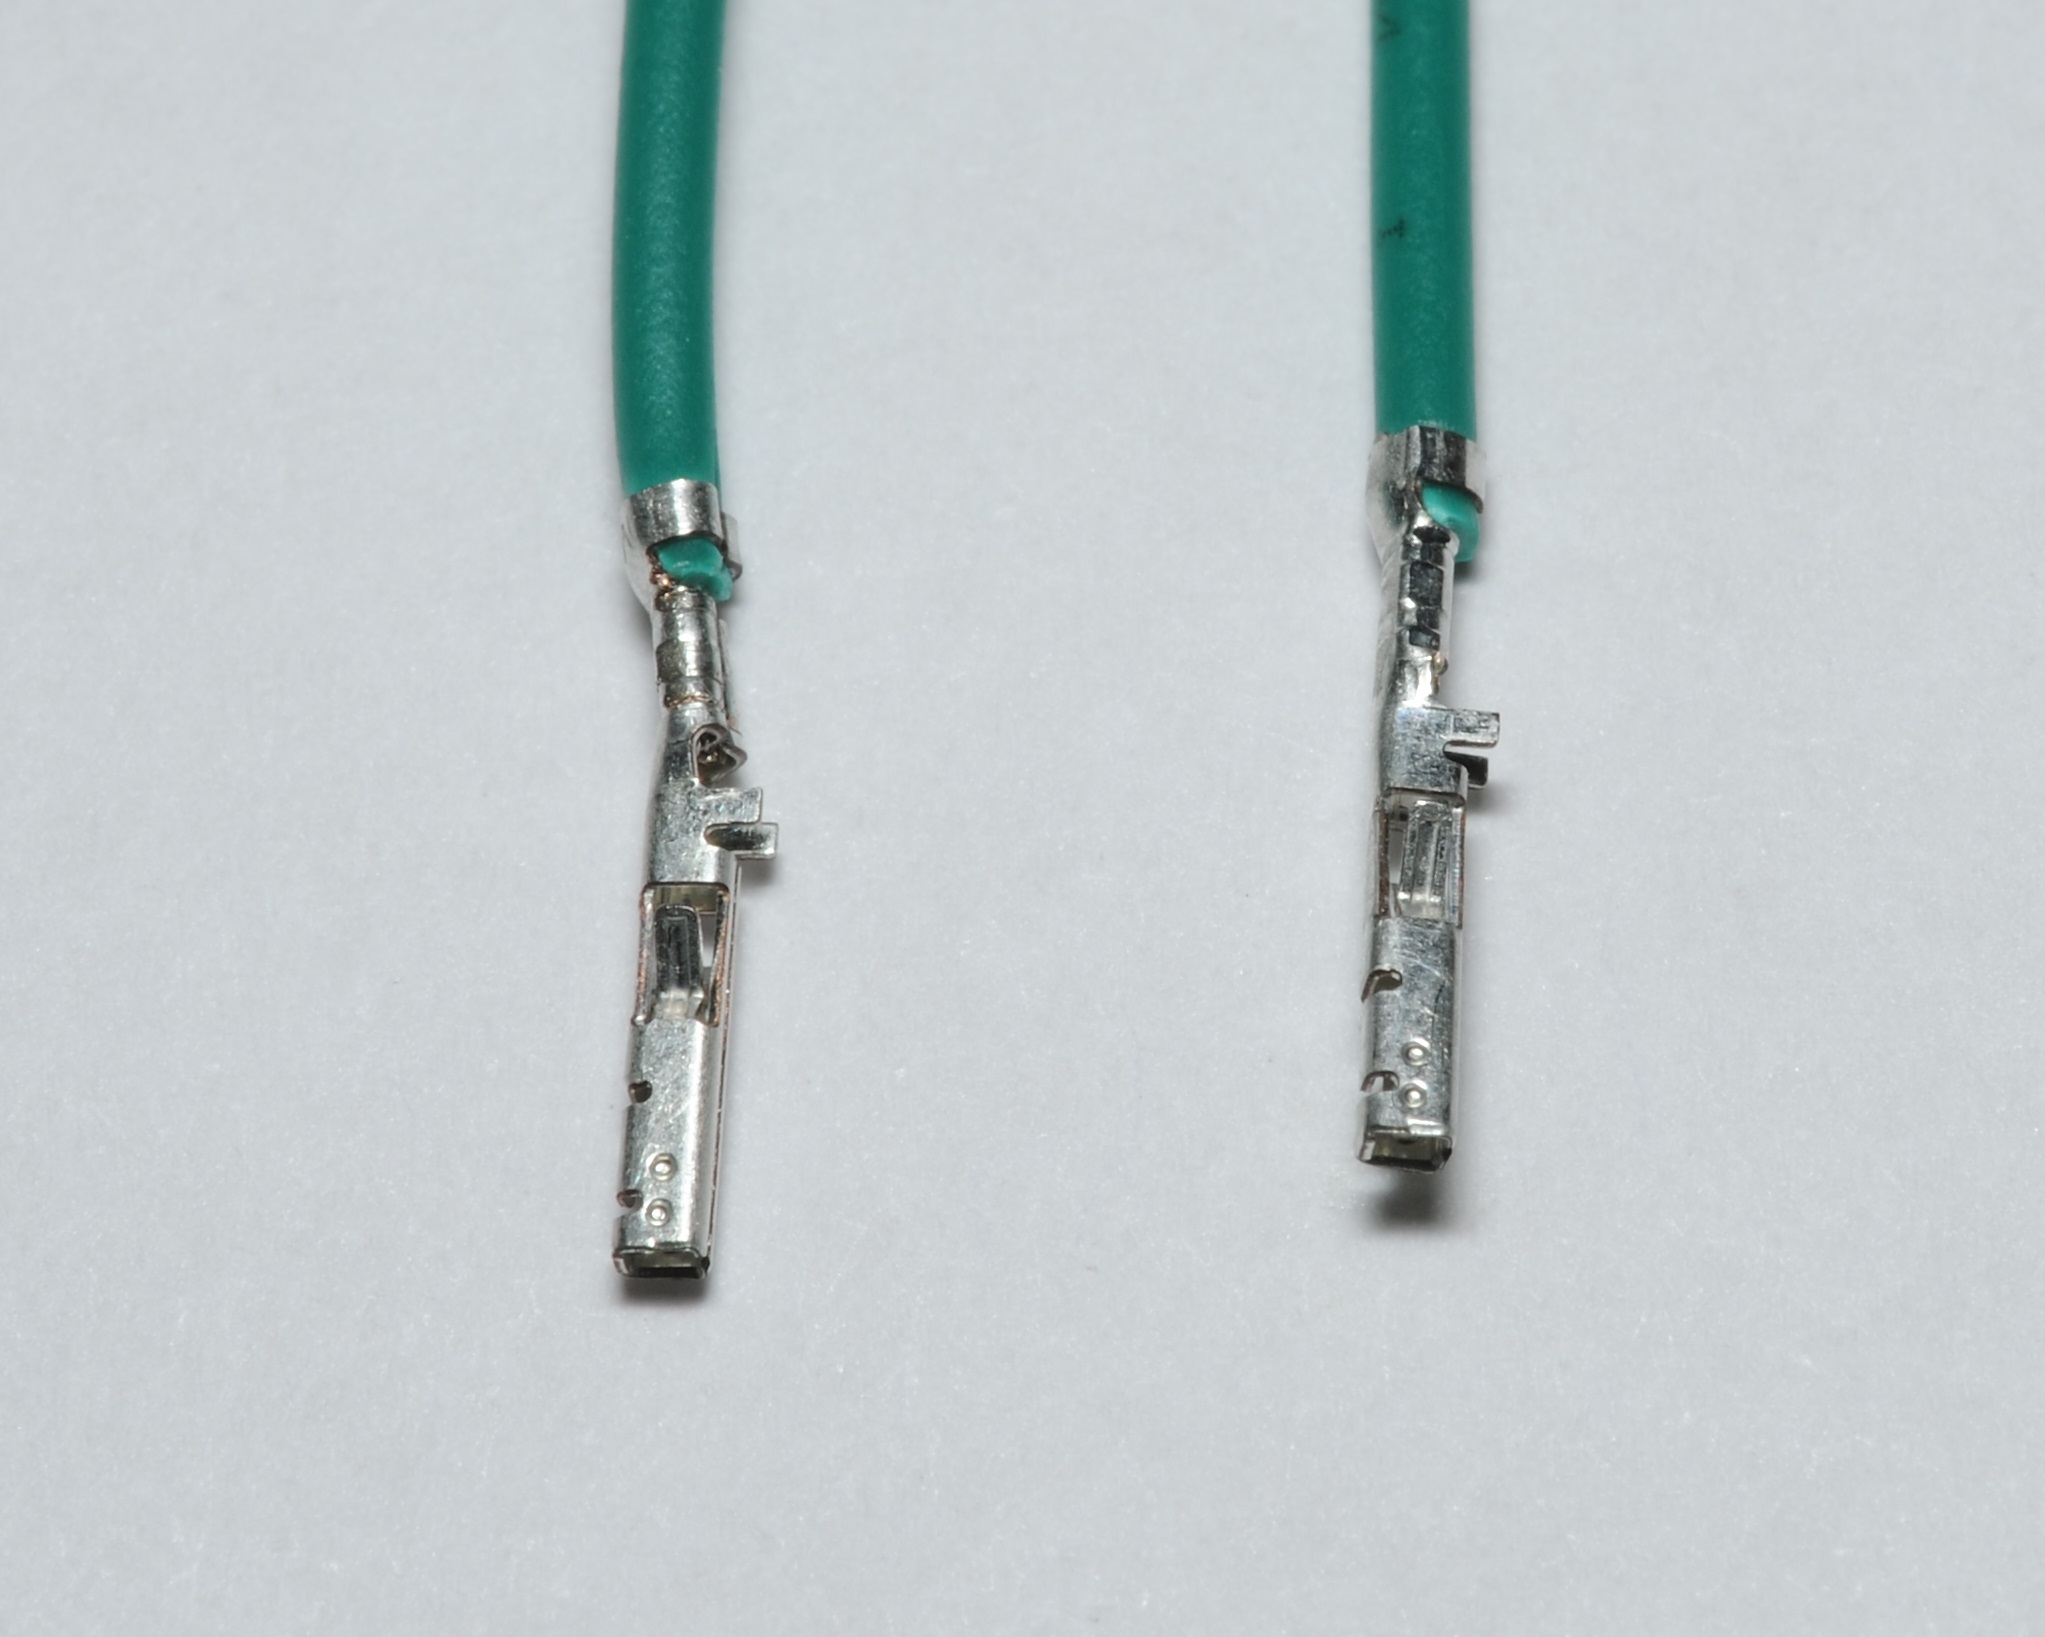
I wasn’t going to bother covering the differences between this tool and generic tools, because they looked so similar, but lately I’ve been noticing something –

When we look at the crimps top down from the rear, we see that the original tool has beautifully curled the insulation crimp ends around, pressing neatly on the insulation without piercing it. This explains one of my biggest gripes with these connectors, which went away when I started using the original tool: The insulation keeps tearing off.
This problem is particularly acute with this type of connector because the transition from wire to terminal is at flush with the top of the housing, so if there’s already a tear created by the crimping process – it only takes a few movements back and forward to create the above mess.
Picoblade (Molex)

Very small (1.25mm) pitch connectors commonly found on laptop and VGA card fans.
KK 254 / KK .100 (Molex)
This type of connector is produced by a very large number of manufacturers. For the most part, headers and housings mate and latch fairly well across brands.
Sub series:
- KK 6471 – Housings
- KK 6410 – Headers
- KK 7395 – Headers (Right angle)
- 08-50-0113 – Terminal (Tin plated)
- 08-50-0114 – Terminal (Tin plated, Pack of 100)
The application most people have likely seen it in is as the connector for PC 2, 3, and 4 wire fans.
For the most part I don’t buy original Molex parts, with the exception of the oddball 47054-1000 housing and 47053-1000 header – both have the specially tweaked polarisation for 4-wire fans (pictured below).

- 63811-8200: Official crimp tool


Left: Terminal crimped with PA-09, Right: Terminal crimped with Original molex tool.
I don’t think the result of the PA-09 is unacceptable, but it requires a lot of force to get sufficient crimp on the wire part, subsequently leaving you prone to then over crimping the insulation part, in many cases severing the wire off completely, and having to start again!
The official tool is a lot easier and faster to use! it also does not end up piercing the insulation after crimping. If you crimp a lot of these like I do, I suggest waiting around on eBay for one to come up cheap, it’s worth it.
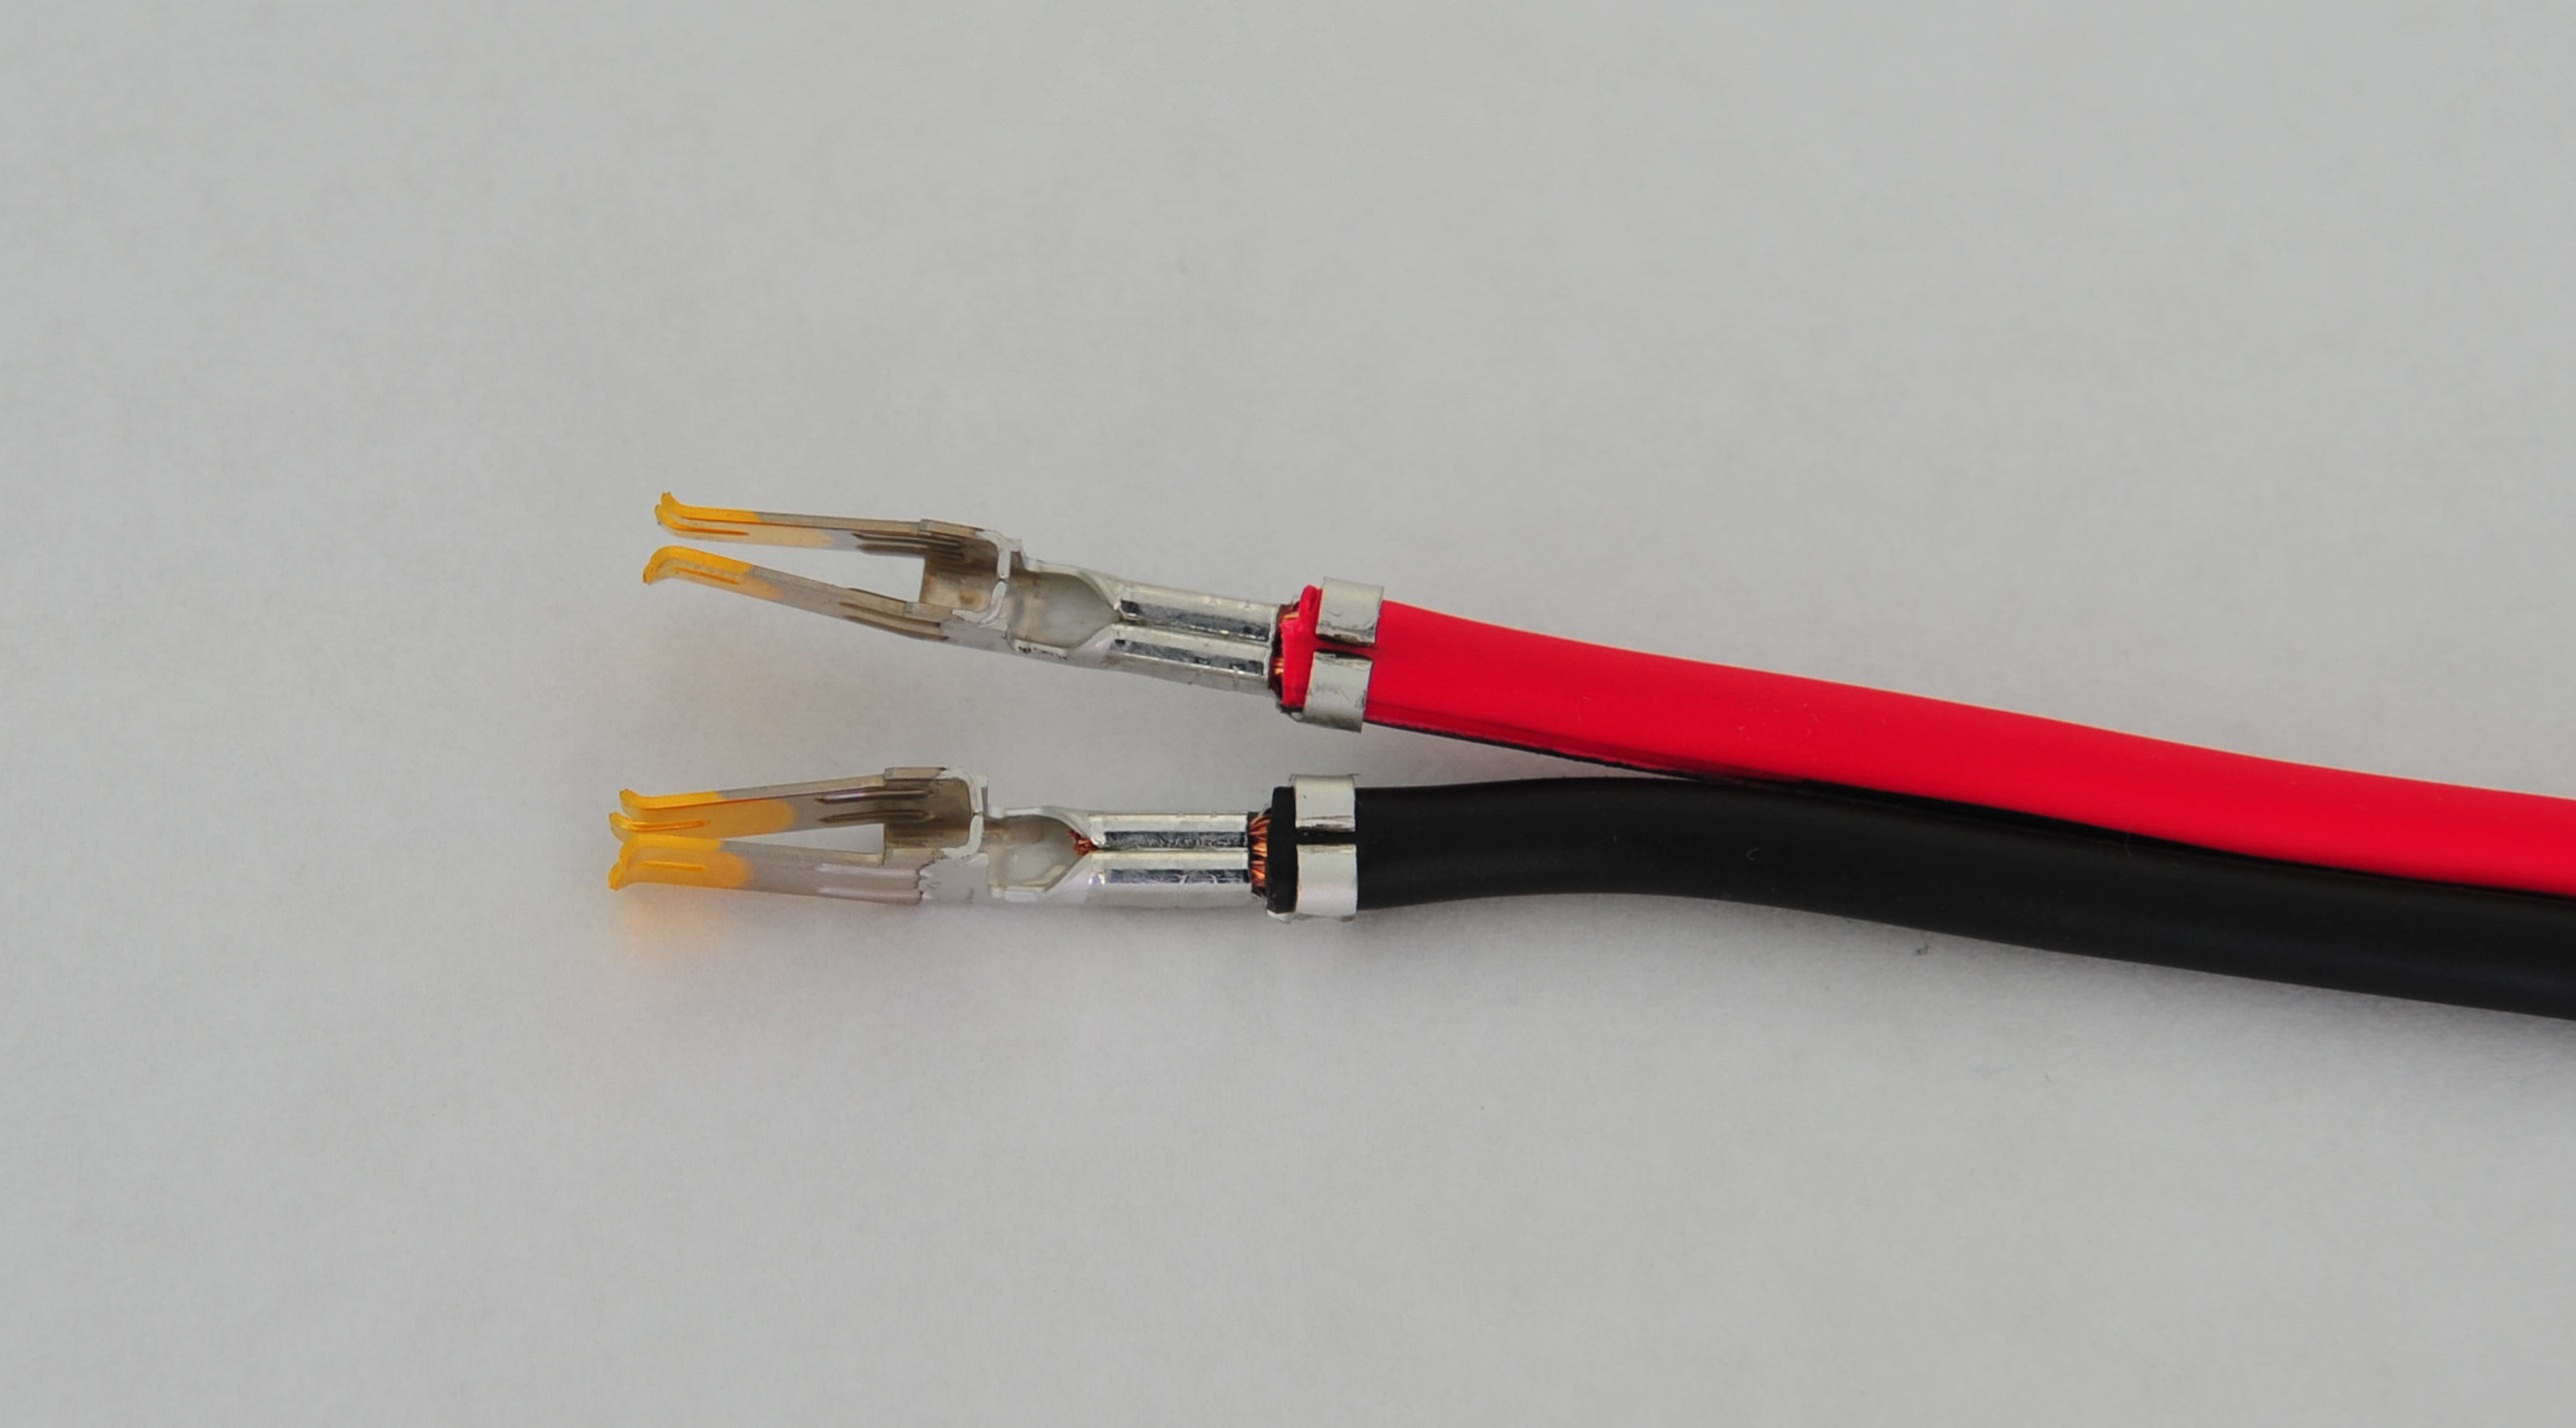
Unofficial male connectors
Unfortunately there is no standard male connector in the KK 100 family, but this hasn’t stopped a slew of unofficial connectors from being produced.

Above is a variety of Chinese manufactured connectors I’ve purchased off eBay and Alibaba which are designed to mate with KK 100 female connectors. They are only found in 2, 3 and 4 positions, because, these are the variants used for PC fans.
The quality of these is not comparable to that of the mating connectors, but perhaps this is not so surprising, given the intended market of these connectors.
SL (Molex)

A common 0.1″ (2.54mm) pitch connector which is similar in appearance to Mini-PV, even mates with Mini-PV but is quite different in design, in that the retention mechanism is part of the terminal, where as with Mini-PV it is part of the housing. Not surprisingly, terminals and housings are not interchangeable.
The most likely place you’ve seen them before is in PCs on the cable that traditionally connected the CD-ROM drive audio signal to the sound card.
If I were to start over, I would probably use these connectors in place of several others I commonly use, this is because it is truly a “do-it-all” connector family.
With 2.54mm pitch, they’re good for breadboard, strip board and anything else like it, they have a reliable and practical wire-to-wire male connector, they’re polarised, latching and terminal retention is very good i.e. in male housings they don’t flop around risking bending on mating. There’s even panel mounting options!
They’re not particularly cheap, but if not on a budget, well worth considering.

There are two crimp tools for SL:
- 63825-8800: AWG 24, AWG 26, AWG 28, AWG 30
- 63811-8700: AWG 22, AWG 32, AWG 34, AWG 36
- 64016-0201: Budget crimp tool (Works with SL, but not designed specifically for it)
For all but specialty uses, 63811-8700 is effectively useless. SL is not a particularly good system for AWG 22, or AWG 30+ wires.

Unlike Mini-PV which almost no generic tools can crimp properly – SL Terminals crimp pretty well with off-brand tools.
As we can see from the picture above we have a familiar problem of not being able to apply the same kind of force. The original tool is designed in such a way that a large amount of pressure can be applied to a small area, but on the Engineer tool this just isn’t possible short of jamming the jaw into a vice every time, which’d be a little time consuming.
The lack of crimping force isn’t going to be an issue for the most part. It just means that it’s conceivably possible that the wire could be yanked out of the terminal, and if pushing these terminals to the absolute maximum current rating (which you shouldn’t be), there’s potential of meltdown – assuming the contact doesn’t give first.
KK 396 / KK .156 (Molex)

Effectively a jumbo version of the KK .100 connector, this is another very common wire-to-board connector of which compatible connectors are made by a large number of manufacturers. Pitch spacing is 0.156″ (3.96mm). The most likely place you will encounter them is inside of switching power supplies, almost certainly on the primary side, and possibly on the secondary side too.
There are two varieties of terminal: basic and “trifurcon” – a special variant which contacts the pin on three surfaces for increased current carrying capability.
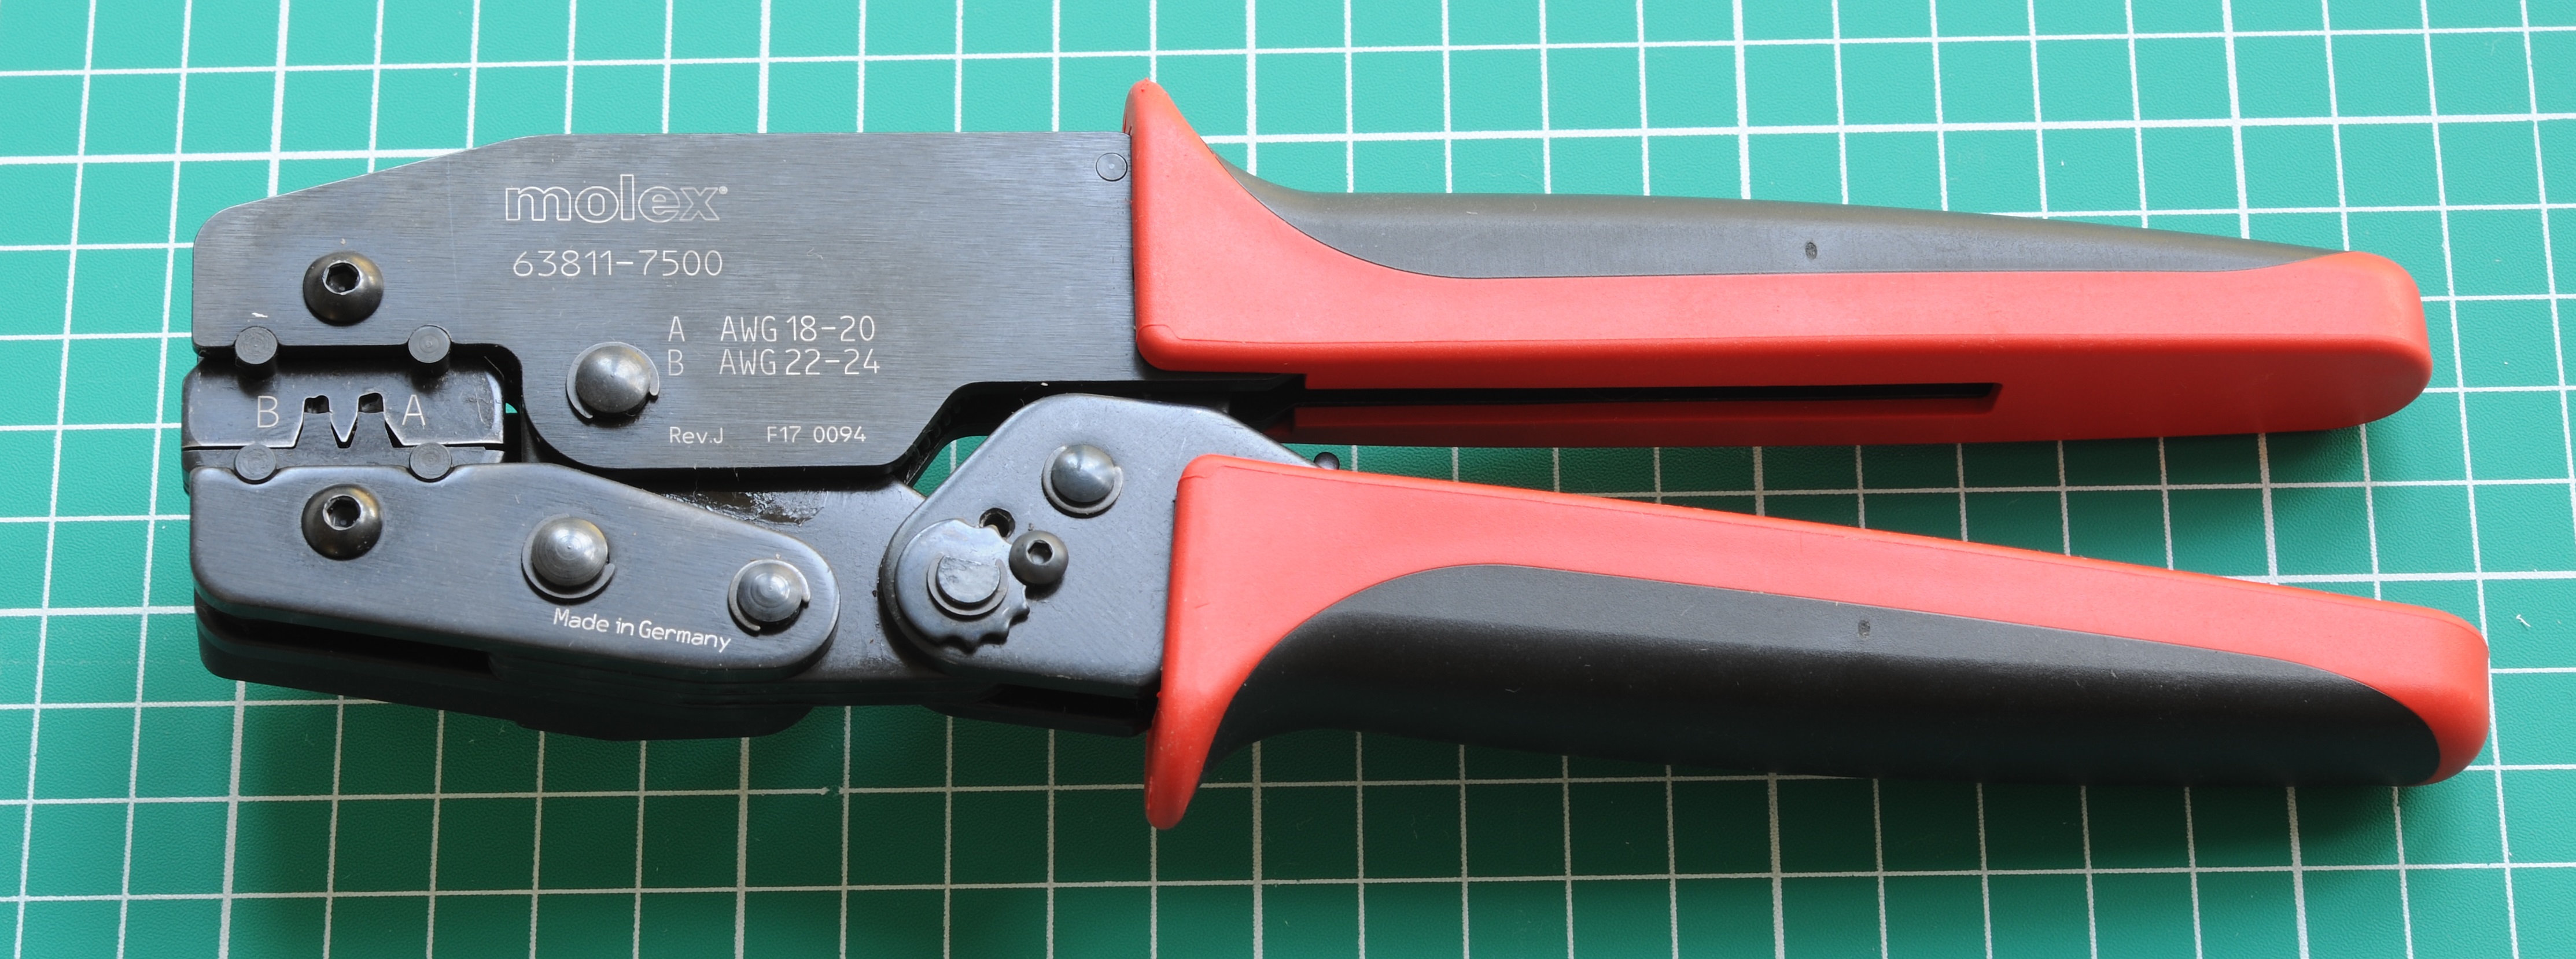
- 63811-7500: Official crimp tool
- Left: Crimped by Molex 63811-7500
- Centre: Crimped by Generic tool (HT-225D)
- Right: Crimped by Engineer PA-21

As expected, the original tool is effortless to use and gets absolutely perfect results.
Due to their larger size and awkward shape, they do not crimp easily with the Engineer tools (although it is definitely possible). I have a cheap tool (Model # HT-225D) which does a pretty good job of these, albeit not quite applying enough force to the wire crimp.
Update: Don’t use HT-225D for crimping these terminals. I recently had a few go up in smoke under heavy load, and it was because of insufficient force on the wire crimp. I went back to check a few others too and found those were also in a dangerous melted state.
Mini-Fit Jr (Molex)

Used for 20 and 24-pin ATX power supply connectors, and for the 4, 6 and 8 pin +12V connections found in modern PCs.
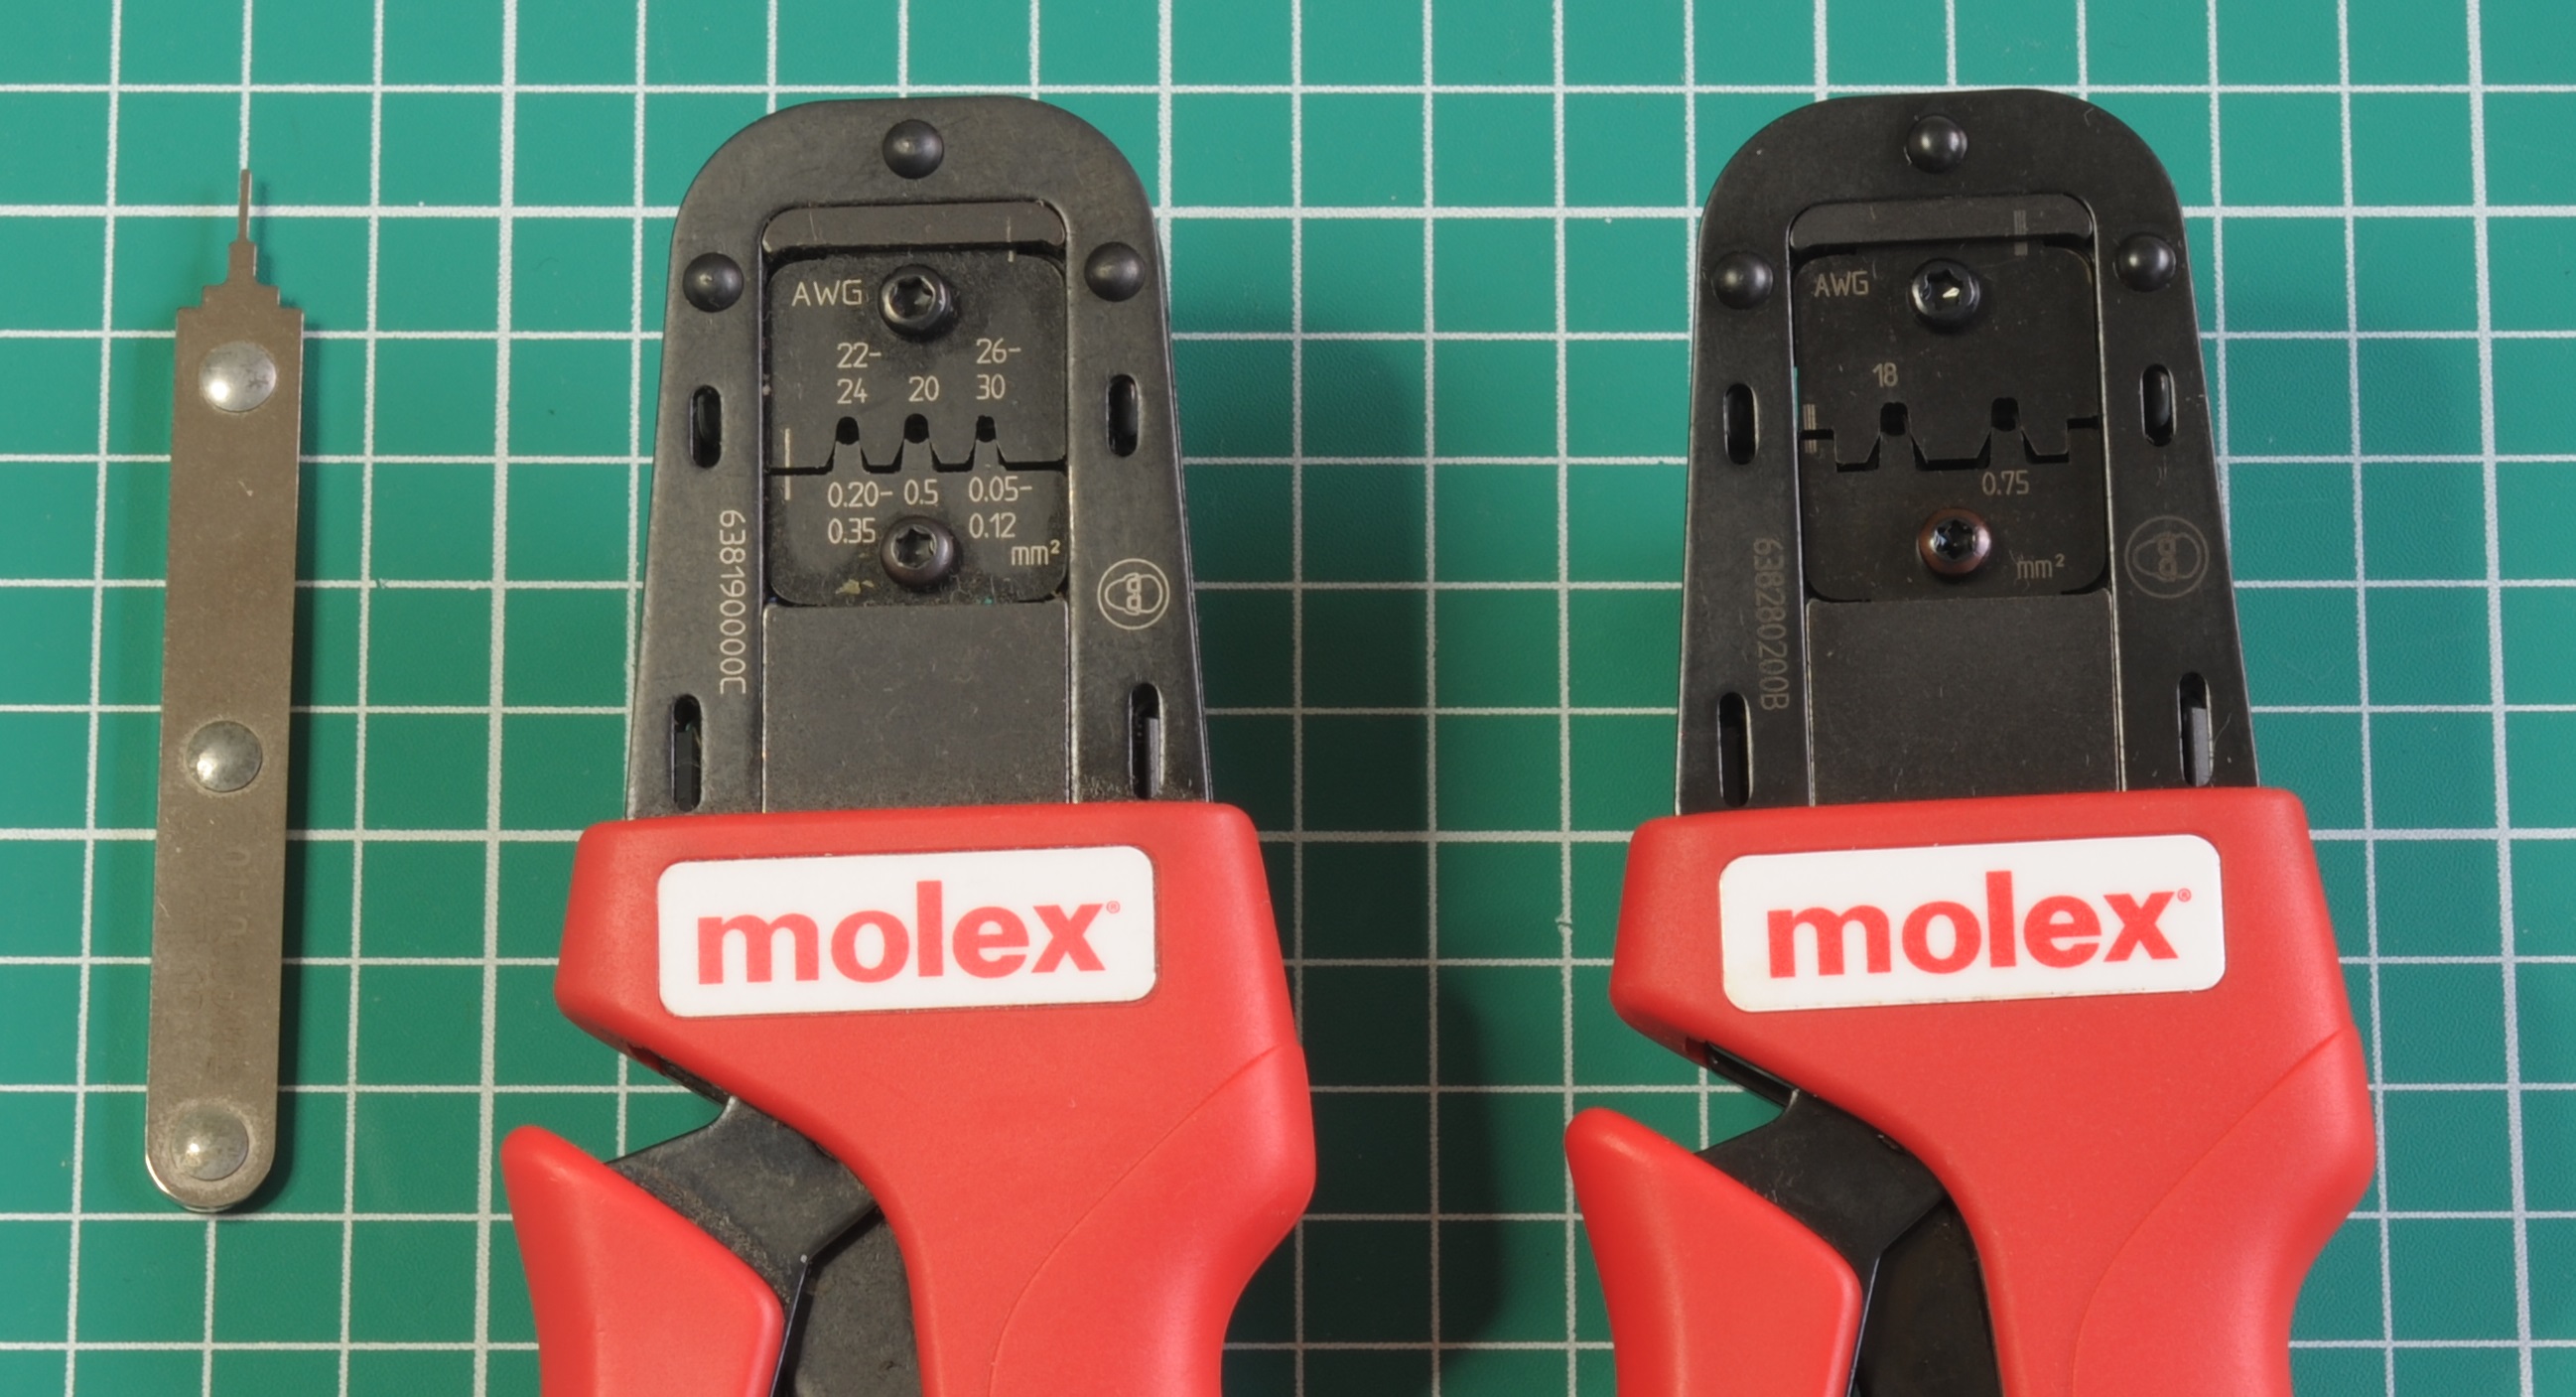
There are two official crimp tools for this family:
- 64016-0200: (Budget) 16 to 28 Gauge
- 63819-0900: (Premium) 16 to 24 Gauge

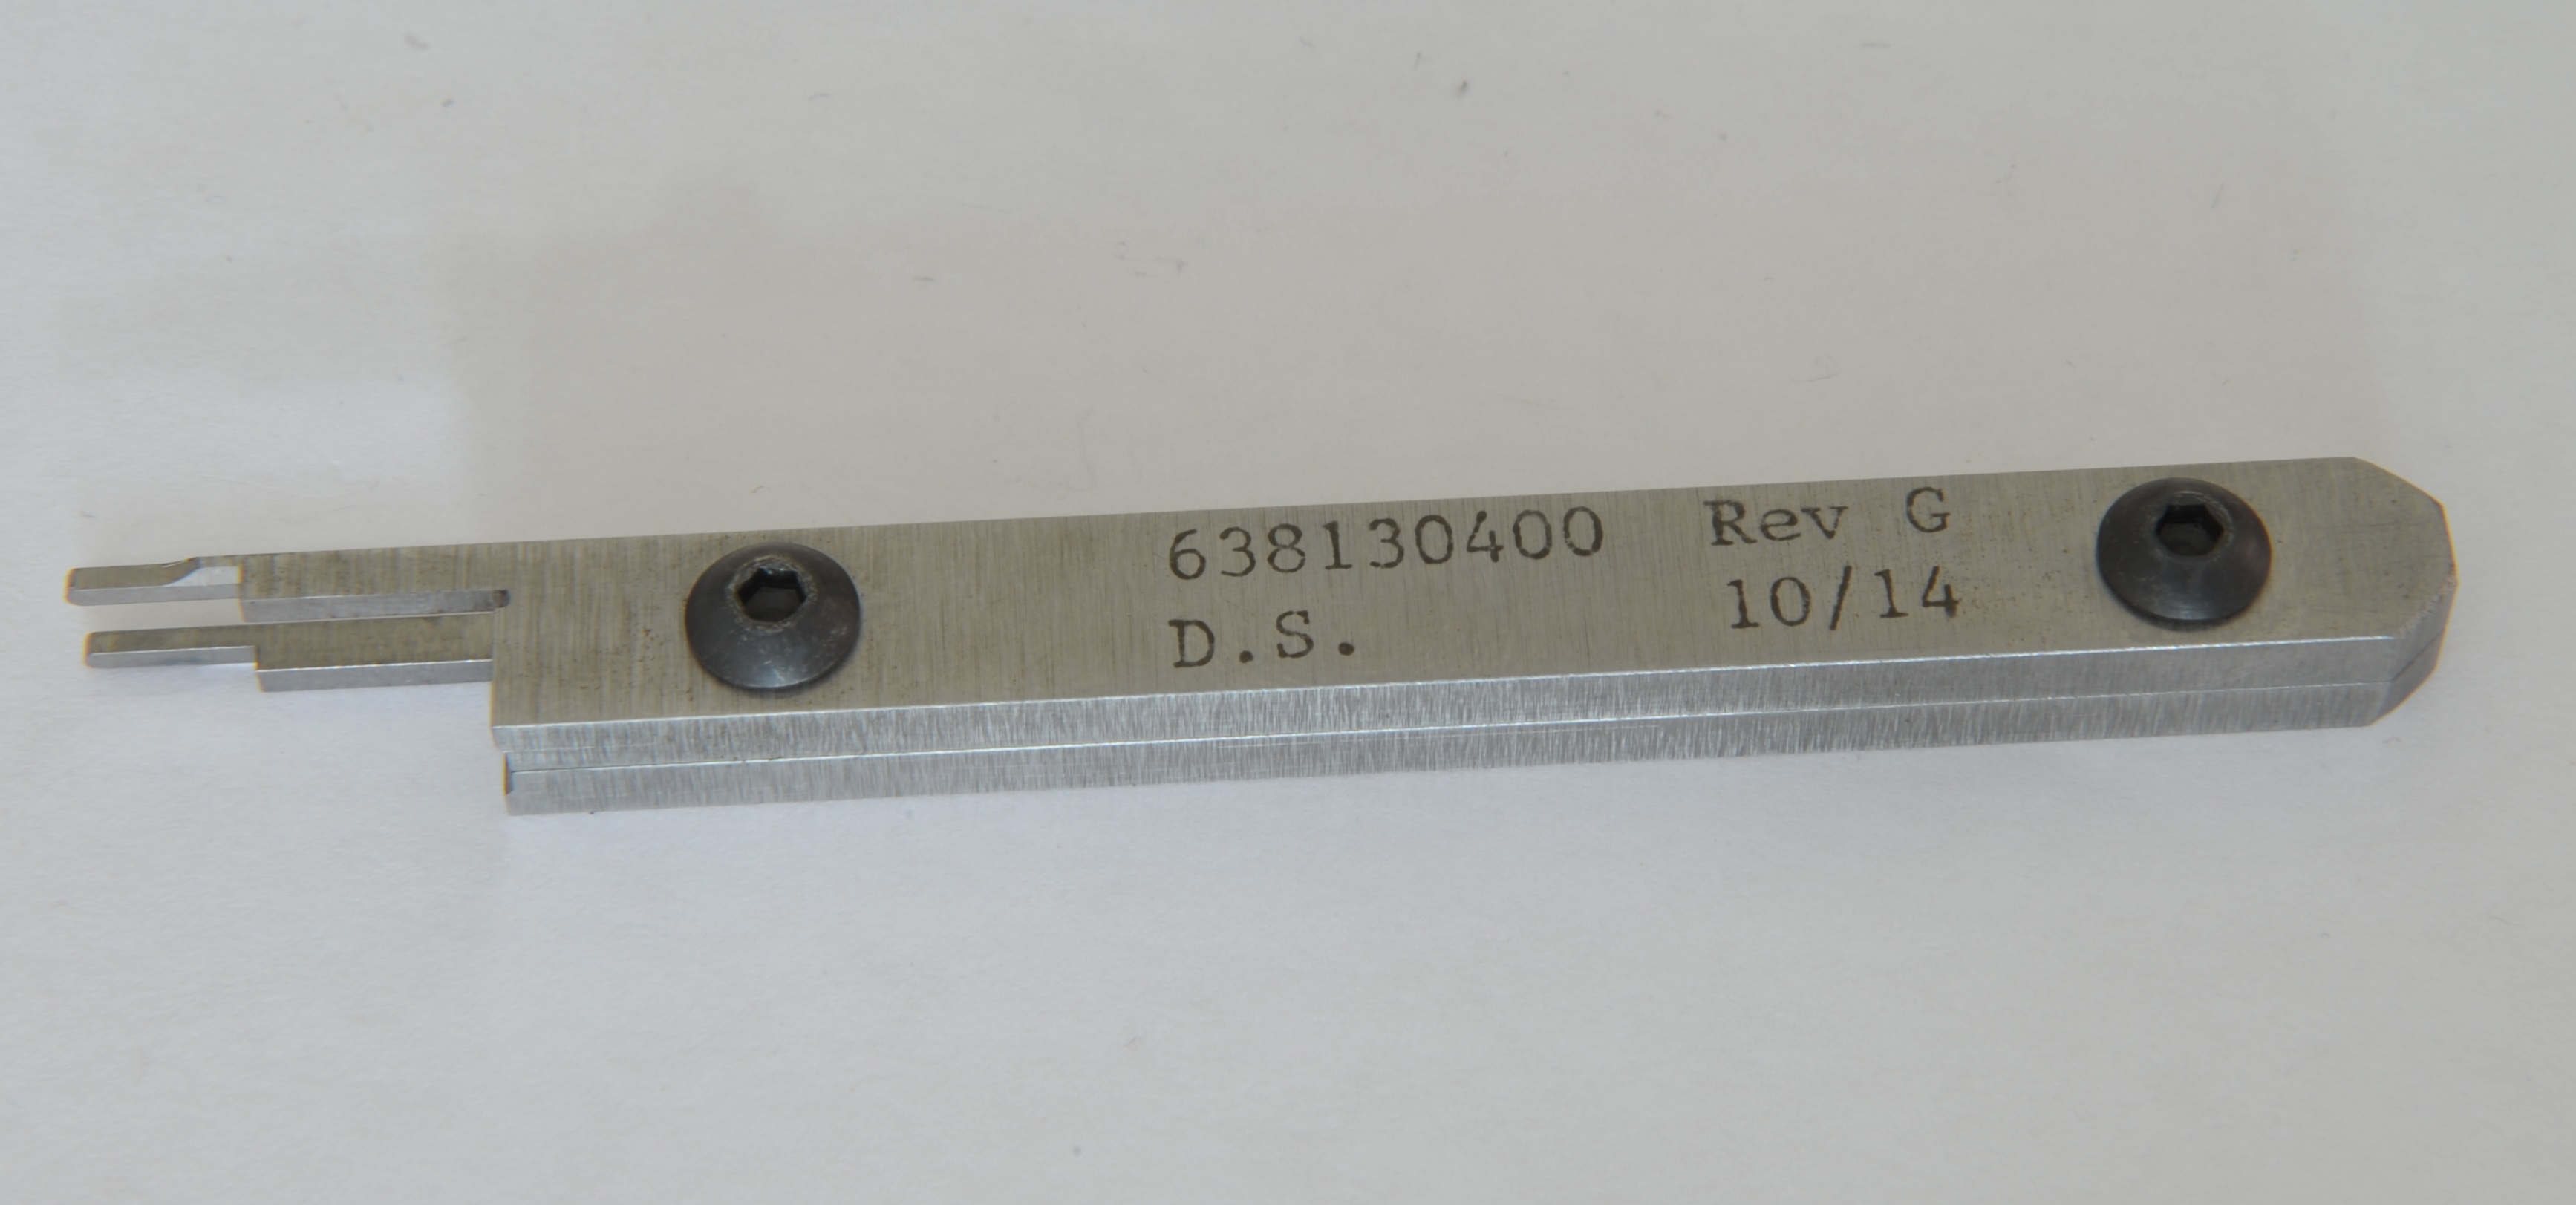
The extraction tool
Sold separately (11-03-0044). If you’ve ever found yourself trying to remove already inserted contacts, you’ll appreciate one. Instead of potentially hours of uttering profanities attempting to extract contacts with sewing needles, the contacts will pop straight out with one of these.
Crimping with unofficial tools
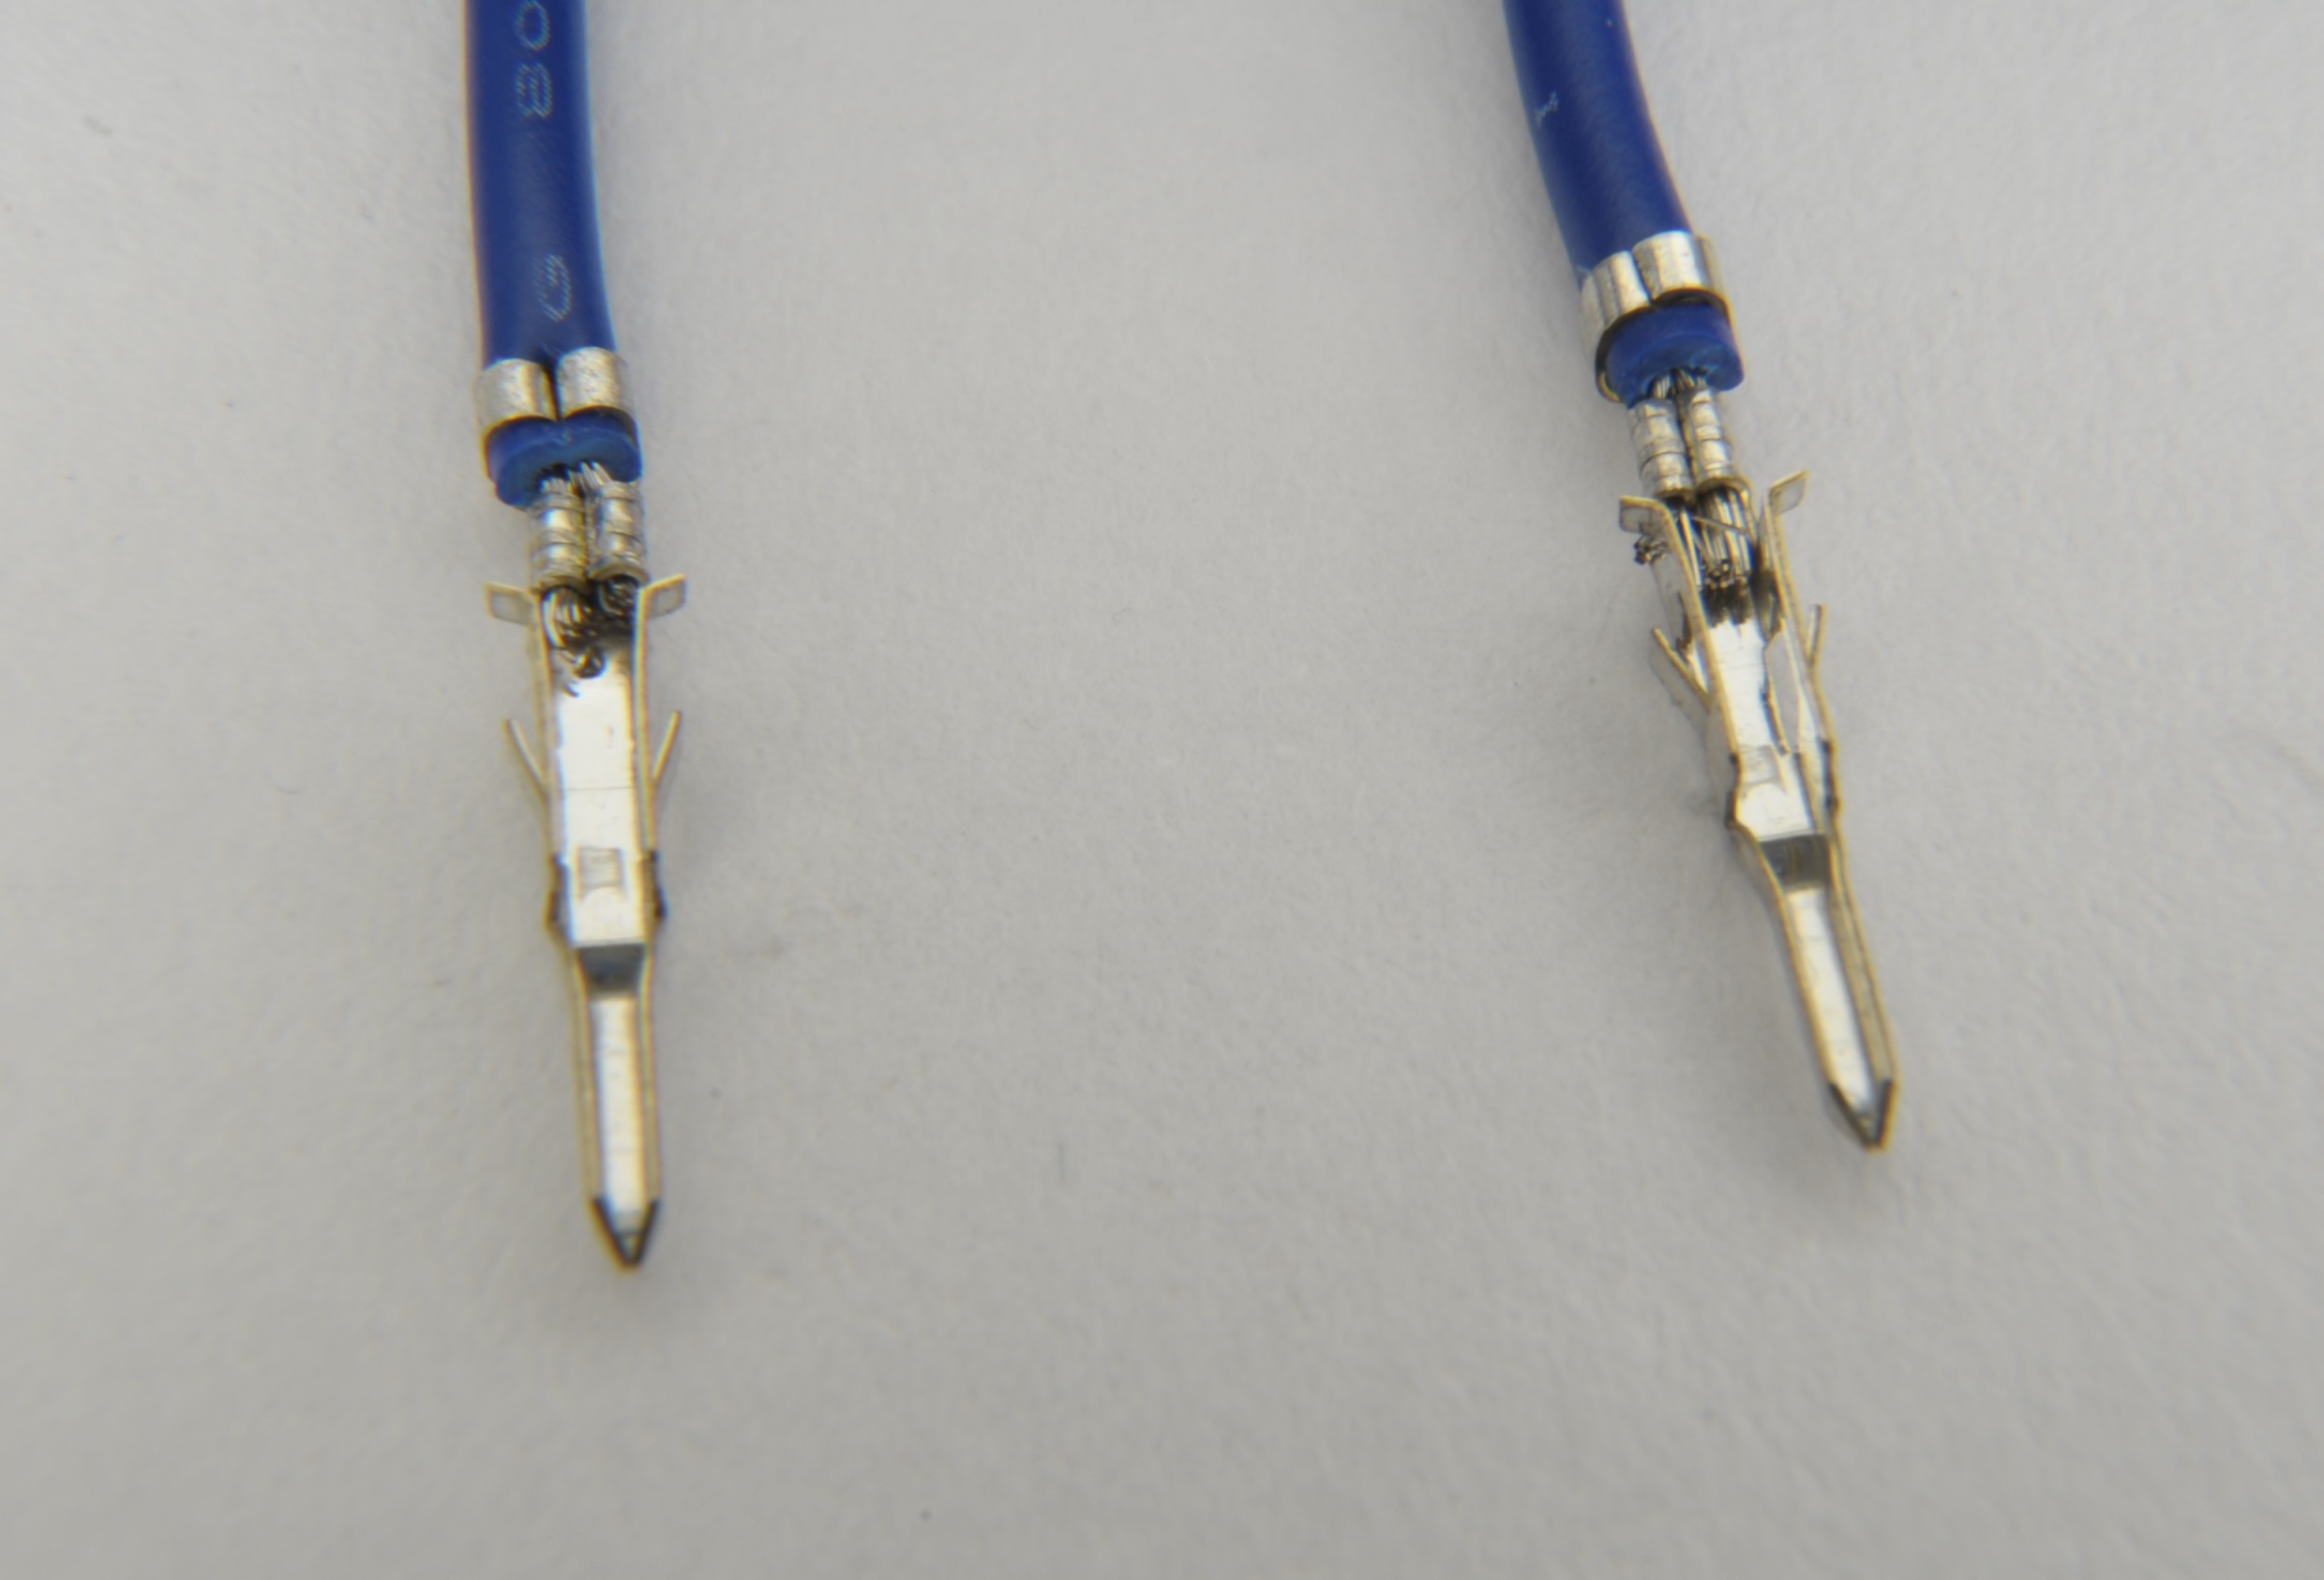 Crimped Mini-Fit Jr terminals
Left is a terminal crimped with the Engineer PA-21. Pretty good really, about the same result as the budget Molex tool would produce, albeit with less ability to apply the minimum recommended crimping force.
On the right is a terminal crimped with the original tool, the big difference is that the insulation crimp is cleanly wrapped around the wire, whereas on the budget tool, and on generic tools, the insulation crimp has ended up piercing the insulation, which is technically a less robust result.
Mini-Fit Sr (Molex)

A commonly used heavy (50 amp) power connector. It has no frequent consumer uses, but is often used industrially for battery connectors, chargers, large motor controllers, DC power supplies etc.
Despite the similarity of the name to Mini-Fit Jr, that’s about where it ends – these connectors are big. They would make a very a reliable replacement for cigar plugs in marine/automotive applications.
There are three official crimp tools for this family:
- 63811-1500: AWG 8
- 63811-1600: AWG 10, 12
- 63811-3800: AWG 14, 16
Given the amount of force required to crimp these, I’m doubtful there is much in the way of good unofficial crimp tools. Even with 63811-1600 – large enough to bludgeon someone to death with, crimping requires significant elbow grease.
Half measures aren’t generally a good idea when you’re dealing with something that carries the kind of power these are designed for. If you don’t have the tool, I would suggest carefully soldering terminals – unless you’re looking to start a fire. Mini-Fit Sr terminals are near impossible to reliably manually crimp with pliers.


Mini-FIt Sr in recent years has become my go-to for big DC power connections. The one gripe I have is that in the case of the AWG8 terminals – Molex appeared to have forgone the possibility of an insulation crimp. Instead those larger terminals are crimped entirely onto the wire, leaving nothing restraining the insulation, which isn’t as robust as what we end up with on AWG10+ sized terminals.
The AWG 14/16 tool understandably requires smaller terminals, but even with these, you’ve got to open the tool right up, and even then, the terminals just barely fit into it, not so great for usability, In any case, these wire sizes are far too puny for the monster size and carrying capacity of these connectors. If you are using AWG 14/16, it’s because everything else in your system uses a bigger size, and you want something smaller on this one particular occasion. That can make splashing out on this tool hard to justify.
AWG 10/12 are the optimum wire sizes for Mini-Fit Sr.
Micro-Fit (Molex)
These look identical to Mini-Fit Jr, but quite a bit smaller. Not often seen in consumer products but has occasional use in small ‘DC’ / ITX / Automotive PC power supply applications. I’ve also seen them in other unusual applications such as the connector on the DC end of the plug pack for HP Printers and Cisco routers.
- 63819-0000: Official crimp tool
The extraction tool
Similar in appearance to the Mini-Fit Jr extraction tool, but used quite differently. Read the manual.
Microfit 3.0 terminals crimp fairly well with generic tools:
As always when using generic tools, results are usable but not entirely ideal. The insulation crimp has clearly pierced the insulation, meaning it would be at risk of tearing under mechanical stress. Another issue I noticed is that the contact ends up bent vertically a little too, due to the awkward un-crimped shape of the terminal. This means that you’ll have to bend each terminal straight again before insertion into the housing.
Due to their small size and high current capacity, these have become one of my favourite connectors.
Milligrid (Molex)

2.0mm pitch. Was used by parallel ATA laptop hard disks. Has a few current uses i.e. USB 3.0 internal headers. Compatible connectors are manufactured by many other companies.
Disk Drive Power Connection System (Molex)

Referred to as “Molex” connectors by the layman, this is a largely obsolete family. Notable however, as it was used for 5.25″ PC floppy drives, CD-ROM drives and 3.5″ parallel ATA hard disk drives, plus a veritable arseload of other PC related applications.
The official crimp tool for this family is 63811-7000. I have never seen one, and I doubt that I ever will.
Key part numbers
- 15-24-4048: Female crimp housing
- 15-24-4047: Male crimp housing
- 15-24-4441: PCB Mount header
Crimping with unofficial tools
Realistically you can crimp these with almost anything. If you own the genuine tool, I tip my hat to you. I bet you didn’t pay for it!
Below is a tool known as HT-225D I got for a few quid off eBay a while back:


Does a superb job of crimping Molex DDPCS. It also does a swell job of crimping KK 156 terminals (see above).
E.I. – Economical Interconnect (AMP)
Often mistakenly referred to as “Molex” connectors – Molex did not ever produce any connector compatible with this family.
Like the above, also obsolete, but historically notable. Used for 3.5″ PC floppy drives. These connectors once came with up to 9 positions. I found a 5 position example in my Tektronix oscilloscope, and I suspect this will be the only other variety I will ever see.

Like the above, these can be crimped with pretty much anything you can fit the contact into. There certainly would have been an official tool, but I care too little to even search for its part number.
Molex 90331/8619 series

Obsolete but notable for its use on AT/XT power supplies. If this series ever had a proper name, I unaware of it. The Molex website describes it as part of “KK” series. They appear to be a relative of the KK 396 family, sharing the same contacts, and 3.96mm contact spacing. Mating surface is quite different however, the male connector has wide flat pins instead of the square pins used by KK 396.
This type of connector was introduced to us by the IBM PC 5150, which made use of them in its power supply. A number of them were used internally, numbered P1, P2, P3 etc. The ones we are most familiar with were P8/P9 which connected to the motherboard. “P8″/”P9” then became the de-facto identification for the two motherboard connectors on subsequent AT/XT power supply designs, with some left pondering what ever happend to P1-7.
On this page I show an obscure 4 position example of this type of connector (whose part number I have not been able to identify) – “P4” which was used for the AC Fan.
The most useful housing is 90331-0001 which comes with all polarising ribs attached, allowing one to snip off the remainder to achieve the desired polarisation. Unfortunately for anyone needing them, they are a little difficult to come by these days.
Sub series
- 8619: PCB Headers
- 90331: Housings
- 2478: Crimp terminals
- 63811-7500: Official crimp tool
Comments
Due to the large number on the post. Please don’t post anything more than a short paragraph long. It will be deleted.
Many thanks for taking the trouble to make this publicly available. The range of connectors available is just bewildering and the naming inconsistent so this is very helpful
This was extremely helpful. Thanks for putting this together. I had browsed digi-key’s site and was overwhelmed by the variety. Your introduction to connectors was a great find.
I echo the previous comments. I have had cause to start working with some of these connector types recently; I was utterly bemused at the enormous range of products and tools on the market, to say nothing of the confusing names and terminology used, so this article has been very helpful indeed. Many thanks for taking the time to put it together.
like the above comments:
excellent guide, I appreciate you taking your time to o such a comprehensive article.
Others found on the net can be quite cryptic and incomplete.
I just picked up a Berg HT-47 for 50$ incl. shipping on Ebay, since generic tools doesn’t seem to cut it.
hopefully it’ll do the job as well as the HT-95.
Thanks a lot.
I’ve been researching for a while about this connectors and tools and your’s is, by far, the most complete and informative post I’ve found.
I was looking for a budget “universal” crimping tool (or two) that I could use to start making my own connectors.
Looks like the Engineer tools are the ones to look at. The other brand I’ve found interesting was KS Tools, models 115.1440 and 115.1450, but I haven’t found any review about them.
As said before, this was extremely helpful. I’m working on a tiny project to add a couple of contacts on the rear of my desktop that will be wired to the power switch on my motherboard, allowing for general switching needs, but I couldn’t for the life of me find the correct search terms to find the right connectors on *generic chinese webshop* for the motherboard headers. Turned out to be DuPont, thanks for helping out!
Also enjoyed reading the rest of the article, you have an enjoyable writing style.
3 position Mini-PV plugs are used for most hobby servos btw. (some servos use what I think is a JST-RE connector which will mate with Mini-PV but uses a slightly different pin and housing design) Futaba uses a Mini-PV variant with a polarizing flange on one side of the housing (the pins are the same the only difference is the flange on the housing) The funny thing is that tracking down the identity of this connector was actually pretty hard, and most people in the R/C hobby don’t know the true identity of this connector or what the proper crimping tool for it is (it took me ages to track this down)
hi,
Regarding the original vs. PA-09 crimping of Mini-PV, what about using this tool? http://www.aliexpress.com/store/product/SN-28B-Pin-Crimping-Tool-2-54mm-3-96mm-28-18AWG-Crimper-0-1-1-0mm2/1112865_2041066651.html?
Seems cheap but it has the rounded form that you mentioned.
…sorry, those AliExpress SN-28B crimpers weren’t rounded like I thought.
Thank you Sir for this great introduction and comparison to various connectors and corresponding tools. Very, very helpful and best resource I’ve seen about this subject.
I uses hours trying to get my head around this – and was baffled – not anymore.
One other tool that is very useful, is the AMP Service Tool I also known as the SUPER CHAMP Hand Tool 696202–1. This is an “inexpensive” (~$125 list) stamped tool. It will do the round strain relief crimp and many 2.54mm, 3.96mm, and some larger contacts fairly well. There is also a Service Tool II, but I do not have one and can’t describe how it’s different. It looks identical to me in the photos I’ve seen.
Do you have any material that verifies this? From what I can see the tool you refer to is another generic double wrap-around crimp die which isn’t appropriate for Mini-PV
The only information I have is experience. I picked one up used on a lark. It does far better than I ever expected.
Here are some aftermarket mini-PV terminals crimped with an AMP Service Tool I:
http://ozindfw.net/crimps/
This is awesome. I’ve scoured the web for information like this and it’s very difficult to find. This page is even better than what I expected to eventually find so thank you for taking the time to put this together, it’s very appreciated!
Great info, thanks! I envy your official crimp tool collection.
Since most of my project work is automotive, Deutsch DT, DTM, and DTP connectors have become a mainstay. Molex has equivalent connector systems but availability is a challenge.
MPI (a company that sells R/C stuff) sells servo plug kits using the “double D” type pins I was talking about earlier, they look like Mini-PV but they have an insulation and conductor crimp with square “wings” and will crimp correctly with double D type crimpers. I don’t think these are real JST-RE connectors rather I think they are a chinese knockoff, for one thing JST-RE doesn’t have an official male pin. I’ve noticed that a lot of R/C hobby servos now use these instead of the Mini-PV knockoff.
If you look at their crimping guide you’ll see that the pins are different than the standard Mini-PV.
http://maxxprod.com/pdf/Connector%20Assembly%20Step-by-Step.pdf
Have you ever come across TE Connectivity connector systems? I liked the look of their Power Triple Lock connectors so bought a bunch of different plug housings and crimps. Unfortunately the crimps are not suitable for the HT-225D crimper, my only tool. TE’s tool costs over $1000 as far as I can tell although I can’t really work out if you can buy the die separately and get a 2nd hand “structure only” tool?
In this day and age it is quite difficult not to come across TE. They do now own several of the families I have listed on this blog.
Most of the stuff I’ve listed on here is made by several manufacturers. Connectors like what you’ve mentioned are still in patent and only made by the one company. Of course, when dealing with such systems, it will not be cheap and therefore not really in the ‘hobby’ realm.
Sorry I’m back again (even when I try and Google an answer your page comes up the top).
I’ve literally been looking for a couple of weeks for 2.54mm (breadboard compatible) connector system that is suitable for both wire-to-board and wire-to-wire connections. I do a lot of breadboard and low power robot projects and am looking for a good connector system to justify the invest in a crimping tool. I’m trying to satisfy these requirements:
– Small header for board socket, 6 to 8 mm,
– Locking mechanism,
– Crimp Contacts,
– Supports 22 AWG wire.
– Price, 2 position plug & socket less than USD1 each.
The only thing I’ve found that matches the first 4 are the AMPMODU MTE family from TE. But some of the parts such as the 2 position connector are a USD1.65 each.
I’ve looked over the JST ranges: XA, XH, SM, PH & RCY but they see to be W2B only.
Is there anything out there??
Molex SL will satisfy your requirements – not sure about AWG22. That might be pushing it. Will definitely do AWG24.
Quite similar to Mini-PV but has different crimp tool, housings and contacts.
I thought about buying into SL a few years back but realistically couldn’t justify it.
Would Dupont pins (terminals) fit in the JST style housings?
They would not.
Thanks for the detailed article!
I was wondering if the knipex 97 49 44 “for rolled contacts”[1] would work for the Mini-PVs.
If the matching crimp system pliers qualify as a generic tool, could be this is
the answer to your question for a generic tool in the Mini-PV section.
Any experience or thoughts on this?
[1]: http://knipex-tools.com/index.php?id=1023&page=art_detail&parentID=1299&groupID=1449&artID=3827
If you purchase one, and provide pictures of satisfactory results, I will post it up here.
If I buy it I will do that. Unfortunately it is a little expensive to just try it out.
When I say ‘Generic’ I guess I also infer readily available and inexpensive.
Probably not worth considering then. Genuine tools come up cheap on eBay fairly often.
Harwin makes their own version of the Mini PV connectors that they call M20 connectors. they also have their own crimp tool for them called Z20-320 which is “reasonably” priced at $445
Just found another tool for Mini PV pins, the Berg HT-114, it’s an odd looking tool, apparently a set of wire cutters with an 22-26AWG Mini PV crimp die built into the handle.
Seems there is actually an official tool for crimping the male terminals after all, the HT-102. I’ve seen these with Berg branding so it’s not a recent thing either.
And there’s the HT-73 which is for crimping Mini-PV terminals onto 18-20AWG wire. How you’d fit an 18 AWG wire into a Mini-PV housing I don’t know, 20 AWG would just barely fit, some hobby servos come with 20AWG leads.
Also FCI Amphenol makes large wire (18-20AWG) and small wire (28-32AWG) versions of the Mini PV crimp terminals as well as multiple versions of each type that have differing insertion force ratings. Again I have no idea how you’re supposed to fit an 18AWG wire into a Mini-PV housing, it seems like it wouldn’t go in unless there’s a large wire version of the housings (which I haven’t been able to find)
Anyway this page shows the different terminals with part numbers in an organized table.
http://www.mouser.com/catalog/catalogusd/648/1683.pdf
Good find – I’ll order some large contacts.
I have a spool of #18 thinwall insulated wire, rated UL1061.
Insulation measures 0.064″. That’s close to generic #22 insulated wire I have which measures 0.060″.
Anyhow, the #18 Insulation slips into a ‘clone’ Mini-PV shell with clearance.
Matt, great info, which I’ve used to firm up some of my own which is currently a work in progress at OCN PC Crimping Part Numbers.
See the info I added this evening about Disk Drive Power Connection System (Molex) which are still being used in most ATX PSUs. which are currently available as TE parts.
Btw, got me an HT-208a in fantastic condition a few days ago; found it on eBay for just over $50 US, including shipping.
Great site! When it comes to the HT95 and HT 100 there seem to be different dies. What die do I need for 22-28 awg wire? Thanks!
Thank you for all this great information! It’s helped me figure out different contact systems. I originally was wondering how to crimp those DuPont style connectors and since reading this last year, I’ve now got a HT-102, HT-95 and a HT-208. Though between the 95 and 102, the crimp anvil on the 102 for the contacts is too long for the DuPont style connectors and crushes them.
I’ve decided I’m going to give that knipex 97 49 44 a try as well since I saw it floating around on Amazon for $37 bucks. Worth a shot if it’ll fit into my paladin crimp handles.
Did the Knipex 97 49 44 do the job for the DuPont style connectors?
Matt – what an excellent resource!
Re: Generic crimpers with round insulation crimp dies, for Mini-PV:
Hozan crimper models P-706, P-707 work for Mini PV.
Both models have have round insulation dies. There is no issue with the contact hanging up at the insulation crimp during installation.
Crimp settings:
— Hozon P-706
1.4 width wire die
1.8mm round insulation crimp
— Hozon P-707
1.4Lmm width wire die
1.6mm round insulation crimp
Matt, you mentioned “for the most part I don’t buy original Molex parts” above, and I was just wondering what your preference was when sourcing (e.g.) Mini Fit Jr. type housings .
In terms of Mini-Fit Jr, I only buy originals – they are actually easier to get (for me at least).
For KK100, in reference to that comment, my preference has since changed. I discarded my entire stock of knock-off KK100’s and replaced them with original gold plated headers/contacts. The reason for this is that I have found that tin plated KK100 connectors (when used for signal connections) only last about 3 years, after that they corrode and fail, needing to be replaced – something I have gotten rather tired of lately.
Thanks for that update, always good stuff to know. Since you mentioned the problem with the tin-plated contacts, are you referring to corrosion in general, or something more specific like fretting corrosion?
Matt, thanks for the great writeup. I’m also curious about the type of corrosion you saw with tin-plated terminals, as I’ve read warnings on other websites about tin corrosion, but I’ve never heard of someone who actually observed it. Did you see oxidation or fretting (or both) on your tin-plated terminals?
Also, regarding gold terminals for Mini-Fit Jr (for PC power connections), I’ve read that it’s very bad to mate gold-plated terminals to tin-plated terminals (male to female, or vice versa). Google “mate gold to tin”. The claim is that gold-mated-to-tin can actually speed up oxidation of the tin-plated terminals. And since both my PSU pins and motherboard power pins are non-gold plated (probably Tin, based on the color), I’m concerned that if I go with gold-plated terminals on my power cables, that means I will have gold-to-tin connections and it may make the oxidation/corrosion worse versus all tin-plated cables connecting to tin-plated PSU/motherboard power pins.
So I was curious if you had any thoughts on the subject, since you’ve actually observed corrosion issues with tin-plated terminals? I know your corrosion was on signal connections (which tend to be more sensitive than power connections), but I’m curious if you have any thoughts about gold-plated versus tin-plated terminals for PC power cables?
The corrosion I observed was a small strip of black crud. Barely visible to the naked eye. The more visible change is having to spray them with contact cleaner to make them work again, after which they failed again 2 months later.
Never tried tin-to-gold. My high school chemistry knowledge says this should be no worse than tin-to-tin.
As a failure analyst I’ve seen numerous issues with dissimilar metals. Any difference in electronegativity (in the galvanic series) greater than 0.15V is considered to be prone to corrosion unless in a controlled environment, in which case the difference can be as high as 0.5V. Unfortunately tin has a 0.6V difference from gold, making the tin sacrificially acidic; it will corrode over time, exposing the brass/bronze base metal. The base metal is prone to corrosion with oxygen, sulfur, and other substances in the air. The corrosion by-products can be dark red, dark green, shades of blue, and black/brown, so a black “crud” isn’t unusual.
If the mating contacts carry enough current, the localized heating can accelerate the corrosion process. I have seen quite a few “charting events” due to dissimilar mating materials, so maintaining a low galvanic potential between these materials is key.
Damn autocorrect! .*acidic” was supposed to be “anodic”. Grrr!
Double-Grrr! “charting” should be “charring”.
I am looking for Berg/Dupont/Mini PV keying pins. They were the plastic ‘spikes’ which seated flush with the connector shell
Thanks!
Just found the identity of another common connector type, this one took me ages to track down. These are commonly used on RC servos as an alternative to Mini PVs (more servos in recent years seem to use these instead of the Mini-PV). They originally showed up on JR Propo servos and then spread from there. They are superficially similar to Mini-PV terminals but the “latch” is lower on the housing and they are designed for a double D crimp die. The male side of the connector has a shroud that snaps over the housing.
http://php2.twinner.com.tw/files/goodjob/TY5081,2,3,4series.pdf
I don’t think these are the original JR connectors but rather a copy of them, for one thing they have Futaba style housings with a polarity key.
Addition to the above, I mean they have futaba style housings available for these terminals in addition to the JR type housings. The main difference is that JR housings have a beveled corner for polarity pritection where the Futaba type have a flange on the side of the housing.
Genuine Futaba terminals are yet another 0.1 terminal type, they have two “tongs” that grip the male pin on either side. So far I have not been able to track these down.
@Fythios I have an HT-102 and it works perfectly for Mini-PV male terminals. Does yours have the terminal holding device? I’ve seen a lot of modified or flat out incorrect tools being sold on Ebay as HT-95 or HT-102s.
@Atomic Skull apparently I dun goofed and got that backwards. The HT-102 is fine, but the HT-95 anvils wire crimp area are too long and crush part of the contact. Both have the terminal holders, the 102 has the male holder and the 95 has female holders.
I also have an HT-95 and it works just fine with the female terminals. It crimps the terminals exactly as shown in this picture http://techmattmillman.s3.amazonaws.com/wp-content/uploads/2015/06/minipvcrimped2-800×574.jpg
Yes the conductor crimp is longer than the generic crimpers, but it’s supposed to look like that, it is actually the generic crimpers that are doing it wrong.
With the Molex Micro-Fit 3.0 pins, do you use the PA-09?
I’ve been crimping with needle nose and finally had to give up with these tiny pins and sockets.
I don’t want to dish out $300+ for the official crimper, so I was wondering about whether an Engineer-PA09 would do the job.
I have got the official tool for those.
Never tried the engineer on Microfit. Did not think anyone would be interested. Will give it a shot and update shortly.
Just added pics of Microfit crimps!
Thanks for the info.
The Sargent tool is a pretty good universal style crimper for wraparound style insulation wings, just crimp the wire and insulation separately. About $50-$55 USD. Works well on AMP Superseals.
Sargent CT 1026 for the superseal and CT 1027 for D-Subs.
Molex also sells a very cheap universal B crimper that has an extreme variety of sizes in one tool, Molex P/N 63811-1000
these used to be sub 20 USD. This is a very handy unit for a travel toolkit becasue it can do a very wide variety of sizes in one tool.
@Scott Evans very good tip! It’s a bit more than that now (£45-ish in UK), but compares to Engineer PA-20/21. And should be a good investment should one standardize on Molex and doesn’t go below 24 awg.
This tool has a round die for crimping the strain relief http://www.bandc.aero/openbarrelcrimptool.aspx
I agree
I saw that comment and am considering buying it for review on this page.
If anyone gets it before me do share results…
Tentatively, this BCT-1 is identical to the Sargent 1026-CT. For example:
https://www.greatplainselectronics.com/proddetail.asp?prod=1026-CT&cat=138
It seems to be quite popular in the pinball community:
https://www.google.com/search?q=BCT-1+site:pinside.com
You can currently find it on eBay for $32 with shipping.
Have you tested the HT-225D blue crimper on the KK254/KK.100 connectors?
Also, it might be nice to see Deans T connectors, XT60/90, and Anderson PowerPole covered. Pretty common for hobby RC stuff.
@Evidlo Deans and XT60s are not crimped connectors, Powerpoles are though they aren’t small wire to board connectors.
Nice article. Though i am a beginner it helped me a lot while differentiating between the connectors. I will be glad if you can put few images of those connectors where they are used. That will make me more clear when i will use them actually. I am working on a project where the device consist of sensors, steppers, stepper drivers, switches, power supply and arduino mega. I would need to figure out few connectors but want to know which connector will be exact fit for the place where i am going to use it.
There is one more helpful article on this. Please refer below link:http://dangerousprototypes.com/blog/2017/06/22/dirty-cables-whats-in-that-pile/
I was really hopeful that the PA-09 would do the Molex KK 396 series. Will have to keep looking.
This is an astonishingly well-conceived, exhaustively-considered, and beautifully rendered resource. It’s incredibly valuable for beginners like me; I don’t think there’s anything else like this out there on the Internet. Many many thanks for this!
Those “Engineer” tools sure make ugly crimps. Thank you for showing that next to quality crimps.
Matt- is the official extraction tool necessary for the micro-fit connectors? I figure I can insert it by hand, wondering if I need to pay $20 for that specific extraction tool.
You’ll be struggling to extract contacts without it. IMHO more important than having the official crimp tool. The only extractor i regret buying was for Mini-fit Sr.
thanks!
Thanks. So what are the KK254 style plugs called on eBay? I love them, and hate JPX, and every seller on eBay has KK254 and JPX mixed up under the weirdo terms like “terminal pin housing header adapter”. A search for JPX yields many results but “KK254” or simply “molex” doesn’t give me what I’m looking for. I have to search for “pcb connector” and then prune the results by looking at the pictures.
As I stated on this page, this type of connector is produced by a very large number of manufacturers, each which have their own name them. Good luck!
What’s the difference, or is there a difference between Molex KK connectors and JST VH connectors? I don’t think the crimp pins are compatible, for one.
Hi man, thanks for the excellent guide. You might want to take a look at this:
https://hobbyking.com/en_us/hobbyking-jst-sh-connector-crimping-tool.html
They say it’s an excellent tool, I’ve ordered already.
I got a lot of useful information, thanks so much for the excellent guide!
Quote: I have never seen a generic tool with a jaw like this. If you find one, tell me about it!
This tool – Hozan P-707
This crimp tool have round insulation die (1.6mm round insulation crimp) and it works just fine with Mini-PV (DuPont) terminals.
http://pccooling.ru/forum/index.php?media/hozan_7.18019/full
more iformations here:
http://www.overclock.net/forum/17973-cables-sleeving/1327420-pc-crimping-part-numbers-46.html#post26682481
Here’s another Mini-PV crimper, Rennsteig 616 006 3 1. Costs around $350 brand new. Apparently it’s fairly recent, Farnell is the only place that carries it and Rennsteig US doesn’t have it listed at all. It seems to have come out around the middle of last year. Farnell’s SVHC listing for it (no SVHC) it is dated 7/7/17.
http://uk.farnell.com/rennsteig/616-006-3-1/crimp-tool-26-22awg-socket-contact/dp/2802987
Thanks for the overview and comparison, this is really valuable information. You didn’t mention which crimp size your used in most cases. I’d be particularly interested in the Mini-Fit Jr. and if the PA-21 can properly manage the 16AWG, some articles/forms posts have reported mixed results… it doesn’t seem to be rated for 16AWG crimps though. At 18AWG it’s not an issue, but since the Mini-Fit Jr. can go as big as 16 I was wondering if the Engineer can manage.
Mini-fit Jr is just fine with AWG16. The official tool has a jaw for AWG16 and official terminals are available. I was crimping some just the other day.
Only thing I would say is while the copper side of things is no issue, some AWG16 has quite thick insulation which can be a struggle with this connector family.
Standard hook up wire is OK, fancy wire i.e. silicon sheath is generally too fat.
I would imagine the engineer tools would just about manage it, but have not attempted it. Perhaps look at one with larger terminal support.
agreed, I use Mini-Fit Jr. with the Engineer PA-21 pliers and 16-gauge wire (thousands of repetitions), and they DO work well. I use the 2.5 tooth for 16-gauge insulation and the 2.3 tooth for 16-gauge conductor (CCA in my case)
Hi, this is a great resource – thank you!
As someone who builds a lot of custom projects and has flexibility in selecting a crimp-able connector – which should I buy into? This would be for projects which averagee 2-8 connections per cable and typically do not carry more than 30-50 watts of power. Mix of relatively low frequency data (25khz or lower) and DC power. Typically something close to AWG16. I’d like to have a box of connectors on hand for when the mood strikes. Right now most of my projects are built around lots of wire to wire soldering.
Best,
Rob
Molex Micro-Fit
I often use them for both power, and RS-232/I2C
I am starting to see several Berg crimpers show up on ebay cheap. I just got a HT101 and a pair of HT48’s. How do you know which dies you need to look for to use these professional crimpers? I also just got one of the SN28B’s. They look like they will work but I gather from your write up that they will not, at least not very well.
I assume you mean putting the die’s from the HT-95 into this tool? If so, I don’t think you’ll manage that. There are eight pieces per tool (4x Anvils & 4x Dies). Each one costs about US $80 new. Very rarely seen second hand.
This is a great guide to the beginner like myself but it doesn’t go quite small enough for what I need; I need to crimp some (100) HIROSE DF20 rectangular crimp socket contacts on AWG30 wire for a touchscreen interface cable. The HIROSE tool is over $1000! I looked at the Engineer PA-09 but I am wondering if the IWISS IWS-3220M would be a better fit. Any thoughts?
DF20 with the PA-09? – Forget it. The terminals are too tiny.
The Engineer PAD-11 does these fairly well. A tool I have, but have not covered here (yet), but will get around to at some point.
Here is a DF20 crimped with the PAD-11:
http://techmattmillman.s3.amazonaws.com/wp-content/uploads/2015/06/df20_crimped.jpg
Thanks for the reply. The crimp from the PAD-11 looks good but what does it’s width measure? I ended up ordering the Iwiss IWS-3220M just to give it a try but the crimps came out to 1.15mm, too wide to fit the housing. The original crimped contacts measure 0.75mm.
The crimp from the PAD-11 is the correct width – about 0.7mm as stated on the die.
That said, crimping each terminal is pretty darn fiddly.
I just wanted to stop back in here to thank you for the recommendation. The Engineer PAD-11 did the trick nicely. As you mentioned, it was indeed “pretty darn fiddly” since each contact had to be individually cut from the strip, pre-bent parallel to fit the die on the PAD-11, inserted rather precisely into the die, and crimped multiple times including lightly crimping around the insulation in the 1mm die then lightly crimping in the 0.7mm die and lastly test fitting each contact in the housing and re-crimping as required. This over the 100 individual contacts plus several test crimps and bad crimps. Needless to say, it took a long time. lol.
Unfortunately, the first go with the new harness was not fully successful. After much [more] fiddling, 100% continuity testing, 100% resistance testing and a little extra help from people smarter than myself on web forums it appears that I must now extract many pins and twist together some wire pairs (for proper “timing”?). I will begin that process today. Since I don’t have a proper removal tool, I will just use a fine needle to remove them. I am not quite sure if this will be much less efficient than using a real removal tool but tests so far indicate it will be slow but doesn’t seem to harm the contacts. I’ll let you know how it goes.
Thanks again!
I congratulate you for the detailed tutorial. I wanted to ask you if any of you know the terminals that mount the cable AXI I2C 800mm PMBus Cable (Corsair Link PSU connector):
http://forum.corsair.com/v3/attachment.php?attachmentid=13280&d=1380017291
http://forum.corsair.com/v3/attachment.php?attachmentid=13282&d=1380018961
These terminals are the same as the Micro-Fit (Molex) very common in the power cables CPU and VGA, but its size is half of small.
I have asked the Corsair brand and they have not even bothered to answer me. I believe that being the owner of a power supply of that brand, I am entitled to know it…
One of my favorites is Pancon (Panduit) Mas-Con. they are 0.1″ IDC style connectors. I used them in arcade and pinball games. If you have the pistol grip hand tool (not the cheap T shaped push tool) you can make cables really fast, with the right parts you can daisy chain. In a pinch you can jam them on most other 0.1″ connectors.
https://panconcorp.com/product-category/pancon-connectors/mas-con-100-idc-wire-to-board-connector-system/
Very informative pages. I have just bought a replacement LCD screen for my laser engraver which has a hirose 14pin header. Some fow I need to connect it to a 14wat ffc ribon cable. Any suggestions very welcome.
Really like this page. Very useful.
A couple of great additions would be the JST-SH 1.0mm pitch connectors (which I don’t like very much), and JST-GH 1.25mm pitch connectors (which are awesome). They’re both used heavily in smaller/racing drones.
My Engineer PA-09s are the best solution I’ve found so far.
Bloody awesome page. I’ve been doing lots of electronics in the last couple of months and connectors we’re always my achilles heel. Your guide helped me alot, thanks mate!
Fantastic ,simply Fantastic .Thank You MUCH for sharing this knowledge .Yepp connectors is what I start working on when my “Patience Meter” is maxed out .I was looking to identifie some connector on FPV Camera +Mini DVR’s to link everything up .(some have kind of “USB” look, others like JST-XH/PH,some are Micro/Mini HDMI ) but the size never match .If I cant find matching connectors I will need to try to remove (with out destroying everything with the heat ) and spot wires everywhere .
If anyone know about connectors used in that field ,please feel free to reply .
Again TYVM Matt Thumbs Up!!
@admin: you mention the YTH-202B in the context of generic Mini-PV/DuPont crimp tools that actually have a correct die shape…but only for the insulation crimp. Have you come across/tried the [eg HT]-213 variant? Supposedly, it can crimp both parts.
https://www.jameco.com/z/HT-213-R-Hanlong-Tools-Crimper-D-Sub-Pin-and-Socket-Tool-20-28AWG_159266.html
Better die shape photos: http://dinkdaze.org/robots/notes/crimp/HT213.html
Nope
But I agree, it does look promising.
I have that tool (different brand but the exact same tool). I got mine from an R/C hobby shop. It’s quite challenging to get the terminal lined up with the wire compared to the official tools and it tends to bend the terminal slightly. I never use it since I got an HT-95 and HT-102.
Mini PV terminals are used extensively in R/C hobby wiring, though most servos now come with a very similar terminal that is designed for a “double D” crimp die. The connector box is also better designed. The housing is similar to the generic Mini-PV type except that the “latch” is lower on the housing and some have a Futaba style polarization key (a lot of companies don’t bother with the key because the positive lead is in the middle with the signal and ground on either side so if you plug something in backwards it merely doesn’t work). I call these TYU connectors due to the “TYU” printed on many of the housings however I suspect that they are made by several different manufactures. Took me forever to track down exactly what these things are:
http://php2.twinner.com.tw/files/goodjob/TY5081,2,3,4series.pdf
I’m still trying to figure out what exactly Futaba servos use, the terminals look like a milligrid terminal except it’s 2.54mm spacing for compatibility with the pin headers on hobby R/C equipment. Picture of the mystery Futaba connector here:
https://www.helifreak.com/showthread.php?p=7351711#post7351711
Molex 64016-0201 will also work with SL terminals as well as a few other Molex connector families, it is a “service grade” tool and costs about half the price of the other two more expensive tools. The difference is that it has a simpler design for the terminal locator and it does a “double D” insulation crimp instead of an “overlap” crimp. Apparently SL terminals are designed to work with either crimp style though the overlap is considered superior.
Just noting, as I couldn’t find it in the comments, the part number for the Mini-PV male is 47792-003LF
£0.56 a piece! A strip of those would get through your pay-packet at quite a clip…
They would! I did some more digging later and found the 75653 range Amphenol Mini-PV male crimp – I bought them as a cut strip under the part number 75653-002LF from Mouser, waaaaay more reasonably priced. Current price was 0.181 NZD per (at 500+ price break), converts to about 0.093 GBP at time of writing.
A good alternative for Mini Fit Sr. are Anderson Powerpoles and SB50 connectors (they both use the same terminals). The PP45’s are single terminal housings that can be stacked and the SB50’s are two pole keyed housings. Both are hermaphroditic which might be a problem in certain applications. While the official tooling is very expensive Powerwerks makes affordable third party crimp tools for them. Also while the PP45 terminals claim 45 amps maximum they are actually very underspecced and can take a lot more than that. I’ve seen them used on large electric helis with 10 gauge wire that pull 50-100 amps continuously and spike up to 200 amps for a split second periodically without any problems. The amp rating on the terminals seems to be based on the wire rather than the terminal e.g. the PP15 terminals have the exact same contact area as the PP45 terminal, it’s just designed for a smaller wire crimp (PP15s and PP45s both use the same housings)
Great article. I’ve been working on getting a set of Mini-PV connectors put together, and I’ve found that the PA-09 tool works pretty well if you take a needle file and A.) file down the point in the 1.9mm die, making a nice rounded contour, and B.) round out the anvil a bit in the same die. This allows the insulation wings to be crimped properly, and the rounded anvil keeps the connector from being crushed out of shape as long as you don’t go all Arnold Schwarzenegger on the pressure for that crimp. The crimped pins slide into the housing and click into place without any difficulty at all after this mod.
The “high contact force” version of the female Molex SL terminals are not for use on wire to wire connections only with square header pins. The reason why is that round crimp terminal pins can slide sideways out from between the two contacts because the end of the connector box on the high contact force terminals are open at the top and bottom. On the datasheet it says “TERMINAL TO BE USED WITH (0.64)/.025 SQUARE PINS” but doesn’t explain why this is and it’s easy to miss.
Actually after some experimentation I think the high contact force SL female terminals are ok with SL male pins, just not with mini-pv / dupont connector pins due to how those terminals can wiggle around in the housing where the SL pins can’t
After some further experimentation I’d say the high contact force SL female terminals are also ok with the male dupont crimp pins, provided they fully mate with the pins. The thing with the high contact force SL terminals is that the top and bottom of the connection box is open in the middle and if the pin does not reach the back of the terminal where it is constrained on all sides it could in theory slide out from between the two contacts if the housing were to become skewed at an angle.
Could you please advise me? Is it OK to get tin plated wires to crimp with gold plated terminals?
https://www.molex.com/molex/products/datasheet.jsp?part=active/0016020097_CRIMP_TERMINALS.xml&channel=Products&Lang=en-US#partdetail
Googling this did not bring me any concrete answer besides that tin + gold is a bad combination and will corrode even quicker than tin-to-tin connectors.
It is not a problem
Another tool for mini-pv / dupont terminals recently came to my attention, the FCI SP1552B. This tool has a round die on BOTH crimp barrels. I found it worked well with genuine mini-pv but not so well on *some* of the knockoffs. The ones I have from Hansen Hobbies (which I think are actually Harwin M20 terminals) work great, the cheap ebay terminals I had laying around not so much (wire pullout force was lower). Currently this tool is being sold cheap on Ebay as NIB surplus by a couple different sellers, the actual retail price appears to be around $300. The locator is a gate style, the one I had needed the adjustment nut on this gate to be tightened slightly as it was a bit sloppy. Crimp height adjustment did nothing as the die fully closes with the default setting. The correct way to align the terminal seems to be with the back end of the connector box lined up against the gate.
Atomic,
You are nearly as obsessed with crimp terminals as I am.
Matt
Does any of the Engineer Crimpers work with the Molex SL? Could you post pics of proper SL crimps? Thanks for this awesome page!
Done.
Where does the offering from Pololu amongst all the choices
See
https://www.pololu.com/category/70/crimp-connector-housings
Would be very interested in your opinion. Thanks
These are the exact same cheap connectors that any eBay seller is flogging. They work fine but tend to become unreliable after about 20-30 mating cycles due to loss of spring tension in the contact. If you need something durable and reliable you have to look at originals or a different family which of course is going to cost more.
Re. Molex Disk Drive connector tool 63811-7000: it’s a currently available product (04/2019), you can buy one under $300, so not only you can see one, but you can afford it, too
Thank you sir, this was extremely informative and I wish out found this article months ago it would have saved me hours of searching, cross-referencing, and quite frankly guessing as to what the hell I was looking for.
This is a good source for quality dupont terminals, these guys specialize in selling servo connector supplies to the R/C hobby.
http://www.hansenhobbies.com/products/connectors/servoconnectors/
These are NOT the same cheap noname terminals a lot of Ebay vendors well, I’m pretty wire they are actually Harwin M20 series terminals. If you need generic square housings then do not buy the servo housings as these are either keyed ion the case of the Futaba type or have a beveled corner in the case the the JR type.
I will also say that the Hozan P-706 works better than the ratchet crimper they sell (which is a generic “double D” type crimper). You can get a P-706 off Amazon for around $45.
I have some odd looking crimp connectors, flat, forked blade with a normal wire crimp looking tangs on the wire-side.
Cannot find them anywhere, but I’m sure you would know what the application is.
Would be glad to email a pic…
THANKS!
It looks like I had a pair of the HT-213 generic crimpers mentioned by @dzeez. I’m new to crimping, but the crimp looks really nice. However, the 28 AWG wire is not held by the wire crimp nor the insulation crimp.
Pictures: https://imgur.com/a/BmhMxNY
The problem might partially be due to the size of my wire. The wire gauge is 28 AWG but the OD is only 0.6mm. However, I would have still expected it to the crimp the wire portion correctly but even that was very loose.
When I crimped 24 AWG it looked nice (but 24 AWG is a bit large for Mini-PV/Dupont so the wire bulged out the sides a bit).
I find myself today working with some TE NanoMQS connectors, which are downright pathological in their crimp dimension tolerances. The official crimper is $800 so that’s out of the question.
My trusty 63811-1000 doesn’t even rank. Its narrowest nest is 1.4mm and that’s simply too wide for the cavity, the terminals won’t even start to insert.
What’s working best for me right now is crimping the wire-grip with the 1.3mm nest of a PA-13, then gently hitting the insulation-grip with the A nest of an AMP Service Tool I, then returning to the PA-13 to gently narrow the insulation-grip in the 1.3mm nest. (Crimping it directly in the PA-13 bananas it badly.)
The root problem here is that the PA-13 has the right X and Y dimensions of its crimp cavities, but the Z thickness is way too thin. The other automotive-style crimpers have the right Z dimension, but they don’t go nearly small enough in X and Y.
Does ANYONE make a generic Service Tool type crimper with narrow nests, say 0.8, 0.9, 1.0, 1.1, 1.2, 1.3mm, but a nice thick (say, 3.5mm) jaw? The Engineers are all thinned to 1.0 or 1.5mm in the nests I care about, and that makes banana crimps every time.
Really enjoy this page. Perhaps the best go-to-place I’ve found on the internet! I was wondering what crimping tools you’d recommend for the milli-grid connector terminals (besides the original £1000 options out there)? I’m new to this and I’ve spent weeks trying to figure out what to choose. I’ve tried on forums, specialized shops, you name it – none could answer my question. I’ve been looking at Engineer PA-09 and PAD-11. Any suggestion which tool(s) would be a good option – or is there another third option I’ve missed?
Hi Matt,
I have tried to email you a couple of times, but haven’t heard back. I have found that tools intended for Multimate III do very well on the generic dupont pins, and also do pretty well on Molex KK.
1. CDM Jevons 769.116-00 http://www.jevons.on.ca/pdf/V35/crimp-tools-datasheet.pdf (a nice SAHT made by Wezag, based on the design, $362 shipped)
2. AMP/TE 9607 tool with 58495 die (found on eBay for as cheap as $50 if you wait) — see https://www.te.com/usa-en/product-58495-1.html document ENG_SS_408-9819_D.pdf
I personally like the CDM, as it’s much lighter and the positioner is a little more forgiving of strip length (you line up the positioner with the end of the insulation, but on the AMP you line it up with the tip of the wire, if that makes sense — see page 3 of the pdf). They produce equal quality crimps.
Those both look pretty rare or expensive. I myself certainly don’t mind sourcing tools like that however the majority of people reading this are usually looking for something cheaper / more common. The bounty is for a cheap Chinese tool. Still have not been made aware of one!