Cognitoを使ってブラウザアプリからAWS IoTへのPub/Sub権限を制御する


はじめに
サーバーレス開発部@大阪の岩田です。 前回のブログでAWS IoTのカスタムオーソライザーを用いた、ブラウザアプリの権限管理に挑戦して撃沈しました。
今回はベタにCognitoと連携した権限管理に挑戦したいと思います。
やりたい事
今回の目標は下記のようなシナリオを実現する事です。
- Cognitoを利用してブラウザアプリにログインする
- ブラウザアプリにログインしている場合、対象ユーザーが所有するデバイスに関連するトピックにPublish・Subscribeできるようにする
- ブラウザアプリにログインしていない場合や、対象ユーザーが所有するデバイスに関連しないトピックへのPublish・Subscribeは拒否する

必要な設定
今回のシナリオを実現するに当たって、下記の設定が必要になります。
- Cognito認証済みロールにAWS IoTの操作を許可するポリシーをアタッチ
- CognitoアイデンティティIDに対して、AWS IoTの適切なポリシーをアタッチ
- AWS IoTのモノにCognitoアイデンティティIDをアタッチ
それでは、1つづつ順を追って環境を構築していきます!!
必要なAWSリソースの作成
まず下記のCFnテンプレートから必要なAWSリソースを作成します。
1 2 3 4 5 6 7 8 9 10 11 12 13 14 15 16 17 18 19 20 21 22 23 24 25 26 27 28 29 30 31 32 33 34 35 36 37 38 39 40 41 42 43 44 45 46 47 48 49 50 51 52 53 54 55 56 57 58 59 60 61 62 63 64 65 66 67 68 69 70 71 72 73 74 75 76 77 78 79 80 81 82 83 84 85 86 87 88 89 90 91 92 93 94 95 96 97 98 99 100 101 102 103 104 105 106 107 108 109 110 111 112 113 114 115 116 117 118 119 120 121 122 123 124 125 126 127 128 129 130 131 132 133 134 135 136 137 138 139 140 141 142 143 | AWSTemplateFormatVersion: '2010-09-09'Description: Create Cognito User PoolResources: CognitoUserPoolMyUserPool: Type: "AWS::Cognito::UserPool" Properties: AdminCreateUserConfig: AllowAdminCreateUserOnly: false UnusedAccountValidityDays: 7 AutoVerifiedAttributes: - email Policies: PasswordPolicy: MinimumLength: 8 RequireLowercase: false RequireNumbers: true RequireSymbols: false RequireUppercase: false Schema: - AttributeDataType: "String" DeveloperOnlyAttribute: false Mutable: true Name: "email" StringAttributeConstraints: MaxLength: "2048" MinLength: "0" Required: true - AttributeDataType: "String" DeveloperOnlyAttribute: false Mutable: true UserPoolClient: Type: AWS::Cognito::UserPoolClient Properties: ClientName: Fn::Join: - "" - - Ref: AWS::StackName - UserPoolClient GenerateSecret: false RefreshTokenValidity: 7 UserPoolId: Ref: CognitoUserPoolMyUserPool MyIdentifyPool: Type: "AWS::Cognito::IdentityPool" Properties: IdentityPoolName: "MyIdentifyPool" AllowUnauthenticatedIdentities: true CognitoIdentityProviders: - ClientId: Ref: UserPoolClient ProviderName: Fn::Join: - "" - - "cognito-idp." - Ref: "AWS::Region" - ".amazonaws.com/" - Ref: CognitoUserPoolMyUserPool ServerSideTokenCheck: false CognitoUnAuthRole: Type: AWS::IAM::Role Properties: AssumeRolePolicyDocument: Version: "2012-10-17" Statement: - Effect: "Allow" Principal: Federated: - "cognito-identity.amazonaws.com" Action: - "sts:AssumeRoleWithWebIdentity" Condition: StringEquals: "cognito-identity.amazonaws.com:aud": !Ref MyIdentifyPool ForAnyValue:StringLike: "cognito-identity.amazonaws.com:amr": "unauthenticated" CognitoAuthRole: Type: AWS::IAM::Role Properties: ManagedPolicyArns: - "arn:aws:iam::aws:policy/AWSIoTFullAccess" AssumeRolePolicyDocument: Version: "2012-10-17" Statement: - Effect: "Allow" Principal: Federated: - "cognito-identity.amazonaws.com" Action: - "sts:AssumeRoleWithWebIdentity" Condition: StringEquals: "cognito-identity.amazonaws.com:aud": !Ref MyIdentifyPool ForAnyValue:StringLike: "cognito-identity.amazonaws.com:amr": authenticated CognitoRoleMapping: Type: AWS::Cognito::IdentityPoolRoleAttachment Properties: IdentityPoolId: !Ref MyIdentifyPool Roles: authenticated: !GetAtt CognitoAuthRole.Arn unauthenticated: !GetAtt CognitoUnAuthRole.Arn IoTPolicy: Type: AWS::IoT::Policy Properties: PolicyDocument: Version: "2012-10-17" Statement: - Effect: "Allow" Action: - "iot:*" Resource: - "*" IoTThing1: Type: AWS::IoT::Thing Properties: AttributePayload: Attributes: myAttributeA: "MyAttributeValueA" myAttributeB: "MyAttributeValueB" myAttributeC: "MyAttributeValueC" Outputs: UserPoolId: Description: "User Poll ID" Value: Ref: CognitoUserPoolMyUserPool UserPoolClient: Description: "User Pool Client ID" Value: Ref: UserPoolClient MyIdentifyPool: Description: "Identify Pool ID" Value: Ref: MyIdentifyPool IoTPolicy: Description: "AWS IoT Policy" Value: Ref: IoTPolicy IoTThing1: Description: "AWS IoT Thing1" Value: Ref: IoTThing1 |
必要なCognitoユーザープール、 フェデレーティッドアイデンティティ、AWS IoTのモノやポリシーが作成されます。
ポイントとして
1 2 3 4 5 | CognitoAuthRole: Type: AWS::IAM::Role Properties: ManagedPolicyArns: - "arn:aws:iam::aws:policy/AWSIoTFullAccess" |
の部分で、Cognito認証済みロールに対してAWS IoTへのフルアクセス権を付与しています。
動作確認用Reactアプリの作成
動作確認にはReactとAWS Amplifyを使って作成した簡易なアプリを使います。 AWS IoTでCognito認証を使う場合はHTTPリクエストにSigv4の署名を付ける必要があるのですが、AWS Amplifyを使えば勝手にやってくれるのでラクチンです。
バージョン等
検証に用いた環境の各種バージョンは下記の通りです。
- Node.js:v8.10.0
- aws-amplify:1.0.11
- aws-amplify-react:2.0.1
- react:16.5.0
- react-dom:16.5.0
- react-scripts:1.1.5
Reactアプリの作成
まずcreate-react-appでアプリのひな形を作成し、npm install --save aws-amplify aws-amplify-reactで追加のライブラリを導入します。
ライブラリが導入できたら、App.jsを下記のように修正します。 ハイライト箇所はCloudFormationの出力を参考に、自分の環境に合わせて修正して下さい。
1 2 3 4 5 6 7 8 9 10 11 12 13 14 15 16 17 18 19 20 21 22 23 24 25 26 27 28 29 30 31 32 33 34 35 36 37 38 39 40 41 42 43 44 45 46 47 48 49 50 51 52 53 54 55 56 57 58 59 60 61 62 63 64 65 66 67 68 69 70 71 72 73 74 75 76 77 78 79 80 81 82 83 84 85 86 87 88 89 90 91 92 93 94 95 | import React, { Component } from 'react';import './App.css';import { withAuthenticator } from 'aws-amplify-react';import Amplify, { PubSub } from 'aws-amplify';import { AWSIoTProvider } from '@aws-amplify/pubsub';Amplify.configure({ Auth: { identityPoolId: 'us-east-1:xxxxxxxxxx', region: 'us-east-1', userPoolId: 'us-east-1_xxxxxxxxxx', userPoolWebClientId: 'xxxxxxxxxx', }});Amplify.addPluggable(new AWSIoTProvider({ aws_pubsub_region: 'us-east-1', clientId: 'xxxxxxxxxxxxxxxxxxxx' //AWS IoTに作成したモノの名前}))class App extends Component { constructor(props) { super(props); this.state = { messages: [], topic: '' } this.handleSubscribe = this.handleSubscribe.bind(this) this.handlePublish = this.handlePublish.bind(this) this.handleChangeTopic = this.handleChangeTopic.bind(this) this.handleReceive = this.handleReceive.bind(this) } render() { return ( <div className="App"> <label>TOPIC: <input type="text" onChange={this.handleChangeTopic}></input> </label><br/> <button onClick={this.handlePublish}>publish</button> <button onClick={this.handleSubscribe}>subscribe</button> <MessageList messages={this.state.messages} /> </div> ) } handlePublish(){ PubSub.publish(this.state.topic, 'pub message from browser!!') } handleSubscribe(topic){ PubSub.subscribe(this.state.topic).subscribe({ next: this.handleReceive, error: error => console.error(error), close: () => console.log('Done'), }) } handleChangeTopic(event) { this.setState({topic: event.target.value}) } handleReceive(msg){ const messages = this.state.messages messages.push(JSON.stringify(msg.value)) this.setState({messages: messages}) }} class MessageList extends React.Component { render() { let id = 1 return ( <ul> {this.props.messages.map(message => { id += 1 return ( <li key={id}> <div> {message} </div> </li> ) })} </ul> ) }} export default withAuthenticator(App) |
動作確認
準備ができたので、実際に動作確認していきます。
npm startでアプリを起動し、サインアップ・サインイン後に、適当なトピックを入力してpublishしてみます。
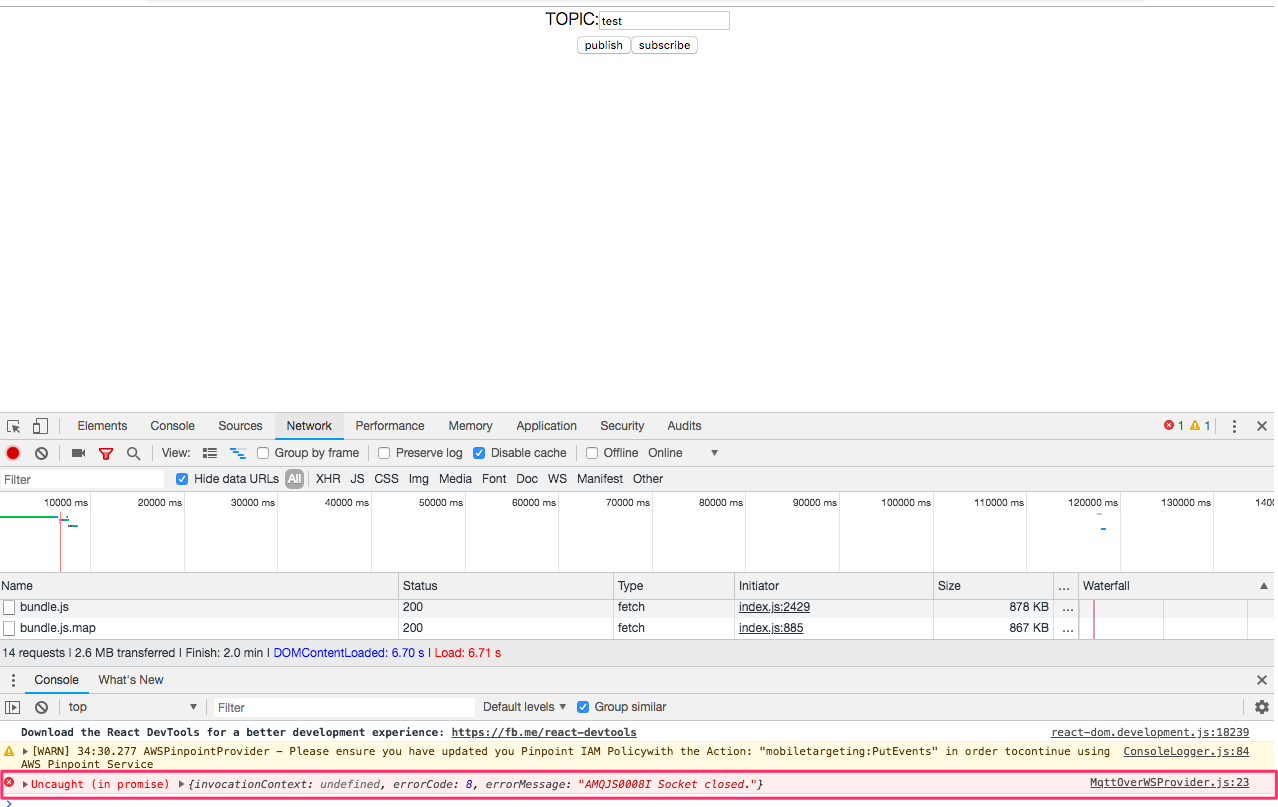
コンソールにエラーメッセージが表示され失敗しました。 Cognito認証済みロールへの権限付与に加えて、サインアップ時に作成されたCognitoアイデンティティIDに対して権限設定が必要なためです。
CognitoアイデンティティIDに対して、AWS IoTの適切なポリシーをアタッチ
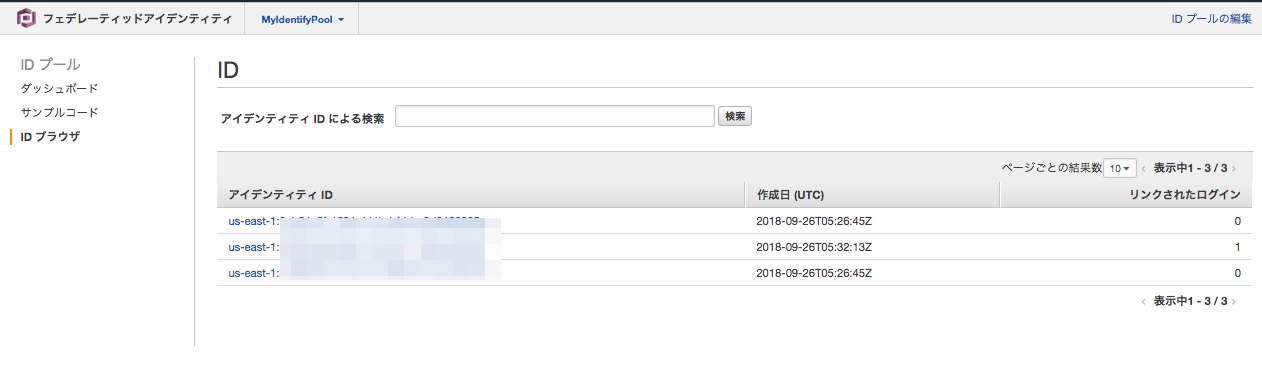
2018年9月現在、マネジメントコンソールからの操作がサポートされていないので、AWS CLIを利用して下記のコマンドでポリシーをアタッチします。
1 | aws iot attach-policy --policy-name <作成したポリシー名> --target <作成されたCognitoアイデンティティID> |
CognitoアイデンティティIDはマネジメントコンソールのIDブラウザ等から確認可能です。
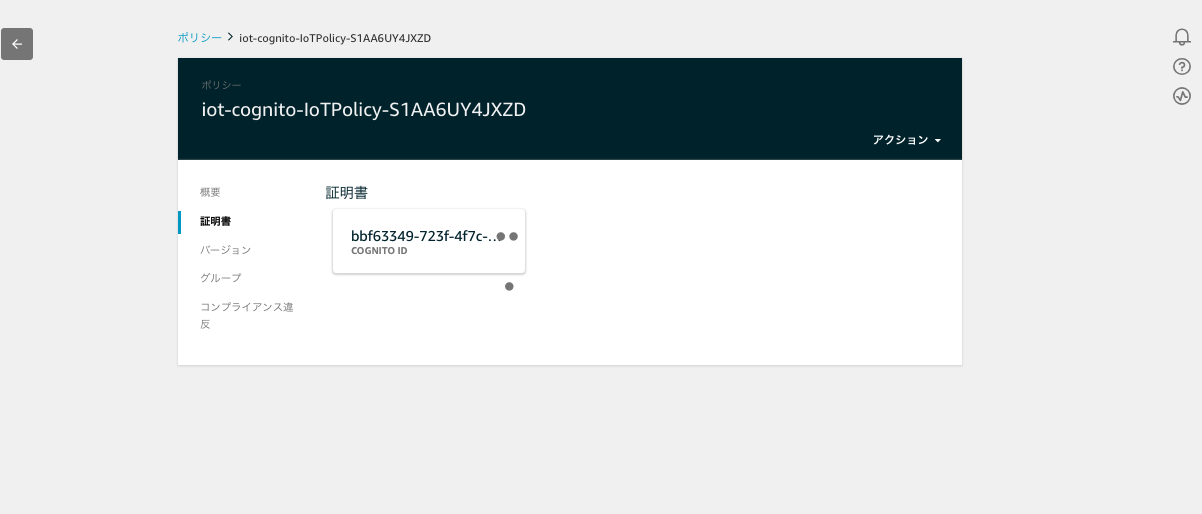
なお、アタッチ作業自体はマネジメントコンソールから行えませんが、CLIからアタッチした後はマネジメントコンソールから参照できるようになります。
ポリシーアタッチ後に改めてブラウザアプリから動作確認します。
成功です!!
Pub・Sub可能なトピックを対象ユーザーが所有するデバイスに関連するトピックに制限
このままだと、何でもかんでもPub・Subできてしまうので、権限を絞っていきます。
作成したAWS IoTのポリシーを下記のように修正します。
1 2 3 4 5 6 7 8 9 10 11 12 13 14 15 16 17 18 19 20 21 22 23 24 25 26 27 28 29 30 31 32 33 34 35 36 37 38 39 40 | { "Version": "2012-10-17", "Statement": [ { "Condition": { "Bool": { "iot:Connection.Thing.IsAttached": [ "true" ] } }, "Action": [ "iot:Connect" ], "Resource": [ "*" ], "Effect": "Allow" }, { "Action": [ "iot:Publish", "iot:Receive" ], "Resource": [ "arn:aws:iot:us-east-1:xxxxxxxxxx:topic/${iot:Connection.Thing.ThingName}/*" ], "Effect": "Allow" }, { "Action": [ "iot:Subscribe" ], "Resource": [ "arn:aws:iot:us-east-1:xxxxxxxxxx:topicfilter/${iot:Connection.Thing.ThingName}/*" ], "Effect": "Allow" } ]} |
ポイントとしてポリシー変数iot:Connection.Thing.IsAttachedとiot:Connection.Thing.ThingNameを使用して制御を行なっています。
それぞれのポリシー変数の説明をAWSのドキュメントから引用します。
iot:Connection.Thing.IsAttached
ポリシーが評価されているモノに、証明書または Amazon Cognito ID がアタッチされている場合は、true に解決されます。
このポリシー変数を使う事で、サインインしていないユーザーの接続を拒否します。
iot:Connection.Thing.ThingName
これは、ポリシーが評価されているモノの名前に解決されます。モノ名は、MQTT/WebSocket 接続のクライアント ID に設定されます。このポリシー変数は、MQTT または MQTT over WebSocket プロトコルに接続するときにのみ使用できます。
モノのポリシー変数
Cognito認証を使ってAWS IoTに接続した場合は、${iot:Connection.Thing.ThingName}の部分がMQTTのクライアントIDに置きかわります。
このポリシー変数を使う事で、<対象ユーザーが所有するモノの名前>/から始まるトピックにのみPub・Subを許可するように制御します。
動作確認
トピック名の指定を<作成したAWS IoTのモノの名前>/に変更し、改めて動作確認してみます。
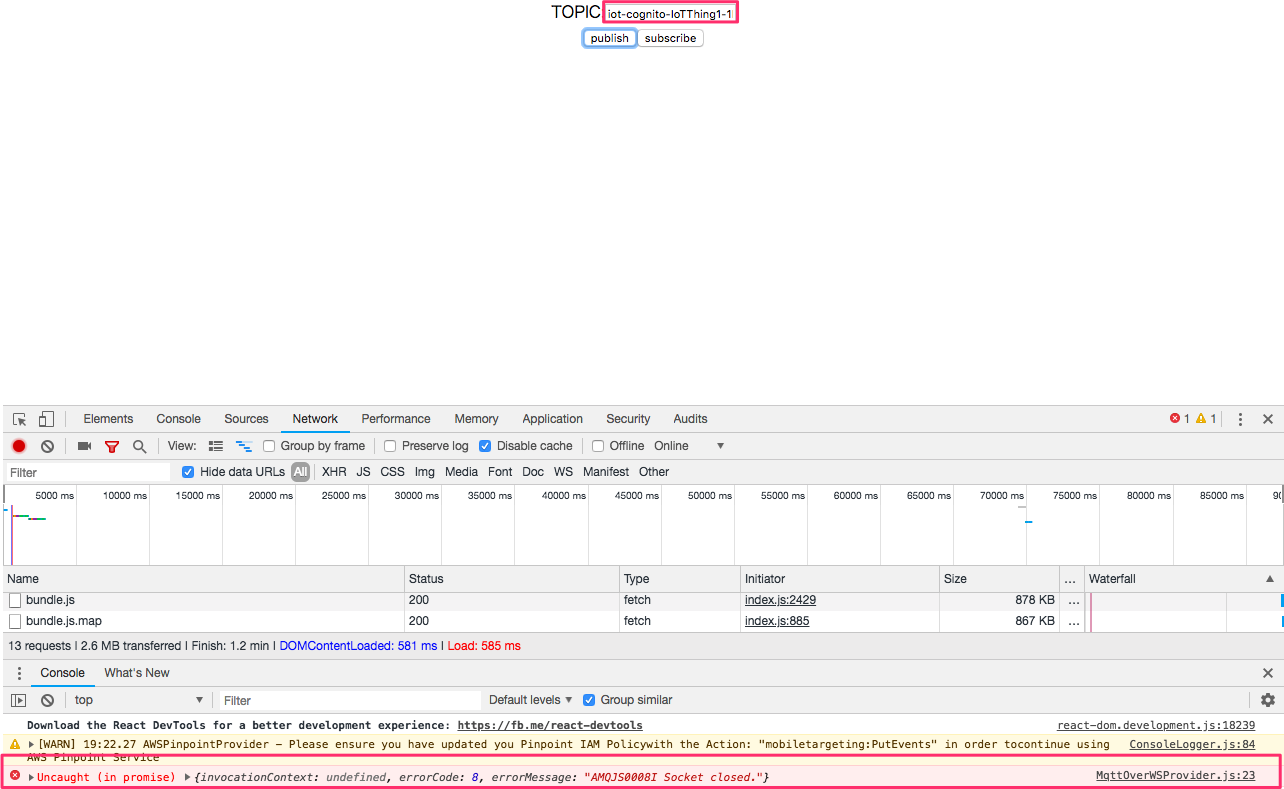
失敗しました。 今度はCognitoアイデンティティIDとAWS IoTのモノを紐付けてやる必要があります。
AWS IoTのモノにCognitoアイデンティティIDをアタッチ
AWS CLIで下記のコマンドでポリシーをアタッチします。
1 | aws iot attach-thing-principal --thing-name <ユーザーに紐付けるモノの名前> --principal <対象ユーザーのCognitoアイデンティティID> |
これでAWS IoTのモノとCognitoアイデンティティIDが紐付きました。

MQTTのクライアントIDはブラウザ側で自由に設定可能な項目ですが、こうやってCognitoアイデンティティIDと紐付けておく事で、セキュリティが担保されます。
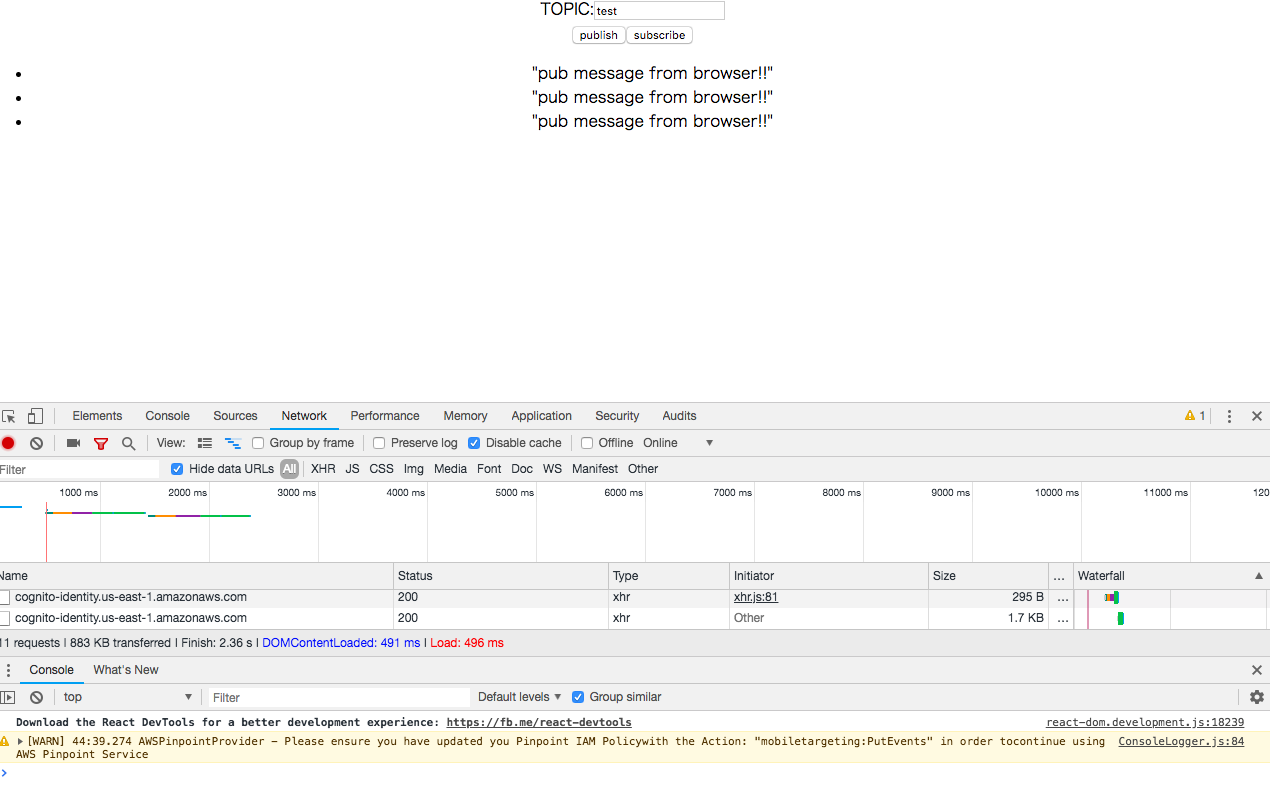
改めて動作確認してみます。
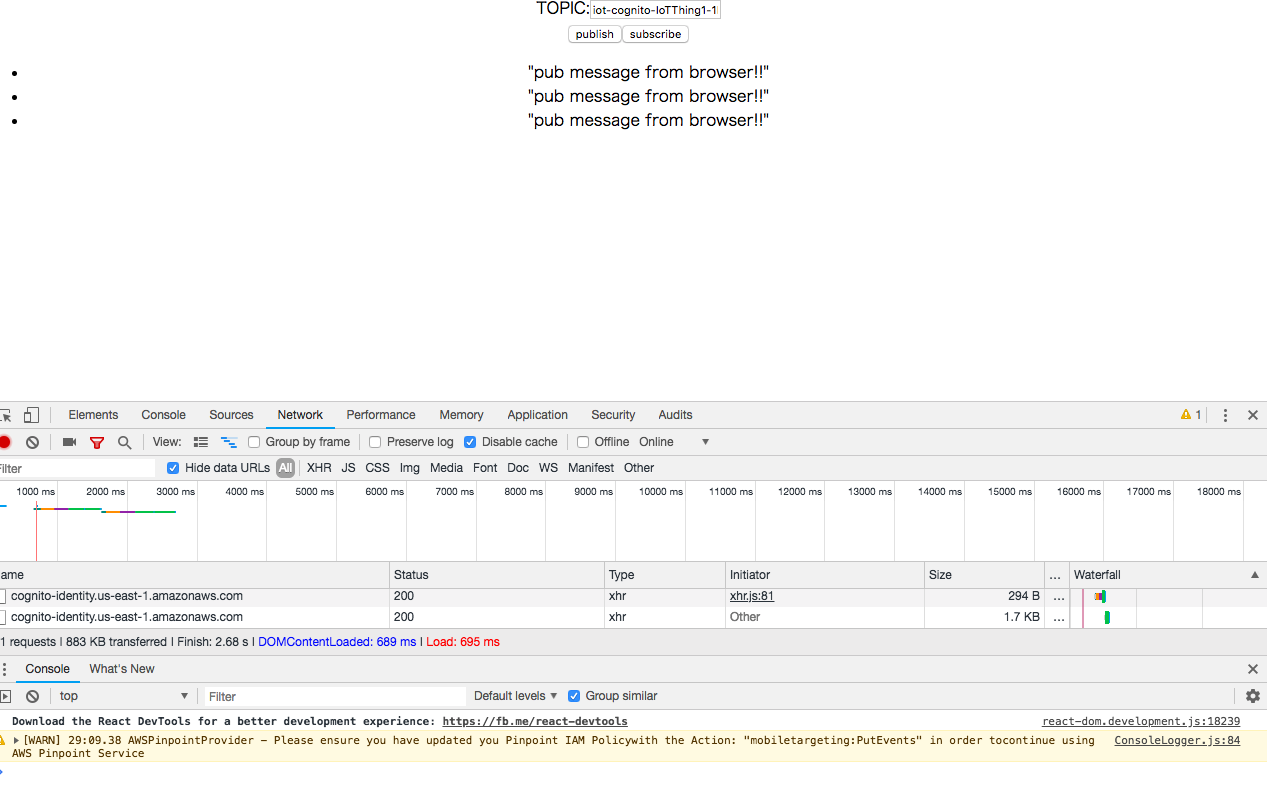
成功です! 念のためマネジメントコンソールの方で同じトピックをSubscribeしつつ、ブラウザからパブリッシュしてみます
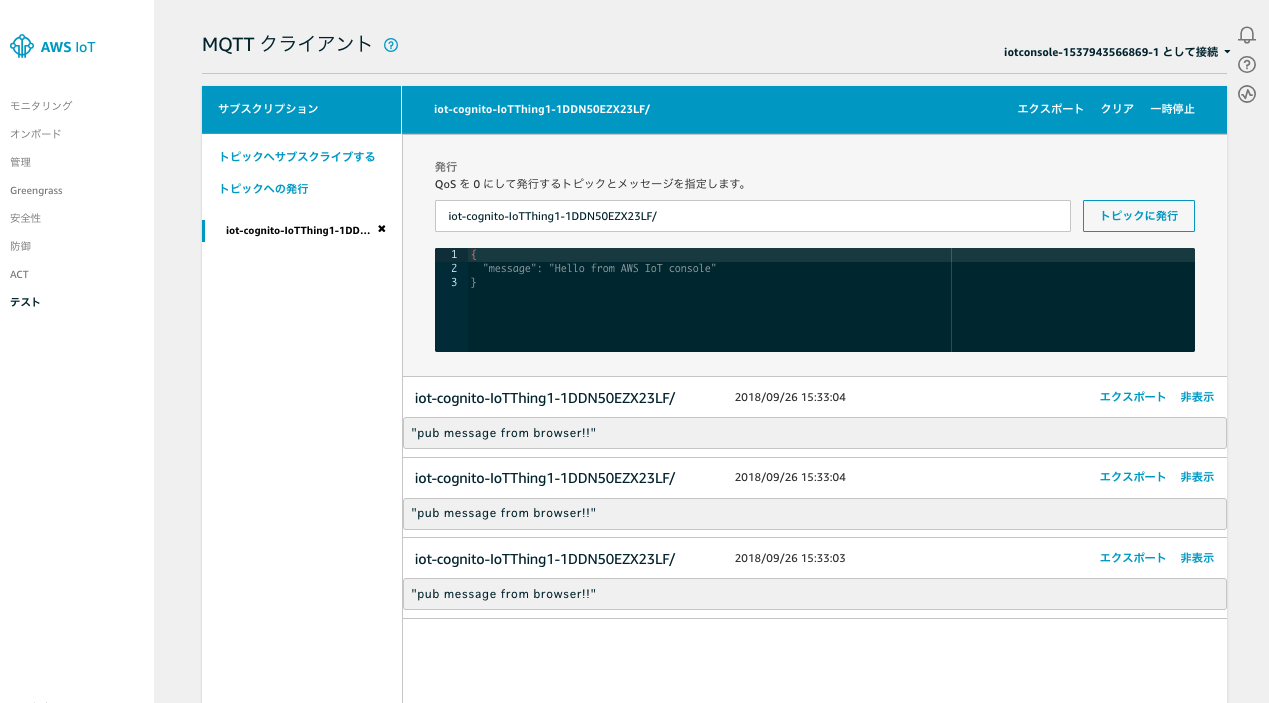
マネジメントコンソール側でもブラウザから正常にPublish出来ている事が確認できます。
最後に、別のユーザーでサインインし直して、同じトピックに対してPub・Subしてみます。
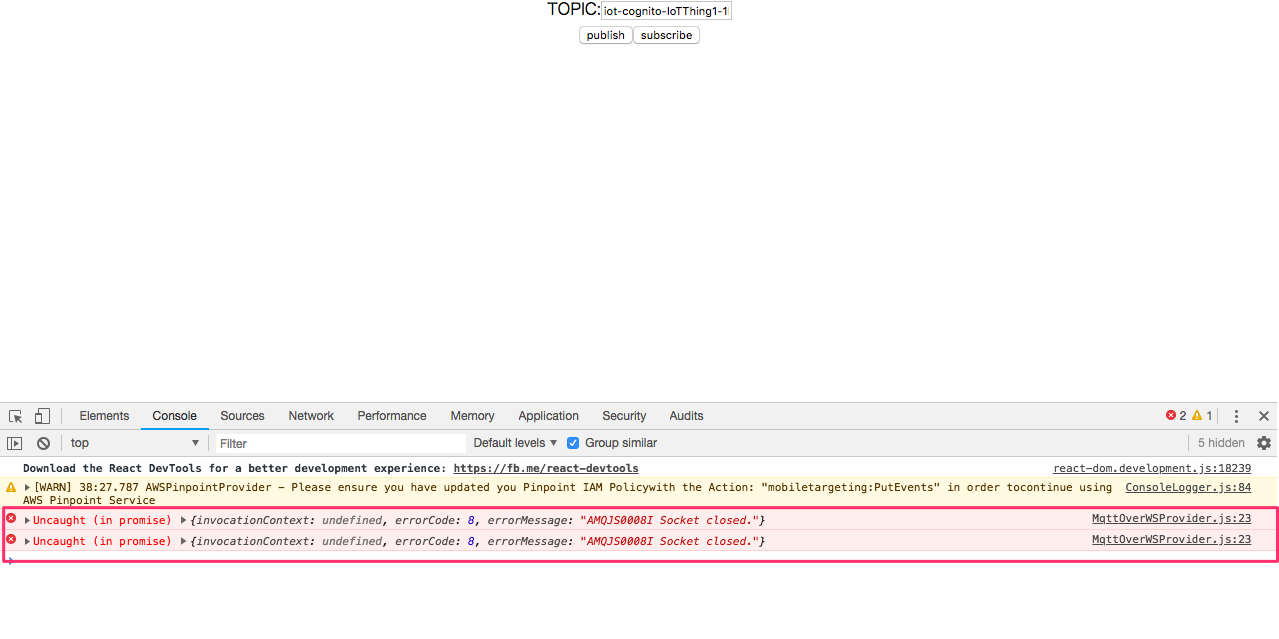
想定通り失敗しました!! これで設定完了です。
まとめ
Cognitoを利用したAWS IoTへの権限管理について調べてみました。
- ポリシーをアタッチすべき箇所が多いことと
- ポリシー変数の挙動を理解していないと思うような権限制御が行えない
というところに苦戦しました。
実案件に利用する際は、CognitoアイデンティティIDに対するAWS IoTのポリシーのアタッチと、AWS IoTのモノに対するCognitoアイデンティティIDのアタッチをどのように実現するか、業務フローの検討や周辺アプリの作り込みが重要になりそうです。
誰かの参考になれば幸いです。