

まえがき
Vue.js によるデスクトップアプリ開発を行う際に便利な
electron-vue というボイラープレートの紹介です。
この記事は、昨年度の Vue.js Advent Calendar 2016 に投稿された
ElectronでVue.jsを始める の2017年度版という位置付けを意識して書いていきます。
(ElectronとVue.jsはどちらも開発スピードが早いことで有名なので、変更点が幾らかあります)
初期設定
electron-vue 日本語ドキュメント を参考に構築していきます。
※事前に node.js のインストールが必要です。
まず vue-cli をインストールし、
vue init でプロジェクトを作成します。
my-project の部分は好きな名前で大丈夫です。
$ npm install -g vue-cli
$ vue init simulatedgreg/electron-vue my-project
以下の設問に回答してプロジェクトの設定をします。
基本的に全てEnterで大丈夫です。
コーディングスタイルの選択に関しては好みで。
プロジェクト作成中ログ
? Application Name (my-project)
? Project description (An electron-vue project)
? Select which Vue plugins to install (Press <space> to select, <a> to toggle all, <i> to inverse selection)
❯◉ axios
 ◉ vue-electron
 ◉ vue-router
 ◉ vuex
? Use linting with ESLint? (Y/n)
? Which eslint config would you like to use? (Use arrow keys)
❯ Standard (https://github.com/feross/standard)
  AirBNB (https://github.com/airbnb/javascript)
  none (configure it yourself)
? Setup unit testing with Karma + Mocha? (Y/n)
? Setup end-to-end testing with Spectron + Mocha? (Y/n)
? What build tool would you like to use? (Use arrow keys)
❯ electron-builder (https://github.com/electron-userland/electron-builder)
  electron-packager (https://github.com/electron-userland/electron-packager)
? author (1ntegrale9 <1ntegrale9@example.com>)
全て回答すると以下のような表示になると思います。
プロジェクト作成後ログ
? Application Name my-project
? Project description An electron-vue project
? Select which Vue plugins to install axios, vue-electron, vue-router, vuex
? Use linting with ESLint? Yes
? Which eslint config would you like to use? Standard
? Setup unit testing with Karma + Mocha? Yes
? Setup end-to-end testing with Spectron + Mocha? Yes
? What build tool would you like to use? builder
? author 1ntegrale9 <1ntegrale9@example.com>

   vue-cli · Generated "my-project".

---

All set. Welcome to your new electron-vue project!

Make sure to check out the documentation for this boilerplate at
https://simulatedgreg.gitbooks.io/electron-vue/content/.

Next Steps:

  $ cd my-project
  $ yarn (or `npm install`)
  $ yarn run dev (or `npm run dev`)
プロジェクトを作成したら、依存関係のライブラリのインストールを行います。
Windowsの場合はもしかしたらここで詰まる可能性がありますが、
その場合は Windows ユーザーのための注意 を読むと良いでしょう。
$ cd my-project
$ npm install
一部のライブラリの変更、署名の有無、実行環境によってWARNが出ますが、
無視をしても問題なく動作します。気になる場合は適宜設定をしてください。
この時点でのプロジェクト構成は以下のようになっています。
プロジェクト構成
my-project
├─ .electron-vue
│  └─ <build/development>.js files
├─ build
│  └─ icons/
├─ dist
│  ├─ electron/
│  └─ web/
├─ node_modules/
├─ src
│  ├─ main
│  │  ├─ index.dev.js
│  │  └─ index.js
│  ├─ renderer
│  │  ├─ components/
│  │  ├─ router/
│  │  ├─ store/
│  │  ├─ App.vue
│  │  └─ main.js
│  └─ index.ejs
├─ static/
├─ test
│  ├─ e2e
│  │  ├─ specs/
│  │  ├─ index.js
│  │  └─ utils.js
│  ├─ unit
│  │  ├─ specs/
│  │  ├─ index.js
│  │  └─ karma.config.js
│  └─ .eslintrc
├─ .babelrc
├─ .eslintignore
├─ .eslintrc.js
├─ .gitignore
├─ package.json
└─ README.md
アプリケーションの起動
ここまで無事に完了したら、npm run dev でアプリケーションを起動します。
electron-vue はメインのコマンドでAAを表示してくれるところが素敵ですね。
起動時ログ
$ npm run dev

> my-project@0.0.0 dev /Users/1ntegrale9/my-project
> node .electron-vue/dev-runner.js


         ___                      __
   __   /\_ \       __     ___   /\ \__    _ __    ___     ___              __  __  __  __     __
 / ,.`\ \//\ \    / ,.`\  /'___\ \ \ ,_\  /\` __\ / __`\ /' _ `\   _______ /\ \/\ \/\ \/\ \  / ,.`\
/\  __/   \_\ \_ /\  __/ /\ \__/  \ \ \/  \ \ \/ /\ \_\ \/\ \/\ \ /\______\\ \ \/ |\ \ \_\ \/\  __/
\ \____\  /\____\\ \____\\ \____\  \ \ \_  \ \_\ \ \____/\ \_\ \_\\/______/ \ \___/ \ \____/\ \____\
 \/____/  \/____/ \/____/ \/____/   \ \__\  \/_/  \/___/  \/_/\/_/           \/__/   \/___/  \/____/
                                     \/__/
  getting ready...

~~~~~~~~~~~~~~~~~~~~~~~~~~~~~~ omit ~~~~~~~~~~~~~~~~~~~~~~~~~~~~~~

┏ Electron -------------------

  Debugger listening on port 5858.
  Warning: This is an experimental feature and could change at any time.
  To start debugging, open the following URL in Chrome:
      chrome-devtools://devtools/bundled/inspector.html?experiments=true&v8only=true&ws=127.0.0.1:5858/dfebf1ea-506b-497e-b9c3-435f8788b931

┗ ----------------------------

┏ Electron -------------------

  2017-12-01 21:39:32.755 Electron Helper[12957:469599] Couldn't set selectedTextBackgroundColor from default ()

┗ ----------------------------
上記表示後はデバッグコンソールとして動作します。
また、以下のような画面でアプリケーションが起動します。
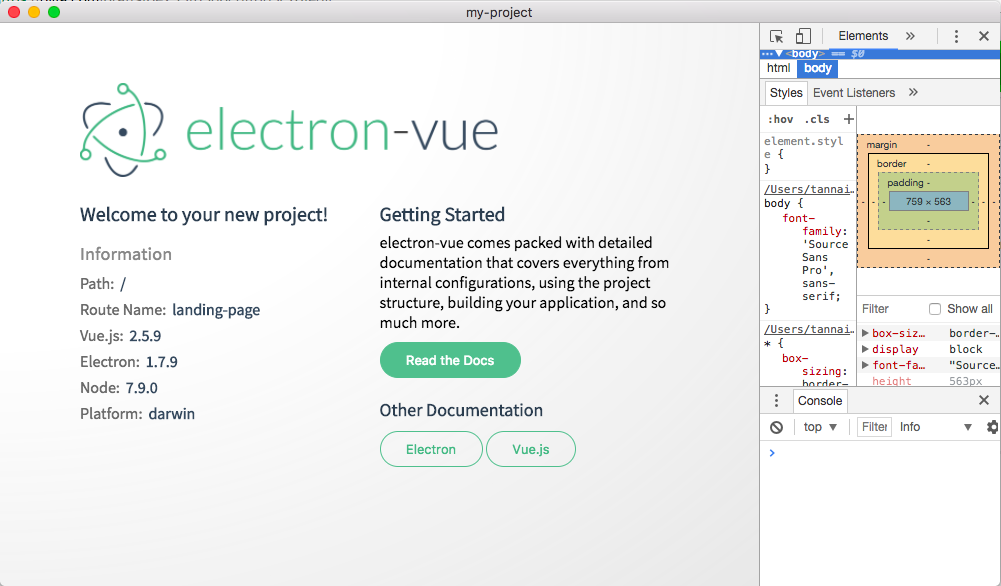
開発モードで起動しているため、初期状態でデベロッパーツールが表示されています。
electron は chromium 上で動作しているため、
GoogleChrome と同様の機能が使えることが特徴です。
開発の進め方
まずはこの時点で git init するのがオススメです。
既に必要な .gitignore は作成されているので安心してください。
electron-vue はSPA(Single Page Application)の構成になっており、
開発は基本的にコンポーネントを追加していく流れになると思います。
具体的には、my-project/src/renderer/App.vue が常にレンダリングされ、
App.vue内の <router-view></router-view> に対して
my-project/src/renderer/router/index.js がコンポーネントの割り当てを行います。
また、my-project/src/renderer/components/ 以下にコンポーネント(.vue)を配置します。
とりあえずコンポーネントを追加して画面遷移を実装してみましょう。
以下の.vueファイルを作成して保存します。
<template>
  <div>
    <router-link to="/">画面遷移成功!</router-link>
  </div>
</template>

<script>
  export default {
    name: 'next-page',
    methods: {
      open (link) {
        this.$electron.shell.openExternal(link)
      }
    }
  }
</script>
次に、コンポーネントをrouterに設定します。
import Vue from 'vue'
import Router from 'vue-router'

Vue.use(Router)

export default new Router({
  routes: [
    {
      path: '/',
      name: 'landing-page',
      component: require('@/components/LandingPage').default
    },

    // 以下を追加
    {
      path: '/next',
      name: 'next-page',
      component: require('@/components/Next').default
    },
    // 以上を追加

    {
      path: '*',
      redirect: '/'
    }
  ]
})
そして LandingPage にリンクを追加します。
<template>
  <div id="wrapper">
    <img id="logo" src="~@/assets/logo.png" alt="electron-vue">
    <main>
      <div class="left-side">
        <span class="title">
          Welcome to your new project!
        </span>
        <system-information></system-information>

        // 以下の行を追加
        <router-link to="/next">画面遷移します</router-link>

...
LandingPage を確認すると、以下のように左下にリンクが追加されている状態となり、

リンクをクリックすると以下の画面に遷移します。
左上に表示されているリンクをクリックすると元の画面に戻ります。
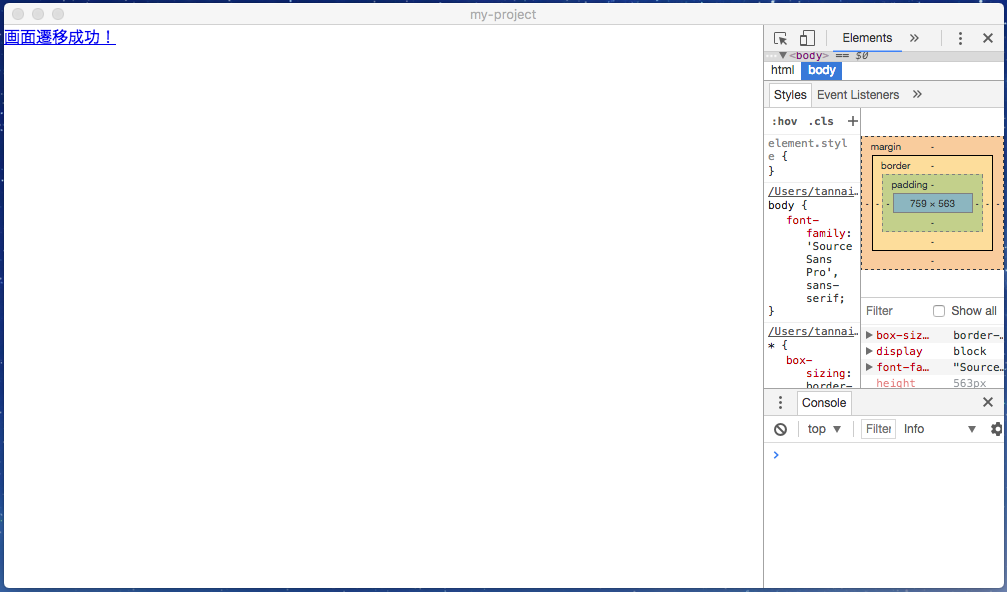
見た目がショボいのは App.Vue と Next.Vue ともにCSSを設定していないためです。
他の記事を見ると同様の記述でもリッチな表示になっているため、仕様が変わったようです。
また、ファイルを追加する度に再度レンダリングが行われるため、
アプリを起動し直す必要はありません。
途中で , を記述し忘れる等のエンバグが発生すると、
アプリケーション画面にエラーメッセージが表示されます。
デバッグコンソールにも同様に表示されています。

アプリケーションのテスト
electron-vue ではプロジェクトを作成した段階で
ユニットテストとエンドツーエンドテストを行う準備が整っています。
それぞれ npm run unit と npm run e2e で実行が可能ですが、
npm run test にてまとめて実行することが可能です。
テスト実行ログ
$ npm run test

> my-project@0.0.0 test /Users/1ntegrale9/my-project
> npm run unit && npm run e2e


> my-project@0.0.0 unit /Users/1ntegrale9/my-project
> karma start test/unit/karma.conf.js

~~~~~~~~~~~~~~~~~~~~~~~~~~~~~~ omit ~~~~~~~~~~~~~~~~~~~~~~~~~~~~~~

  LandingPage.vue
    ✓ should render correct contents

Electron 1.7.9 (Node 7.9.0): Executed 1 of 1 SUCCESS (0.049 secs / 0.026 secs)
TOTAL: 1 SUCCESS


=============================== Coverage summary ===============================
Statements   : 70.59% ( 12/17 )
Branches     : 100% ( 2/2 )
Functions    : 100% ( 1/1 )
Lines        : 68.75% ( 11/16 )
================================================================================

~~~~~~~~~~~~~~~~~~~~~~~~~~~~~~ omit ~~~~~~~~~~~~~~~~~~~~~~~~~~~~~~
ユニットテストではカバレッジも出してくれるのが嬉しいです。
アプリケーションのビルド
npm run build 一発で my-project/build/以下に
(macであれば) .dmg と .zip を生成してくれます。
ビルド実行ログ
$ npm run build

> my-project@0.0.0 build /Users/1ntegrale9/my-project
> node .electron-vue/build.js && electron-builder


 ___              __                        __                       ___       __
/\_ \       __   /\ \__     ____           /\ \       __  __   __   /\_ \     /\ \
\//\ \    / ,.`\ \ \ ,_\   / ,__\  _______ \ \ \____ /\ \/\ \ /\_\  \//\ \    \_\ \
  \_\ \_ /\  __/  \ \ \/  /\__, `\/\______\ \ \  ,. \\ \ \_\ \\/\ \   \_\ \_ /\ ,. \
  /\____\\ \____\  \ \ \_ \/\____/\/______/  \ \____/ \ \____/ \ \ \  /\____\\ \____\
  \/____/ \/____/   \ \__\ \/___/             \/___/   \/___/   \/_/  \/____/ \/___ /
                     \/__/

  ✔ building main process
  ✔ building renderer process

~~~~~~~~~~~~~~~~~~~~~~~~~~~~~~ omit ~~~~~~~~~~~~~~~~~~~~~~~~~~~~~~

 OKAY  take it away `electron-builder`

electron-builder 19.47.1
No native production dependencies
Packaging for darwin x64 using electron 1.7.9 to build/mac
Signing app (identity: XXXXXXXXXXXXXXXXXXXXXXXXXXXXXXXXXXXXXXXX Developer ID Application: 1ntegrale9 (XXXXXXXXXX))
Building macOS zip
Building DMG
Elementの導入
Element - A Desktop UI Toolkit for Web
Elementは、BootstrapのようなVueベースのUIコンポーネントライブラリです。
electron-vueでも簡単に使うことができます。
$ npm i element-ui -S
でインストールし、src/renderer/main.jsに
import ElementUI from 'element-ui'
import 'element-ui/lib/theme-chalk/index.css'

Vue.use(ElementUI)
を追加します。CDNも使用できますが、
デスクトップアプリケーションなのでオフラインでも使えるのが吉です。
まとめ
Vue.js による開発では環境構築が往々にして面倒になりがちですが、
electron-vue では初期設定を飛ばしてアプリ開発に着手できてしまうのが魅力です。
また、デバッグやテストツール、今回は紹介しませんでしたがCIも利用できる準備が整っており、
Web開発の初心者がステップアップするための教材としても優れていると思います。
参考ドキュメント
本稿ではあまり Vue.js に関する解説を行いませんでしたが、
幸い vue 関連のドキュメントはとても充実しているので、これらを参考にするとよいでしょう。
Vue.js 日本語ドキュメント
Vuex 日本語ドキュメント
vue-router 日本語ドキュメント
electronに関しては、根気よく 公式のドキュメント を読む必要があります。
