ヘッドレスChromeの自動化ツール「Chromeless」を使って自動テストを実施する #serverless #adventcalendar


ヘッドレスChromeでシンプルに自動テストを行う
Google Chromeのバージョン59から標準搭載された、ヘッドレスモード(GUIがないモード)。コマンドラインからヘッドレスブラウザを立ち上げることができ、スクリーンショットの撮影を行ったりDOMを出力したりすることができます。自動化の可能性に満ち溢れた機能です。
ヘッドレスChromeの導入については、次の公式ドキュメントが詳しいです。
ドキュメントを読んでいただくと分かると思いますが、様々なことが可能なため指示の記述が少し冗長な面があります。
そこでヘッドレスChromeを用いた自動化処理をシンプルにすることに特化した便利ツール「Chromeless」を紹介します。
検証環境
- Node.js v8.7.0
- yarn 1.3.2
- chromeless 1.4.0
デモ
動作デモ(Playground)を、ブラウザから試すことができます。まずは試してみるとどんな感じか分かると思います。

環境構築
ChromelessはNode.jsで動作します。ですので、Node.jsアプリケーションと同様の環境構築を行います。
適当なディレクトリを作成し yarn init を実行します。
1 | $ yarn init |
あとは chromeless をインストールします。
1 | $ yarn add chromeless |
試しにChromelessを動かしてみましょう。サンプル通り次のようなファイルを作成します。
1 2 3 4 5 6 7 8 9 10 11 12 13 14 15 16 17 18 | const { Chromeless } = require('chromeless')async function run() { const chromeless = new Chromeless() const screenshot = await chromeless .type('chromeless', 'input[name="q"]') .press(13) .wait('#resultStats') .screenshot() console.log(screenshot) // prints local file path or S3 url await chromeless.end()}run().catch(console.error.bind(console)) |
次のコマンドで実行します。
1 | $ node example.js |
スクリーンショットが作成されています。簡単!

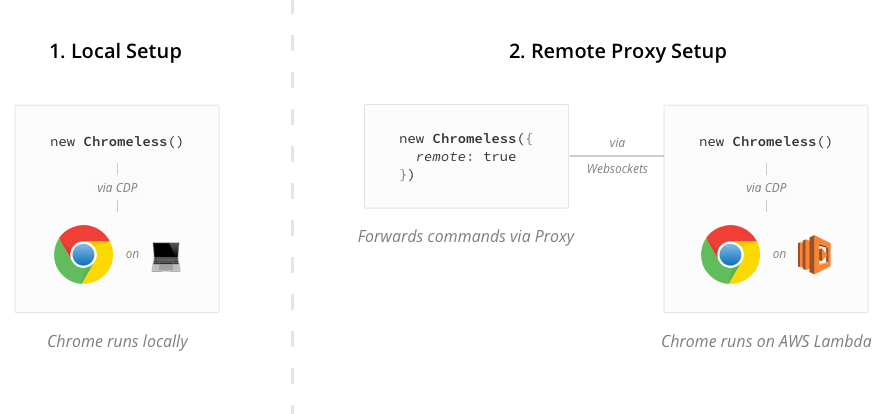
ローカルでテストを実行する
まず、テストに必要なテスティングフレームワークとして mocha と chai を使います。
1 | $ yarn add mocha chai |
package.json には mocha のテスト実行用に scripts を書き足します。次のようになります。
1 2 3 4 5 6 7 8 9 10 11 12 13 | { "name": "chromeless", "version": "1.0.0", "private": true, "dependencies": { "chai": "^4.1.2", "chromeless": "^1.4.0", "mocha": "^4.0.1" }, "scripts": { "test": "mocha" }} |
次のファイルを作成します。本ブログ「Developers.IO」で「Lambda」の記事の検索結果が1,000件以上であることをテストします。
1 2 3 4 5 6 7 8 9 10 11 12 13 14 15 16 17 18 19 20 21 22 23 24 25 | const { Chromeless } = require('chromeless')const { expect } = require('chai')describe('「Lambda」で検索したとき', function () { it('検索結果が1,000件以上になる', async function () { this.timeout(10000) const chromeless = new Chromeless() await chromeless .click('.dm_anchor') .type('Lambda', 'input[id="searchKeywordInput"]') .click('#searchKeywordInputButton') .wait('#pageSubject') const result = await chromeless.evaluate(() => { return document.getElementsByClassName('page_count')[0].innerText }) const count = result.replace('検索結果:', '') expect(Number(count)).to.be.gt(1000) await chromeless.end() })}) |
次のようにテストを実行します。
1 2 3 4 5 6 7 8 9 10 11 12 | $ yarn testyarn run v1.3.2mocha 「Lambda」で検索したとき ✓ 検索結果が1,000件以上になる (3234ms) 1 passing (3s)Done in 3.74s. |
成功!Developers.IOにはLambdaの記事が1,000件以上あります。
AWS Lambdaを使ってテストを実行する
Chromelessの面白い機能としてAWS Lambdaを使って実行環境を並列化させるというものがあります。
試してみましょう!
まずLambdaが動作する環境を用意します。先ほどのテスト用のプロジェクトとは全く別のディレクトリで構いません。
GitHubリポジトリをcloneします。使用するのは serverless ディレクトリです。このディレクトリ内はServerless Frameworkプロジェクトになっています。ディレクトリに移動し、必要なライブラリをインストールしておきます。
1 2 3 | $ git clone git@github.com:graphcool/chromeless.git$ cd serverless$ yarn |
AWS IoTも活用している関係で、環境変数として AWS_IOT_HOST を設定しておく必要があります。次のコマンドで設定します。
1 | $ export AWS_IOT_HOST=$(aws iot describe-endpoint --output text) |
yarn run deploy で、デプロイします。
1 2 3 4 5 6 7 8 9 10 11 12 13 14 15 16 17 18 19 20 21 22 23 24 25 26 27 28 29 | $ yarn run deployyarn run v1.3.2serverless deployServerless: Compiling with Typescript...Serverless: Using local tsconfig.jsonServerless: Injecting Headless Chrome...Serverless: Packaging service...Serverless: Excluding development dependencies...(省略)..........................................................................................Serverless: Stack update finished...Service Informationservice: chromeless-serverlessstage: devregion: eu-west-1api keys: dev-chromeless-session-key: xxxxxxxxxxxxxxxxxxxxxxxxxxxxxxxxxxxxxxxxendpoints: GET - https://xxxxxxxxxx.execute-api.eu-west-1.amazonaws.com/dev/version OPTIONS - https://xxxxxxxxxx.execute-api.eu-west-1.amazonaws.com/dev/ GET - https://xxxxxxxxxx.execute-api.eu-west-1.amazonaws.com/dev/functions: run: chromeless-serverless-dev-run version: chromeless-serverless-dev-version session: chromeless-serverless-dev-session disconnect: chromeless-serverless-dev-disconnectDone in 231.92s. |
これで実行環境の準備は完了です。
上記のエンドポイントを、先ほどのテストプロジェクト内に設定します。
まず環境変数を設定します。
1 2 | $ export CHROMELESS_ENDPOINT_URL=https://XXXXXXXXXX.execute-api.eu-west-1.amazonaws.com/dev$ export CHROMELESS_ENDPOINT_API_KEY=your-api-key-here |
次に test/test.js のChromelessの設定に追加します(ちなみにJS内で直接エンドポイントを指定する方法もあります。お好みで)。また、Lambda Functionの起動時間やレイテンシなども考慮しタイムアウトをローカル時よりも長めに設定します。
1 2 3 4 5 6 7 8 9 10 11 12 13 14 15 16 17 18 19 20 21 22 23 24 25 | const { Chromeless } = require('chromeless')const { expect } = require('chai')describe('「Lambda」で検索したとき', function () { it('検索結果が1,000件以上になる', async function () { this.timeout(60000) const chromeless = new Chromeless({ remote: true }) await chromeless .click('.dm_anchor') .type('Lambda', 'input[id="searchKeywordInput"]') .click('#searchKeywordInputButton') .wait('#pageSubject') const result = await chromeless.evaluate(() => { return document.getElementsByClassName('page_count')[0].innerText }) const count = result.replace('検索結果:', '') expect(Number(count)).to.be.gt(1000) await chromeless.end() })}) |
あとは先ほどと同じようにテストを実行するだけです。
1 | $ yarn test |
Lambdaを使う場合も簡単にできますね!
自動化の夢が広がる!
ChromelessはヘッドレスChromeの操作をよりシンプルにしてくれます。自動化が捗りますね!
明日はサーバーレスアドベントカレンダーのトリです!お楽しみに。
参考
本記事を執筆するにあたって、下記の記事を参考にしました。
