エイチームライフスタイルアドベントカレンダー2017、9日目は株式会社エイチームライフスタイルのデザイナー @chika_1127 が担当します。
今回はCSSアニメーションについてのご紹介です。
本記事についての注意書き
- 今回の記事はCSSアニメーションの基本的な書き方を知っている方向けです
基本的なプロパティや使い方などは省略します - 基礎的な記述について知りたい方は下記のページがオススメです
CSSアニメーション 入門
CSSアニメーションの使いどころが分からない問題
ところでみなさん、CSSアニメーションをどういう場面で使っていますか?
特設サイトやLPで使うもの、といったイメージがありませんか?
世の中にはこれもCSSアニメーションなの!? と驚くような複雑なCSSアニメーションなどもありますが、
そればかりがCSSアニメーションではありません。
プロモーションサイトのようなギミックの多いサイトで使われているアニメーションも素敵ですが、
もちろん企業サイトなどのwebサイト制作にもCSSアニメーションは効果的です。
今回はサイトにさりげなく取り入れて、リッチなページにするポイントと実装例をご紹介します!
CSSアニメーションはどこに設定するもの?
人は要素が動くことで、要素に対する意識が高まります。
hoverをしても何も変化のないボタンより、hoverで少し凹むボタンの方がよりユーザーの興味を引きます。
さらに凹むだけではなくボタンの色がわかる、グラデーションがかかる、カードひっくり返ったような動作をする
これらの動きを連続した表現になるようにすることで、ユーザーにより強い意識を向けることができます。
しかしアニメーションが頻発していると、ページのあちこちに意識が分散してしまい、
本来見てほしいポイントに目を向けてもらえません。
アニメーションをその時々の目的にあった場所に限定することで、
初めてアニメーションの目的を達成することができます。
「ユーザが使いやすいページになっているか」を意識しながら、
どういったアニメーションをどこに適用するのが効果的か、検討してみてください。
CSSアニメーションの種類
どんなサイトでも取り入れやすいアニメーション例としてまとめました。
- テキスト
- ボタン
- フォーム
- 画像コンテンツ
Text
実行結果はこちらをご覧ください。
デモを見る/EX_text by chika_1127 @CodePen
<ul class="list-box1">
    <li>chrome</li>
    <li>Firefox</li>
    <li>Opera</li>
</ul>
<ul class="list-box2">
    <li>Mac OS</li>
    <li>Windows</li>
    <li>Linux</li>
</ul>
<ul class="list-box3">
    <li><span data-hover="html">HTML</span></li>
    <li><span data-hover="css">CSS</span></li>
    <li><span data-hover="javascript">JAVASCRIPT</span></li>
</ul>
.list-box1,
.list-box2,
.list-box3 {
  display: flex;
  justify-content: center;
  margin: 30px 0;
  li {
    position: relative;
    margin: 0 20px;
    padding: 15px;
    font-size: 130%;
    list-style: none;
  }
}

.list-box2 {
  margin-bottom: 50px;
}

.list-box1 li {
  &::before,
  &::after {
    display: inline-block;
    opacity: 0;
    transition: transform 0.3s, opacity 0.2s;
  }
  &::before {
    margin-right: 10px;
    content: '[';
    transform: translateX(20px);
  }
  &::after {
    margin-left: 10px;
    content: ']';
    transform: translateX(-20px);
  }
  &:hover::before,
  &:hover::after,
  &:focus::before,
  &:focus::after {
    opacity: 1;
    transform: translateX(0px);
  }
}

.list-box2 li {
  &::after {
    position: absolute;
    top: 100%;
    left: 0;
    width: 100%;
    height: 1px;
    background: #fff;
    content: '';
    opacity: 0;
    transition: height 0.3s, opacity 0.3s, transform 0.3s;
    transform: translateY(-4px);
  }
  &:hover::after,
  &:focus::after {
    height: 1px;
    opacity: 1;
    transform: translateY(0px);
  }
}

.list-box3 li {
    overflow: hidden;
  margin: 0 35px;
    padding: 0 5px;
    height: 1.3em;
  span {
    position: relative;
    display: inline-block;
    transition: transform 0.3s;
    &::before {
      position: absolute;
      top: 100%;
      content: attr(data-hover);
      transform: translate3d(0,0,0);
    }
  }
  &:hover span,
  &:focus span {
    transform: translateY(-100%);
  }
}
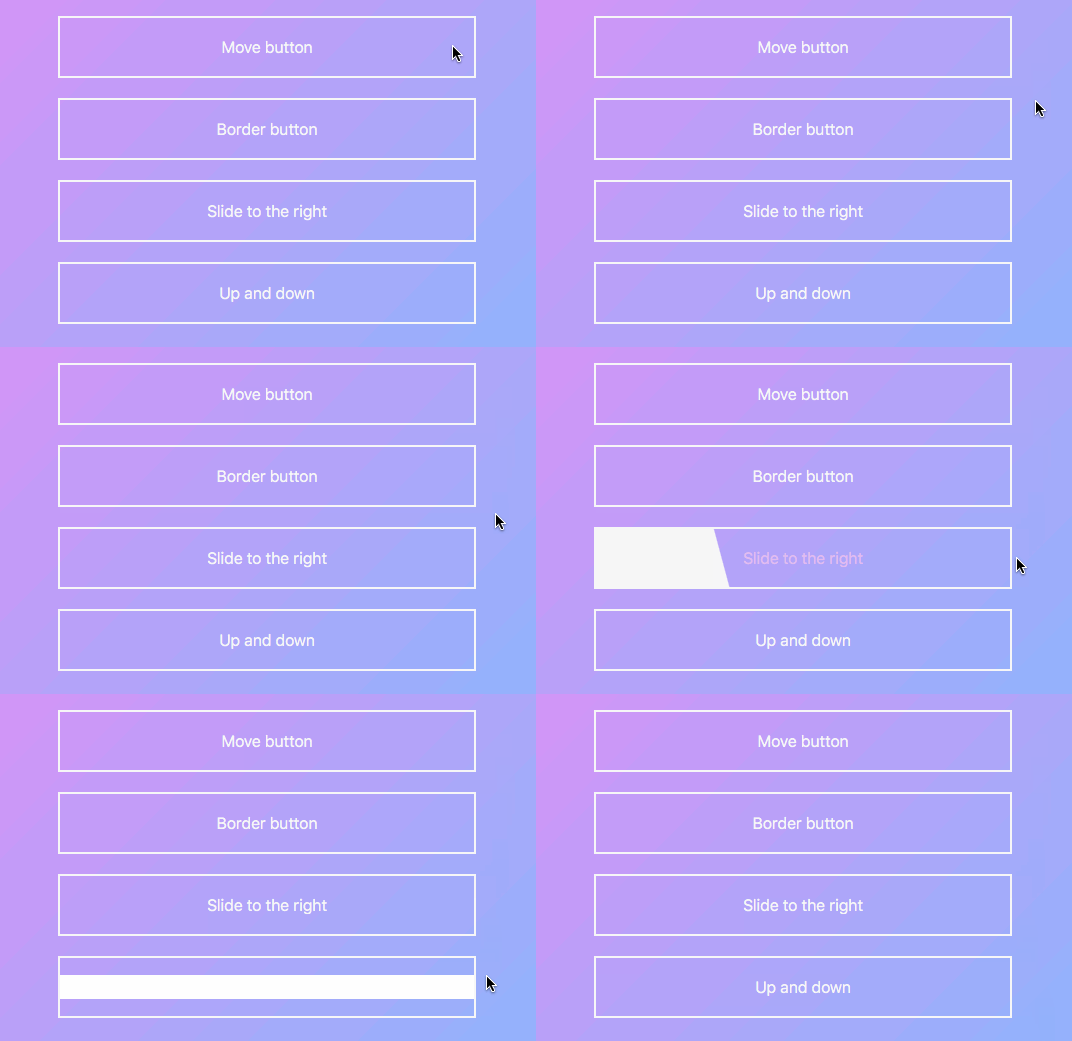
button
実行結果はこちらをご覧ください。
デモを見る/EX_button by chika_1127 @CodePen
<div class="button_box">
  <button class="button">Move button</button>
  <button class="button">Border button</button>
  <button class="button">Slide to the right</button>
  <button class="button">Up and down</button>
</div>
.button {
  position: relative;
  display: block;
  overflow: hidden;
  width: 100%;
  background-color: transparent;
  border: 2px solid #f7f7f7;
  margin: 20px;
  padding: 20px;
  color: #f7f7f7;
  font-size: 16px;
  text-align: center;
  transition: all .3s ease;
  &:after {
    position: absolute;
    content: '';
    width: 0;
    left: 50%;
    bottom: 0;
    height: 3px;
    background: #f7f7f7;
    transition: .3s;
  }
  &:nth-of-type(3):after {
    height: 120%;
    left: -10%;
    transform: skewX(15deg);
    z-index: -1;
  }
  &:nth-of-type(4):after {
    background: none repeat scroll 0 0 #fff;
    height: 0%;
    left: 50%;
    top: 50%;
    width: 100%;
    transition: all .3s ease 0s;
    transform: translateX(-50%) translateY(-50%);
  }
  &:hover {
    cursor: pointer;
    &:nth-of-type(1) {
      padding: 20px 15px 20px 25px;
    }
    &:nth-of-type(2) {
      box-shadow: inset 0px 0px 0px 3px #f7f7f7;
    }
    &:nth-of-type(3) {
      color: #b846e2;
    }
    &:nth-of-type(3):after {
      left: -10%;
      width: 120%;
    }
    &:nth-of-type(4):after {
      height: 140%;
    }
  }
}
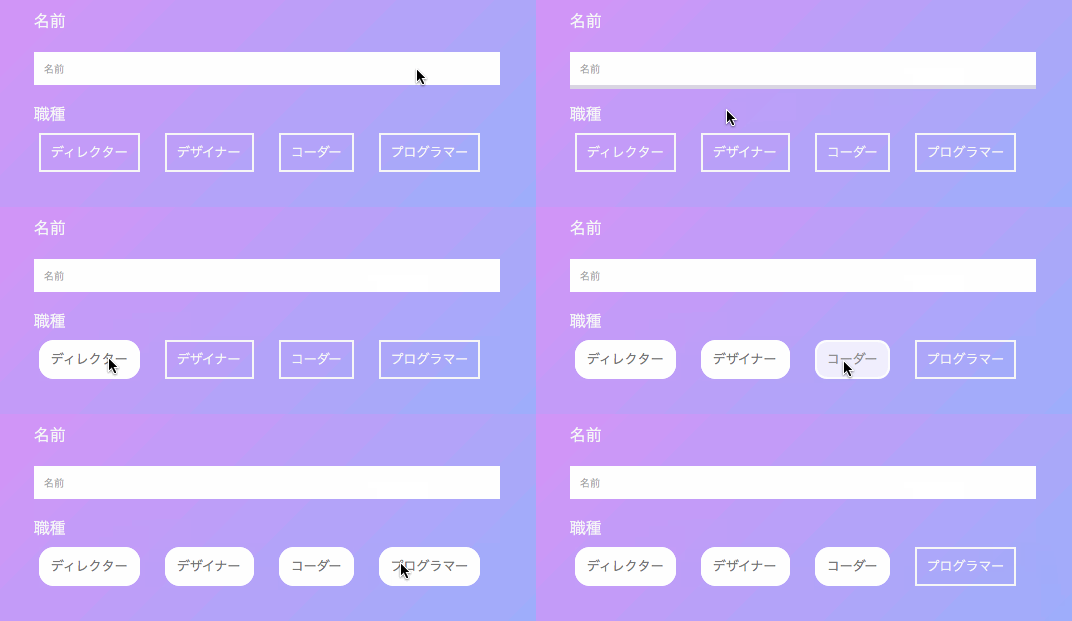
form
実行結果はこちらをご覧ください。
デモを見る/EX_form by chika_1127 @CodePen
<form>
  <div class="form_box">
    <div>
      <p>名前</p>
      <p><input type="text" name="name" class="input_text" placeholder="名前"></p>
    </div>
    <div>
      <p>職種</p>
       <ul class="checkbox_cnt">
        <li><input type="checkbox" name="job" value="director" id="director" class="input_checkbox">
          <label for="director">ディレクター</label>
        </li>
        <li><input type="checkbox" name="job" value="designer" id="designer" class="input_checkbox">
          <label for="designer">デザイナー</label>
        </li>
        <li><input type="checkbox" name="job" value="coder" id="coder" class="input_checkbox">
          <label for="coder">コーダー</label>
        </li>
        <li><input type="checkbox" name="job" value="programmer" id="programmer" class="input_checkbox">
          <label for="programmer">プログラマー</label>
        </li>
      </ul>
    </div>
  </div>
</form>
input {
  padding: 10px;
  box-sizing: border-box;
  border: none;
  border-radius: 0px;
  appearance: none;
  &:focus {
    outline: none;
  }
  &[type=radio],
  &[type=checkbox]{
    display: none;
  }
}

.input_text{
  width: 100%;
  box-shadow: none;
  transition: all 0.3s;
  &:focus{
    box-shadow: 0px 5px 0px #ddd;
    transition: all 0.3s;
  }
}

.checkbox_cnt {
  display: flex;
  padding: 0;
  li {
    margin: 0 5px;
    list-style: none;
  }
}
.input_checkbox {
  + label {
    font-size: 0.8rem;
    margin-right: 15px;
    padding: 10px;
    border-radius: 0px;
    border:2px solid #f7f7f7;
    transition: all 0.3s;
  }
  &:checked + label {
    color: #777;
    border-radius: 15px;
    border:2px solid #fff;
    background-color: #fff;
    transition: all 0.3s;
  }
}
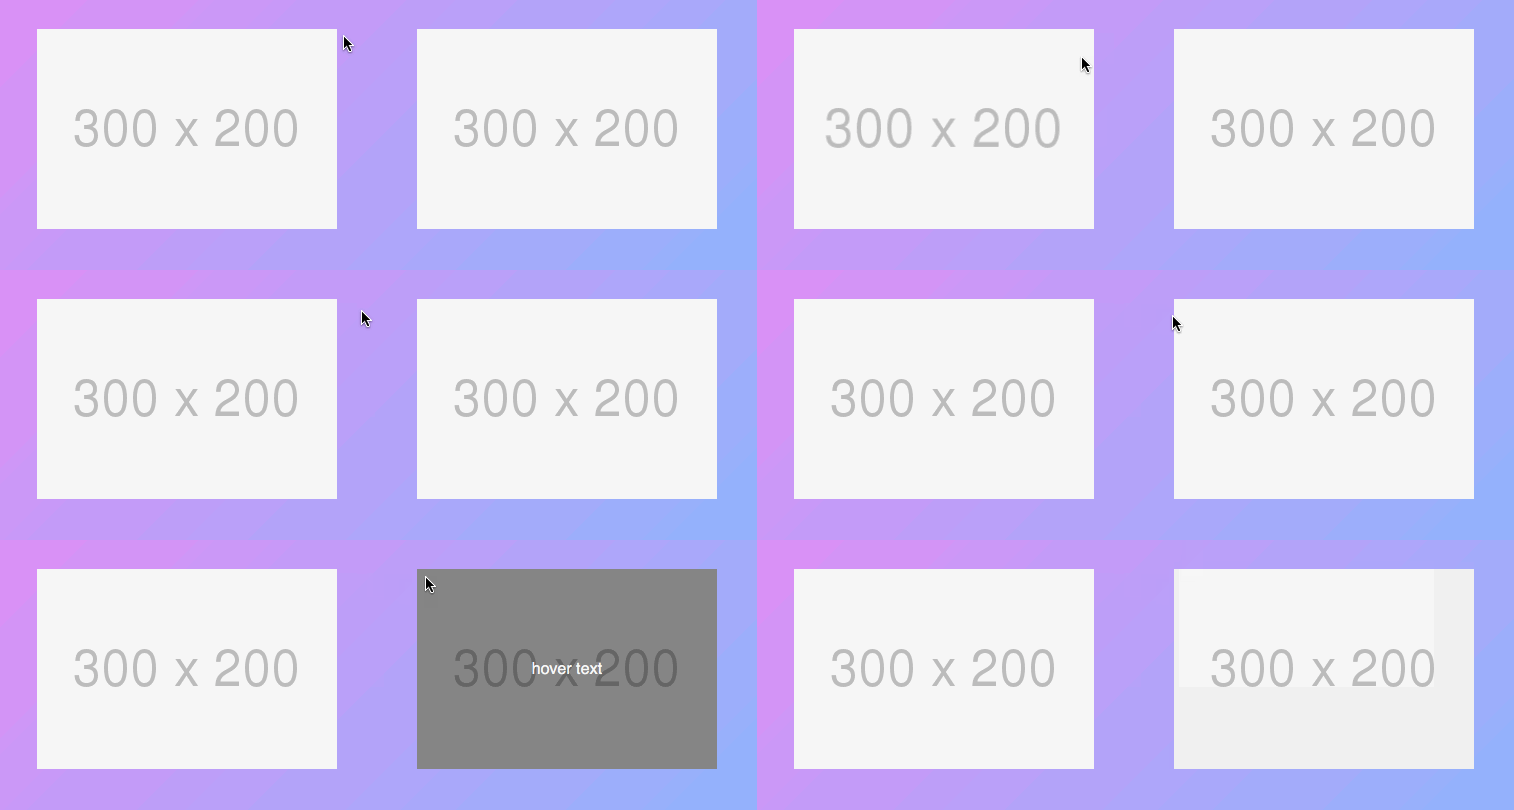
Img
実行結果はこちらをご覧ください。
デモを見る/EX_img by chika_1127 @CodePen
<figure class="img_box">
  <figure class="img_cnt1">
    <img src="https://placehold.jp/f7f7f7/bbbbbb/300x200.png" alt="">
  </figure>
  <figure class="img_cnt2">
    <img src="https://placehold.jp/f7f7f7/bbbbbb/300x200.png" alt="">
    <div class="mask">
      <p>hover text</p>
    </div>
  </figure>
</div>
.img_box {
  display: flex;
  justify-content: center;
}

.img_cnt1 {
  overflow: hidden;
  width: 300px;
  height: 200px;
  img {
    transform: scale(1);
    transition: .3s ease-in-out;
  }
  &:hover img {
    transform: scale(1.05);
  }
}

.img_cnt2 {
    position: relative;
  display: flex;
    overflow: hidden;
    width: 300px;
    height: 200px;
  .mask {
    position: absolute;
    display: inline-flex;
    width: 100%;
    height: 100%;
    top: 0;
    left: 0;
    opacity: 0;
    background-color:   rgba(0,0,0,0.5);
    transition: all 0.2s ease;
    justify-content: center;
    align-items: center;
  }
  &:hover .mask {
    opacity: 1;
  }
}
JavaScriptとCSSのアニメーションの違いについて
アニメーションはCSSだけではなくJavaScriptでも実装が可能です。
結論から言うと、移動する・緩急をつける・要素を出現させる、などの動作をつける場合ですと、JavaScriptよりCSSがおすすめです。
しかし何らかのイベントとアニメーションを連動されるといった実装の場合は、JavaScriptでの記述・連動が必要となります。
その時々にあった技術を選択してください。
CSSアニメーションのメリット
- JavaScriptが不要、コーダーで実装できる
- JavaScriptが書けない人でもアニメーションの実装ができる
- JavaScriptよりロードが早い
参考ページ
- CSSアニメーション 入門
- CSSのみで実装するボタンデザインやホバーエフェクト 20+α
- “押してオーラ”でCV率アップ!?CSSアニメーションでクリックしたくなるCVボタンを作る
- Creative Link Effects
- Pure CSS Image Hover Effect Library
- Some More Subtle Hover Effect Ideas
- 使える!CSSアニメーション 20選
終わりに
アニメーションでの表現は、アイディア次第で千差万別です。
様々なエフェクトを適用することで、インタラクティブで活き活きとしたページに変化し、
要素の変化はユーザーに視覚的な楽しさを与えるとともに、コミュニケーションにもなり得ます。
サイトに適した表現を作るきっかけになりますように。
エイチームライフスタイルアドベントカレンダー2017、明日はDJもやっちゃうエンジニア @otama さんがDockerでRuby on Railsの開発環境を作る記事を書いてくれるらしいので、お楽しみに。


