


告知:10/22(日)にこの内容説明します。
conpass:ReactJS MeetsMore
ReactJS使ってナウいウェブアプリケーション作ろうぜってことでまとめてみようと思います。
以前はウェブアプリケーション作る時はBracketsやAtom使っていたのですが
プラグインのアップデートとかバグった時がめんどくさかったり、エディタが重かったりしたので
最近はVisual Studio Codeに乗り換えました。
(必要な便利な機能もプラグインいれなくても揃ってるし、デフォルトでJSXサポートしてるから楽)
ちょこっとReactJSを試したいときはCodeSandboxがブラウザエディタで環境構築済み状態で書けるのでおすすめです。
前提としてES2015以降でBabelを使います。
NodeJSに関してはある程度理解している人向け前提に説明します。
下記の書籍はキャッチアップできてない人には結構おすすめです。
ReactJSでSingle Page Applicationを作る
今時なSPA構成にするには
次のモジュールを使います。
- ReactJS(コンポーネント、JSX、差分レンダリング)
- React-Router(ページ遷移)
- Redux(状態管理)
- MaterialUI(UIコンポーネント)
- babel(トランスパイラ)
- webpack(リソースファイルを1つにコンパイル)
環境構築
- エディタ:基本何でもいいですが、個人的にはVSCodeがJSXをデフォルトサポートしてるからおすすめ
- ESLint:ビルド前に文法チェックしてくれるので入れておいたほうが良い
- React Developer Tools(ChromeのReact開発用ブラウザアドオン)
ミニマムなReactJSアプリケーション
ReactJSでDOMをレンダリングするには
- ReactJS
- React DOM
- Babel
が必要です。
簡易のため、上記JSファイルをCDN経由で読み込みます
<!DOCTYPE html>
<html>
<head>
  <meta charset="utf-8">
  <script src="https://unpkg.com/react@15/dist/react.min.js"></script>
  <script src="https://unpkg.com/react-dom@15/dist/react-dom.min.js"></script>
  <script src="https://cdnjs.cloudflare.com/ajax/libs/babel-core/5.8.38/browser.min.js"></script>
</head>
<body>
  <div id="root"></div>
  <script type="text/babel">
    ReactDOM.render(
      <h1>Hello, world!</h1>,
      document.getElementById('root')
    )
  </script>
</body>
</html>
実際にレンダリングしているのは
ReactDOM.renderの部分です。
ここで注目すべき点はscriptタグ内なのに
<h1>タグ(DOM)が記述されている点です。
実際に実行される際にはBabelにて次のようなJSに変換されます。
上記のような一見DOMが混じったようなJSの記法をJSXと呼びます。
ReactDOM.render(React.createElement(
    'h1',
    null,
    'Hello, world!'
), document.getElementById('root'));
React.CreateElementメソッドにてroot以下に
DOMが生成されます。

実際にcompile.jsの形に変換されているか確認するためには
JSXのBabelトランスパイラを使います。
React JSX transform
下記コマンドでBabelとJSXトランスパイラプラグインをインストールします。
# Babelコマンドをインストール
npm install -g babel-cli
# package.json作成
npm init --force
# BabelのJSXトランスパイラプラグインをダウンロード
npm install --save-dev babel-plugin-transform-react-jsx
次のJS部分を切り出したtest.jsxファイルを作成します。
ReactDOM.render(
    <h1>Hello, world!</h1>,
    document.getElementById('root')
  )
次のコマンドでtest.jsxに対して直接Babelのトランスパイルを行うとcompile.jsが出力されます。
$babel --plugins transform-react-jsx test.js
webpack + Babelでコンポーネントを作成する
webpackを使うことで複数のリソースファイルを1つにまとめることができます。
さらにBabelと組み合わせることでJSXの変換に加えてブラウザではまだ未対応のimport文などが利用可能になります。
これにより、JSファイルからJSファイルのモジュールを呼び出すような構成が可能になります。
webpackでビルドするためにパッケージを追加します。
$npm install -D webpack babel-core babel-loader babel-plugin-transform-react-jsx babel-preset-react react react-dom
インストール後のpackage.jsonは次のようになっています。
(モジュールのバージョンは指定しないと最新版が入ります)
{
  "name": "meetdep",
  "version": "1.0.0",
  "description": "",
  "main": "test.js",
  "scripts": {
    "test": "echo \"Error: no test specified\" && exit 1"
  },
  "keywords": [],
  "author": "",
  "license": "ISC",
  "devDependencies": {
    "babel-core": "^6.26.0",
    "babel-loader": "^7.1.2",
    "babel-plugin-transform-react-jsx": "^6.24.1",
    "babel-preset-react": "^6.24.1",
    "react": "^16.0.0",
    "react-dom": "^16.0.0",
    "webpack": "^3.6.0"
  }
}
次のようなtree構造にします。
├── App.js
├── index.html
├── index.js
├── node_modules
├── package.json
└── webpack.config.js
Reactのコンポーネントを作成します。
ReactのコンポーネントはReact.Componentを継承することで作成します。
renderメソッドでDOMを返却するようにします。
export defaultで外部のJSからクラスをimportできるようにします。
import React from 'react'

export default class App extends React.Component {

    render () {
        return <h1>Hello, world!</h1>
    }

}
index.jsにて作成したReactコンポーネントをimportして
DOMをレンダリングします。
ここで注目してほしいのはJSXにて<App />というDOMが指定できるようになっています。
React DOMによって作成したReactコンポーネントは新しいDOMとして指定できるようになります。
(DOMの振る舞いはReactコンポーネント内部でJSで記述する)
最終的なレンダリングはReactコンポーネントのrenderメソッドにて返却されるDOMが描画されます。
import React  from 'react'
import ReactDOM from 'react-dom'
import App from './App'

ReactDOM.render(
    <App />,
    document.getElementById('root')
)
index.htmlは次のようにbundle.jsのみ読み込むように書き換えてください
(bundle.jsはwebpackでビルド後に生成されるファイル想定)
<!DOCTYPE html>
<html>
<head>
  <meta charset="utf-8">
</head>
<body>
  <div id="root"></div>
  <script type='text/javascript' src="bundle.js" ></script>
</body>
</html>
webpackでビルドするための設定ファイル、webpack.config.jsを作成します。
module.exports = {
    entry: './index.js', // エントリポイントのjsxファイル
    output: {
      filename: 'bundle.js' // 出力するファイル
    },
    module: {
      loaders: [{
        test: /\.js?$/, // 拡張子がjsで
        exclude: /node_modules/, // node_modulesフォルダ配下は除外
        loader: 'babel-loader', // babel-loaderを使って変換する
        query: {
          plugins: ["transform-react-jsx"] // babelのtransform-react-jsxプラグインを使ってjsxを変換
        }
      }]
    }
  }
次のコマンドでindex.jsに付随するJSファイルをまとめてビルドして一つのbundle.jsとして出力することができます
$ node_modules/webpack/bin/webpack.js
Hash: 7a16807494494a5823f6
Version: webpack 3.6.0
Time: 6049ms
    Asset    Size  Chunks                    Chunk Names
bundle.js  835 kB       0  [emitted]  [big]  main
  [15] ./index.js 168 bytes {0} [built]
  [32] ./App.js 258 bytes {0} [built]
    + 31 hidden modules
index.htmlを開くと表示されるはずです。

下記のコマンドでwebpackの監視モードにするとビルド対象のJSファイルの変更が保存されるとビルドされるようになります。(開発中は楽です。)
$ webpack --watch
Reactの基本お作法
Reactの基本的なルールを覚えつつ簡単なアプリケーションを作ってみましょう。
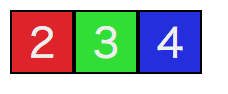
次のようなボックスのコンポーネントを作ってみます。
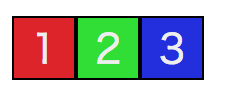
それぞれのボックスクリック時にはボックス内の数字がカウントアップします。
まずボックスのコンポーネントを作ります。
import React from 'react'

export default class Rect extends React.Component {

  constructor (props) {
    super(props)
    // ステートオブジェクト
    this.state = { number : this.props.num }
  }

  componentWillMount () {
    // propsに属性値が渡ってくる
    const { num, bgcolor } = this.props

    // CSS スタイルはキャメルケースでプロパティを書く
    this.rectStyle = {
      background: bgcolor,
      display: 'table-cell',
      border: '1px #000 solid',
      fontSize: 20,
      width: 30,
      height: 30,
      textAlign: 'center',
      verticalAlign: 'center',
    }

  }

  // カウントアップ
  countUp (num) {
    // ステートオブジェクトのパラメータを更新→renderメソッドが呼ばれ、再描画される
    this.setState({ number : num + 1 })
  }

  render () {

    // 複数行になる場合は()で囲む
    // 返却する最上位のDOMは1つのみ
    return (
      <div style={ this.rectStyle } onClick={(e)=> this.countUp(this.state.number)}>
        <span style={{ color : '#eeeeee' }}>{this.state.number}</span>
      </div>
    )
  }
}
App.jsではRectコンポーネントを読み込んで表示します。
import React from 'react'
import Rect from './Rect'

export default class App extends React.Component {

  render () {
    return (
      <div>
        <Rect num={1} bgcolor='#e02020' />
        <Rect num={2} bgcolor='#20e020' />
        <Rect num={3} bgcolor='#2020e0' />
      </div>
    )
  }
}
Reactコンポーネントのライフサイクルについて
全体図は良い図があったのでそちらを参考にしてください。
React component ライフサイクル図
初期化時と属性値変更時に呼ばれるcomponentWillMountメソッドと
描画時に呼ばれるrenderメソッドはよく使うのでまず抑えておいてください
属性値について
新規に作成したRectコンポーネントには通常のDOMと
同様に属性値を定義することができます。
<Rect num={1} bgcolor='#e02020' />
独自に定義したプロパティはpropsオブジェクト内に格納されて
Rectコンポーネントに渡ってきます。
componentWillMount () {
    // propsに属性値が渡ってくる
    const { num, bgcolor } = this.props
CSS Styleについて
JSX内でスタイルを渡すにはキャメルケースで書く必要があります。
babelでCSSに変換してもらいます。
例えば、font-sizeを適応したい場合はfontSizeと記述する必要があります。
    // CSS スタイルはキャメルケースでプロパティを書く
    this.rectStyle = {
      background: bgcolor,
      display: 'table-cell',
      border: '1px #000 solid',
      fontSize: 20,
      width: 30,
      height: 30,
      textAlign: 'center',
      verticalAlign: 'center',
    }
JSX内で{}した箇所にはJSを書くことができます。
今回はJSのスタイルオブジェクトを渡しています。
<div style={ this.rectStyle } >
コンポーネントのstateについて
コンポーネント内部で状態を保持したい場合は
stateオブジェクトという特殊なオブジェクトを定義します。
中身のパラメータに関しては自由に入れて構いません。
今回はクリックしたときに数字をカウントアップしたいため
numberパラメータを保持するようにしました。
  // ステートオブジェクト
  this.state = { number : this.props.num }
イベントハンドリングとnumberオブジェクトの更新に関して記述した箇所が次の箇所になります。
Reactにはstateオブジェクトのパラメータを更新させるために
setStateメソッドが用意されています。
クリックされてsetStateメソッドが呼び出されるとstateオブジェクトのパラメータを更新し
renderメソッドを呼び出します(再描画される)。
  // カウントアップ
  countUp (num) {
    // ステートオブジェクトのパラメータを更新→renderメソッドが呼ばれ、再描画される
    this.setState({ number : num + 1 })
  }

  render () {
     return (
      <div onClick={(e)=> this.countUp(this.state.number)}>
     )
  }
renderメソッド内でsetStateメソッドを直接呼び出してはいけません。
render→setState→renderと無限ループになるからです。
React Routerでページ遷移
SPA上でページ遷移(画面切り替え)するには
React-Routerを使います。
React-Routerはバージョンで互換性がないので今回の説明では4系を使います。
React-Routerをインストールします。
$npm install -D react-router-dom@4.2.2
App.jsを次のように修正してください。
import React from 'react'
// React Routerのコンポーネントを使う
import {
BrowserRouter as Router,
Route,
Link
} from 'react-router-dom'
/*
class Home extends React.Component {
render () {
// 返却するDOMが複数行になる場合は()で囲む
return (
<div>
<h2>Home</h2>
</div>
)
}
}
*/
// 上記のReactコンポーネントの簡略記法
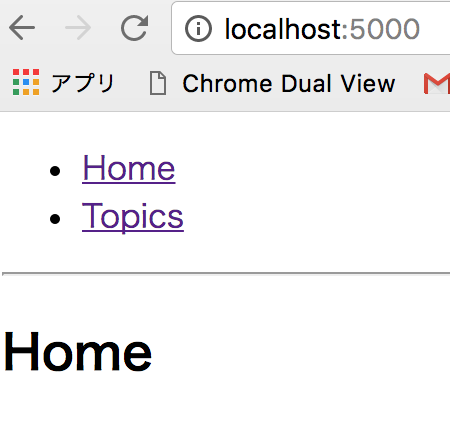
const Home = () => (
<div>
<h2>Home</h2>
</div>
)
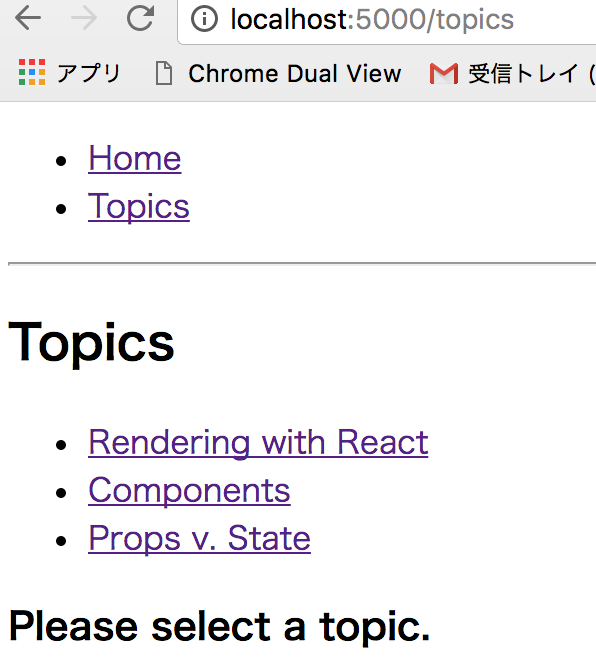
const Topic = ({ match }) => (
<div>
<h3>{match.params.topicId}</h3>
</div>
)
const Topics = ({ match }) => (
<div>
<h2>Topics</h2>
<ul>
<li>
<Link to={`${match.url}/rendering`}>
Rendering with React
</Link>
</li>
<li>
<Link to={`${match.url}/components`}>
Components
</Link>
</li>
<li>
<Link to={`${match.url}/props-v-state`}>
Props v. State
</Link>
</li>
</ul>
<Route path={`${match.path}/:topicId`} component={Topic}/>
<Route exact path={match.path} render={() => (
<h3>Please select a topic.</h3>
)}/>
</div>
)
const App = () => (
<Router>
<div>
<ul>
<li><Link to="/">Home</Link></li>
<li><Link to="/topics">Topics</Link></li>
</ul>
<hr/>
<Route exact path="/" component={Home}/>
<Route path="/topics" component={Topics}/>
</div>
</Router>
)
export default App
webpackで再ビルドします。
$node_modules/webpack/bin/webpack.js
React Routerはサーバー上でないとCORSの制約にひっかかるので
簡易的なサーバ上で動かします。
npmのserveモジュールをインストールします。
$npm install -g serve
次のserveコマンドを実行するとカレントディレクトリがサーバのpublicフォルダになります。
$ serve .

   ┌──────────────────────────────────────────────────┐
   │                                                  │
   │   Serving!                                       │
   │                                                  │
   │   - Local:            http://localhost:5000      │
   │   - On Your Network:  http://192.168.1.28:5000   │
   │                                                  │
   │   Copied local address to clipboard!             │
   │                                                  │
   └──────────────────────────────────────────────────┘
http://localhost:5000
にアクセスしてみてください
Topicのリンクを踏むと画面の一部が切り替わります。(DOMが差し替わります。)
Reduxによる状態制御
Reduxを用いることでアプリケーション全体の状態を管理し、
イベントコールバック→一元管理されたストアのパラメータ更新→描画反映
といったことが楽になります。
(類似のフレームワークにfluxがあります。)
参考:Redux入門【ダイジェスト版】10分で理解するReduxの基礎
参考:React+Redux入門
SPAなReactJSと特に相性が良いです。
Reduxは次の思想で設計されています。
1.ストアがいっぱいあると不整合が起きるのでビューに使うコンポーネントから分離して1つのストアに格納する
2.ストアの状態を更新するためには決められたアクション経由で行う
3.Stateの変更を行うReducerはシンプルな関数(Pure関数)にする
ReactとReduxを連動させるためにはreact-reduxのnpmパッケージを使うのですがconnectの記述方法がいくつもあり混乱します。
ReactとReduxを結ぶパッケージ「react-redux」についてconnectの実装パターンを試す
今回は可読性の良さを重視して、decoratorsを使って実装します。
追加で下記のRedux関連のパッケージをインストールします。
$ npm install -D babel-plugin-transform-decorators-legacy redux redux-devtools redux-thunk react-redux react-router-redux
package.jsonは次のようになります。
{
  "name": "meetdep",
  "version": "1.0.0",
  "description": "",
  "main": "test.js",
  "scripts": {
    "test": "echo \"Error: no test specified\" && exit 1"
  },
  "keywords": [],
  "author": "",
  "license": "ISC",
  "devDependencies": {
    "axios": "^0.16.2",
    "babel-core": "^6.26.0",
    "babel-loader": "^7.1.2",
    "babel-plugin-transform-decorators-legacy": "^1.3.4",
    "babel-plugin-transform-react-jsx": "^6.24.1",
    "babel-preset-react": "^6.24.1",
    "react": "^16.0.0",
    "react-dom": "^16.0.0",
    "react-router-dom": "^4.2.2",
    "redux": "^3.7.2",
    "redux-devtools": "^3.4.0",
    "redux-thunk": "^2.2.0",
    "react-redux": "^5.0.6",
    "react-router-redux": "^4.0.8",
    "webpack": "^3.6.0"
  },
  "dependencies": {}
}
decoratorの文法を使うので
babel-plugin-transform-decorators-legacyのプラグインを
webpack.config.jsに追加します。
module.exports = {
    entry: './index.js', // エントリポイントのjsxファイル
    output: {
      filename: 'bundle.js' // 出力するファイル
    },
    module: {
      loaders: [{
        test: /\.js?$/, // 拡張子がjsで
        exclude: /node_modules/, // node_modulesフォルダ配下でなければ
        loader: 'babel-loader', // babel-loaderを使って変換する
        query: {
          plugins: ["transform-react-jsx","babel-plugin-transform-decorators-legacy"] // babelのtransform-react-jsxプラグインを使ってjsxを変換
        }
      }]
    }
  }
index.jsを書き換えます
import React  from 'react'
import ReactDOM from 'react-dom'
// applyMiddlewareを追加
import { createStore, applyMiddleware } from 'redux'
// react-reduxのProviderコンポーネントを追加
import { Provider } from 'react-redux'
import App from './App'
// reducerを読み込み(後述)
import reducer from './reducer'

// storeを作成
const store = createStore(reducer)

// Providerタグで囲うとApp内でstoreが利用可能になる
ReactDOM.render(
    <Provider store={store}>
      <App />
    </Provider>,
    document.getElementById('root')
)
reducer.jsに読み込むreducerを記述します
import { combineReducers } from 'redux'
// コメント取得のreducer
import comment from './comment'

// 作成したreducerをオブジェクトに追加していく
// combineReducersで1つにまとめてくれる
export default combineReducers({
  comment
})
comment.jsにコメント用のreducerを作成します。
// reducerで受け取るaction名を定義
const LOAD = 'comment/LOAD'

// 初期化オブジェクト
const initialState = {
  comments: null,
}

// reducerの定義(dispatch時にコールバックされる)
export default function reducer(state = initialState, action = {}){
  // actionの種別に応じてstateを更新する
  switch (action.type) {
    case LOAD:
      return {
        comments:action.comments,
      }
    default:
      // 初期化時はここに来る(initialStateのオブジェクトが返却される)
      return state
  }
}

// actionの定義
export function load() {
  const comments = 'hello'
  // action種別と更新stateを返却(dispatchされる)
  return { type: LOAD, comments }
}
App.jsでコメントのactionをキック、reducer経由でのstate更新を行います。
import React from 'react'
import { connect } from 'react-redux';
// コメントreducerのactionを取得
import { load } from './comment'

// connectのdecorator
@connect(
  state => ({
    // reducerで受け取った結果をpropsに返却する
    comments: state.comment.comments
  }),
  // actionを指定
  { load }
)
export default class App extends React.Component {

  componentWillMount() {
    // コメントのactionをキックする
    this.props.load()
  }

  render () {
    // connectで取得したstateはpropsに入る
    const { comments } = this.props
    // 初回はnullが返ってくる(initialState)、処理完了後に再度結果が返ってくる
    console.log(comments)
    return (
      <div>{comments}</div>
    )
  }
}
次のような結果になります。

actionを非同期にする
react-reduxを実際に使う場面は通信や画面遷移周りだと思います。
redux-thunkを使うとaction部分の処理を非同期にできます。
通信用のライブラリ(axios)をインストールします
$ npm install -D axios
index.jsにてaxiosを付与した
thunkミドルウェアをreduxに適応します。
import React  from 'react'
import ReactDOM from 'react-dom'
import { createStore, applyMiddleware } from 'redux'
import { Provider } from 'react-redux'
import client from 'axios'
import thunk from 'redux-thunk'

import App from './App'
import reducer from './reducer'

// axiosをthunkの追加引数に加える
const thunkWithClient = thunk.withExtraArgument(client)
// redux-thunkをミドルウェアに適用
const store = createStore(reducer, applyMiddleware(thunkWithClient))

ReactDOM.render(
    <Provider store={store}>
      <App />
    </Provider>,
    document.getElementById('root')
)
reducer.jsを修正します。
今回はユーザー用のreducerを作成します。
import { combineReducers } from 'redux'

import user from './user'

export default combineReducers({
  user,
})
user.jsには
Random User Generatorで生成した疑似ユーザ情報をAPIで取得するreducerを作成します。
次のようにaction部分を非同期で記述できます。
const LOAD = 'user/LOAD'

const initialState = {
  users: null,
}

export default function reducer(state = initialState, action = {}){
  switch (action.type) {
    case LOAD:
      return {
        users:action.results,
      }
    default:
      return state
  }
}

export function load() {
  // clientはaxiosの付与したクライアントパラメータ
  // 非同期処理をPromise形式で記述できる
  return (dispatch, getState, client) => {
    return client
      .get('https://randomuser.me/api/')
      .then(res => res.data)
      .then(data => {
        const results = data.results
        // dispatchしてreducer呼び出し
        dispatch({ type: LOAD, results })
      })
  }
}
取得したユーザデータを表示します。
import React from 'react'
import { connect } from 'react-redux';
import { load } from './user'
@connect(
state => ({
users: state.user.users
}),
{ load }
)
export default class App extends React.Component {
componentWillMount() {
this.props.load()
}
render () {
const { users } = this.props
return (
<div>
{/* 配列形式で返却されるためmapで展開する */}
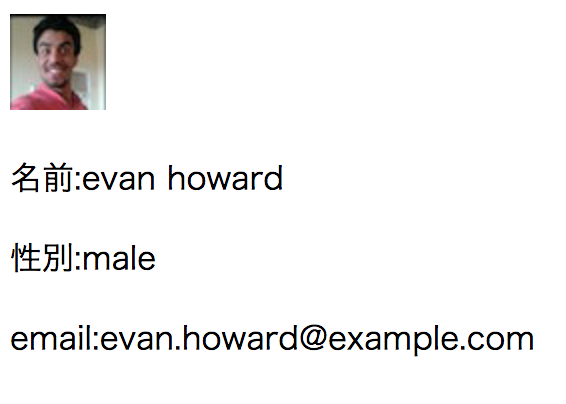
{users && users.map((user) => {
return (
// ループで展開する要素には一意なkeyをつける(ReactJSの決まり事)
<div key={user.email}>
<img src={user.picture.thumbnail} />
<p>名前:{user.name.first + ' ' + user.name.last}</p>
<p>性別:{user.gender}</p>
<p>email:{user.email}</p>
</div>
)
})}
</div>
)
}
}
実行結果です。Random User Generatorで生成された疑似ユーザを表示しています。
Material-UIでモダンな画面を作る
マテリアルUIはグーグルが提唱するデザインフォーマットです。
フラットデザインに現実の物理要素(影やフィードバック)を持たせたようなデザインです。
Androidアプリでの全面的な利用など最近のアプリケーションのデザインは大体マテリアルデザインでできています。
Material Design
Material-UIのパッケージをインストールします。
$ npm install -D material-ui@next material-ui-icons
package.jsonは次のようになります。
{
  "name": "meetdep",
  "version": "1.0.0",
  "description": "",
  "main": "test.js",
  "scripts": {
    "test": "echo \"Error: no test specified\" && exit 1"
  },
  "keywords": [],
  "author": "",
  "license": "ISC",
  "devDependencies": {
    "axios": "^0.16.2",
    "babel-core": "^6.26.0",
    "babel-loader": "^7.1.2",
    "babel-plugin-transform-decorators-legacy": "^1.3.4",
    "babel-plugin-transform-react-jsx": "^6.24.1",
    "babel-preset-react": "^6.24.1",
    "material-ui": "^1.0.0-beta.16",
    "material-ui-icons": "^1.0.0-beta.15",
    "react": "^16.0.0",
    "react-dom": "^16.0.0",
    "react-redux": "^5.0.6",
    "react-router-dom": "^4.2.2",
    "react-router-redux": "^4.0.8",
    "redux": "^3.7.2",
    "redux-devtools": "^3.4.0",
    "redux-thunk": "^2.2.0",
    "webpack": "^3.6.0"
  },
  "dependencies": {}
}
ユーザを取得したApp.jsをmaterial-uiで書き直します。
import React from 'react'
import { connect } from 'react-redux'
import { load } from './user'

import { withStyles } from 'material-ui/styles'
import { AppBar,Toolbar, Avatar, Card, CardContent, Button, Dialog, DialogTitle, DialogContent } from 'material-ui'
import Typography from 'material-ui/Typography'
import { Email } from 'material-ui-icons'

@connect(
  state => ({
    users: state.user.users
  }),
  { load }
)
export default class App extends React.Component {

  constructor (props) {
    super(props)
    this.state = {
      open:false,
      user:null,
    }
  }

  componentWillMount () {
    this.props.load()
  }

  handleClickOpen (user) {
    this.setState({
      open: true,
      user: user,
    })
  }

  handleRequestClose () {
    this.setState({ open: false })
  };

  render () {
    const { users } = this.props
    return (
      <div>
        <AppBar position="static" color="primary">
          <Toolbar>
            <Typography type="title" color="inherit">
              タイトル
            </Typography>
          </Toolbar>
        </AppBar>
          {/* 配列形式で返却されるためmapで展開する */}
          {users && users.map((user) => {
            return (
                // ループで展開する要素には一意なkeyをつける(ReactJSの決まり事)
                <Card key={user.email} style={{marginTop:'10px'}}>
                  <CardContent style={{color:'#408040'}}>
                    <Avatar src={user.picture.thumbnail} />
                    <p style={{margin:10}}>{'名前:' + user.name.first + ' ' + user.name.last} </p>
                    <p style={{margin:10}}>{'性別:' + (user.gender == 'male' ? '男性' : '女性')}</p>
                    <div style={{textAlign: 'right'}} >
                      <Button onClick={() => this.handleClickOpen(user)}><Email/>メールする</Button>
                    </div>
                  </CardContent>
                </Card>
            )
          })}
          {
            this.state.open &&
            <Dialog open={this.state.open} onRequestClose={() => this.handleRequestClose()}>
              <DialogTitle>メールアドレス</DialogTitle>
              <DialogContent>{this.state.user.email}</DialogContent>
            </Dialog>
          }
      </div>
    )
  }
}
次のような画面になります。

「メールする」をクリックするとダイアログが表示されます。

Material-UIの各コンポーネントに関しては
公式:Material-UIのComponents Demoに各種コンポーネントのデモを見たほうが理解できると思います。
Material UIのアイコンに関しては下記アイコンが使えます。
Material icons
今回はメールのアイコンを使っています。
emailというアイコン名になっているので、
次のように先頭大文字でメールアイコンを読み込みできます。
import { Email } from 'material-ui-icons'
webpackしたコンポーネントを非同期で読み込む(上級編)
参考:Code Splitting for React Router with Webpack and HMR
プロジェクトが大きくなってくるとwebpack.jsでコンパイルしたbundle.jsが肥大化します。
bundle.jsが肥大化するとbundle.jsの読み込みに時間がかかってしまい、初回のページの表示が遅くなります(SPAの欠点)
そこでAsyncComponentを作成して、非同期リソース読み込みを行います。
import React from 'react';

export default (loader, collection) => (
  class AsyncComponent extends React.Component {
    constructor(props) {
      super(props)
      this.Component = null
      this.state = { Component: AsyncComponent.Component }
    }

    componentWillMount() {
      if (!this.state.Component) {
        loader()
          .then(module => module.default)
          .then(Component => {
            AsyncComponent.Component = Component
            this.setState({ Component })
          })
      }
    }

    render() {
      if (this.state.Component) {
        return <this.state.Component { ...this.props } { ...collection } />
      }

      // 読み込み中表示を出したい場合はここで読み込み表示DOMを返す
      return null
    }
  }
)
使い方は次のように読み込みます。
次の例はMainPageコンポーネントを読み込んでいる例です。
const MainPage = asyncComponent(() => import('./components/MainPage'));
webpackでコンパイル後のファイル名を指定のファイル名にする方法
上記のacyncComponentでラップしたコンポーネントをwebpackでコンパイルすると
1234567890.jsのような人間には識別不可能なファイル名で出力されます。
これを回避するためにWebpack 2.4.0以降でmagicコメントが使えます。
参考:How to use Webpack’s new “magic comment” feature with React Universal Component + SSR
このmagicコメントを指定することでwebpackでコンパイルされた後のファイル名を指定することができます。
const MainPage = asyncComponent(() => import(/* webpackChunkName: 'mainpage' */ './components/MainPage'));
上記にマジックコメントで指定すれば、webpackコンパイル時に
mainpage.jsが出力されます。
なお、複数コンポーネントがある場合は、出力するコンポーネント名(mainpage)は被ってはいけません。