CentOS7にMySQL導入&初期設定をおこなう
2016/09/03
こんにちは、okutani(@okutani_t)です。本記事ではCentOS7にMySQLを導入する手順を紹介しています。
本記事では下記のCentOSで設定を進めています。
$ cat /etc/redhat-release
CentOS Linux release 7.2.1511 (Core)
なお、CentOS7ではデフォルトでMariaDBという、MySQLの後継と言われている(フォーク元がMySQL)データベースが導入されます。MariaDBを使う場合は次のように導入できます。
$ yum -y install mariadb mariadb-server今回はMariaDBではなく、MySQLを導入する方法について解説していますので注意してください。
では、さっそくCentOS7にMySQLを導入してみましょう。
参考MySQL 5.7 を CentOS 7 に yum インストールする手順 | WEB ARCH LABO
スポンサーリンク
もくじ [隠す]
CentOS7にMySQLを導入する方法
CentOS7にMySQLを導入していきます。
MariaDBの削除
まずはじめに、MariaDBがデフォルトで導入されているかどうか確認しておきます。
$ yum list installed | grep maria
mariadb-libs.x86_64 1:5.5.44-2.el7.centos @base
もし見つかった場合は削除しておきます。
$ sudo yum remove mariadb-libs.x86_64データフォルダが残っている場合は以下コマンドで削除。
$ rm -rf /var/lib/mysql/yumリポジトリの追加・インストール
MySQLのリポジトリをyumに追加していきます。
下記のサイトへアクセスし、Linux7のDownloadをクリック。
LINKMySQL :: Download MySQL Yum Repository
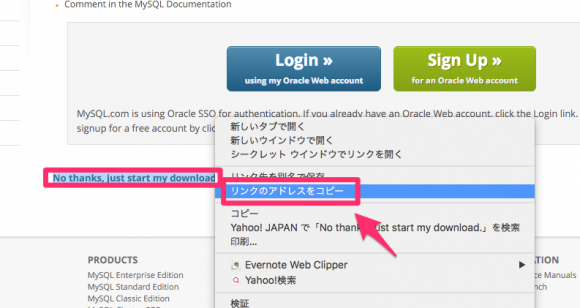
「No thanks, just start my download.」のリンク先をコピーします。
今回は以下のURLがコピーされました。
http://dev.mysql.com/get/mysql57-community-release-el7-7.noarch.rpm「localinstall」を使うことでrpmファイルを直接インストールすることができます。先ほど取得したURLを使って下記を実行。
$ sudo yum -y localinstall http://dev.mysql.com/get/mysql57-community-release-el7-7.noarch.rpm導入できるMySQLのバージョンを確認。
$ yum info mysql-community-server
名前                : mysql-community-server
アーキテクチャー    : x86_64
バージョン          : 5.7.11
リリース            : 1.el7
容量                : 143 M
リポジトリー        : mysql57-community/x86_64
要約                : A very fast and reliable SQL database server
...省略...
5.7.11が導入できることが分かりました。下記を実行してインストール。
$ sudo yum -y install mysql-community-server導入を確認。
$ mysqld --version
mysqld  Ver 5.7.11 for Linux on x86_64 (MySQL Community Server (GPL))
無事にCentOS7にMySQLが導入されました。
MySQL起動設定
MySQLの起動まわりについて解説します。
MySQLの起動は以下コマンド。
$ systemctl start mysqld.service停止は以下。
$ systemctl stop mysqld.serviceサーバー起動時に、自動でMySQLを立ち上げるようにするには以下コマンド。
$ systemctl enable mysqld.serviceCentOS7からsystemctlが使われるようになったので気をつけましょう。
自動起動を停止するには以下。
$ systemctl disable mysqld.service現在の起動の状態を確認するには以下コマンドです。
$ systemctl status mysqld.service自動起動設定かそうでないかの確認は以下。
$ systemctl is-enabled mysqld.servicerootのパスワードを変更
初期状態で、MySQLのrootのパスワードが設定されているので変更しておきます。初期パスワードは「/var/log/mysqld.log」で確認できます。
$sudo cat /var/log/mysqld.log | grep root
2016-03-15T02:44:33.949457Z 1 [Note] A temporary password is generated for root@localhost: l9Xl9gbb,c9J
上記のように、デフォルトのパスワードが決まっています。
「mysql_secure_installation」コマンドを利用すると、対話形式にrootパスワード変更や、その他初期設定がかんたんにおこなえます。こちらを利用して設定をおこないましょう。
$ mysql_secure_installation
Securing the MySQL server deployment.

Enter password for user root: [先ほど調べたrootパスワード]

The existing password for the user account root has expired. Please set a new password.

New password: [新しいパスワード]
Re-enter new password: [新しいパスワード]

The 'validate_password' plugin is installed on the server.
The subsequent steps will run with the existing configuration
of the plugin.
Using existing password for root.

Estimated strength of the password: 100
Change the password for root ? ((Press y|Y for Yes, any other key for No) : [y入力]

New password: [新しいパスワード]
Re-enter new password: [新しいパスワード]

Estimated strength of the password: 100
Do you wish to continue with the password provided?(Press y|Y for Yes, any other key for No) : [y入力]

By default, a MySQL installation has an anonymous user,
allowing anyone to log into MySQL without having to have
a user account created for them. This is intended only for
testing, and to make the installation go a bit smoother.
You should remove them before moving into a production
environment.

Remove anonymous users? (Press y|Y for Yes, any other key for No) : [y入力]
Success.

Normally, root should only be allowed to connect from
'localhost'. This ensures that someone cannot guess at
the root password from the network.

Disallow root login remotely? (Press y|Y for Yes, any other key for No) : [y入力]
Success.

By default, MySQL comes with a database named 'test' that
anyone can access. This is also intended only for testing,
and should be removed before moving into a production
environment.

Remove test database and access to it? (Press y|Y for Yes, any other key for N : [y入力]

- Dropping test database...
Success.

- Removing privileges on test database...
Success.

Reloading the privilege tables will ensure that all changes
made so far will take effect immediately.

Reload privilege tables now? (Press y|Y for Yes, any other key for No) : [y入力]
Success.

All done!
上記設定では次の設定をおこなっています。
- rootパスワード変更
- 匿名ユーザーの削除
- リモートホストからrootログイン禁止
- テスト用データベース削除
- ユーザー権限が保存されているテーブルをリロード
ちなみに、新しく設定するパスワードは「8文字以上かつ英大文字・小文字・数字・記号」を含んでいないと弾かれますので気をつけてください。
これでrootパスワードの変更、その他初期設定が完了しました。
文字コードの設定
文字コードをUTF-8にしておきましょう。「/etc/my.cnf」をviで開いて、次の2項目を最終行に追記。
$ sudo vi /etc/my.cnf
character_set_server=utf8
skip-character-set-client-handshake「skip-character-set-client-handshake」を設定しておくと、クライアントの応答がすべてUTF-8になります。
設定を反映させるため、MySQLを再起動させておきます。
$ systemctl restart mysqld.service念のため確認。
$ mysql -u root -p
> show variables like 'char%';
+--------------------------+----------------------------+
| Variable_name            | Value                      |
+--------------------------+----------------------------+
| character_set_client     | utf8                       |
| character_set_connection | utf8                       |
| character_set_database   | utf8                       |
| character_set_filesystem | binary                     |
| character_set_results    | utf8                       |
| character_set_server     | utf8                       |
| character_set_system     | utf8                       |
| character_sets_dir       | /usr/share/mysql/charsets/ |
+--------------------------+----------------------------+
8 rows in set (0.00 sec)
無事に文字コードがUTF-8になりました。これでCentOS7でMySQLが使えますね。
おまけ: rootパスワードを制限なく自由に決める
rootのパスワードはデフォルトで4種類の文字を含まないといけないため、その規約を外すには以下のように設定します。
「/etc/my.cnf」の最終行あたりに下記を追記。
$ sudo vi /etc/my.cnf
validate_password_policy=LOW
再起動します。
$ systemctl restart mysqld.serviceログイン後、パスワードを再設定すればOKです。
$ mysql -u root -p
> set password for root@localhost=password('newpass');
これを設定しておけば、root以外のユーザーにも上記設定が適応されます。参考になれば幸いです。
スポンサーリンク
PC用AdSense
PC用AdSense
こちらの関連記事もどうぞ
-
-
さくらのVPSにCentOS7を導入する方法
こんにちは、okutani(@okutani_t)です。本記事ではさくらのVPS …
-
-
CentOS7に最新のEmacsを導入する方法
こんにちは、okutani(@okutani_t)です。需要があるかどうか分かり …
-
-
CentOS7にPHP5.6を導入する方法
こんにちは、okutani(@okutani_t)です。本記事ではCentOS7 …
-
-
CentOS7にRuby on Railsを導入する方法
こんにちは、okutani(@okutani_t)です。本記事ではCentOS7 …
-
-
CentOS7に最新のGitを導入する方法
こんにちは、okutani(@okutani_t)です。CentOS7でGitを …
- PREV
- CentOS7にPHP5.6を導入する方法
- NEXT
- Laravel導入方法&初期設定まとめ


