
画像を使わなくても、HTMLとCSSだけで立派なリボンを作ることができます。この記事では様々な形のリボンの作り方を使用サンプルとともに紹介していきます。どれもHTMLとCSSのコピペで使うことができます。
はじめに
リボンのテキストはサンプルでは「Welocome to My Blog!」や「NEW」などとしていますが、お好みのテキストに変えてご利用ください。ただし、複数行にわたるような長文にするとデザインが崩れてしまうことがあります。なるべく、短めのテキストを入れて頂くのがおすすめです。
また、HTMLコードでは例としてh3タグを使っていますが、この部分をh1~h5やpタグ、div、spanタグに置き換えてそのまま使うことができます。
シンプルなリボン
1. 端を山形に
<h3 class="ribbon1">Welcome to My Blog!</h3>
CSS
.ribbon1 {
    display: inline-block;
    position: relative;
    height: 50px;/*リボンの高さ*/
    line-height: 50px;/*リボンの高さ*/
    vertical-align: middle;
    text-align: center;
    padding: 0 30px;/*横の大きさ*/
    font-size: 18px;/*文字の大きさ*/
    background: #f57a78;/*塗りつぶし色*/
    color: #FFF;/*文字色*/
    box-sizing: border-box;
}

.ribbon1:before, .ribbon1:after{
    position: absolute;
    content: '';
    width: 0px;
    height: 0px;
    z-index: 1;
}

.ribbon1:before{
    top: 0;
    left: 0;
    border-width: 25px 0px 25px 15px;
    border-color: transparent transparent transparent #fff;
    border-style: solid;
}

.ribbon1:after{
    top: 0;
    right: 0;
    border-width: 25px 15px 25px 0px;
    border-color: transparent #fff transparent transparent;
    border-style: solid;
}
シンプルでフラットなリボンです。特に目立たせたい見出しや、アイキャッチに使うと良いでしょう。端の山形は、擬似要素(beforeとafter)を帯の端に重ねることで表現しています。コードに書かれているコメントを参考に、色やフォントサイズを調整してくださいませ。
2. ステッチ付き

<div class="ribbon2">
  <h3>Welcome to My Blog!</h3>
</div>
CSS
.ribbon2 {
    display: inline-block;
    position: relative;
    height: 60px;
    line-height: 60px;
    vertical-align: middle;
    text-align: center;
    padding: 7px 0;
    font-size: 18px;/*フォントサイズ*/
    background: #78d0f5;/*背景色*/
    color: #FFF;/*文字色*/
    box-sizing: border-box;
}

.ribbon2 h3 {
    vertical-align: middle;
    margin: 0;
    padding: 0 30px;
    border-top: dashed 1px #FFF;/*上の破線*/
    border-bottom: dashed 1px #FFF;/*下の破線*/
    line-height: 46px;
}

.ribbon2:before, .ribbon2:after{
  position: absolute;
  content: '';
  width: 0px;
  height: 0px;
  z-index: 1;
}

.ribbon2:before{/*左端の山形*/
  top: 0;
  left: 0;
  border-width: 30px 0px 30px 15px;
  border-color: transparent transparent transparent #fff;
  border-style: solid;
}

.ribbon2:after{/*右端の山形*/
  top: 0;
  right: 0;
  border-width: 30px 15px 30px 0px;
  border-color: transparent #fff transparent transparent;
  border-style: solid;
}
破線(border:dashed)をリボンの少し内側に入れることで、縫い目のような表現をしています。
3. 縫い目を太めに

<div class="ribbon3">
  <h3>Welcome to My Blog!</h3>
</div>
CSS
.ribbon3 {
    display: inline-block;
    position: relative;
    height: 60px;
    line-height: 60px;
    vertical-align: middle;
    text-align: center;
    padding: 7px 0;
    font-size: 18px;
    background: #acd879;
    color: #FFF;
    box-sizing: border-box;
}

.ribbon3 h3 {
    vertical-align: middle;
    margin: 0;
    padding: 0 30px;
    border-top: dashed 2px rgba(255, 255, 255, 0.5);
    border-bottom: dashed 2px rgba(255, 255, 255, 0.5);
    line-height: 42px;
}

.ribbon3:before, .ribbon3:after{
  position: absolute;
  content: '';
  width: 0px;
  height: 0px;
  z-index: 1;
}

.ribbon3:before{/*左の山形*/
  top: 0;
  left: 0;
  border-width: 30px 0px 30px 15px;
  border-color: transparent transparent transparent #fff;
  border-style: solid;
}

.ribbon3:after{/*右の山形*/
  top: 0;
  right: 0;
  border-width: 30px 15px 30px 0px;
  border-color: transparent #fff transparent transparent;
  border-style: solid;
}
先程のものから色を変えて、さらに縫い目を太くしてみました。より可愛い印象となりますね。
4. 右端だけカット

<h3 class="ribbon4">Welcome to My Blog!</h3>
CSS
.ribbon4 {
    display: inline-block;
    position: relative;
    height: 60px;/*高さ*/
    line-height: 60px;/*高さ*/
    vertical-align: middle;
    text-align: center;
    padding: 0 40px 0 18px;/*文字の左右の余白*/
    font-size: 18px;/*文字サイズ*/
    background: #ffc668;/*背景色*/
    color: #FFF;/*文字色*/
    box-sizing: border-box;
}

.ribbon4:after {
    position: absolute;
    content: '';
    width: 0px;
    height: 0px;
    z-index: 1;
}

.ribbon4:after {
    top: 0;
    right: 0;
    border-width: 30px 15px 30px 0px;
    border-color: transparent #fff transparent transparent;
    border-style: solid;
}
右側だけをカットしたような形にしてみました。鯉のぼりっぽくてかわいい(?)
5. 片側カット+縫い目つき

<div class="ribbon5">
  <h3>Welcome to My Blog!</h3>
</div>
CSS
.ribbon5 {
    display: inline-block;
    position: relative;
    height: 60px;
    line-height: 60px;
    vertical-align: middle;
    text-align: center;
    padding: 7px 0;
    font-size: 18px;/*文字サイズ*/
    background: #7f9dfb;/*背景色*/
    color: #FFF;/*文字色*/
    box-sizing: border-box;
}
.ribbon5 h3 {
    vertical-align: middle;
    margin: 0;
    padding: 0 30px 0 15px;
    border-top: dashed 1px #FFF;
    border-bottom: dashed 1px #FFF;
    line-height: 46px;
}


.ribbon5:after{
  position: absolute;
  content: '';
  z-index: 1;
  top: 0;
  right: 0;
  width: 0px;
  height: 0px;
  border-width: 30px 15px 30px 0px;
  border-color: transparent #fff transparent transparent;
  border-style: solid;
}
合わせ技です。縫い目をつけるとよりリボンっぽさが出ます。
6. 影付き

<div class="ribbon6">
  <h3>Welcome to My Blog!</h3>
</div>
CSS
.ribbon6 {
    display: inline-block;
    position: relative;
    height: 60px;
    line-height: 60px;
    vertical-align: middle;
    text-align: center;
    padding: 7px 0;
    font-size: 18px;
    background: #acd879;
    color: #FFF;
    box-sizing: border-box;
    box-shadow: 0 2px 2px rgba(0, 0, 0, 0.25);
}

.ribbon6 h3 {
    vertical-align: middle;
    margin: 0;
    padding: 0 30px;
    border-top: dashed 2px rgba(255, 255, 255, 0.5);
    border-bottom: dashed 2px rgba(255, 255, 255, 0.5);
    line-height: 42px;
}

.ribbon6:before, .ribbon6:after{
  position: absolute;
  content: '';
  width: 0px;
  height: 0px;
  z-index: 1;
}

.ribbon6:before{
    top: -2px;
    left: -2px;
    border-width: 32px 0px 32px 15px;
    border-color: transparent transparent transparent #fff;
    border-style: solid;
}

.ribbon6:after{
    top: -2px;
    right: -2px;
    border-width: 32px 15px 32px 0px;
    border-color: transparent #fff transparent transparent;
    border-style: solid;
}
うっすらと下側に影をつけました。これにより、画面上に置かれているように見せることができます。
7. 折り目付きリボン

<h3 class="ribbon7">Welcome to My Blog!</h3>
CSS
.ribbon7 {
    display: inline-block;
    position: relative;
    padding: 15px 20px;
    font-size: 18px;/*フォントサイズ*/
    color: #FFF;/*フォントカラー*/
    background: #a6d3c8;/*リボンの色*/
}

.ribbon7:before {
position: absolute;
content: '';
top: 100%;
left: 0;
border: none;
border-bottom: solid 15px transparent;
border-right: solid 20px rgb(149, 158, 155);/*折り返し部分*/
}
左側だけカクっと折り目がついたようなリボンです。シンプルに奥行きを表現することができます。コードに書かれたコメントを参考に色を自由に変えてみてください。
8. 両側に折り目

<h3 class="ribbon7-2">Welcome to My Blog!</h3>
CSS
.ribbon7-2 {
    display: inline-block;
    position: relative;
    padding: 15px 20px;
    font-size: 18px;/*フォントサイズ*/
    color: #FFF;/*フォントカラー*/
    background: #a6d3c8;/*背景色*/
}

.ribbon7-2:before {
    position: absolute;
    content: '';
    top: 100%;
    left: 0;
    border: none;
    border-bottom: solid 15px transparent;
    border-right: solid 20px rgb(149, 158, 155);/*折り返し部分*/
}

.ribbon7-2:after {
    position: absolute;
    content: '';
    top: 100%;
    right: 0;
    border: none;
    border-bottom: solid 15px transparent;
    border-left: solid 20px rgb(149, 158, 155);/*折り返し部分*/
}
折り目を両側につけると、より前に押し出されているような力強い見た目になります。
華やかでかわいい系のデザイン
9. 両端に折り目のついたポップなリボン

<div class="ribbon11">
  <h3>Welcome to My Blog!</h3>
</div>
CSS
.ribbon11 {
    display: inline-block;
    position: relative;
    height: 45px;
    vertical-align: middle;
    text-align: center;
    box-sizing: border-box;
}
.ribbon11:before{/*左側のリボン端*/
    content: '';
    position: absolute;
    width: 10px;
    bottom: -10px;
    left: -35px;
    z-index: -2;
    border: 20px solid #56adf3;
    border-left-color: transparent;/*山形に切り抜き*/
}

.ribbon11:after{/*右側のリボン端*/
    content: '';
    position: absolute;
    width: 10px;
    bottom: -10px;
    right: -35px;
    z-index: -2;
    border: 20px solid #56adf3;
    border-right-color: transparent;/*山形に切り抜き*/
}

.ribbon11 h3 {
    display: inline-block;
    position: relative;
    margin: 0;
    padding: 0 20px;
    line-height: 45px;
    font-size: 18px;
    color: #FFF;
    background: #2196F3;/*真ん中の背景色*/
}
.ribbon11 h3:before {
    position: absolute;
    content: '';
    top: 100%;
    left: 0;
    border: none;
    border-bottom: solid 10px transparent;
    border-right: solid 15px #397eb5;/*左の折り返し部分*/
}
.ribbon11 h3:after {
    position: absolute;
    content: '';
    top: 100%;
    right: 0;
    border: none;
    border-bottom: solid 10px transparent;
    border-left: solid 15px #397eb5;/*右の折り返し部分*/
}
端は山形にカットされたような雰囲気を出しつつ、擬似要素をずらして配置することで折り目を再現しました。より可愛い雰囲気にしたい場合は、ピンクやオレンジ、黄色などの色を使うと良いでしょう。
10. ストライプ模様

<div class="ribbon11-2">
  <h3>Welcome to My Blog!</h3>
</div>
CSS
.ribbon11-2 {
    display: inline-block;
    position: relative;
    height: 45px;
    vertical-align: middle;
    text-align: center;
    box-sizing: border-box;
}

.ribbon11-2:before{
    content: '';
    position: absolute;
    width: 10px;
    bottom: -10px;
    left: -35px;
    z-index: -2;
    border: 20px solid #a5cff3;
    border-left-color: transparent;
}

.ribbon11-2:after{
    content: '';
    position: absolute;
    width: 10px;
    bottom: -10px;
    right: -35px;
    z-index: -2;
    border: 20px solid #a5cff3;
    border-right-color: transparent;
}

.ribbon11-2 h3 {
    display: inline-block;
    position: relative;
    margin: 0;
    padding: 0 20px;
    line-height: 45px;
    font-size: 18px;
    color: #008eff;
    text-shadow: 0 0 2px #FFF;
    background: -webkit-repeating-linear-gradient(-45deg, #b0daff, #b0daff 3px,#cfe8ff 3px, #cfe8ff 7px);
    background: repeating-linear-gradient(-45deg, #b0daff, #b0daff 3px,#cfe8ff 3px, #cfe8ff 7px);
}

.ribbon11-2 h3:before {
    position: absolute;
    content: '';
    top: 100%;
    left: 0;
    border: none;
    border-bottom: solid 10px transparent;
    border-right: solid 15px #7fafd9;
}

.ribbon11-2 h3:after {
    position: absolute;
    content: '';
    top: 100%;
    right: 0;
    border: none;
    border-bottom: solid 10px transparent;
    border-left: solid 15px #7fafd9;
}
さきほどのデザインから背景色をストライプに変えてみました。ストライプはrepeating-linear-gradientと呼ばれるCSSの関数により表現します。
ボックスに折り込まれたようなデザイン
11. シンプル
<div class="ribbon_box">
  <h3 class="ribbon8">Welcome to My Blog!</h3>
  <p>サルワカへようこそ!</p>
</div>
CSS
.ribbon_box {
    display: block;
    position: relative;
    margin: 0 auto;
    padding: 10px 0;
    width: 300px;
    background: #f1f1f1;
  }
.ribbon8 {
    display: inline-block;
    position: relative;
    box-sizing: border-box;
    padding: 10px;
    margin: 0 0 0 -20px;
    width: calc(100% + 20px);
    font-size: 22px;
    color: white;
    background: #70c7ff;
}
.ribbon8:before {
    position: absolute;
    content: '';
    top: 100%;
    left: 0;
    border: none;
    border-bottom: solid 15px transparent;
    border-right: solid 20px #6eb3e0;
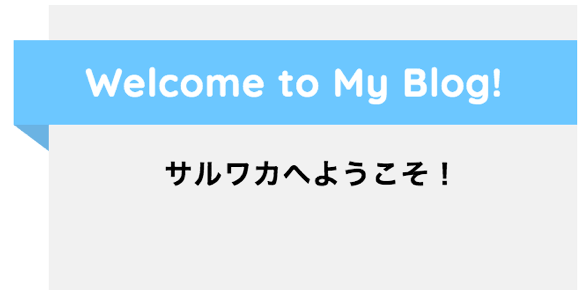
}シンプルなデザインで織り込んでみた場合です。大きめの帯を左側にはみ出させ、その下に擬似要素で三角形を配置しています。ボックス部分(グレイの部分)は自由に変えてもらってOKですが、ボックスの要素にはposition:relative;を指定するようにしてください。これによりリボンがボックスの裏から折り込まれたように配置されます。
12. 影をつけた場合
<div class="ribbon_box">
  <h3 class="ribbon9">Welcome to My Blog!</h3>
  <p>サルワカへようこそ!</p>
</div>
CSS
.ribbon_box {
    display: block;
    position: relative;
    margin: 15px auto;
    padding: 10px 0;
    width: 300px;
    background: #f1f1f1;
  }

.ribbon9 {
    display: inline-block;
    position: relative;
    box-sizing: border-box;
    padding: 10px;
    margin: 0 0 0 -20px;
    width: calc(100% + 20px);
    font-size: 22px;
    color: white;
    background: #70a6ff;
    box-shadow: 0 2px 2px rgba(0, 0, 0, 0.2);
}

.ribbon9:before {
    position: absolute;
    content: '';
    top: 100%;
    left: 0;
    border: none;
    border-bottom: solid 15px transparent;
    border-right: solid 20px #6081b7;
}
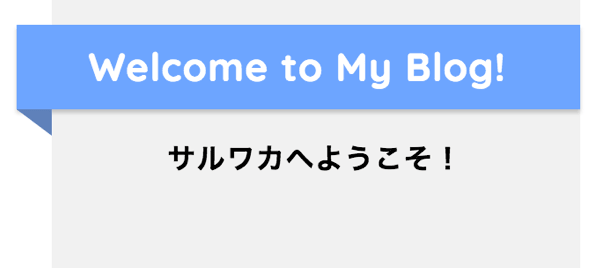
少し分かりづらいですが、リボンの下に薄っすらと影をつけてみました。より奥行きが感じられるはずです。
13. ステッチ付き折り込みリボン
<div class="ribbon_box">
  <div class="ribbon10">
    <h3>Welcome to My Blog!</h3>
  </div>
  <p>サルワカへようこそ!</p>
</div>
CSS
.ribbon_box {
    display: block;
    position: relative;
    margin: 15px auto;
    padding: 10px 0;
    width: 300px;
    background: #f1f1f1;
  }

.ribbon10 {
    display: inline-block;
    position: relative;
    box-sizing: border-box;
    padding: 5px 0;
    margin: 0 0 0 -20px;
    width: calc(100% + 20px);
    color: white;
    background: #70a6ff;
    box-shadow: 0 2px 2px rgba(0, 0, 0, 0.2);
}

.ribbon10 h3{
    vertical-align: middle;
    margin: 0;
    padding: 0 30px 0 15px;
    border-top: dashed 1px #FFF;
    border-bottom: dashed 1px #FFF;
    font-size: 20px;
    line-height: 46px;
}

.ribbon10:after{
    position: absolute;
    content: '';
    z-index: 1;
    top: 0;
    right: 0;
    width: 0px;
    height: 0px;
    border-width: 30px 15px 30px 0px;
    border-color: transparent #f1f1f1 transparent transparent;
    border-style: solid;
}

.ribbon10:before {
    position: absolute;
    content: '';
    top: 100%;
    left: 0;
    border: none;
    border-bottom: solid 15px transparent;
    border-right: solid 20px #6081b7;
}
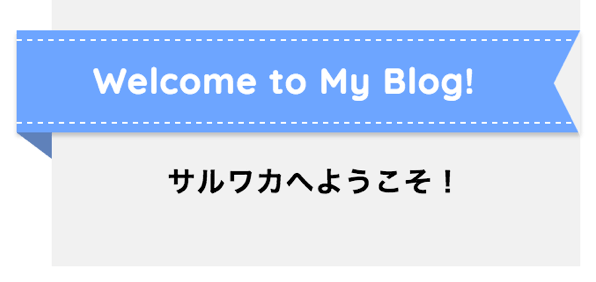
少しコードは長くなってしまいますが、折り込み+刺繍+山形にカットとしてみました。柔らかい雰囲気を出したいときにおすすめです。
縦のリボン
14. フラット

<div class="ribbon_box2">
  <span class="ribbon12">★</span>
  <div>
    <p>サルワカへようこそ!</p>
  </div>
</div>
CSS
.ribbon_box2 {
    display: block;
    position: relative;
    margin: 15px auto;
    padding: 10px 0;
    width: 300px;
    background: #f1f1f1;
    box-sizing: border-box;
  }

.ribbon12 {
    display: inline-block;
    position: absolute;
    top: 0;
    right: 10px;
    margin: 0;
    padding: 10px 0;
    z-index: 2;
    width: 40px;
    text-align: center;
    font-size: 17px;
    color: white;
    background: #ff785b;
}

.ribbon12:after{
    content: '';
    position: absolute;
    left: 0;
    top: 100%;
    height: 0;
    width: 0;
    border-left: 20px solid #ff785b;
    border-right: 20px solid #ff785b;
    border-bottom: 10px solid transparent;
}
立体感などは出さずにフラットな縦リボンにしてみました。★はアイコンではなく「星」と入力して変換した全角文字です。もちろんFontAwesomeなどのアイコンやその他の文字を使っても良いでしょう。
15. 丸みを出した場合
<div class="ribbon_box2">
  <span class="ribbon13">★</span>
  <div>
    <p>サルワカへようこそ!</p>
  </div>
</div>
CSS
.ribbon_box2 {
    display: block;
    position: relative;
    margin: 15px auto;
    padding: 10px 0;
    width: 300px;
    background: #f1f1f1;
    box-sizing: border-box;
  }

.ribbon13 {
    display: inline-block;
    position: absolute;
    top: -6px;
    right: 10px;
    margin: 0;
    padding: 10px 0;
    z-index: 2;
    width: 40px;
    text-align: center;
    color: white;
    font-size: 17px;
    background: linear-gradient(#ff785b 0%, #e95738 100%);
    border-radius: 2px 0 0 0;
  }

.ribbon13:before{
position: absolute;
    content: '';
    top: 0;
    right: -6px;
    border: none;
    border-bottom: solid 6px #cf4a2d;
    border-right: solid 6px transparent;
}
.ribbon13:after{
    content: '';
    position: absolute;
    left: 0;
    top: 100%;
    height: 0;
    width: 0;
    border-left: 20px solid #e95738;
    border-right: 20px solid #e95738;
    border-bottom: 10px solid transparent;
}
さきほどのデザインにうっすらとグラデーションを加え、丸みを表現しています。また、背後から折込まれたように見せるために、リボンの右上に小さな三角形を配置しました。
16. 端を三角に
<div class="ribbon_box2">
  <span class="ribbon13-2">NEW</span>
  <div>
    <p>サルワカへようこそ!</p>
  </div>
</div>
CSS
.ribbon_box2 {
    display: block;
    position: relative;
    margin: 15px auto;
    padding: 10px 0;
    width: 300px;
    background: #f1f1f1;
    box-sizing: border-box;
  }

.ribbon13-2 {
    display: inline-block;
    position: absolute;
    top: -6px;
    right: 10px;
    margin: 0;
    padding: 10px 0 7px;
    z-index: 2;
    width: 40px;
    text-align: center;
    color: white;
    font-size: 13px;
    background: #fa8383;
    border-radius: 2px 0 0 0;
  }

.ribbon13-2:before{
    position: absolute;
    content: '';
    top: 0;
    right: -5px;
    border: none;
    border-bottom: solid 6px #d07676;
    border-right: solid 5px transparent;
}

.ribbon13-2:after{
    content: '';
    position: absolute;
    left: 0;
    top: 100%;
    height: 0;
    width: 0;
    border-left: 20px solid transparent;
    border-right: 20px solid transparent;
    border-top: 10px solid #fa8383;
}
リボンの端を山形ではなく、三角形にしました。「NEW」という文字はもちろん変えることができます。ただし、短めの文字にしましょう。
5. 斜めのリボン
17. ボックスの角に斜めにかけたような帯
<div class="ribbon_box3">
  <div class="ribbon_area">
    <span class="ribbon14">NEW</span>
  </div>
    <p>サルワカへようこそ!</p>
</div>
CSS
.ribbon_box3{
    display: block;
    position: relative;
    margin: 15px auto;
    padding: 10px 0;
    width: 300px;
    height: 150px;
    background: #f1f1f1;
    box-shadow: 0 3px 5px rgba(0, 0, 0, 0.14);
    box-sizing: border-box;
}

.ribbon_area {
    position: absolute;
    top: -6px;
    right: -6px;
    width: 89px;
    height: 91px;
    overflow: hidden;
  }

.ribbon14 {
    display: inline-block;
    position: absolute;
    padding: 7px 0;
    left: -23px;
    top: 22px;
    width: 160px;
    text-align: center;
    font-size: 18px;
    line-height: 16px;
    background: #ffa520;
    color: #fff;
    letter-spacing: 0.05em;
    -webkit-transform: rotate(45deg);
    -ms-transform: rotate(45deg);
    transform: rotate(45deg);
    box-shadow: 0 2px 5px rgba(0, 0, 0, 0.2);
}

.ribbon14:before,.ribbon14:after{
    position: absolute;
    content: "";
    border-top: 4px solid #b2751b;
    border-left: 4px solid transparent;
    border-right: 4px solid transparent;
    bottom: -4px;
}

.ribbon14:before{
    left: 14px;
}

.ribbon14:after{
  	right: 18px;
}
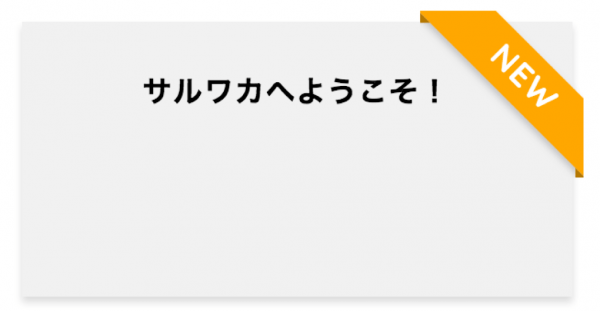
ボックスの角に斜めにかけたようなデザインです。目立たせたいボックスがあるときに使うと、効果的に目を引くことができるのではないかと思います。また、この例ではボックスにも影をつけて奥行きを表現しています。
18. グラデーションをかけた場合
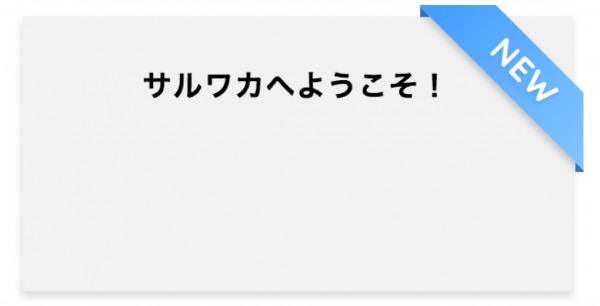
<div class="ribbon_box3">
  <div class="ribbon_area">
    <span class="ribbon15">NEW</span>
  </div>
    <p>サルワカへようこそ!</p>
</div>
CSS
.ribbon_box3{
    display: block;
    position: relative;
    margin: 15px auto;
    padding: 10px 0;
    width: 300px;
    height: 150px;
    background: #f1f1f1;
    box-shadow: 0 3px 5px rgba(0, 0, 0, 0.14);
    box-sizing: border-box;
}

.ribbon_area {
    position: absolute;
    top: -6px;
    right: -6px;
    width: 89px;
    height: 91px;
    overflow: hidden;
  }

.ribbon15 {
    display: inline-block;
    position: absolute;
    padding: 7px 0;
    left: -23px;
    top: 22px;
    width: 160px;
    text-align: center;
    font-size: 18px;
    line-height: 16px;
    background: linear-gradient(to right, #4298fa 0%,#8fcdff 100%);
    color: #fff;
    text-shadow: 0 2px 2px #56a1f3;
    letter-spacing: 0.05em;
    -webkit-transform: rotate(45deg);
    -ms-transform: rotate(45deg);
    transform: rotate(45deg);
    box-shadow: 0 2px 5px rgba(0, 0, 0, 0.2);
}

.ribbon15:before,.ribbon15:after{
    position: absolute;
    content: "";
    border-top: 4px solid #3672b6;
    border-left: 4px solid transparent;
    border-right: 4px solid transparent;
    bottom: -4px;
}

.ribbon15:before{
    left: 14px;
}

.ribbon15:after{
   right: 18px;
}
うっすらとグラデーションをかけることでリボンに丸みとリアリティーとを与えています。
19. フラットデザイン用
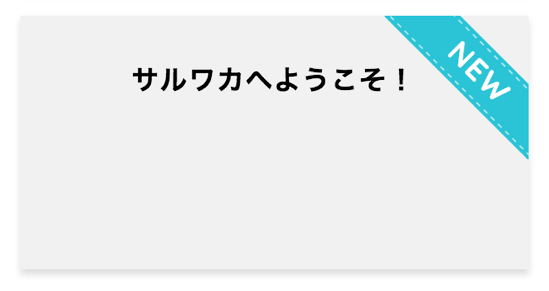
<div class="ribbon_box3">
  <div class="ribbon_area">
    <span class="ribbon16">NEW</span>
  </div>
    <p>サルワカへようこそ!</p>
</div>
CSS
.ribbon_box3{
    display: block;
    position: relative;
    margin: 15px auto;
    padding: 10px 0;
    width: 300px;
    height: 150px;
    background: #f1f1f1;
    box-shadow: 0 3px 5px rgba(0, 0, 0, 0.14);
    box-sizing: border-box;
}

.ribbon_area {
    position: absolute;
    top: 0;
    right: 0;
    width: 85px;
    height: 85px;
    overflow: hidden;
  }

.ribbon16 {
    display: inline-block;
    position: absolute;
    padding: 5px 0;
    left: -24px;
    top: 20px;
    width: 160px;
    text-align: center;
    font-size: 18px;
    line-height: 16px;
    background: #39c3d4;
    color: #fff;
    letter-spacing: 0.05em;
    -webkit-transform: rotate(45deg);
    -ms-transform: rotate(45deg);
    transform: rotate(45deg);
    box-shadow: 0 0 0 2px rgb(57, 195, 212);
    border-top: dashed 1px rgba(255, 255, 255, 0.65);
    border-bottom: dashed 1px rgba(255, 255, 255, 0.65);
}
立体感のない、フラットな斜めがけリボンにしてみました。破線(border-topとborder-bottom)は好みで除去してください。
その他おしゃれなデザイン
20. ラベルのようなリボン
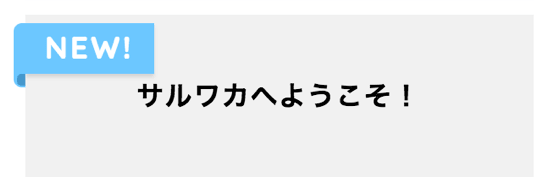
<div class="ribbon_box">
  <h3 class="ribbon17">NEW!</h3>
  <p>サルワカへようこそ!</p>
</div>
CSS
.ribbon_box {
    display: block;
    position: relative;
    margin: 0 auto;
    padding: 20px 0;
    width: 300px;
    background: #f1f1f1;
  }
.ribbon17 {
    display: inline-block;
    position: absolute;
    left: 0;
    top: 5px;
    box-sizing: border-box;
    padding: 0 12px;
    margin: 0;
    height: 30px;
    line-height: 30px;
    font-size: 18px;
    letter-spacing: 0.1em;
    color: white;
    background: #70c7ff;
    box-shadow: 0 2px 2px rgba(0, 0, 0, 0.12);
}
.ribbon17:before {
    position: absolute;
    content: '';
    top: 0;
    left: -7px;
    border: none;
    height: 38px;
    width: 7px;
    background: #70c7ff;
    border-radius: 5px 0 0 5px;
}
.ribbon17:after {
    position: absolute;
    content: '';
    bottom: -7px;
    left: -5px;
    border: none;
    height: 7px;
    width: 5px;
    background: #4d99ca;
    border-radius: 5px 0 0 5px;
}
裏から回り込んだような丸みのあるラベル風リボンです。かわいくてポップな雰囲気を出したいときに使うと良いでしょう。
21. 上からの角度に変えてみた場合
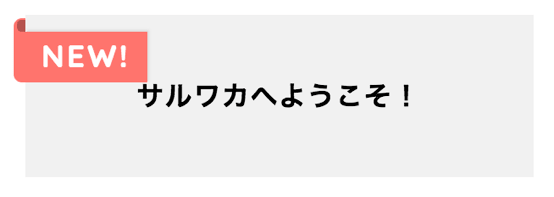
<div class="ribbon_box">
  <h3 class="ribbon18">NEW!</h3>
  <p>サルワカへようこそ!</p>
</div>
CSS
.ribbon_box {
    display: block;
    position: relative;
    margin: 0 auto;
    padding: 20px 0;
    width: 300px;
    background: #f1f1f1;
  }
.ribbon18 {
    display: inline-block;
    position: absolute;
    left: 0;
    top: 10px;
    box-sizing: border-box;
    padding: 0 10px;
    margin: 0;
    height: 30px;
    line-height: 30px;
    font-size: 18px;
    letter-spacing: 0.1em;
    color: white;
    background: #ff7470;
    box-shadow: 1px -1px 1px rgba(0, 0, 0, 0.1);
}
.ribbon18:before {
    position: absolute;
    content: '';
    top: -8px;
    left: -7px;
    border: none;
    height: 38px;
    width: 7px;
    background: #ff7470;
    border-radius: 5px 0 0 5px;
}
.ribbon18:after {
    position: absolute;
    content: '';
    top: -7px;
    left: -5px;
    border: none;
    height: 7px;
    width: 5px;
    background: #b25552;
    border-radius: 5px 0 0 5px;
}
さきほどと似ていますが、こちらはリボンを上から見たような形になっています。お好みで使い分けてくださいませ。
23. クール

<div class="ribbon20">
  <h3>Welcome!</h3>
</div>
CSS
.ribbon20 {
    display: inline-block;
    position: relative;
    height: 45px;
    vertical-align: middle;
    text-align: center;
    box-sizing: border-box;
    -ms-transform: rotate(-10deg) skew(-17deg,4deg);
    -webkit-transform: rotate(-10deg) skew(-17deg,4deg);
    transform: rotate(-10deg) skew(-17deg,4deg);
}
.ribbon20:before{
    content: '';
    position: absolute;
    width: 40px;
    height: 40px;
    background: #eb9920;
    bottom: -7px;
    left: -15px;
    z-index: -2;
}

.ribbon20:after{
    content: '';
    position: absolute;
    width: 40px;
    height: 40px;
    background: #eb9920;
    bottom: -10px;
    right: -25px;
    z-index: -2;
}

.ribbon20 h3 {
    display: inline-block;
    position: relative;
    margin: 0;
    padding: 0 20px;
    line-height: 45px;
    font-size: 18px;
    color: white;
    background: #f8aa37;
}
.ribbon20 h3:before {
    position: absolute;
    content: '';
    top: 100%;
    left: 0;
    border: none;
    border-bottom: solid 7px transparent;
    border-right: solid 25px #c6821e;
}
.ribbon20 h3:after {
    position: absolute;
    content: '';
    top: 100%;
    right: 0;
    border: none;
    border-bottom: solid 10px transparent;
    border-left: solid 15px #c6821e;
}
まさに斜めにねじれていく瞬間を再現したような躍動感のあるデザインです。カッコよさを出したいときにおすすめです。
最後に
ここまで22個のリボンデザインを紹介してきました。デザインにインパクトや華やかさを加えたいときにご活用ください。なお、上で紹介してきたデザインサンプルのフォントは全てGoogle FontsのQuicksandです。

