DataBaseのSQLiteを使うときにSQL文を書くのは面倒です。そんな時に、簡単にデータベースを管理してくれるライブラリーにActiveAndroid があります。
Android 7.1.1
ActiveAndroid
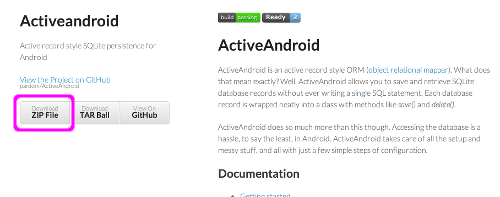
こちらからzipファイルをダウンロードして、jarファイルをビルドしprojectに追加するとできます。ダウンロード先:ActiveAndroid
あるいはjarファイルを直接ダウンロードすることもできます
https://github.com/pardom/ActiveAndroid/downloads
Mac の場合
この後は、Mac の場合はターミナルでできます
ターミナルを起動して
ダウンロードして解凍したフォルダ内に入り
sh gradlew build
|
1 2 3 |
$ sh gradlew build Downloading https://services.gradle.org/distributions/gradle-1.8-bin.zip ............. |
パッケージのフォルダ内に ../build/libs/activeandroid.jar ができています
できた jar ファイルをライブラリーフォルダーに入れます
Windows の場合
Windows のコマンドプロンプトを使い
ダウンロードして解凍したフォルダ内に入り
gradlew build
を実行します
|
1 2 3 4 5 6 7 8 9 10 11 12 13 14 15 16 17 18 19 20 21 22 23 24 25 26 |
C:\temp\pardom-ActiveAndroid-08c6335>gradlew build :compileJava 警告: [options] ブートストラップ・クラスパスが-source 1.6と一緒に設定されていません 注意:入力ファイルの操作のうち、未チェックまたは安全ではないものがあります。 注意:詳細は、-Xlint:uncheckedオプションを指定して再コンパイルしてください。 警告1個 :processResources UP-TO-DATE :classes :jar :javadocs :javadocsJar :sourcesJar :signArchives SKIPPED :assemble :compileTestJava UP-TO-DATE :processTestResources UP-TO-DATE :testClasses UP-TO-DATE :test UP-TO-DATE :check UP-TO-DATE :build BUILD SUCCESSFUL Total time: 7.203 secs C:\temp\pardom-ActiveAndroid-08c6335> C:\temp\pardom-ActiveAndroid-08c6335> |
../build/libs/pardom-ActiveAndroid-xxx.jar
../build/libs/pardom-ActiveAndroid-xxx-javadoc.jar
../build/libs/pardom-ActiveAndroid-xxx-sources.jar
ができます
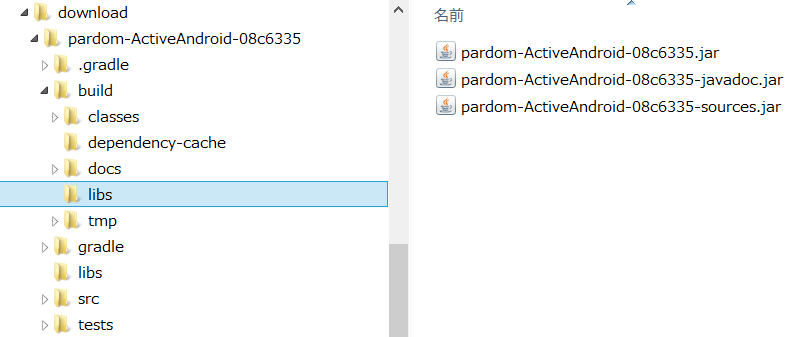
/build/libs/にあるpardom-ActiveAndroid-xxx.jar (/buildの下の/libs/です)
をライブラリーフォルダーに入れます
エラーが発生した場合:エラー内容にもよりますが。JDKのパスをJAVA_HOMEとしてシステム環境変数に設定する場合がおおいかもしれません。
|
1 2 3 4 5 6 7 8 9 10 11 12 13 14 |
C:\download\pardom-ActiveAndroid-08c6335>gradlew build :compileJava FAILED FAILURE: Build failed with an exception. * What went wrong: Execution failed for task ':compileJava'. > Cannot find System Java Compiler. Ensure that you have installed a JDK (not just a JRE) and configured your JAVA_HOME system variable to point to the according directory. * Try: Run with --stacktrace option to get the stack trace. Run with --info or --debug option to get more log output. BUILD FAILED |
環境変数のシステム環境変数にJAVA_HOMEに、JDKのバスを設定

C:\Program Files\Java\jdk1.8.x_xx
この場合、exeファイルはbin以下にありますがbinは指定しません
Android Studio
libsフォルダーをプロジェクトのapp以下に作成してjarを入れます。
build.gradle(Module: app) に実際に入れたjarファイル名を記述しSyncします

|
1 2 3 4 5 6 7 8 9 |
apply plugin: 'com.android.application' android { ... } dependencies { ... compile files('Libs/activeandroid.jar') } |
Manifest の設定
android:name=”com.activeandroid.app.Application” と
AA_DB_NAME を test.db
AA_DB_VERSION を 1
として
AndroidManufest.xml に追加します
|
1 2 3 4 5 6 7 8 9 10 11 12 13 14 15 16 17 18 19 20 21 22 23 |
<application android:name="com.activeandroid.app.Application" android:allowBackup="true" android:icon="@drawable/ic_launcher" android:label="@string/app_name" android:theme="@style/AppTheme" > <meta-data android:name="AA_DB_NAME" android:value="testDB.db" /> <meta-data android:name="AA_DB_VERSION" android:value="1" /> <activity android:name="com.example.testactiveandroid.MainActivity" android:label="@string/app_name" > <intent-filter> <action android:name="android.intent.action.MAIN" /> <category android:name="android.intent.category.LAUNCHER" /> </intent-filter> </activity> </application> |
Model を継承したクラスの作成
id はデフォルトで設定されているのであえて作らなくても大丈夫です
Item.java
|
1 2 3 4 5 6 7 8 9 10 11 12 13 14 15 16 17 18 19 20 21 22 23 24 25 26 27 28 29 30 31 32 33 |
import com.activeandroid.Model; import com.activeandroid.annotation.Column; import com.activeandroid.annotation.Table; /* Copyright (C) 2010 Michael Pardo Licensed under the Apache License, Version 2.0 (the "License"); you may not use this file except in compliance with the License. You may obtain a copy of the License at http://www.apache.org/licenses/LICENSE-2.0 Unless required by applicable law or agreed to in writing, software distributed under the License is distributed on an "AS IS" BASIS, WITHOUT WARRANTIES OR CONDITIONS OF ANY KIND, either express or implied. See the License for the specific language governing permissions and limitations under the License. */ @Table(name = "testDB") public class Item extends Model { @Column(name = "data1") public String keyData; @Column(name = "data2") public String valueData; public Item() { super(); } } |
ここまでで準備ができましたので
実際のプロジェクトでデータを扱って見ましょう
1件データの登録
1件のkeyDataとvalueDataの登録
|
1 2 3 4 5 6 7 8 9 10 11 12 |
// 登録 Item item = new Item(); item.keyData = "ABC"; item.valueData = "9900"; item.save(); // 全て取リだし List<Item> list = new Select().from(Item.class).execute(); for (Item i : list) { Log.d("keyData: ", i.keyData); Log.d("valueData: ", i.valueData); } |
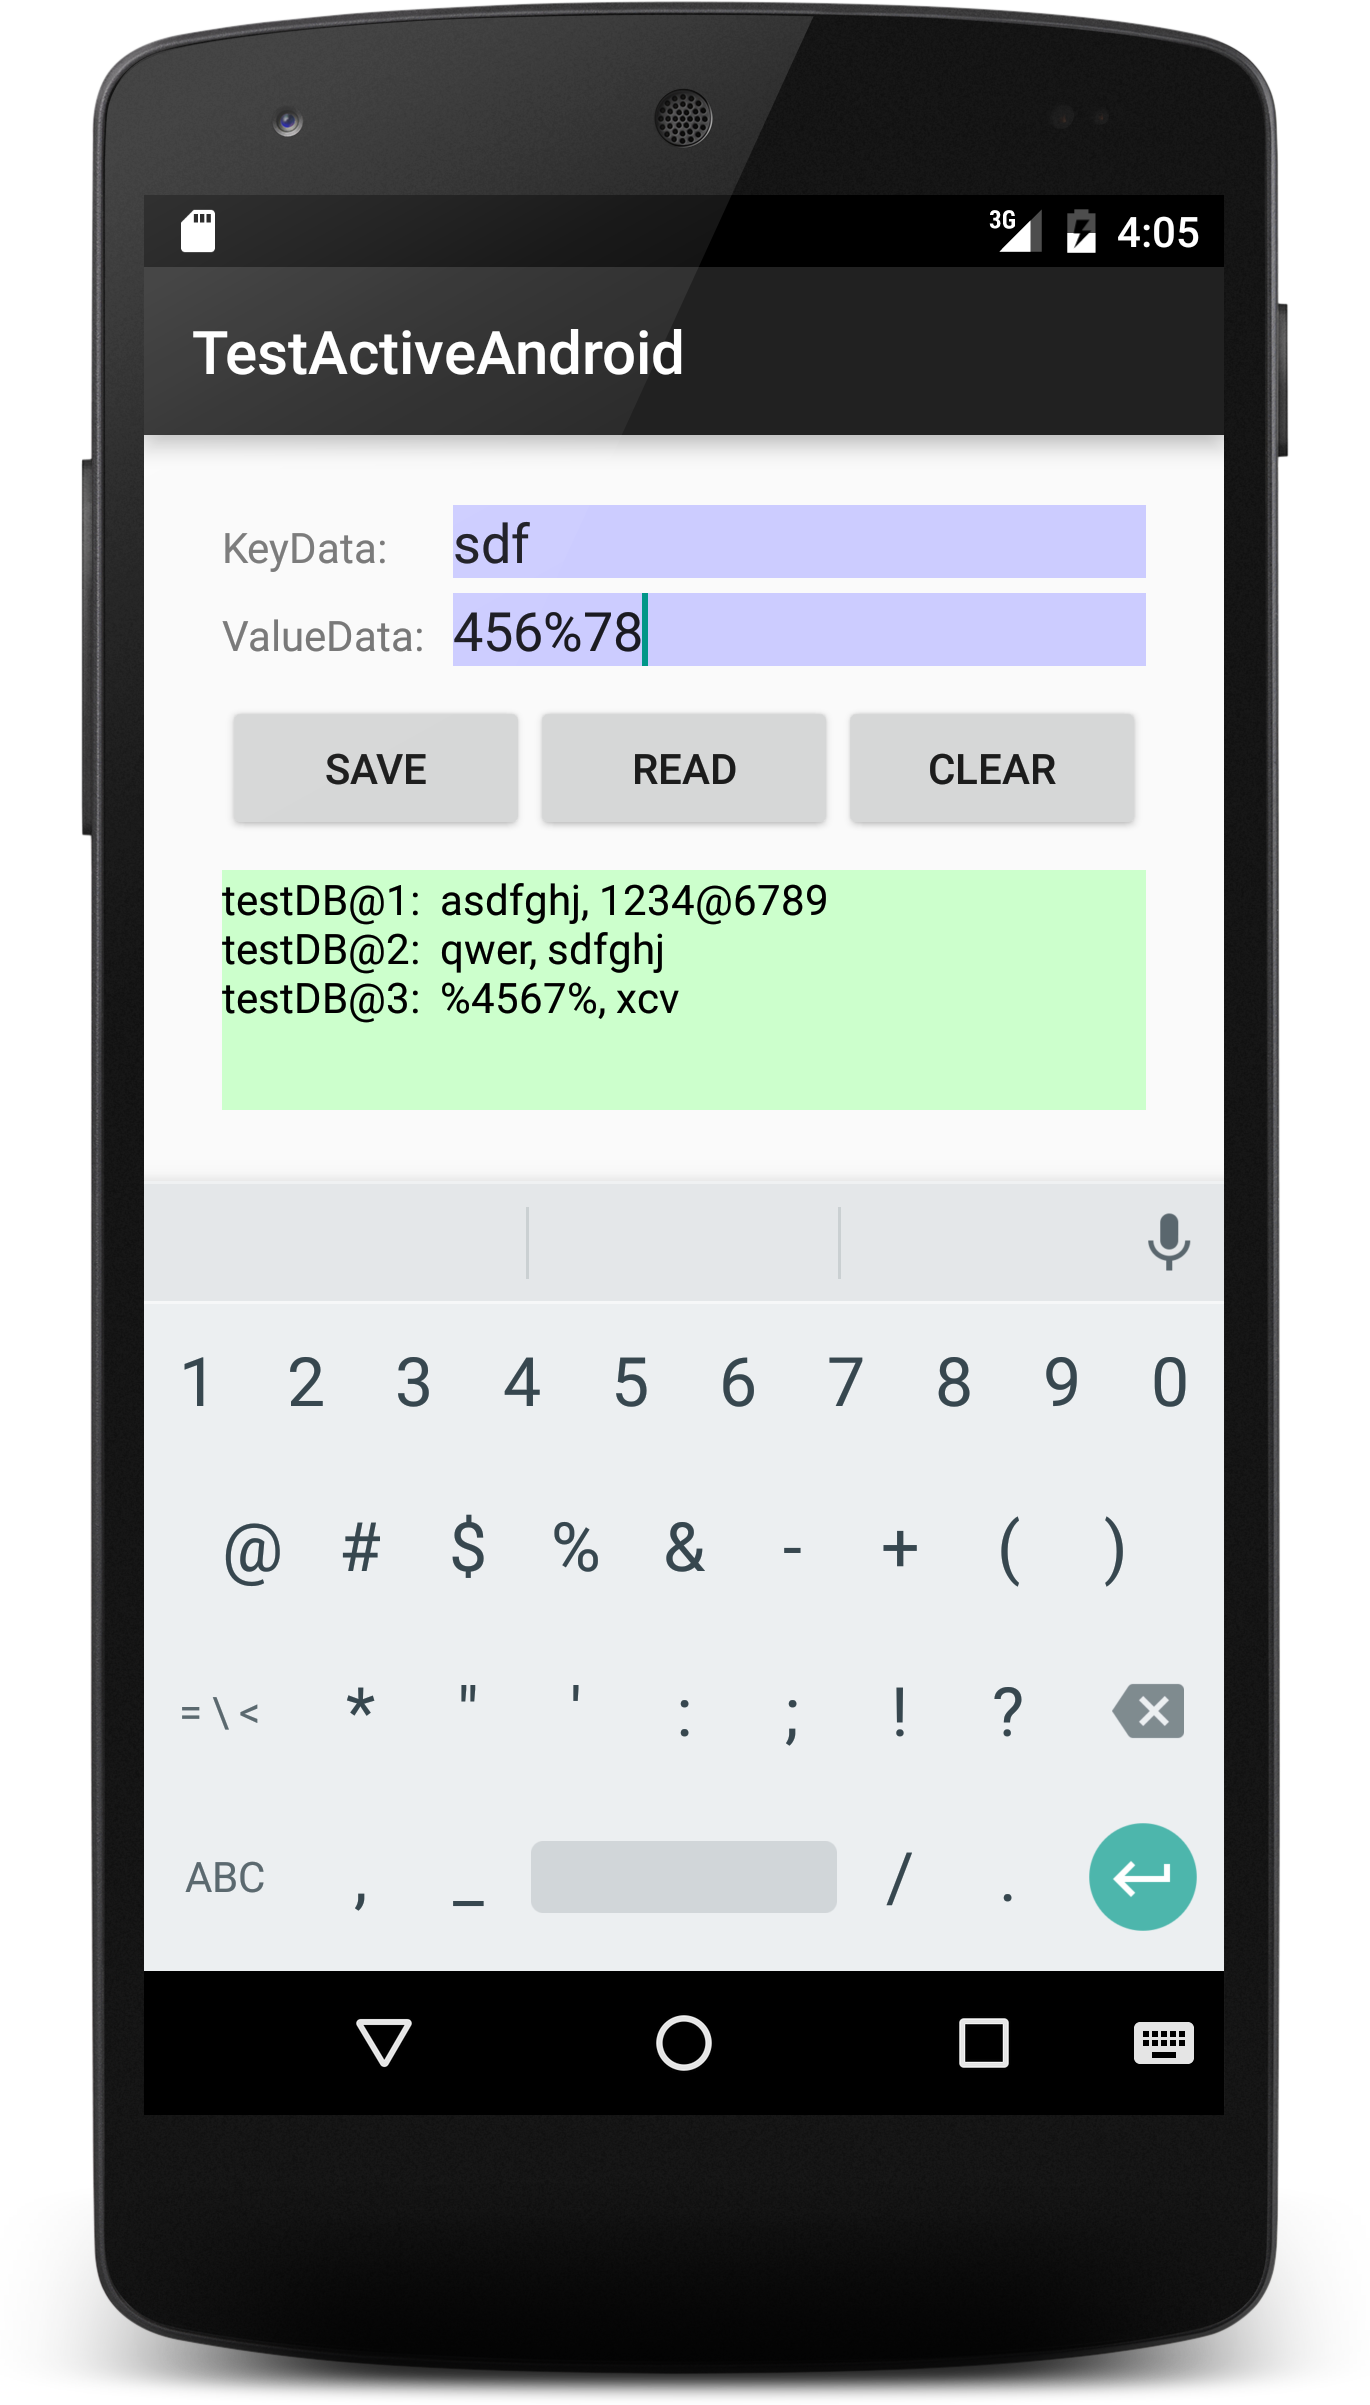
登録と読み出しアプリ
とりあえず、データを登録して読み出す簡単なアプリを作ってみます。
MainActivity.java
|
1 2 3 4 5 6 7 8 9 10 11 12 13 14 15 16 17 18 19 20 21 22 23 24 25 26 27 28 29 30 31 32 33 34 35 36 37 38 39 40 41 42 43 44 45 46 47 48 49 50 51 52 53 54 55 56 57 58 59 60 61 62 63 64 65 66 67 68 69 70 71 72 73 74 75 76 77 78 79 80 81 82 83 84 85 86 87 88 89 90 91 92 93 94 95 96 97 98 99 100 101 102 103 104 105 106 107 108 109 110 111 112 113 114 115 116 117 118 |
import android.content.Context; import android.database.Cursor; import android.database.sqlite.SQLiteDatabase; import android.os.Bundle; import android.support.v7.app.AppCompatActivity; import java.util.ArrayList; import java.util.List; import android.util.Log; import android.view.View; import android.view.inputmethod.InputMethodManager; import android.widget.Button; import android.widget.EditText; import android.widget.TextView; import com.activeandroid.ActiveAndroid; import com.activeandroid.query.Select; public class MainActivity extends AppCompatActivity { private EditText editText1, editText2; private Button buttonSave, buttonRead, buttonClear; private TextView textView; @Override protected void onCreate(Bundle savedInstanceState) { super.onCreate(savedInstanceState); setContentView(R.layout.activity_main); editText1 = (EditText)findViewById(R.id.edit_text1); editText2 = (EditText)findViewById(R.id.edit_text2); buttonSave = (Button)findViewById(R.id.save_button); buttonSave.setOnClickListener(new View.OnClickListener() { @Override public void onClick(View v) { String text1 = editText1.getText().toString(); String text2 = editText2.getText().toString(); if (text1 != null && text2 != null){ saveData(text1, text2); // 次の入力のため空白とする editText1.setText(""); editText2.setText(""); // ボタンがタップでkeyboard を閉じる InputMethodManager inputMethodManager = (InputMethodManager)getSystemService(Context.INPUT_METHOD_SERVICE); inputMethodManager.hideSoftInputFromWindow(v.getWindowToken(), 0); } } }); textView = (TextView)findViewById(R.id.text_view); buttonRead = (Button)findViewById(R.id.read_button); buttonRead.setOnClickListener(new View.OnClickListener() { @Override public void onClick(View v) { readData(); } }); buttonClear = (Button)findViewById(R.id.clear_button); buttonClear.setOnClickListener(new View.OnClickListener() { @Override public void onClick(View v) { clearData(); } }); } private void saveData(String text1, String text2){ // 登録 Item item = new Item(); item.keyData = text1; item.valueData = text2; item.save(); // 読出し readData(); } private void readData(){ String resText = ""; // 全て取リだし List<Item> list = new Select().from(Item.class).execute(); for (Item i : list) { resText += String.valueOf(i) + ": " + i.keyData +", "+i.valueData +"\n"; } textView.setText(resText); } private void clearData(){ List<String> tables = new ArrayList<>(); SQLiteDatabase database = ActiveAndroid.getDatabase(); Cursor cursor = database.rawQuery("SELECT * FROM sqlite_master WHERE type='table';", null); cursor.moveToFirst(); while (!cursor.isAfterLast()) { String tableName = cursor.getString(1); if (!tableName.equals("android_metadata") && !tableName.equals("sqlite_sequence")) { tables.add(tableName); } cursor.moveToNext(); } cursor.close(); for (String tableName : tables) { database.execSQL("DELETE FROM " + tableName); } } } |
activity_main.xml
|
1 2 3 4 5 6 7 8 9 10 11 12 13 14 15 16 17 18 19 20 21 22 23 24 25 26 27 28 29 30 31 32 33 34 35 36 37 38 39 40 41 42 43 44 45 46 47 48 49 50 51 52 53 54 55 56 57 58 59 60 61 62 63 64 65 66 67 68 69 70 71 72 73 74 75 76 77 78 79 80 81 82 83 84 85 86 87 88 89 90 91 92 93 94 95 96 97 |
<LinearLayout xmlns:android="http://schemas.android.com/apk/res/android" xmlns:tools="http://schemas.android.com/tools" android:layout_width="match_parent" android:layout_height="match_parent" android:layout_margin="16dp" android:orientation="vertical" android:gravity="center" tools:context=".MainActivity"> <LinearLayout android:layout_marginLeft="10dp" android:layout_marginRight="10dp" android:orientation="horizontal" android:layout_width="match_parent" android:layout_height="wrap_content"> <TextView android:text="KeyData: " android:layout_weight="1" android:layout_width="0dp" android:layout_height="wrap_content" /> <EditText android:id="@+id/edit_text1" android:background="#ccf" android:layout_weight="3" android:layout_width="0dp" android:layout_height="wrap_content" /> </LinearLayout> <LinearLayout android:layout_marginLeft="10dp" android:layout_marginRight="10dp" android:layout_marginTop="5dp" android:orientation="horizontal" android:layout_width="match_parent" android:layout_height="wrap_content"> <TextView android:text="ValueData: " android:layout_weight="1" android:layout_width="0dp" android:layout_height="wrap_content" /> <EditText android:id="@+id/edit_text2" android:background="#ccf" android:layout_weight="3" android:layout_width="0dp" android:layout_height="wrap_content" /> </LinearLayout> <LinearLayout android:layout_gravity="center_horizontal" android:layout_margin="10dp" android:orientation="horizontal" android:layout_width="match_parent" android:layout_height="wrap_content"> <Button android:id="@+id/save_button" android:text="Save" android:layout_gravity="center_horizontal" android:layout_width="0dp" android:layout_weight="1" android:layout_height="wrap_content" /> <Button android:id="@+id/read_button" android:text="Read" android:layout_width="0dp" android:layout_weight="1" android:layout_height="wrap_content" /> <Button android:id="@+id/clear_button" android:text="Clear" android:layout_width="0dp" android:layout_weight="1" android:layout_height="wrap_content" /> </LinearLayout> <ScrollView android:background="#cfc" android:layout_marginLeft="10dp" android:layout_marginRight="10dp" android:layout_width="match_parent" android:layout_height="80dp"> <TextView android:id="@+id/text_view" android:textColor="#000" android:layout_width="wrap_content" android:layout_height="wrap_content" /> </ScrollView> </LinearLayout> |
このような感じでシンプルな機能のみのアプリになりました。
その他の機能について以下に記述しました。
複数のデータの登録
まとめてデータを登録したい場合
|
1 2 3 4 5 6 7 8 9 10 11 12 13 14 15 16 17 |
// 登録 Item item = new Item(); item.title = "Android アプリ開発極意"; item.price = "9900"; item.save(); item = new Item(); item.keyData = "EFG"; item.valueData = "8900"; item.save(); // 全て読み出し List<Item> list = new Select().from(Item.class).execute(); for (Item i : list) { Log.d("keyData: ", i.keyData); Log.d("valueData: ", i.valueData); } |
ただこれでは毎回インスタンスを作成するので
コストがかかります
transactions
同時にデータの登録をする時は transactions を使うと100倍早いそうです
|
1 2 3 4 5 6 7 8 9 10 11 12 13 14 15 |
// Bulk Insert ActiveAndroid activeAndroid = new ActiveAndroid(); activeAndroid.beginTransaction(); try { for (int i = 0; i < 10; i++) { Item item = new Item(); item.keyData = "No." + String.valueOf(i+1); item.price = String.valueOf(9900+i*20); item.save(); } activeAndroid.setTransactionSuccessful(); } finally { activeAndroid.endTransaction(); } |
データを取り出す
例えば6番目のデータを取り出す時は
|
1 2 3 4 5 6 |
// 6番目のデータを取り出す Item item = Item.load(Item.class, 6); String key = item.keyData; String value = item.valueData; Log.d("i.keyData :", key); Log.d("i.valueData :", value); |
データの削除
4番目のデータを削除するとき
|
1 2 3 |
// 削除 Item item = Item.load(Item.class, 4); item.delete(); |
ランダムにデータを取り出す
ランダムにデータを取り出せます
|
1 2 3 4 |
// ランダムにデータを取り出す Item item = new Select().from(Item.class).orderBy("RANDOM()").executeSingle(); Log.d("i.title :", item.title); Log.d("i.price :", item.price); |
クエリ
Id が 5 あるいは “ABCD” の検索です
|
1 2 3 4 5 6 |
// クエリ List<Item> list = new Select().from(Item.class).where("Id = ? or keyData = ?", 5, "ABCD").execute(); for (Item i : list) { Log.d("keyData: ", i.keyData); Log.d("valueData: ", i.valueData); } |
データベースを削除する
ActiveAndroidの使いにくい点として、登録データを削除すると、それに関係していたIDがなくなっているということです。(もしかしたら修正されているか、代案があるのかもしれませんが)
データベースを削除してしまう方法です。ただこれは一旦アプリを終了させないと反映されません。またデータベースを使用中だと削除されないようです。
|
1 |
this.deleteDatabase("/data/data/[your project package name]/databases/testDB.db"); |
ここで設定しているのはアプリ内のメモリにあるデータベースで、ターミナルなどで入っていくとデータベースの実体が見えてきます。セキュリティブロックされないようにするは run-as を使います。
|
1 2 3 4 5 6 |
root@generic_x86:/data/data/com.example.testactiveandroid/databases $ ls test.db test.db-journal testDB.db testDB.db-journal root@generic_x86:/data/data/com.example.testactiveandroid/databases $ |
Android Studio 2.0 でのエラー
(2016/4/26) ActiveAndroidがAndroid Sudio2.0において実行エラーとなります。gradle wrapper2.10以降の問題と思われますが、ワークアラウンドとしてはInstant Runを一時的に止めることで対応できます。
File->Settings->Build, Execution, Deployment->Instant Run
にて「Enable Instant Run …」のチェックを外す
その他の方法も以下にあります
staackoverflow
尚、この現象はAndroid Studio 2.1 で解消されました。
Reference:
Getting-started