はじめに
tensorflow、chainer、scikit-learnなど各種python用の機械学習ライブラリをインストールしてあって、すぐに使えるDockerイメージを作りました。mecabなども入っているので自然言語処理にも役立つかと思います。
機械学習の実験のための環境構築がちょっと面倒であったり、いろんなところに環境が散ってしまっていたので、管理しやすい形にしたくてDockerイメージを作りました。
インストールされているライブラリ
今後、他のライブラリのインストールやバージョンアップなどをしていくつもりですが、現状以下のライブラリがインストールされています。
- tensorflow 0.12.0
- chainer 1.19.0
- scikit-learn 0.18.1
- gensim 0.13.4
- word2vec 0.9.1
- numpy 1.11.3
- pandas 0.19.2
- jupyter 4.2.1
- matplotlib 1.5.3
- mecab latest
- juman++ 7.01
もちろん、上記の依存ライブラリやmecab・juman++用のPythonバインディングもインストールされています。
ちなみにOSはUbuntu 16.04です。
使い方
Pullとコンテナにログイン
やり方は以下のコマンドのとおりです。jupyter notebookのパスワードもsudoのパスワードも”ml”になっています。利用環境に応じて必要であればパスワードを変更してください(jupyter notebookだけを立ち上げる場合は、すみませんが現状パスワード変更は出来ません)。
jupyter notebookのパスワード変更方法はこちらを参考にしてください(/home/ml/.jupyter/jupyter_notebook_config.py これがjupyter notebookの設定ファイルです)。
### Docker Pull
docker pull zuqqhi2/ml-python-sandbox:latest
docker images
#REPOSITORY                  TAG                 IMAGE ID            CREATED             SIZE
#zuqqhi2/ml-python-sandbox   latest              4402825ff756        2 hours ago         12.9 GB

### Run jupyter without login to container
sudo docker run -it -p 8888:8888 zuqqhi2/ml-python-sandbox
# access to the host using browser with 8888 port like http://sample.com:8888

### Login to container
sudo docker run -it -p 8888:8888 zuqqhi2/ml-python-sandbox /bin/bash
source ~/.bash_profile
mlact

### Run jupyter notebook after login to container
jupyter notebook --ip=0.0.0.0 --port=8888
Jupyter上でいろいろ試してみる
ちゃんと利用できる形でライブラリ群がインストールされているか確認するために、jupyter notebook上で決定木の学習とプロット、そしてmecabとjuman++を動かしてみます。
まず、jupyter notebook起動したホストに8888ポートでブラウザからアクセスします(http://sample.com:8888)。すると、ログイン画面が出てくるのでパスワードを入力してログインします(デフォルトは”ml”)。

次にノートを作ります。
次に以下のコードを入力して実行します。以下のコードは、scikit-learnに入っているirisデータを決定木で品種分類ルールを獲得させ、そのルールをプロットさせるコードです。
import numpy as np
import pandas as pd
from sklearn.cross_validation import ShuffleSplit, train_test_split
from sklearn.tree import DecisionTreeClassifier, export_graphviz
from sklearn.metrics import f1_score, make_scorer, accuracy_score
from sklearn.grid_search import GridSearchCV
from sklearn import datasets
from pydotplus import graph_from_dot_data
from IPython.display import Image

# Load data
iris = datasets.load_iris()
features = iris.data
categories = iris.target

# Cross-Validation setting
X_train, X_test, y_train, y_test = train_test_split(features, categories, test_size=0.2, random_state=42)
cv_sets = ShuffleSplit(X_train.shape[0], n_iter = 10, test_size = 0.20, random_state = 0)
params = {'max_depth': np.arange(2,11), 'min_samples_leaf': np.array([5])}

# Learning
def performance_metric(y_true, y_predict):
  score = f1_score(y_true, y_predict, average='micro')
  return score

classifier = DecisionTreeClassifier()
scoring_fnc = make_scorer(performance_metric)
grid = GridSearchCV(classifier, params, cv=cv_sets, scoring=scoring_fnc)
best_clf = grid.fit(X_train, y_train)

# Plot decision tree
dot_data = export_graphviz(best_clf.best_estimator_, out_file=None,
                         feature_names=iris.feature_names,
                         class_names=iris.target_names,
                         filled=True, rounded=True,
                         special_characters=True)
graph = graph_from_dot_data(dot_data)
Image(graph.create_png())
このコードを実行して、以下のような結果が得られるので、scikit-learnは大丈夫ですね。

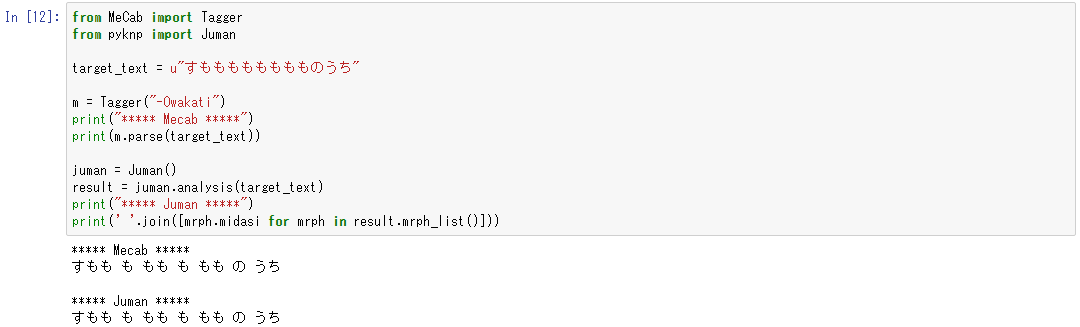
次はmecabとjuman++です。”すもももももももものうち”というフレーズの分かちがちを両方の解析器に解析させるプログラムを実行させてみます。
from MeCab import Tagger
from pyknp import Juman

target_text = u"すもももももももものうち"

m = Tagger("-Owakati")
print("***** Mecab *****")
print(m.parse(target_text))

juman = Juman()
result = juman.analysis(target_text)
print("***** Juman *****")
print(' '.join([mrph.midasi for mrph in result.mrph_list()]))
結果は以下のようになるので、mecabとjuman++についてもちゃんとpythonバインディングが入っていて使えます。
おわりに
自分で実際に普段使っているDockerイメージなので、必要に応じて新しいライブラリの追加などしていきます。
Related Posts
2014年8月3日 [PCL][Python][CPP]Python PCL (Point Cloud Library)のインストールとサンプル実行 概要 PCL(点群処理ライブラリ)のが出たということで触って見た。 まだ python pcl でできる部分は少ないみたい。 Env Linux ubuntu 3.8.0-29-generic #42~precise1-Ubuntu SMP Wed Aug 14 […]
コメントを残す