BLACK SHEEP

The T-62 is undeniably the least memorable among all of its world-famous post war era brothers - the T-54/55, T-64, T-72, T-80 and T-90 all come to mind - and it is also arguably the least historically significant among them all, but it was a step nonetheless in the evolutionary path to the modern T-14 we know today, and its relevance on the battlefield was certainly undeniable for the better part of two decades.
The sentiment among the few amateur academic-enthusiasts that haven't forgotten the T-62's existence is that it was a highly mediocre design with a whopping gun, and in many ways, that is perfectly true from a technological standpoint icann the evolution of armoured warfare during the Cold War. Between former Soviet tankers, however, the sentiment is slightly different. Many remember the T-62 fondly as a fairly reliable and endearing sweetheart that certainly had its own faults, but rarely ever disappointed - a sentiment echoed by Syrian and Iraqi tankers. The ones that lived, at least.
It was plain to see that the T-62 was considered nothing more than a stopgap solution until the new and radically superior T-64 arrived on the scene, though it is some consolation that the T-62 was considered the most advanced Soviet main battle tank during its brief tenure. Being a mere evolutionary stepping stone, though, we can observe the way Soviet school of thought on mechanized warfare evolved with it. In the early 60's, tank riding infantry was still considered a core part of mechanized warfare. The armoured APC had arrived on the scene in the form of the wheeled BTR-152 and tracked BTR-50, but infantry were sometimes obliged to move and fight as one with a tank, and so to that end, the T-62 had handrails over the circumference of the turret for tank riders to hold on to. When the BMP-1 was introduced in 1966, it drove a major revision of contemporary tank tactics, and the shift in paradigm can be very well seen in the T-62's successors. The T-64A did not have any handrails, nor did the T-72, and the T-62M introduced in the late 60's abolished them too.
The changes to the T-62 dutifully followed international trends as well, most notably the global shift to jet power in the aviation industry. Too fast to be harmed by machine gun fire, the ground attack jet rendered the normally obligatory DShKM machine gun obsolete. The birth of the AH-1 Huey Cobra and the subsequent heavy use of helicopters for fire support and landing missions during the American intervention (or invasion, if you prefer) in Vietnam permanently shifted the conventional ideals of armoured warfare, and the men and women at Uralvagonzavod obeyed. The DShKM was back by 1972.

In the Soviet Union, the T-62 was produced from 1963 to 1975, with the first pre-production models appearing in 1961. After 1975, all "new" T-62s are actually simply upgraded, modified, or otherwise overhauled versions from the original production run.
COMMANDER'S STATION

The commander is seated on the port side of the turret, directly behind the gunner, and to his left is the R-113 radio station, created just as the T-62 first entered service in 1961.

The R-113 radio operates in the 20.00 to 22.375 MHz range and has a range of 10 to 20 km with its 4 m-long antenna. It could be tuned into 96 frequencies within the limits of its frequency range.
In 1965, the radio was swapped out for a newer and much more advanced R-123 radio. The R-123 radio had a frequency range of between 20 MHZ to 51.5 MHZ. It could be tuned to any frequency within those limits via a knob, or the commander could instantly switch between four preset frequencies for communications within a platoon. It had a range of between 16km to 50km. The R-123 had a novel, but rather redundant frosted glass prism window at the top of the apparatus that displayed the operating frequency. An internal bulb illuminated a dial, imposing it onto the prism where it is displayed. The R-123 had an advanced modular design that enabled it to be repaired quickly by simply swapping out individual modules.

It is quite clear that the commander's station is the most habitable one by far in the very spartan T-62. The close proximity between all the turret occupants with each other and the shortage of breathing space makes the internal climate hot and humid, contributing to the overall discomfort. This is compounded by the fact that the crew isn't provided with any local ventilators such as fans or directed air vents, so it can get quite stuffy inside. However, the commander seems to be the most well off, since he sits right in front of the sole ventilator in the turret and he isn't required to exert himself physically, unlike the loader. Although the T-62 superficially resembles the T-54, the dome-shaped turret is significantly larger and noticeably more spacious, even with the larger cannon, and unique to the rest of this dome-shaped turret, the area around the commander's station was cast to be devoid of any vertical sloping or rounding whatsoever, which was necessary to enable his rotating cupola to be installed. This also meant that any debilitating effects of the shaping of turret (lack of headroom, for instance) do not apply on him.
The cupola is mounted on a race ring. The fixed part constitutes half of the total size of the cupola, while the other half is occupied by the semicircular hatch with a maximum width of 590mm. The hatch opens forward, which is quite convenient for when the commander wants to survey the landscape from outside - perhaps with a pair binoculars - because being as thick as it is, the hatch is a superb bulletproof shield for protecting the commander from sniper fire.

There is also a small porthole in the hatch. It is meant for a panoramic periscope tube for indirect fire.
As befitting his tactical role, the commander's general visibility is facilitated by two TNPO-170 periscopes on either side of the primary surveillance periscope in the fixed forward half of the cupola, and further augmented by two more 54-36-318-R periscopes embedded in the hatch, aimed to either side for additional situational awareness. Overall, this scheme was sufficient for most purposes, but was deficient if compared to the much more generous allowance of periscopes and vision ports found on NATO tanks.

The TNPO-170 periscope has a total range of vision of 94° in the horizontal plane and 23° in the vertical plane. The four periscopes in addition to the TKN-type periscope aimed directly forward gives the commander a somewhat acceptable field of vision over the turret's front arc. The use of periscopes instead of direct glass vision blocks presents pros and cons - for one, the lack of any direct vision means that the viewer's eyes is protected from machine gun fire or glass specks if the device is destroyed, but a bank of periscopes offer a much more limited panorama than vision blocks like the type found in the commander's cupola on the M60 tank.
TKN-2 "Karmin"

The TKN-2 had an active night channel which picked up infrared light from the OU-3 IR spotlight attached to the periscope aperture to provide a limited degree of night vision to the commander. With a nominal viewing range of only about 300 to 400 m, the TKN-2 was all but useless for serious target acquisition at night, serving only to give away the tank's position the moment the spotlight was turned on. Performance could be improved with mortar-delivered IR flares, of course, but that doesn't count as an intrinsic merit of the device itself.
Due to the fact that the periscope is unstabilized, identifying another tank at a distance is very difficult while on the move over very rough terrain. However, the commander is meant to bear down and brace against the handles of the periscope for improvised stabilization, which is adequate for when driving over a dirt road, but not when traversing over rougher terrain.
The left handle has a thumb button for turning the OU-3 spotlight on or off.
The OU-3 is a high-powered xenon arc lamp with an IR filter. The filter isn't totally opaque, though, and the spotlight will glow faintly red. It is mechanically linked to the periscope, enabling it to elevate with the TKN-2.
 |
| OU-3 IR spotlight with the IR filter removed to transform it into a regular white light spotlight |
The OU-3 spotlight consumes 110 W of power.
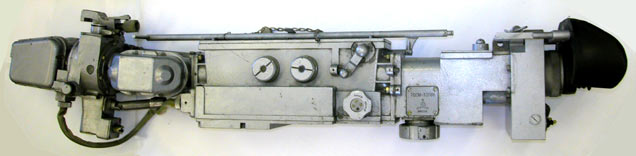
TKN-3 "Kristal"

The TKN-3 was a sufficiently modern observation device of its time. It featured target cuing, was very compact, and had a relatively advanced passive light intensification system, but it wasn't stabilised, and featured only rudimentary rangefinding capabilities as a cost saving measure. It offered rudimentary night vision capability in two flavours; passive light intensification or active infrared. In the passive mode of operation, the TKN-3 intensifies ambient light to produce a more legible image. This mode is useful down to ambient lighting conditions of at least 0.005 lux, which would be equivalent to an overcast, moonless and starless night. In these conditions, the TKN-3 can be used to identify a tank-type target at a nominal distance of 400m, but as the amount of ambient light increases such as on starlit or moonlit nights, the distance at which a tank-sized target is discernible can be extended to up to 800m in dark twilight hours. Any brighter, though, and the image will be oversaturated and unintelligible.
The active mode requires the use of the OU-3K IR spotlight, which is practically identical to the OU-3 performance-wise. With active infrared imaging, the commander can identify a tank at 800m, or potentially more if the opposing side is also using IR spotlights, in which case, the TKN-3 can be set to the active mode but without turning on the IR spotlight.
Rangefinding is accomplished through the use of a stadiametric scale sighted for a target with a height of 2.7 m, which is the average size of the average NATO tank. Like the TKN-2, the TKN-3 is unstabilized, making it exceedingly difficult to reliably identify enemy tanks or other vehicles at extended distances while the tank is travelling over rough terrain, let alone determine the range. The left thumb button initiated turret traverse for target cuing, and the right thumb button turned the OU-3K spotlight on or off. The range of elevation is +10° to -5°, just like the TKN-2. The OU-3K spotlight is also directly mechanically linked to the periscope (the arm to which the spotlight is linked to can be seen in the photo above) to enable it to elevate with the TKN-3.
Target cuing is done by placing the crosshair reticle in the periscope's viewfinder over the intended target and pressing the cue button. The system only accounts for the cupola's orientation, though, and not the periscope's elevation, so the cannon will not elevate to meet the target, only the turret will. This wasn't really an issue, since the gunner needs to manually elevate the cannon to place the crosshair on target anyway (explained later in the Sights segment).
 |
| TKN-3 viewfinder |
Because the cupola did not counter rotated as turret traverse was initiated, it will be spun along with the turret as it rotates to meet the target cued by the commander, potentially causing him to lose his bearings. To prevent this, there is a simple U-shaped steel rung for him to brace with his right arm as he uses his left hand to designate the target. This wasn't as convenient as a counter rotating motor, of course, but it was better than nothing.

Ventilation for the crew is facilitated by the KUV-3 ventilator, identifiable on the rear of the turret as a large, overturned frying pan-shaped tumor on the rear of the turret.

A centrifugal fan inside the ventilator housing sucks in air and performs some low level filtration, ejecting dust and larger particles out of a small slit at the base of the housing (refer to photo above), and then released into the crew compartment, passing through a drum-shaped NBC filter unit inside the tank proper. The air can be optionally cleaned of chemical and biological contaminants by the filter in contaminated environments where the centrifugal fan is simply not enough. The filter unit also contains a supercharger to increase the positive pressure inside the tank to produce an overpressure, preventing chemical and biological agents from seeping into the tank.
 |
| Notice the PVC pipe connecting it to the ventilation dome on the outside of the turret rear |

The commander's station is the second most roomy one in the tank, besides the loader's station. Here in the photo below, you can see his seat back and the few pieces of equipment that he is responsible for.
Sometime during the 70's, a select few T-62s received a shield of sorts over the commander's hatch. It is a sheet steel face shield with a canvas skirt draping down. Being so thin, the face shield is not bulletproof, though perhaps resistant to hand grenade fragments and small mortar splinters.

Since it doesn't really do very well as ballistic protection, the main function of the shield appears to be to conceal the opening of the commander's hatch to disguise his exit from the prying eyes of snipers, and to keep away dust if the commander feels like sitting outside during road marches. Either way, not many T-62s received the addition, though almost all T-72s did. The reason for the bias is unknown.

GUNNER'S STATION

As was, and still is common among manually loaded tanks, the gunner doesn't have a hatch of his own. Instead, he must ingress and egress through the commander's hatch. The biggest flaw with this layout is that if the commander is unconscious, incapacitated or killed, then the gunner will suddenly find it extremely difficult to leave the tank unless the commander was somehow completely vaporized. Even worse, if the tank has been struck, there is a very distinct possibility that the interior is catching fire.
Plus, another flaw with the layout is if the turret was perforated through the front on the port side cheek, both the gunner and commander would be killed, effectively rendering the tank useless in combat.
For extra visibility, the gunner has a single TNP-165 periscope pointed forward and slightly to the right, though for what exact purpose this lone periscope is meant for is unknown, since the field of view from it is so small that the gunner can't really see very much, nor can the commander seated behind him. It is more useful for the commander for checking directly in front of the tank.

In addition to all of the necessary switches and toggle buttons to activate this and that, there are also some other odds and ends at his station, including a turret azimuth indicator, which is used to orient the turret for indirect fire. It is akin to a clock, having two hands - one for general indication measured in degrees, and the other in 100 mil increments for precise turret traverse.

SIGHTING COMPLEX
 |
| TSh2B-41 sight aperture port, with nuclear attack seal in place |
TSh2B-41
The TSh2B-41 is a monocular telescopic sight, functioning as the gunner's primary sight for direct fire purposes. It has two magnification settings, x3.5 or x7, and an angular field of view of 18° in the former setting and 9° in the latter setting. As was and still is common for all tank sights, it has an anti-glare coating for easier aiming when facing the sun. It comes with a small wiper to clean it from moisture, and it comes with an integrated heater for defrosting.
Like most other tanks of its time, the T-62 lacked a ballistic computer, but it was also unusually deficient in the rangefinding department. For rangefinding, the gunner had to make use of a stadiametric ranging scale embossed on the sight aperture. Compared to optical coincidence rangefinders, stadia rangefinding was terribly imprecise, but also much simpler in both production and employment, and much more economical than, say, optical coincidence rangefinding. In fact, stadia rangefinding is essentially free, since all that is needed are some etchings into the sight lens. The savings made from the exclusion of an optical coincidence rangefinder were enormous, amounting to many thousands of rubles. Ranging errors of up to several hundred meters is often the norm, especially if some of the lower part of the target vehicle is obscured behind vegetation or other terrain features. It isn't uncommon for the first shot on faraway tank-sized targets to fall woefully short or fly clear over.
Below is the sight picture:
 |
| From left to right: APFSDS, HEAT, HE-Frag, Co-Axial Machine Gun |
Calibration is when the chevron is elevated or depressed to account for range. If the target is very far away, for example, then the chevron will be dropped significantly, forcing the gunner to sharply elevate the gun to line up the target with the chevron, thus forming a ballistic solution. Because APFSDS, HEAT and HE-Frag shells all have different ballistic characteristics, the gunner must refer to a set of fixed range scales drawn on the upper half of the sight in order to get the proper gun elevation. For instance, if the target is 1.6 km away, and the gunner wishes to engage it with high explosive shells, then he must line up a horizontal bar (which moves up and down with the targeting chevron but at different speeds due to a reduction gear) with a notch on the range scale for "OF" shells that says "16". If the gunner wishes to use APFSDS instead, then he need only line up the horizontal bar with the "16" notch on the "BR" scale. Then, the chevron will show how much supraelevation is needed in order to hit the target with the selected ammunition. The gunner will then lay the chevron on the target and open fire.
The sight has an internal light bulb that when turned on, illuminates the reticle for easier aiming in poor lighting conditions such as during twilight hours or dawn.
Unless the gunner had 20/20 vision and the tank was completely still, considerable ranging errors in the neighborhood of 100 or so meters was the norm, and as the distance from the target increased, the accuracy of the measurement decreased exponentially, deteriorating drastically past 2000 m. As such, it is more difficult hitting targets with lower velocity ammunition like HE-Frag and HEAT shells, and even harder for moving targets. However, the inclusion of near-hypersonic APFSDS ammunition in the T-62's loadout greatly helped counterbalance this issue, making it markedly easier for the gunner to hit both stationary and moving tank-type targets, while most targets requiring HE-Frag shells like machine gun nests and pillboxes and other fortifications would be stationary anyway, thus making pinpoint accuracy much less of a priority. Even so, on account of the extremely high speed of the APFSDS rounds fired from the 2A20 gun, the sight can be battlesighted at a very generous 1000 m, allowing the gunner to confidently hit a tank of NATO-type dimensions at any distance between 200 to 1600 m by aiming at center mass without needing to ascertain the range beforehand.
However, one inescapable flaw of the TSh2B-41 was that it lacked independent vertical stabilization, being directly mechanically linked to the 2A20 cannon, forcing it to elevate with it when the loading procedure is underway. This causes the gunner to (very annoyingly) lose sight of anything he is aiming at at the moment, making the commander's the only pair of eyes to observe the 'splash' and give corrections or search for new targets. This led to the development of the independently stabilized TSh2B-41U.
TSh2B-41U

In the 1972 modification of the T-62, it was given the upgraded TSh2B-41U sight with independent vertical stabilization as a transient solution. If it were to be used as then it would not have been very impressive, having a mean vertical stabilization accuracy of 3 mils - an accuracy of 3 meters at 1000 m, or a maximum deviation of up to 1.5 m, which would incredibly inadequate for firing on the move. Fortunately, the sight is only stabilized when the cannon is elevated during the loading procedure, as the TSh2B-41U was expressly created to remedy the issue of the gunner losing sight of the target. When the cannon is automatically goes into detente, the sight does not follow, allowing the gunner to use his handgrips to manipulate the elevation of the sight. Once the cannon is ready to fire again, the Meteor stabilizer reengages and "catches up" to the sight, whereby the sight's stabilizer deactivates and defers its work to Meteor once again. This is different from true independent stabilization where the sight's stabilizer can be as precise or less precise than the cannon's, and the cannon's stabilizer is only perpetually slaved to the sight.
Another modification was the addition of a range scale for the new and improved 3UOF18 HE-Frag shell, and the separation of it from the scale of the older 3UOF11. The aiming distance of HEAT was increased to 3.7 km and the aiming distance for OF-18 and OF-11 shells are listed as 4.8 km and 3.6 km respectively.

Because the TSh2B-41 sight aperture is just left of the gun barrel, there is a very high likelihood that it will be rendered inoperable if the turret takes a hit anywhere near it. An very close miss may create a big enough shock to knock the sight out of alignment or even crack the lenses, not to mention the disasterous effects of a direct hit on the aperture itself. But for all of its inherent flaws, the TSh-2B-41/U should not be seen as anything less than an extremely high quality product of its time. Lack of independent vertical stabilization notwithstanding, the glass was of superb quality and the insulation and shockproofing of the sight unit was designed to survive the blast wave of a nuclear explosion and ambient temperatures of over 200° C. Nevertheless, whereupon the TSh2B-41/U is out of service, then the gunner must rely on the TPN-1-41-11 backup night sight.
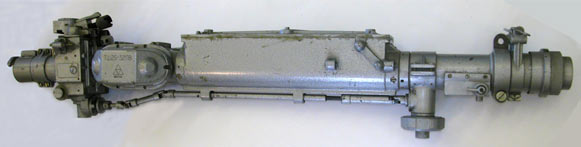
TPN-1-41-11


The TPN-1-41-11 is a monocular periscopic night or backup sight located on the turret roof just in front of the commander's cupola. The TPN-1-41-11 has a fixed magnification of x5.5 and a field of view of 6° in the daytime mode. It could operate in either passive or active modes. In the active mode, it must work in tandem with the L-2 Luna IR spotlight which moves along with the cannon though a mechanical linkage. The infrared light supplied by the spotlight is picked up by the sight, which allows the gunner to identify a tank-type target at distance of around 800m, which is only just decent, but not worse than its immediate counterparts'. In the passive mode, it employs light intensification for a nominal maximum identification distance of 400m for a tank-type target under lighting conditions of no less than 0.005 lux. As with the TKN-3, and indeed any optronics using light intensification, the viewing distance and resolution increases as ambient light intensity increases, but only up to a certain point before the sight is oversaturated and can no longer produce a legible image.
Like with the TSh2B-41/U, the sight has an internal lightbulb which facilitates aiming at night.

Unfortunately for the gunner, the TPN-1-41-11 is mechanically linked to the cannon, and does not have independently stabilization, nor is there any modified variant that features it. As such, just like the TSh2B-41, its range of vertical motion is limited to the cannon's range of elevation, which is -6° to +16°.
1K13-2

When the T-62M was introduced in 1983, it brought with it a myriad of improvements to the fire control and sighting systems, central among these was the addition of the 1K13-2 combined monocular auxiliary sight which introduced the ability to guide new 115mm GLATGMs.
The sight has a nominal maximum identification range of 5000 m on a tank-type target in the daytime mode under a maximum 8x magnification, though the actual distance depends on meteorological and geographical conditions more than anything. Like with the previous auxiliary sighting complexes, the 1K13-2 has two modes; passive and active, both of which operate under a 5x magnification. The sight enables the gunner to detect a tank-type target at nominal maximum range of 800 m in the passive mode under lighting conditions of no less than 0.005 lux. Alternatively, the identification distance can be as high as 1100 m in the active mode under illumination from the L-2G IR spotlight. The sight has an internal lightbulb that illuminates the reticle to facilitate aiming at night.

In contrast to all of the previous sighting complexes, the 1K13-2 sight has two-plane stabilization. The accuracy of stabilization while the tank is on the move at 15 km/h is 0.15 mrad in the vertical plane and 0.2 mrad in the horizontal plane, translating to a stabilization accuracy of 0.02 m at 1000 m vertically and 0.03 m horizontally. which is a level of accuracy so high that it is practically the same as if the tank was not moving at all.
The sight can only be used to guide GLATGMs in the daytime mode.
LASER RANGEFINDER
 |
| T-62 with 1K13 and KDT-1 |

The KTD-2 had a maximum measuring distance of 4000 m and a minimum of 500 m. The maximum margin of error in the measurement was 20 m.
The rangefinder aperture has a hinged armoured cover 14mm in thickness. It is sufficient against artillery and mortar splinters, but not more.
KTD-2

The T-62M built in 1983 received the highly advanced KTD-2 multi-laser rangefinder. The KTD-2 laser rangefinder has a minimum measuring distance of 500 meters and a maximum of 4000 meters under perfect meteorological conditions, namely a visibility distance of 10 kilometers. The principal difference, though, is the installation of a viewfinder directly routed over to the gunner's sight. Through this viewfinder, the gunner can observe the battlefield within an angular field of view of 2.5° under a 7x magnification, and select and range up to 3 targets simultaneously.

LOADER'S STATION


From 1961 to 1971, the loader had a large (about two feet in diameter), perfectly circular hatch placed directly above his seat, built slanted so that it followed the curving contours of the turret, which was imperative to its overall protection scheme. In 1972, the installation of the DShK anti-aircraft machine gun required a level circular ring mount to operate, and so the loader's part of the turret was renovated completely. Now, he had his own semi-cupola, and the area of the turret around his station lost its domed curve to resemble the commander's station. His new hatch shrank by half and became an irregular semicircle with a maximum width of 580mm, making it half as easy to ingress and egress, especially with bulky winter clothing.
There are two variations of the same type of cupola. Early model T-62s upgraded to obr. 1972 standard have a separately cast cupola welded onto the original turret, while T-62s produced in 1972 and after have the cupola cast as part of the turret.


For general observation purposes, the loader is provided with a single MK-4S periscope with a rear view feature. It can be elevated and depressed, or rotated 360 degrees for all-round vision, although the gunner's L-2 spotlight would be rather unfortunately blocking the loader's view if he were to look to his forward-left. It's not very useful in combat, since the loader must concentrate on his loading duties, but it may be intermittently useful under certain circumstances. For instance, the periscope gives the tank an extra pair of eyes to help ascertain the direction of enemy fire in an ambush during the first few seconds of the attack, which can prove critical to the tank's survival and prompt destruction of hostile forces.
The loader has very little room to work with. Massive size of the rounds notwithstanding, the section of turret floor on which the loader must stand on is very narrow, which impedes his ability to transfer rounds from the front hull stowage racks to the gun breech. The narrowness can also be a real problem if he is trying to load the cannon while the turret is traversing. The loader has a his own seat (which is attached to the turret), but he performs his duties standing, or rather, squatting, unless he is using ready rack of ammo behind him - but we will examine that later. One of the biggest drawbacks of the dome-shaped turret is that the loader hardly has any headroom while standing (1.48 m, or 4'11" from the bottom of the hull to the hatch), and he must perpetually lean slightly forward even while seated. This was remedied in the 1972 revision of the T-62, which raised the ceiling to about 1.55 m, or 5'2", and removed the slope from the loader's sector of the turret. Now, the loader could sit straight or stand up properly when ramming shells into the breech. In fact, the low turret ceiling was the primarily why the breech block on the 2A20 cannon closes sideways and not vertically like on most other tanks.
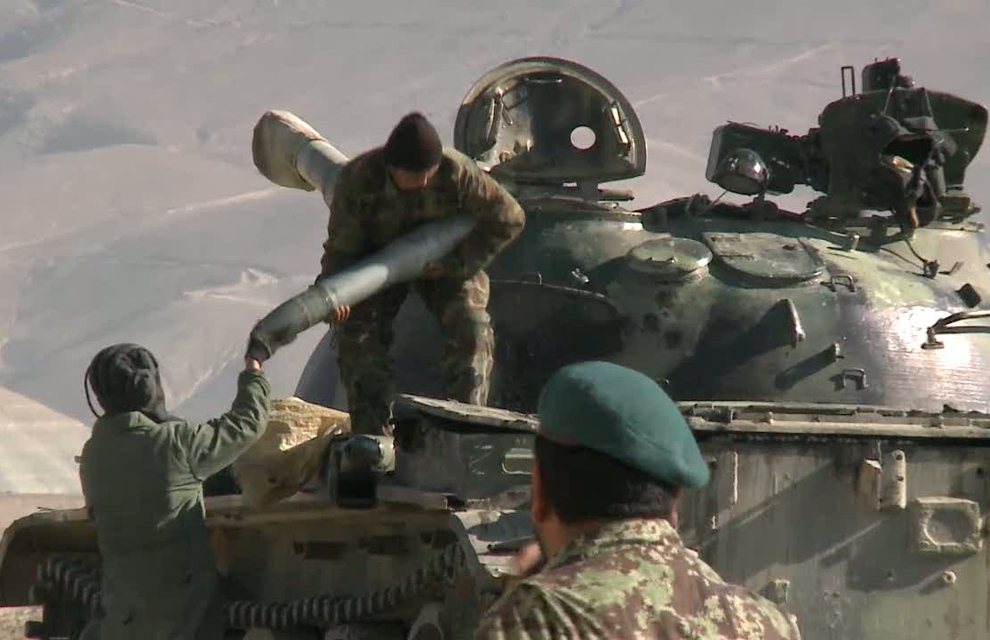
The T-62 can carry a total of 40 rounds of ammunition. The two sets of front hull stowage racks (both are conformal fuel tanks) hold 8 rounds each, for a total of 16 rounds of ammunition (pictured below). Another 20 rounds are stowed in the very back of the hull on the partition between the engine compartment and the fighting compartment. The loader has 2 rounds in a ready rack on the turret wall directly behind him for convenient loading, and another round secured by tension latches in a rack near his feet on the floor of the hull side wall. There is another round stowed in the same way near the commander's feet.
The 16 rounds in the front hull racks are the most convenient for the loader, second to the rack of two behind him. The rounds are held in place by simple hinged handles, which can be easily flicked up to let the loader pull the round out, as you can see below:

The loader must squat down to access these rounds. These racks are principally identical to the ones found on the T-54, only sightly modified for different ammunition.
The aforementioned 20 rounds stowed on the partition are stowed in an interlocking configuration. There are rubber coasters to cup the base of each shell, and a metal frame to support the tip of the shell.
 |
| These rings are rubber collars to secure the base of the rounds |
 |
| The ends of the shells are propped up by a metal frame, which has been removed in this photo (it's green and it's lying on the floor) |
 |
| Here you can see the coasters on the parallel wall |
The loader is normally not able to easily get to these if the turret is oriented directly forward. He must squat down to extricate these rounds, which he may find slightly unnerving if the gunner is about to fire, since he will be directly behind and underneath the cannon breech. But he should be fine, since the arm guard doesn't move when the cannon recoils backwards. To load, he must simply pull the round forward, freeing it from its "coaster", then stand up and return to ram it into the cannon breech.
And of course, the ready rack for a paltry two rounds just behind the loader. Being located directly behind the loader (if he was to face the breech), these are the most easily accessible. To load, he must unlatch a round from a rack first, grab it and turn to face the cannon breech, then ram it in. This can be easily done in 5 seconds or so.

The theoretical maximum rate of fire is around 8 rounds per minute using the front shell racks and the ready racks only. But in reality, the gunner typically takes longer to find a target and acquire a firing solution than it does for the loader to load, thus placing the true cyclic rate of fire of the T-62 at around 4 rounds per minute, assuming that the gunner is engaging four different targets at four different distances. With knowledge of the placement of the ammunition, however, in an extremely target-rich environment where the cannon will be fired as quickly as the loader can load it, then the maximum rate of fire can potentially be as high as 10 rounds per minute or more (with laploading), provided that some modifications are made. Official estimates of "4 rounds per minute" are not to be taken at face value, as the testing committee usually presents the loading rate when using all ammunition stores, including the least convenient ones. Evidence of this practice can be seen very often in Soviet documents, which you may see on Peter Samsonov--'s archiveawareness site.
A reasonable estimate of the T-62's maximm average rate of fire while firing on short halts or on a crawl should be around 4 rounds per minute, as the loader is badly inconvenienced whenever the turret needs to turn when the tank is moving because of the narrow turret floor and the loss of access to his most convenient store of ammunition. How long the loader can maintain his speed under the most optimal conditions, fatigue notwithstanding, is a different matter entirely, of course, and this is a universal issue with all manually loaded tanks. The Abrams tank, for example, has only 16 rounds in the turret bustle for the loader's convenience. After those are expended, he must either use the 6 rounds stored in the hull, which requires that the turret be traversed in a certain direction, or transfer the other 20 rounds from the reserve bustle racks behind the commander. Even then, the loader cannot access the commander's bustle racks - only the commander can, and forcing the commander to abandon his target-searching duties to help load the gun or replenish the gunner's supply is totally egregious in the middle of battle. The T-62 loses out in pure loading speed since its layout for ammunition stowage is far inferior to contemporaries that have a bustle, as the bustle stays put when the turret spins, unlike ammo in the hull like the T-62's front hull racks. However, the fact that the loader has access to all of the ammunition in the tank from his station does count for something during lulls in combat, namely that the commander can continue to survey.
But besides the ammunition for the main gun, the loader is also responsible for reloading the co-axial machine gun. Three ammunition boxes are stowed in simple sheet metal containers mounted on the turrret ring bulge recess, and two more boxes are mounted on the turret rear. More boxes can be tucked away on the hull floor.

CANNON

The chief justification for the T-62's existence was the 2A20 "Rapira" smoothbore cannon, also known as the U-5TS "Molot" as per its internal designation.

The 2A20 has all-round decent durability. It has an EFC rating of 450 shots. This means that the cannon should be able to safely shoot off at least 450 lower pressure rounds like HE-Frag and HEAT, and perhaps around 200 to 150 APFSDS rounds, which operate at a much higher pressure. After the 450 mark, the danger of a catastrophic failure of the barrel from excessive wear increases exponentially, which can result in a piece of the barrel fracturing off and becoming shrapnel in the worst of cases.
The cannon has a recoil stroke of between 350 mm and 415 mm, depending on the power of the ammunition used. The recoiling mechanism has a hard stop at 430 mm.
The cannon can be elevated to
The cannon has three triggers - the electric button trigger on the gunner's right hand grip, the solenoid button on the manual elevation flywheel, and the manual trigger on the breech itself.
STABILIZER
Even as the first pre-production T-62s rolled off the factory gates in 1961, it was already fitted with a relatively advanced 2E15 "Meteor" 2-plane stabilizer, which was not a common practice at the time, to put it simply. Case in point, the M60/A1, which was essentially the nemesis to the T-62, had just powered traverse and only received a serious 2-plane stabilizer in 1972 in the form of the AOS (Add-On Stabilizer) system retrofit, which even then was not noticeably more advanced or useful (reading TankNet, it seems that the AOS system had a range of issues, including the tendency to sometimes spin the turret uncontrollably). "Meteor" gave the T-62 top-notch (relatively) fire-on-the-move (not in the strictest sense of the term) capability, granting it a necessary advantage during breakthrough assaults in line with the Red Army's focus on offensive combat. This also meant that on the tactical level, the T-62 was incomparably more flexible on the dynamic battlefield, being nearly equally adept on the defensive as on the offensive.
As the years went by, the T-62 received continuously updated versions of the Meteor. The 1964 version received the "Meteor-M", which was functionally identical to the Meteor, but replaced its vacuum tubes with transistors. The "Meteor-M1" was installed on the 1967 variant, and brought only minor upgrades without changing the operating characteristics of the original "Meteor". With this in mind, only the original variant will be discussed in detail.
2E15 "Meteor" Hydroelectric Stabilizer
Turret traverse at the maximum rate is quite slow. It takes around 22.5 seconds to make a full revolution, or 16° per second; slow compared to NATO tanks which tended to be about twice as fast. The underwhelming turret rotation speed is broadly inconsequential during long to medium range engagements, but the T-62 suffers in non-linear combat where targets may appear suddenly from unexpected directions.
Minimum Traverse Speed: 0.07 deg/sec
Maximum Traverse Speed: 16 deg/sec
Minimum Gun Elevation Speed: 0.07 deg/sec
Maximum Gun Elevation Speed: 4.5 deg/sec
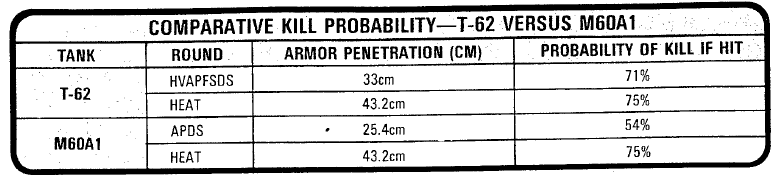
"Meteor" is not precise enough to be used for engaging targets on the move at long distances, but it must be reinforced that was still very advanced for its time. With a mean stabilization accuracy of 0.07 degrees, or 1.24 mils - translating to an accuracy of 1.24 m at 1000 m - it is accurate enough for the T-62 to achieve a greater than 70% hit rate on a stationary target at 1000 m while the tank moved at 20 km/h at an approach angle relative to the target of 30°, according to a U.S TRADOC bulletin.

There are various methods to improve firing accuracy, though. The crew is trained to fire on short halts and on slow crawls, which is a process that must be coordinated by the commander. For either methods, the process is as follows: The commander spots a target, designates it for the gunner and cues the loader to load an appropriate round, while simultaneously using the stadia rangefinder in his periscope to determine the approximate distance to the target. The gunner then inputs the range data from the commander, lays the gun on target, and the driver is ordered to either stop or slow down the tank. Once stopped or slowed down, the gunner then conducts final gun laying manually for maximum accuracy, then fires. If at all possible, the tank approaches the target straight ahead so that there is no dependence on the horizontal stabilizers, thus helping to maximum accuracy on the horizontal plane.
Control of gun elevation and turret traverse is conducted using the Meteor control handgrips. The right thumb trigger fires the main cannon and the left thumb trigger fires the co-axial.

In case of a failure of the electrical systems or some other malfunction, the gunner must use hand cranked flywheels located directly behind the Meteor control handgrips. The gearbox on the manual elevation mechanism has a button for disengaging the stabilizer and engaging the manual drives. The elevation flywheel handle has a solenoid trigger for firing the cannon.
There is an amplidyne amplifier for the turret traverse motor located at the very rear of the turret, immediately behind the commander. It takes an electrical current and amplifies its voltage to produce the immense power needed to rotate the heavy turret at an acceptable pace.

There is a gyroscopic tachometer for measuring the angular velocity of the turret and tank in relation to the intended target at the very front of the gunner's station, behind the sighting complexes.
 |
| Gyroscopic tachometer for Meteor-M1 |
AUTOEJECTOR

The T-62 had a nifty automatic shell casing ejection system. As mentioned before, the interior of the tank is quite cramped, and a few dozen hot brass casings rolling around for the loader to trip over wasn't really desireable, to say the least. Apparently, during early testing of Object 166, cannon fumes accumulating in the fighting compartment were twice higher than the acceptable standard. The culprit was evidently the spent shell casings, which when ejected from the tank immediately after firing, slashed the concentration of fumes by half in addition to saving the crew the trouble of manually throwing them out every now and then.
The ejector mechanism is automatic, with an option for manual activation. In the automatic mode, the ejector mechanism immediately begins operating once the cannon has recovered from its recoil stroke, but there is also a failsafe microswitch for redundancy. It is triggered the instant that the shell is caught in the ejector tray.
When the shell casing is ejected from the breech from the recoiling cycle, it is caught by the ejector tray, affixed to the ejector mechanism. It is held in place by the rim of the casing by two spring-loaded pinball paddle-like grippers. A rubber-padded backplate on the arm guard is placed just behind the ejector tray that prevents the casing from bouncing back to ensure that the grippers have enough time to lock the casing in place.

Then, the ejection port is opened briefly and the shell casing is thrown out, or rather, kicked out very forcefully.

The ejection cycle takes 3 seconds in total (the GIF above is improperly timed).
One of the least-asked but also least-understood questions is "how does the autoejector actually eject spent shell casings?" The answer is actually quite simple - and so is the mechanism; when the shell casing is propelled rearwards and is caught in the ejector tray, it is also caught by an ejector hook at the floor of the tray. The hook is part of an spring-loaded ejector block, which is charged by the recoil of the cannon via a series of levers. The ejector tray is elevated with an electric motor located just under the breech, and when the ejector tray reaches the proper elevation to eject the spent shell casing, the ejector spring is tripped, slamming into the rim of the casing with enough force to propel it clear off the back of the tank with a deafening "clang!". This system performs more than satisfactorily, and it is so simple that a malfunction is almost impossible unless it has never been maintained at all throughout decades of use.
 |
| Spring, Arm which charges the spring, Axis on which the arm is attached to the ejector mechanism, Rod connecting arm to cannon breech |
Contrary to popular belief, shell casings would almost never bounce off the back of the turret and injure crew members because of "misalignment". The tray elevates right up to the ejection port, and even if by pure chance a shell casing does somehow miss the gaping ejection port opening, it will not bounce back and hit anyone, because the paddles will simply catch the casing rim again and prevent it from going any further.
Interestingly, the ejection port could be left open for extra ventilation if needed, and it also doubled as a very convenient and very necessary shell loading hatch for the massive 115mm unitary cartridges. Opening and closing the ejection port can be done from the control box placed just in front of the loader's brace grip. Beside this one, there is another control box and with it, the ejection mechanism can be set to either the autoeject mode whereby it automatically begins the ejection procedure as soon as the gun has finished its recoil stroke cycle, or the manual mode, whereby the ejection system will be activated only when prompted by the gunner. This control box can also be used to hold the ejection port open or closed. If the tank is operating in an NBC-contaminated environment, then the autoejection system is deactivated and the ejection port is left closed. Instead of being ejected, shell casings will bounce off the rubber pad at the rear of the breech arm guard and fall to the floor to be removed later instead.


 |
| M829 compared to 3UB56 |
However, such a comparison is not necessarily an honest one. The loader is always the shortest member in an already very short crew. He still cannot stand upright in his station, of course, and he is obliged to sit down instead of stand when on stand-by unlike his NATO counterparts. Even so, the fact that he can't stand upright while loading isn't that big of a problem when compared one to one with tanks like the Leopard 1. Ramming a round into the chamber is not hampered very much by ceiling height, and since all of the ammo is in the hull (save for the two rounds in the ready rack, which, incidentally, may be used while seated), most of the loader's time will be spent in a squatting position anyway.
The massive length of 115mm rounds may not be quite as big of an encumbrance as it could be, though still significant. This is mostly because the loader has no need to maneuver the shell at all if he were drawing from the front hull racks. All he must do is pull from the racks, lift the shell up to the breech, and ram it in, no need to spin it this way or that like if the ammunition were in a bustle rack, or if he were to draw rounds from the rear hull racks.
But for all that, one critical point still remains to derail this argument, and that is that 115mm rounds are simply much bigger than 105mm rounds. Even though they are both given approximately the same width of space, the T-62 loader is fatigued more easily than a Leopard 1 loader, even more so since a ride in the T-62 isn't quite as smooth.

And of course, a T-62 loader didn't have nearly the same amount of space that loaders in NATO tanks sporting 120mm guns did. Whereas the T-54's turret was borderline satisfactory in terms of the working space for the loader despite being somewhat more cramped, the T-62 is totally substandard.
AMMUNITION
The two biggest assets of the U-5TS cannon were the 3UBM3 shell, the first ever serial APFSDS tank shell to enter service, and the 3UBK-4 HEAT shell, which benefited from the lack of rifling on the cannon.
Shell casings had an atypical form, identifiable by a greatly elongated bottlenecked front section, which was necessary for properly seating the APFSDS shells for which the casings were specially designed for. There are two types of casings; steel 4G9 cases and brass 4G10A cases. The steel ones weigh less at 7.95 kg and cost less to manufacture, while the brass ones weigh more at 8.45 kg. The steel ones were used HE-Frag ammunition, to which accuracy was of less importance while the higher quality brass cases were used for APFSDS and HEAT-FS.
The "default" loadout for a T-62 for a breakthrough assault would be 12 APFSDS shells, 6 HEAT-FS shells and 22 HE-Frag shells.
HE-Frag
High-explosive fragmentation shells are arguably the most important ammunition type for the T-62, given the expected tactical contributions of a Soviet tank to combined arms combat. Though tanks are obviously a major threat, the vast majority of the vehicular targets that a tank would encounter on the battlefield are thin-skinned APCs, IFVs and utility trucks, and the tank will always be called upon by infantry for fire support against bunkers, machine gun nests, and other garrisoned troops. HE-Frag shells may be used as a last resort against enemy tanks as well, serving to knock out various essential components for anything from a mobility kill to a firepower kill (though obviously rooting for the latter). The 2A20's selection of HE-Frag shells have very thick steel walls and a relatively high velocity for its weight as well as variable delay fuses, giving them exceptionally high lethality against any and all types of threats on the modern battlefield.
FUSES
V-429EThe V-429E fuse is point-detonating, distance armed and with variable sensitivity settings. It has two settings - superquick and delayed. The former is fixed at 0.027 seconds and the latter at 0.063 seconds. Superquick action guarantees reliable detonation in snowy or swampy ground, and delayed action gives a small time allowance for the shell to penetrate its target before detonating. This is meant for bunker busting and for erasing lighter vehicles from existence.
Contrary to some allegations, the fuse will not detonate by jolting or by touching the gun barrel's canvas muzzle when firing, or by touching rain drops for that matter. The fuse is distance-armed only after traveling 5m to 20m from the muzzle, precluding the possibility of accidental detonations, even without the protective cap and even in the superquick setting.
3UOF-1
OF-11


First HE-Frag shell available to the 2A20 cannon. It had a cone-shaped nose and sharp, edgy aesthetics. It has a thin steel body suitable for fragmentation and splintering, but the bulk of the damage done by this shell is caused by blast. Explosive compound used is A-IX-1, a mixture of 96% RDX and 4% paraffin wax.
Maximum Direct Fire Range: 3600 m
Mass of Complete Round: 28 kg
Projectile Mass: 14.86 kg
Mass of Explosive Charge: 3.6 kg
Muzzle Velocity: 800 m/s
3UOF-6
OF-18


Vastly improved shell with an ogived nose and much thicker shell casing for superior fragmentation mass and volume as well as a better optimized spray pattern for increased casualties. The shell also boasts an extended firing range despite a 20.1% increase in mass over the OF-11 thanks to better ballistic properties and a more powerful propellant charge. Because of the increased muzzle velocity, this shell is also comparatively more accurate at all distances.
The V-429E variable sensitivity fuse was available later on.
Maximum Direct Fire Range: 4800 m
Mass of Complete Round: 30.8 kg
Projectile Mass: 17.86 kg
Muzzle Velocity: 940 m/s
APFSDS
Being widely considered to be a pioneer on the introduction APFSDS technology into widespread service, the T-62 essentially relies on it as its main selling point, and for good reason. Because of the remarkably high velocity of the T-62's APFSDS ammunition, their ballistic trajectory was essentially flat up to 1600m - quite different from APDS shells. This meant that in typical tank-on-tank combat scenarios, the T-62 gunner would only need to put the sight chevron on target and fire without even needing to determine the range. The extremely high velocity also meant that engaging moving targets was a lot easier, since it would tend to take less than a second for the shell to reach its target in normal European battlefields where combat distances typically don't exceed 1500m. This almost entirely negated the need for calculated target leading, even against relatively fast-moving vehicles. APFSDS shells would also be very useful against vehicles moving at irregular speeds, again because the gunner does not need to apply much lead. This greatly helped offset the retarded engagement time caused by limitations of the targeting system and increased first-round hit probability significantly.
The 2A20 "Rapira" was itself not half bad in any sense of the term, but it had one major drawback related to the Iranian Chieftain in the photo below.

Due to a downright subpar selection of ammunition, the 2A20 sadly never realized its full potential and was definitively eclipsed by the 2A46 125mm cannon within a decade of service. In the photo above, the astute observer will note that the impact crater on the left shows evidence of deflection. This is congruent with the rather underwhelming performance of the 2A20's APFSDS shells, despite being long rod projectiles. But for this babble, that Iranian Chieftain was knocked out all the same.
Note that Russian ammunition certification used a V80 standard, meaning that at least 80% of all ballistic kinetic energy-based shells must penetrate at least a certain thickness given a certain velocity. In reality, the average penetration performance was most definitely higher than stated.
3UBM3
3BM3
Original APFSDS shell made for the 2A20 cannon, first introduced in 1961. It had a tungsten carbide slug in the bulbous region of the projectile at the tip, topped off with a flat steel armour piercing cap to prevent the slug from shattering outright on impact and to improve the shell's performance on sloped armour.
In 1961 terms, the 3BM3 was vastly superior to contemporary 105mm APDS ammunition such as the L28 and L36A1 and the American M392 derived from it, having at least 35% better penetration values at the same distance, accounting for different certification standards and different target steel strength and hardness (particularly relevant for penetration values on sloped armour), all of which are in favour of the Soviets. The 3BM3 is also superior to the L15 APDS shell in terms of penetration on both sloped and unsloped armour as well as much better after-armour performance on significantly overmatched armour as a result of its less optimal design - after the initial tungsten carbide slug is "spent", it solely up to the steel penetrator to finish the job. Being much less efficient than the tungsten carbide slug, it would produce a much more massive fragmentation pattern after going through about 200 mm of steel armour or more. This is only conjecture, since the author doesn't have any documents pertaining to this matter, but it should be quite valid based on 125mm steel APFSDS after-armour lethality reports. This would make the 3BM3 incredibly potent against relatively lightly armoured tanks like the Leopard 1 and AMX-30 appearing in the late 60's (relative to other tanks from the late 60's like the Chieftain and T-64).
Mass of Complete Round: 22 kg
Projectile Mass: 5.5 kg
Certified Penetration at 1000m:
300mm @ 0°
130mm @ 60°
Certified Penetration at 2000m:
270mm @ 0°
120mm? @ 60°
Knowing the armour thickness of the Chieftain Mk.5 tank from ultrasound measurements, it can be reasonably surmised that the 3BM3 is capable of perforating the turret on any point from at least 1000 m. The Chieftain could kill the T-62 and four times that range, of course, but that isn't relevant for a tank duel scenario in Central Europe anyway.
3UBM4
3BM4
Introduced in 1963 as an even cheaper alternative to the 3UBM4. It was basic in construction; It was all-steel, was torpedo-shaped and very cheap to manufacture, but most importantly the muzzle velocity of this shell clocked in at an unheard-of 1650 m/s, just a fraction above a mile a second. The main factors in the decidedly modest penetration potential are the relatively high length-to-diameter ratio of 13:1, and the fantastic speed of the projectile, but because the penetrator was made entirely from steel, the shell's armour piercing performance was somewhat hamstrung.
The penetrator and projectile body is made entirely of solid 60KhNM tool steel with a hardness of around 310 BHN. It had 6 steel fins, which were of a bore riding type design that worked alongside the sabot to stabilize the shell as it travels down the barrel. The ends of the fins have copper lugs embedded in them to minimize abrasive damage to the much tougher chrome lining of the gun barrel. A soft armour piercing cap made of 35KhGSA steel with a flat tip works to decrease the likelihood of a ricochet as well as protects the penetrator from shattering upon impact, especially if the target armour was surface hardened.
Mass of Complete Round: 22 kg
Projectile Total Mass: 5.5 kg
Penetrator Mass (Without Sabot): 3.196 kg
Armour Piercing Cap Mass: 0.187 kg
Certified Penetration at 1000 m:
228mm RHA @ 0°
110mm RHA @ 60°
Certified penetration at 2000 m:
200mm RHA @ 0°
100mm RHA @ 60°
With this shell, the T-62 had a respectable (but by no means dependable) chance of defeating tougher customers like the M48 or M60 frontally out to 1500m, and no trouble at all defeating an AMX 30, Leopard 1 or Centurion frontally out to 2000m. The Chieftain's turret is generally immune to this shell at any range, but the hull is vulnerable at a distance of up to 1000 m, but no more.
3UBM5
3BM6


Introduced in 1970 as a slightly more advanced alternative to the 3UBM4. The penetrator is made from 35KhZNM tool steel with a hardness of around 600 BHN, while the armour-piercing cap was made from 35KhGS steel. Although still made entirely of steel, this shell offers appreciably higher performance, though still far from being comparable to the 3BM3.


Internally identical, the 3BM6 projectile can be distinguished to the 3UBM4 by the presence of "teeth" on the edge of the sabot, which are absent from the one on the 3BM4 projectile.
Projectile Maximum Diameter: 42mm
Diameter of Stabilization Fins: 114mm
Total Projectile Length: 550mm
Total Cartridge Length: 950mm
Mass of Complete Round: 21.66 kg
Total Projectile Mass: 5.34 kg
Projectile Mass (Without Sabot): 4.00 kg
Muzzle Velocity: 1680 m/s
Certified Penetration at 1000 m:
280mm RHA @ 0°
135mm RHA @ 60°
Certified Penetration at 2000 m:
220mm RHA @ 0°
110mm RHA @ 60°
3UBM9
3BM21

Mass of Complete Round: 23.50 kg
Projectile Mass: 6.26 kg
Muzzle Velocity: 1600 m/s
Certified Penetration at 1000 m: (Not known, estimated)
330mm RHA @ 0°
160mm RHA @ 60°
Certified Penetration at 2000 m: (Not known, estimated)
290mm RHA @ 0°
140mm RHA @ 60°
HEAT-FS
Between the mid-50's to late 60's, shaped charge warheads was widely appraised as being the 'great equalizer' of tank warfare. Tube-launched HEAT warheads were decently popular, being tremendously useful in a variety of roles, from general tank-killing to bunker busting or simply as a more flexible alternative to HE-Frag or HEP shells thanks to their thick steel bodies, but because of the immaturity of shaped charge technology in those days, manufacturing a HEAT warhead tended to be costlier than manufacturing a kinetic energy one. Still, the typical HEAT shell on both sides of the Iron Curtain was so powerful that they rendered all contemporary tank armour essentially useless in the event of a direct hit, but the problem was exactly that - scoring a direct hit. Because of the vastly lower velocity - even lower than contemporary 105mm HEAT shells - the 2A20's selection of shaped charge ammunition can be generally characterized by subpar accuracy but excellent armour penetration and fragmentation effects.
3UBK-3
3BK-4


Thanks to a combination of the lack of spinning and a larger diameter warhead, among other things, the 3BK-4 shell had 18.6% greater penetration performance than its 105mm counterpart, but to achieve that sort of performance, great compromises had to be made.

Though extremely capable of knocking out an M60-type tank on the first hit, the chances of scoring a hit are extremely low. At 1500 m, the chances of hitting an M60-sized target is only 20%, and though this rises to about 48% at 1000 m, this is still only means that just one out of two shots will connect.
The warhead uses the GPV-2 point-initiating base detonating (PIBD) piezoelectric fuse.
Mass of Complete Round: 26.00 kg
Projectile Mass: 12.97 kg
Mass of Explosive Charge: 1.55 kg
Muzzle Velocity: 900 m/s
Penetration:
440mm @ 0°
200mm @ 60°
3UBK-3
3BK-4M


Improved variant of the 3BK-4 replacing the steel liner with a copper one, yielding slightly better penetration power. The copper liner was more elongated, which reduced the mass of the explosive filling slightly. The shell uses the GPV-2 point-initiating base detonating (PIBD) piezoelectric fuse
Mass of Complete Round: 26.00 kg
Projectile Mass: 12.97 kg
Mass of Explosive Charge: 1.478 kg
Muzzle Velocity:
Penetration:
>440mm @ 0°
>200mm @ 60°
3UBK-7
3BK-15


The higher pressure acts upon the edge of the cylinder and forces the projectile down until stable airflow is achieved again. According to these simulations, a shape-stabilized projectile should have around 20% more aerodynamic drag than a ogived projectile (not accounting for additional stabilization fins), but since the biggest grinch to accuracy is wind and the tumbling because of it, and since HEAT rounds do the same damage regardless of warhead velocity, the trade off was well worth it.
The warhead also implemented some new technologies to improve jet formation characteristics, including the use of a slightly tapered cylindrical wave shaper to optimize the direction of the blast wave from the explosive filling, more precisely drawn liner cones, and compressed explosives to increase the density of the explosive filling for more punch per volume.
The use of more energetic 12/7 stick powder boosted the shell's muzzle velocity to 1060 m/s, yielding significantly better accuracy at longer distances, though still less accurate than 105mm HEAT shells.
For some very interesting reason, the tracer was not placed at the base of the shell assembly. Instead, it is embedded into the wall of the warhead at the very front. As with all of the previous warheads, this one uses the GPV-2 point-initiating base detonating (PIBD) piezoelectric fuse.
Mass of Complete Round: 26.3 kg
Total Projectile Mass: 12.2 kg
Muzzle Velocity: 1060 m/s
Penetration: (Unknown, estimated)
450mm @ 0° (?)
225mm @ 60° (?)
3UBK-7
3BK-15M
Improved warhead using a copper liner instead of steel for slightly improved penetration power. All other properties remain identical.Mass of Complete Round: 26.3 kg
Total Projectile Mass: 12.2 kg
Muzzle Velocity: 1060 m/s
Penetration:
480mm @ 0° (?)
240mm @ 60° (?)
SECONDARY

The original 1961 preproduction model T-62 was armed with the SGMT machine gun chambered for the 7.62x54mmR cartridge as a co-axial machine gun. It had a cyclic rate of fire of 600 rounds per minute, and it is fed from a 250-round box, of which 10 more are stowed in the tank for a total of 2750 rounds of ammunition. The SGMT could be fired with the left trigger button on the gunner's handgrip, or with the solenoid trigger button attached to the machine gun in case of a total failure of the tank's electrical systems.
In 1964, the SGMT was swapped out for the then-new PKT machine gun. Performance-wise, the two were practically indistinguishable, though the PKT does fire faster at 800 rounds per minute, so the true impetus for the change was not to have a better machine gun, but to standardize the PK general purpose machine gun among the entire armed forces.
The PKT machine gun is fed from proprietary 250-round boxes, of which 10 more are stowed, exactly as with the SGMT. Like the SGMT, the PKT can be fired from the left trigger button on the gunner's handgrips, or with the inclusive solenoid trigger button if the situation calls for it.
Because both machine guns use the same ammunition and have similar barrel lengths and rifling twists, the ballistic trajectory of the shots fired are essentially identical, so there was no need to modify the sights to accommodate the new machine gun. The nominal maximum effective range of both machine guns is around 1500 m, while the effective range against a running target is around 650m. Ball and tracer ammunition are usually linked in a 2:1 ratio, but sometimes tracers are used exclusively. Spent casings and emptied links are collected in a metal bin to the left of the machine gun.
The exact use of the co-axial machine gun is dependent on the gunner more than anything. It is usually used instead of cannon rounds to engage enemy personnel to save ammunition. It is useful for when excessive destruction is undesirable; when friendly forces intend to occupy an evicted foe's garrison, for instance.
TERTIARY

The installation of the DShKM necessitated that the loader was given a more developed cupola with a race ring and a mount to place the machine gun. Elevating and depressing the machine gun cradle is done with a flywheel, and slewing the cupola side-to-side is done by moving it with body weight.
The DShKM has a rate of fire of around 600 rounds per minute, but it is characterized by somewhat mediocre accuracy in comparison with the later NSV and KORD machine guns.
It is fed with proprietary 50-round boxes, with another five strapped close to the side of the turret for easy access by the loader, who needs only to bend down to reach them.
Aiming can be done with either the K-10T anti-aircraft collimator sight kept in the raised box mounted to the cradle or the inclusive leaf-type iron sights on the machine gun itself. The K-10T facilitates accurate aiming at both ground level and high altitude targets, though the leaf sights on the DShK would be more appropriate for aiming at ground targets. The collimator sight has a tinted screen in front of the holographic refractor screen to reduce glare when aiming in the direction of the sun.


The K-10T is electrically powered by the tank's electrical systems. When not in use, the protective cover is closed, mainly to shelter it from the weather.
The DShKM would have been quite successful too, given that the AH-1 Cobra's cockpit armour wasn't nearly enough for protection against 12.7mm shots and the windscreen was only a thin polycarbonate sheet. The rest of the fuselage lacked any meaningful armour protection.
PROTECTION

The T-62's hull retains the same general layout as the T-54, differing only slightly in dimensions. Armour thickness remains unchanged from its predecessor, which was a perpetual liability because of how vulnerable this made the T-62, in contrast to the T-54 which enjoyed at least some degree of immunity from contemporary anti-tank guns. The front hull armour is composed of upper and lower glacis plates. The upper glacis measures 102mm at a 60° slope for a LOS thickness of 204mm, and the lower glacis is the same thickness but with a 55° for a LOS thickness of 178mm, though the angle of incidence can be made bigger due to ballistic drop over distance, and conversely, the angle of incidence on the upper glacis can be made smaller the same way. Regardless, the lower glacis can be considered a weak point of sorts, though it is mostly inconsequential since the lower glacis is only a third of the height of the upper glacis.
The hull side is 80mm thick, thinning down slightly to 70mm over the engine compartment, while the rounded hull side "collars" for mounting the turret are 45mm thick cast steel, angled at 60°.
Like the T-55 before it, the hull of the T-62 was essentially immune to American 90mm APBC at ranges exceeding 1000 m. However, due to the lack of any improvements to the armouring scheme meant that the T-62 had absolutely no chance of surviving the new British 105mm L7 cannon and its APDS ammunition any closer than 2000 m, even in a hull-down position.

The T-62 uses MBL-1 armour grade cast steel for the turret, which has a hardness of 270 to 290 BHN. The steel used for the all-welded RHA hull is 42SM armour steel, which has a hardness of 280 to 340 BHN, harder for the thinner plates (i.e side hull) and softer for thicker plates (glacis). Though the glacis armour of the T-62 is nominally thinner than that of, say, an M60 (252mm LOS), the T-62 uses RHA steel instead of cast steel, and not only that, the hardness of said RHA steel was significantly harder than that of American cast steel at the time. The M60's cast glacis, for example, was unusually soft at 220 BHN, and because of its cast nature, it wasn't as effective as the T-62's.
The turret was 242mm thick at the thickest around the lower half of the mantle portion of the turret, gradually thinning down across the upper half of the turret, though the curvature does offer some slight compensation. The area of the roof behind the crew hatches is only 16mm thick, but the sloped front half of the curving turret roof has a maximum thickness of 40mm sloped at an angle of 80° to a minimum thickness of 30mm sloped at 83°, if a technical drawing from a manual is any good indication.

Though quite thick, the protective qualities of the turret are still rather questionable, mostly because it doesn't have the sort of superb ballistic shaping that the M60A1 had. The sides of the turret are wildly varying in thickness, chiefly because of the almost perfectly round turret as opposed to the oblong one on the T-54. Generally speaking, the 242mm-thick front portion of the turret will curve such that the turret will always pose a similar relative thickness across its 60° frontal arc. The thickness of the side of the turret at the region of the commander's cupola is about 122.5mm, but sharply declines from there to only about 65mm at the lower half of the rear of the turret, and only about 55mm at the upper half where it just begins to form the roof, below the ejection port and ventilator housing. The turret hatches themselves are respectably thick, the commander's being around 30mm thick and the loader's being just under 20mm.
Here's a more detailed breakdown:
Upper Glacis: 102mm RHA @ 60° = 204mm RHA LOS
Lower Glacis: 100mm RHA @ 55° = 174mm RHA LOS
Side Hull: 80mm RHA ... 70mm RHA (Crew Compartment ... Engine Compartment)
Hull Rear: 45mm RHA
Hull Roof: 20mm RHA
Hull Floor: 20mm RHA
Turret Front: 242mm Cast w/ Rounded Geometry = 218mm RHA ~ 230mm RHA LOS
Turret Top Edge: 40mm Cast @ 80° ... 30mm Cast @ 83° = 207mm RHA ... 221mm RHA LOS
Turret Side: ~160mm to ~120mm Cast
Turret Rear: ~60mm Cast
Turret Roof: ~20mm to ~30mm
It must be noted that the glacis armour is stronger than the LOS thickness may suggest due to the inherent positive qualities of rolled armour in tandem with the high hardness of the plate. Both of these factors boost the glacis' ability to deflect armour-piercing ammunition. Overall, the steel used in the T-62 was of a higher quality and of a higher hardness than the steel used in the American Patton series of tanks, which admittedly doesn't mean much if the thickness discrepancy is big, but it does place Soviet metallurgy in a positive light.
While the T-62 was not originally equipped with side skirts, most T-62s were retrofitted with steel-reinforced plastic ones (interwoven textile skirt), similar to that of the T-72.

Their main function was to reduce the amount of dust kicked up by the tank while travelling, which was highly undesirable because the dust clouds could give away the tank's position, not to mention blinding the vehicles following it, if the T-62 was travelling in a convoy. And of course, the side skirts acted as spaced armour for the hull. They are about 10mm thick and quite stiff; enough to ensure that a grenade fuse activates reliably, but not thick enough or strong enough to be of much use against kinetic energy penetrators. The skirts were mounted 610mm away from the hull.
But let us not forget that the protection scheme of a tank is not solely dependent on raw armour thickness. The crampedness of the interior was very well justified by a seemingly impossibly small frontal silhouette, if the tank were to be compared to foreign analogues of the time.

Although similarly wide and similarly long compared to its NATO counterparts at 3.30 m and 6.63 m respectively, it is significantly shorter at just 2.40 meters tall, which is 0.50 m shorter than the Chieftain, 0.80 m shorter than the M60 pictured above, and slightly shorter still compared to the French AMX-30 and German Leopard 1. This is an extremely important aspect to the T-62's survivability. Getting hit and shrugging it off is one thing, but not getting hit in the first place is crucial, so in this sense, the T-62 is arguably on par with NATO tanks in the defensive role, while having a distinct, if small advantage in the offensive one chiefly due to its relatively small size.

The advent of mass produced thermal imaging equipment practical for combat use in tanks, the advantage of size as a concealment factor became largely immaterial, and new technologies such as superior sabot designs, highly precise stabilizers and ballistic computer made hitting even small targets so easy that you couldn't argue for that either. However, those innovations only came in the late 70's and early 80's, years after the T-62 arrived.
Ilyich's Eyebrows

All T-62Ms are equipped with applique BDD armour, and older T-62s may be retrofitted. BDD armour is more popularly known as "Ilyich's Eyebrows" in humorous reference to Soviet Premier Leonid Ilyich Brezhnev's bushy facial features:


BDD armour covered the hull glacis and the turret front on either side of the gun, but not the lower hull area nor the turret top. It is a form of NERA armour, composed of a laminate of alternating steel plates and a solid polyurethane filling. First entering inventories in 1980, BDD armour boosted the T-62's protection level close to that of the T-64's or T-72 Ural's, giving it the ability to intermittently resist widespread 105mm APDS ammunition from the upper boundaries of typical combat ranges as well immunity from lightweight portable anti-tank rockets like the LAW and RPG-7 families.


Method Of Operation
BDD armour most likely operates on the transfer of kinetic energy from impacting projectiles to the thermoplastic polyurethane (TPU) layer, which, due to its elastomeric properties and pliability when heated as a result of the impact, will be violently radially displaced out of the projectile's path like a fluid and thus impart all of the energy to the first steel plate, which then deforms inwards and moves into the projectile's path laterally. When the projectile enters the layer of TPU behind the first steel plate, that layer explosively expands like the first layer, pushing the first steel plate outwards and pushing the second steel plate inwards, thus imparting energy onto the penetrating projectile in two different lateral directions. This is repeated again in the third plate, for a total of at least three "reactions" - hence the 'R' in NERA; Non-Explosive Reactive Armour. This lateral motion would have the effect of either disturbing the delicate flow of cumulative jets or badly eroding and destabilizing a kinetic energy penetrator.

The single hull block is 150mm thick - or 300mm thick taking into account the hull sloping - complete with an array of steel plates within. Each internal steel plate is just 5mm thick, and the polyurethane layer fills the gaps in between. The front wall is 30mm thick, or when angled at 60° as the glacis is, 60mm thick. The internal steel plates are angled at 65°.
The turret blocks are uniformly 296mm thick, but the front plate becomes thinner as it curves upwards. The front plate itself is cast steel, 71mm thick at the top half and 85mm down the bottom half. The added thickness compared to the glacis plate is intended to compensate for the relative weakness of cast steel, which is only about 90% as effective as rolled steel, and the positive influences of the slope on the glacis. The internal steel plates in the turret array are angled at 50° instead of 65°.
 |
| Notice the thickness of the front wall of the turret BDD modules |
 |
| Turret module |
Even when expended, the thick front wall of the BDD blocks can still perform as applique armour coupled with spaced armour effects, added with internal debris. In effect, "expended" areas can still provide a respectable amount of protection, certainly still enough to immunise the T-62 from LAW hits to the front.
Overall, BDD armour on the T-62M can be viewed as a case of "too little, too late". The anaemic M47 Dragon would be brushed off without much ado, sure, but in the early 80's, the ITOW was just around the corner, and it would have been able to defeat this new armour with relative ease. BDD armour could not change the status quo of the T-62 against opposing tanks given the relatively recent introduction of 105mm APFSDS ammunition either, and the T-62 was already well on its way to the scrapyard. On the other hand, "scrapyard tanks" reigned supreme in Afghanistan in the absence of T-72s and T-64s, and it was there that BDD armour proved to be the difference between life and death.
BELLY ARMOUR

But besides the (lack of) additional protection from new NATO weapons, the BDD armour also came with added belly armour for extra mine protection in light of the tactical situation in Afghanistan at the time. The applique belly armour is quite simple in construction, composed of a large spacer frame with many reinforcing ribs, and twelve steel plates individually welded on to it, as you can see in the photo above. The total thickness of the armour is 20mm. The new armour reduced the T-62M's ground clearance from 430mm to 397mm. This affected its ability to drive over tree stumps, large rocks and overcome vertical obstacles, but the otherwise, it was business as usual.
SLAT ARMOUR


Slat armour was often used to cover areas unprotected by BDD armour. This was a not an uncommon combination during the Soviet campaign in Afghanistan, where it proved more useful than the basic rubber side skirts originally installed onto the T-62M. The full slat armour set weighs 0.55 tons.

Kontakt-1
 |
| Photo from Andrei Tarasenko's website |
In the early 80's when Kontakt-1 became available, some T-62s were formally equipped with it, but only on an evaluatory capacity. Instead of Kontakt-1, T-62s were invariably given slat armour instead, which could not be often seen on tanks that used Kontakt-1 like the T-64 and T-72. They both had the same function, but slat armour was much cheaper and easier to install, and since the T-62 was not considered to be an important asset by the early 80's, it was only ever given slat armour instead of more effective ERA kits. However, evidently some field mechanics ignored the official regime and retrofitted their T-62s with Kontakt-1 anyway.

Mounting the blocks are easy. Each one is bolted onto a tinny spacer mounted all over the surface of the hull and turret. The ease of installing and replacing the blocks meant that the entire modification could be done as part of regular scheduled maintenance. However, simplicity comes at a price in this case. The ERA boxes are somewhat fragile, and can be quite easily knocked off when the tank is travelling through densely wooded areas, or perhaps traversing obstacles in urban sprawl. A great many Syrian T-72s lost their side skirts and all of the Kontakt-1 blocks on them from reckless driving.
Each Kontakt-1 block consists of two 4S20 explosive elements, which are plastic explosives packed into a flat steel plates. Each plate weighs 260 grams, and are equivalent to 280 grams of TNT. They have a low sensitivity to ensure that they can survive being hit by machine gun fire without detonating prematurely. The weight of each block is 5.3kg, and a full set covering the entire tank weighs approximately 1.2 tons.


The operation of Kontakt-1 is quite simple, utilizing two angled explosive plates to disrupt cumulative jets. When a cumulative jet passes through the explosive plates, the resulting explosions will generate high-speed shockwaves in two different directions. This, in addition to the separation of the many steel sheets within each module caused by the buildup of pressure from the explosion, severely compromises the jet by cutting off most of its body (but not the tip, which travels at hypersonic speeds and is too fast to intercept). By destroying and dissipating the middle part of the cumulative jet, the residual penetration power of the offending warhead then becomes completely tied to just the tip. The main limitation of Kontakt-1 is the very low sensitivity of the 4S20 explosive compound used the explosive cells. By having such a low sensitivity, they cannot detonate from small arms fire, even incendiary rounds, but it also means that the reaction time is quite slow, and that a significant portion of the cumulative jet may have already penetrated the block before it can explode.
The overall ERA coverage is uncompromising. The entire tank is covered in all areas save for the rear of the hull and turret. Each block can reportedly reduce the penetrating effects of cumulative jets by up to 55% at 0 degrees obliquity, and up to 80% when angled at 60 degrees. Because Kontakt-1 is incapable of providing significant protective value against KE penetrators, only HEAT values will be listed.
Here's a more detailed breakdown:
 |
| Photo from Andrei Tarasenko's website |
Each Kontakt-1 block consists of two 4S20 explosive elements, which are plastic explosives packed into a flat steel plates. Each plate weighs 260 grams, and are equivalent to 280 grams of TNT. They have a low sensitivity to ensure that they can survive being hit by machine gun fire without detonating prematurely. The weight of each block is 5.3kg, and a full set covering the entire tank weighs approximately 1.2 tons.


Method of Operation
The operation of Kontakt-1 is quite simple, utilizing two angled explosive plates to disrupt cumulative jets. When a cumulative jet passes through the explosive plates, the resulting explosions will generate high-speed shockwaves in two different directions. This, in addition to the separation of the many steel sheets within each module caused by the buildup of pressure from the explosion, severely compromises the jet by cutting off most of its body (but not the tip, which travels at hypersonic speeds and is too fast to intercept). By destroying and dissipating the middle part of the cumulative jet, the residual penetration power of the offending warhead then becomes completely tied to just the tip. The main limitation of Kontakt-1 is the very low sensitivity of the 4S20 explosive compound used the explosive cells. By having such a low sensitivity, they cannot detonate from small arms fire, even incendiary rounds, but it also means that the reaction time is quite slow, and that a significant portion of the cumulative jet may have already penetrated the block before it can explode.
The overall ERA coverage is uncompromising. The entire tank is covered in all areas save for the rear of the hull and turret. Each block can reportedly reduce the penetrating effects of cumulative jets by up to 55% at 0 degrees obliquity, and up to 80% when angled at 60 degrees. Because Kontakt-1 is incapable of providing significant protective value against KE penetrators, only HEAT values will be listed.
Here's a more detailed breakdown:
HEAT:
Upper Glacis: 600mm RHAe LOS
Lower Glacis: 600mm RHA LOS
Side Hull: 80mm RHA ... 70mm RHA (Crew Compartment ... Engine Compartment)
Hull Rear: 45mm RHA
Hull Roof: 20mm RHA
Hull Floor: 20mm RHA
Turret Front: ~600 RHAe LOS
Turret Top Edge: ~800 RHA LOS
Turret Side: ~500mm Cast
Turret Rear: ~60mm Cast
Turret Roof: ~160mm RHAe
MINE CLEARANCE
Equipment for clearing a path through minefields was issued to tank platoons, one each. One tank in any given platoon would be a model appropriately modified from the factory to mount any mine clearance devices from the early PT-54 all the way up to the KMT-8.PT-55 Mine Rollers
Mine rollers meant to detonate anti-tank mines before the tracks do. Main disadvantage of mine rollers is that it is not safe for the cannon barrel to be pointing forward, due to the negative effects of the blast on its integrity. They weigh in at a hefty 8.8 tons, and quickly wear out the front suspension of the tank.

Later on, the improved and progressively lighter PT-54M and PT-55 could be mounted. They could not clear as wide a path as the original PT-54, but are more sustainable because of their weight.
KMT-4 Mine Ploughs
Mine ploughs that dig up and shove anti-tank mines out of the way, creating a path just wide enough for the tracks to pass through They weigh 1.2 tons, and are lowered with a hydraulic piston powered by the tank's electrical system. The tank can move at normal speeds with the plough raised, but must slow down to 12 km/h with the plough lowered. The plough is light enough that it will not affect the frontmost torsion bars, which is helped by the better optimized arrangement of roadwheels on the T-62. The large gap between the first and second pair of roadwheels in the T-54 and T-55 designs meant that they would have been placed under excessive strain, possibly breaking them.

Neither of these devices could remove or safely detonate tilt-rod mines, but tank crews could tie a piece of steel wire or cable across the two plows or rollers for a makeshift standoff detonator. Later mine clearance devices like the KMT-5 combined rollers with a plough while weighing less than the original PT-54-type rollers. Later on, the T-62 could mount more sophisticated KMT-6, 7 and 8 devices capable of detonating both tilt-rod mines as well as electromagnetically fused ones. This is mostly thanks to the completely standardized mounting system used for all Soviet mine clearance devices.
NBC PROTECTION
Like any other tank, the T-62 can be decontaminated swiftly by being blasted with jets of hot air to remove chemical and biological agents, which is what is happening to the T-62 below:

But before external decontamination can begin, it must be made sure that NBC contaminants cannot slip through gaps in the tank's armour to incapacitate or even kill the crew, and the effects of a nuclear blast may cause severe illnesses in the long run. To combat all of these effects, the T-62 was furnished with a comprehensive NBC protection suite, something which no other tank in the world save its predecessor had at that time.
ERB-1M
With the need for nuclear protection firmly established with the appearance of tube artillery-delivered tactical nukes, the requirement for such a system remained the same for the T-62 as it did for the T-55, which had the most advanced nuclear protection scheme in the world of tanks, being the only tank that had one. For simplicity's sake, the T-62 simply adopted the same ERB-1M system as the T-55. ERB-1M could detect a nuclear explosion through a gamma radiation sensor located in the middle of the hull, just beside the commander's seat (red box), and activate the tank's collective protection suite.

When gamma radiation was detected and determined to be at or above a dosage indicative of a nuclear explosion or leak, all portholes would be sealed with steel shutters to prevent contamination, as the tank was not airtight unless sealed. The shutters were activated via explosive squibs detonated through an electric impulse. The engine would be immediately stopped and the radiator cooling fan suspended. The radiator louvers would be automatically shut closed and to fully assure the impenetrability of the fighting compartment from radioactive particles, the ventilator is powered up to create a slight overpressure to ensure that nothing can enter even in still air. As any middle school student would know, high winds from a low yield nuclear blast would create a pressure differential causing air from within the tank to be sucked out. The driver has manual switches for activating the nuclear attack seals.
| TSh2B-41/U sight aperture with nuclear attack seal activated |


Compared to a plug-in system where the crew members must plug in their gas masks into the tank's air filter unit as found in most American armoured vehicles, the T-62's collective-type protection suite is ergonomically more convenient by far. The crew does not need to wear masks that obturates their vision, and they can breath easier.
SMOKESCREEN

Like the T-54, the T-62 has an on-board smokescreen generation system. Diesel fuel is injected into the exhaust manifolds, vaporizing it with the heat which produces wonderful plumes of white, opaque smoke. One of the most positive aspects of this system is that smoke produced with this method will be the exact same temperature as the exhaust manifold would be. This makes it impossible to differentiate the heat signature of the tank from the heat of the smoke, giving the T-62 a reliable way of self-concealment from NATO thermal imaging sights appearing in the mid-80's.
902V "Tucha" Smoke Grenade System

The T-62M was outfitted with the Tucha smoke grenade system for instant concealment. Since the T-62M was introduced rather late into the Cold War in 1983, they skipped ahead of the early 3D6 and were straightaway equipped with the more advanced 3D17 IR-obscuring smoke grenades.
3D17

The 3D17 is an advanced IR-blocking aerosol smoke grenade. It completely obturates the passage of IR signatures or IR-based light as well as light in the visible spectrum. It is effective at concealment from FLIR sights and cameras as well as at blocking and scattering laser beams for tank rangefinders and laser-homing missiles. Unlike the 3D6, the 3D17 grenade detonates just 1 second after launch, allowing it to produce a complete smoke barrier in 3 seconds flat. The drawback to this is that the lingering time of the smokescreen is only about 20 seconds, depending on environmental factors and the number of grenades detonated. This is enough for the tank to hastily shift its position, but not much more. This grenade detonates in mid air about 50m away from the tank. It has a caseless design with a propulsion method identical to that of the VOG 30mm and 40mm grenades which came later.
FIREFIGHTING

The T-62 is furnished with the "Rosa-2" automatic firefighting system inherited from the T-55. It can be activated from the driver's station. "Rosa" employs a halocarbon fire extinguishing agent designated "3.5"; a pressurized combination of ethyl bromide and carbon dioxide. The mixture is very effective, but also highly poisonous and carcinogenic, so the crew must at least immediately The system employs TD-1 temperature sensors strategically positioned around the inside of the engine compartment. "Rosa-2" reacts to a rise in temperature to 180°C. The fire extinguishers are activated 10 seconds after detection.
The system can operate in either 'automatic' or 'semi-automatic' modes. In the 'automatic' mode, the system alerts the driver of the source of the fire and immediately closes all of the radiator louvers, shuts off the engine, cuts off the engine air intake and shuts down the radiator fan to deprive the fire of air. Then, the integral fire extinguishers are activated, and if it is unable to put out the flame with a direct blast, the fire will still die down from being totally starved of oxygen.
In the 'semi-automatic' mode, the system only alerts the driver of the source of the fire, but takes no action on its own. The driver can then choose whatever action he deems most suitable at the moment. He can control the deployment of the fire extinguishers from his station, and the commander has a master switch for deploying the fire extinguishers as well.
In addition to the automatic fire extinguishing system, the driver is supplied with a single manual OU-2 carbon dioxide fire extinguisher. Carbon dioxide is suitable against Class B and C fires, namely fuel and electrical fires, which are the predominant causes or victims of fire in a tank.

ESCAPE HATCH
The T-62 mounts an escape hatch for the crew to use in the very worst of emergencies. It is located directly behind the driver's seat and in front of the gunner. All of the turret's inhabitants can (relatively) easily swing down and out, but for the driver to exit, he must first fold his seat backwards, enter the turret, and then fold his seat forwards (the driver must fold as well) before he can egress.
 |
| (The one at the bottom of the photo) |
Though small as always, the hatch has one highly redeeming feature, and that is that it is opened inwards on a hinge as opposed to being a drop out-type. Not only does this practically eliminate any potential concerns of the hatch dropping out on its own accord from bad securings, it means that it can be opened if the tank is submerged.
DRIVER-MECHANIC'S STATION

The driver's station is practically identical to the one in the T-54, with only very minor differences. It is located at the front left quadrant of the hull, and the driver absconds through an elliptical hatch. When swung open, the turret cannot be turned owing to a built-in safety mechanism to prevent the driver's head from being lopped off, and there is a small indicator light that alerts the driver that the gun is over the hatch.

For daytime driving, the driver is provided with two 54-36-317-R periscopes. They can be pulled straight down for removal, which causes spring-loaded shutters to clamp down and reseal the periscope port to prevent irradiated particles from passing through. The 54-36-317-R periscope has 1x magnification. The periscopes have special K-108 windows infused with cerium. Whereupon the windows are blasted with gamma radiation from a nuclear explosion, they begin to slowly darken to give the driver eye protection from the intensity of the visible light and infrared and UV radiation emitted from the explosion. They will return to their original undarkened under daylight within several hours, depending on the time of day (intensity of sunlight). They are heated through the RTC electrical heating system to prevent fogging.


For nighttime driving, the driver is equipped with the TVN-2 binocular infrared nightvision periscope. It has a fixed 1x magnification and a 30° field of view. Both periscopes can be replaced with the TVN-2, but the driver is only given one. With two nightvision periscopes, the driver could potentially get a better range of vision than in most other tanks. Infrared light is sourced from the single IR headlamp on the hull glacis and another similar lamp on the turret, just underneath the L-2G Luna spotlight. The driver can see only about 60 m in front of him, so the speed of the tank must be carefully controlled.


Direction navigation is facilitated by a simple GPK-48 gyrocompass located near the driver's feet. The main function of the gyrocompass is of course to let the crew know which direction they are travelling in, but it is particularly useful when driving underwater because the driver wouldn't have any scenery at all to refer to. With the GPK-48, it is possible for the driver to perform maneuvers when driving underwater (provided that certain conditions are met, including riverbed integrity and so on).
 |
| Photo credit: mashpriborintorg from flikr |
In 1966, the T-62 received the GPK-59 gyrocompass, which had more knobs and dials.

The use of gyrocompasses can perhaps be labeled as a rudimentary form of an Inertial Navigation System (INS), advanced versions of which are often present in modern combat vehicles due to their independence from outside input contrary to a GPS-based navigation system.
MOBILITY

The tactical mobility of the T-62 - that is, its ability to maneuver under its own initiative as opposed to piggybacking on transporters like by lorry, rail, by plane or by ship - is only just admissible. One of the T-62's main grievances, though minor, is that it is just slightly underpowered compared to its predecessor the T-55, mainly because it uses the same V-55V diesel engine of the T-55, but weighs over a ton more than it, bringing its mobility characteristics down to the level of the T-54.
V-55V


The V-55V engine puts out 580 hp at 2000 rpm with a maximum torque of 240 kgm at 1200 to 1250 rpm. It has a specific fuel consumption of 180 g/hph, which is quite reasonable for an engine of its size. Mounting the this engine, production model T-62s weighing in at up to 37.5 tons combat loaded had a power to weight ratio of just 15.46 hp/ton. This placed the T-62 firmly in the category of contemporary medium tanks like the M48 Patton and the Centurion and better than the then-brand new Chieftain, and only slightly better than the M60 that it was to compete against. The T-62 could attain a top speed of 50 km/h on paved roads, and the average speed when going cross country was around half that at 25 km/h, which was more or less the same as the M60. The reverse speed, however, was horrendously bad at 6.8 km/h.
The engine could be started either electrically or by a combination of air pressure and electricity in extremely cold weather, as mentioned before. Electric starting is done with the ST-16M electric starter and the air is supplied by the compressed air tanks.
As with its plainly average performance on the highway and off, the T-62 was also more or less averagely deft at traversing difficult terrain. It could climb vertical obstacles up to 0.8m tall, climb a 32° upward slope and drive on a side slope of 30°. The tank can cross trenches 2.85m wide at slow speeds, but it is possible to jump the tank over much wider trenches provided that it travels fast enough. It would be even better if there was a natural ramp or perhaps a bump to help the tank catch air.
The engine powers the F-6.5 alternator with a maximum output of 6.5 kW for the tank's power supply.
V-55U
This engine was only known to have been given to the T-62M. Thanks to a more optimized direct fuel injection system, it had a slightly increased output of 620 hp to compensate for the added weight of the T-62M, but was identical to the V-55V in every other way. Still, the small increase in power does not adequately balance out the gains in weight, so the T-62M has noticeably poorer driving characteristics.V-46-5M

Instead of the F-6.5 alternator, the V-46-5M is equipped with the G-6.5 model with the same output, differing only in the method of installation and the input capacity.

SUSPENSION

The T-62 used OMSh single pin tracks, carried over from the T-54/55. The full set of 96 links weighs 1386 kg. The tracks are of a simple hinged type, with no inner rubber padding or rubber bushings, nor were there any rubber track pads available for this type of track during the T-62's years of service, so travelling on paved roads was not very good for the asphalt. The tracks are 488mm wide, with standard centered guide horns.

The idler wheel is of a skeletal design with 10 spokes. The idler wheel has 4 spokes.


Contrary to popular belief, Soviet tanks and other armoured fighting vehicles are typically not much better off in terms of ground flotation when contrasted with most other NATO tanks. Exerting a ground pressure of 0.77 kg/sq.cm, the T-62 was no better than the 12-ton-heavier M60A1 (0.76 kg/sq.cm), and only slightly better than the then-common M48A1/A2 (0.83 kg/sq.cm), but it was positively lightfooted compared to tanks on the heavier side of the spectrum like the clumsy old Centurions (~0.95 kg/sq.cm) and the advanced Chieftain which arrived much later (0.90 kg/sq.cm).
During the 70's, the T-62 along with the T-54/55 series was retrofitted with RMSh single-pin tracks from the T-72, which are wider by 92mm and considerably more durable thanks to larger and tougher connecting pins and a reduced rate of wearing thanks to internal rubber bushings. A full set of 97 links weighs 1655 kg. All T-62Ms are fitted with the RMSh track.

This reduced the ground pressure to a measly 0.65 kg/sq.cm, much lower than any other tank of the time, enabling the T-62 to traverse poorly accessible terrain much more easily than other tank can.
The easiest way to tell apart an OMSh track from an RMSh track is to observe the ends of a track link. An OMSh-type track has an open loop at the ends of the track links whereas an RMSh track doesn't (check the photos above to confirm).
ENGINE DECK
The engine deck was renovated twice since the original iteration in 1961. The original engine deck had maintenance hatches to allow easier inspection of the engine and air cleaner without removal of the engine deck. The hatches aren't very large, though, so doing any sort of detailed repairs will be difficult.


Replacing the engine or doing more extensive maintenance can only be done with the removal of the entire deck.
The T-62M brought with it a revised deck design with a large T-72-style engine access hatch, giving a clear, unobstructed view of the innards of the engine compartment.
 |
| Photo credit: Andrei Tarasenko's website |
None of the engine deck designs have enough armour to resist 30mm DU rounds from the legendary A-10 Warthog's GAU-8 cannon, but it is still strong enough stop the extremely anaemic 20x102mm cartridge, which isn't saying much, but very relevant given that the A-10 did not even exist until the T-62 was already well on its way out of Soviet frontline units.
The radiator is located directly behind the engine. It can be accessed by lifting the protective radiator access panel, which is hinged. Directly underneath the radiator unit is the cooling pack into which coolant carries heat from the engine to be dissipated by air sucked in through the radiator unit and out the rear of the engine compartment via a centrifugal fan.

The fan is powered by the engine via a crankshaft connected to the gearbox, thus allowing the fan to meet the engine's cooling needs following its power output, which is proportional to its heat output. The fan housing has its own armoured cover, which has rubber seals to prevent water ingress while the tank is driving under water.


The radiator air intakes are protected by a set of armoured louvers to protect from air burst artillery and mortar shells or even molotov incendiary bombs. These are further augmented by auxiliary armoured covers, which must be manually closed, but can be sprung open with the press of a button in the driver's station. They are too thin to be of much use against air attack, so their main function is to seal the radiator from the ingress of water.

 |
| Engine air intake (Credit: Alex Chung) |


Whereupon the engine air intake is sealed and the vehicle is underwater, the engine draws air from inside the hull via a respirator fan located just behind the commander's seat, on the partition between the engine compartment and fighting compartment. There is no filter in this channel, because the air in the fighting compartment is already filtered.
 |
| (Notice the fan duct at the top of the photo) |

The tank's electrical supply needs are handled by four 6-STAN-140 accumulators located at the front of the hull, adjacent to the driver's station.
ROAD ENDURANCE
Fuel storage is divided between 3 internal tanks and 3 external tanks for a sum total of 960 liters. Two of the internal fuel tanks are also the two front hull shell stowage racks (as seen previously) and the other fuel tank is located at the starboard side of the hull, at the very rear of the fighting compartment, right next to the partition between the engine compartment and the fighting one. The two front hull fuel tanks hold 280 liters each, and the solitary fuel tank at the rear of the fighting compartment in front of the engine compartment partition holds 115 liters
Since all of the fuel tanks are interconnected, the driver-mechanic need only top up the tank from one fuel filler port. There is one at the rear of the hull leading to the rear fuel tank:


(Photo credit: Evgeny Starobinets)
And another two for the pair of conformal front hull fuel tanks at the front of the hull:

The three external fuel tanks are mounted atop the starboard side fenders, each with their own fuel filler cap.
 |
| Here you can see how the fuel tanks are connected |
Total internal fuel capacity is 675 liters, and 285 liters on the external fender tanks. An additional 400 liters of fuel is carried in two 200-liter auxiliary fuel tanks mounted at the stern to augment the tank's operational range with a sum total of 1360 liters of fuel. With auxiliary fuel tanks, the T-62 has a highway cruising range of about 650 km, or 450 km without, and about half of that when travelling cross country.

All the fuel tanks are interconnected. The driver has a control knob just beside the right steering lever to select which set of fuel tanks he wants to draw from, choosing between the internal fuel tanks only, external and the auxiliary drums only, or all together, or the driver may cut off all fuel flow entirely. This is quite helpful if one of the tanks were to be compromised, because by shutting off a set of fuel tanks, the rate of leakage can be greatly reduced and this may even help control a potentially catastrophic internal fire if the driver reacts promptly.
WATER OBSTACLES

There are certain procedures that need to be followed prior to snorkeling, however. In order to prevent water from entering the engine air intake and radiators, they must all be sealed by locking their armoured covers down and the bilge pump should be activated, which can be done with a switch on the driver's instrument panel. It is only necessary to close the armoured louvers for both the radiators and the air intakes when fording. Once the engine air intake is shut off, however, the engine must draw air from inside the tank through a respirator fan located just behind the commander's seat.

When snorkeling, it is also necessary for the exhaust outlet to be sealed with a valve bank, which is a cover with four spring-loaded circular exhaust ports that prevents exhaust gasses from being released until they build enough pressure to blow out forcefully enough that water will not have a chance to leak in. Finally, if the tank will be snorkeling deeper than three meters, the last step is to seal all of the hatch gaps with a waterproof paste, which has the consistency of clay. The entire preparation process takes around 30 minutes for snorkeling, but the tank can readily ford across any stream without any preparations whatsoever.
The air supply for both the crew and engine is provided by the single snorkel erected from the turret roof.

The snorkel is broken down into three parts and latched onto the rear of the turret for convenient stowage during road marches and combat, and must be assembled on site by the crew before it can be used. It is possible to install only one or two of the three parts depending on the depth of the body of water to be crossed. The snorkel is installed in a small port in the turret roof, just in front of the loader's hatch. Once the tank resurfaces and drives off, it is not necessary to remove any of the snorkeling accessories except the snorkel (for obvious reasons), which can be simply cast away by pushing on it from the inside.


The porthole plug itself has a thick rubber seal to prevent rainwater from dripping into the tank, as do all of the hatches.
DISTRIBUTION


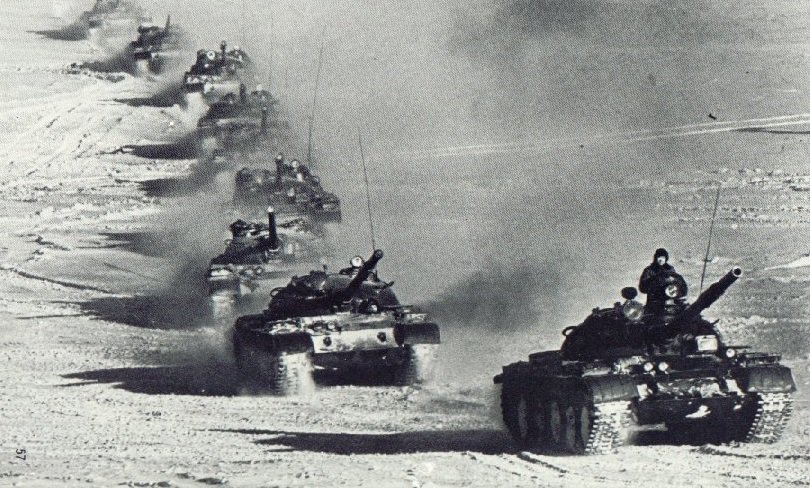
REFERENCES
http://www.fotovalkirumodelism.com/page.php?page=539
https://www.youtube.com/watch?v=kAP1vSOu9Ak
http://army.lv/ru/t-62/foto/631/19/2
http://www.rbs.ru/vttv/99/firms/kotplast/e-pppc5.htm
http://btvt.narod.ru/4/t62weapon.htm
http://www.scribd.com/doc/27319696/Russian-T-62-Medium-Tank-Operators-Manual#scribd
http://walkarounds.scalemodels.ru/v/walkarounds/afv/after_1950/T-62_interior_UVZ_Shinji/?g2_page=1
http://www.kotsch88.de/g_115_mm_d-68.htm
http://www.kotsch88.de/m_115mmmun.htm
http://www.kotsch88.de/al_milex2005.htm
http://morozovkmdb.com/eng/body/t62.php?page=history5
http://olivier.carneau.free.fr/index.htm
http://scalemodels.ru/modules/photo/viewcat_cid_262.html
http://www.tank-samolet.ru/technic/sale/tanks/t62_w.php
http://www.armorama.com/modules.php?op=modload&name=SquawkBox&file=index&req=viewtopic&topic_id=167911&page=2
http://www.rushnglory.com/topic/146-%D1%81%D1%80%D0%B5%D0%B4%D0%BD%D0%B8%D0%B9-%D1%82%D0%B0%D0%BD%D0%BA-%D1%82-62-%D0%B8-%D0%B5%D0%B3%D0%BE-%D0%BC%D0%BE%D0%B4%D0%B8%D1%84%D0%B8%D0%BA%D0%B0%D1%86%D0%B8%D0%B8/page__p__706#entry706
http://www.splav-kharkov.com/en/e_mat_start.php?name_id=171
http://catalog.use.kiev.ua/index.php?action=setLang&lang=eng&search_val=&page=catalog&view=product&id=446&cat_id=&eid=
http://xn----7sbb5ahj4aiadq2m.xn--p1ai/guide/army/ta/t62.shtml
https://yadi.sk/d/WEVHGbC9QUMK2
https://docviewer.yandex.com/?url=ya-disk-public%3A%2F%2FP1N11VfZ3061qfb1STG81nUmieCqVA4wf7G5KgupUb0%3D&name=115mm_2A20_1970.rar&c=5666c85d8103
http://jcammo.com/save-large-calibres-3/
http://www.tank-net.com/forums/index.php?showtopic=9553&page=2
http://www.russianarms.ru/forum/index.php?topic=12003.0
http://tigerscorner.ru/gallery/index.php?option=com_content&view=article&id=61:-62---&catid=35:2010-12-02-12-50-08&Itemid=54
http://webcache.googleusercontent.com/search?q=cache:http://militaryrussia.ru/blog/topic-299.html
http://afganista.ru/a/t-62_-_opisanie_konstruktsii
http://www.bmz.ru/disel/v_46_5m.htm
http://www.vitkovicesteel.com/en/pages/plates-armour-plates
http://photopribor.ck.ua/en/products/defense/equipment_for_armored_vehicles_control_systems/1k13_sighting_and_guidance_device/
Another excellent article. I especially loved the info about the autoejector. I always wanted to see and know how it worked. Will be looking forward to seeing this article be updated with more info as well as new articles.
ReplyDeleteThank you for the kind words! If you want to see anything in particular, don't hesitate to tell me!
DeleteYour welcome and if I find anything I will let you know.
DeleteGood post. By the way what happened to your BMP-1 Post? I saw it, liked it, and it disappeared.
ReplyDeleteGlitch in the matrix.
DeleteDarn glitches. "Prays to the Omnissiah to fix it and appease the machine spirit."
DeleteDamn, I was looking forward to an article on the BMP-1. :( Cursed electronic machines!!!. "Shakes Fists Furiously in the air"
DeleteAnother great, highly detailed article! Thank you for the effort!
ReplyDeleteBut if you dont mind I'd suggest a few corrections:
1, Behind the commander, the big drum like thing is not a hydraulic pump, but rather an amplydine generator for the turret traverse motor
2, You confused the TSh-2B41U with the TShS-41U. Otherwise, the description is correct
3, T-62M received a quite modern fire control system, even better than T-72, called Volna, with a new TShSM-41U sight. More info here: http://www.kotsch88.de/f_t-55am.htm
4, 115mm round performance is not entirely correct. 2 more modern, and quite powerful DU APFSDS rounds are missing.
http://btvt.narod.ru/4/t62weapon.htm
Unfortunately, there isnt any info about the most modern 3BM36, but its performance is probably around 450mm/2000m
http://www.russianarms.ru/forum/index.php/topic,12001.0.html
5, The revised engine deck appeared way before the T-62M, around 1967 (im not sure about exact date)
6, The V-55U engine does not use supercharger, but a further optimized fuel injector system.
7, The V-46-5M engine was used much more widely, indicated by an -1 suffix after the designation (T-62M-1, T-62M1-1, T-62MV-1, etc.)
Its performance is 690hp, not 780.
Thank you very, very much for spotting those errors! Due to the length of each article and the lack of a proofreader, there are often many avoidable mistakes, and I appreciate that you read the article in its entirety. I did not write about the DU shells because they were tactically irrelevant already in the mid to late 80's because the T-62 was being chucked out of Soviet warehouses, and also because they were not procured in big numbers and their performance wasn't nearly good enough to stand a chance of defeating new NATO armour (Leopard 2 and M1A1). I might add something about the Volna system later, though. Sadly I completely forgot about it. As for the other mistakes, I must apologize for my laziness!
DeleteExcellent article, t(h)ank you for your time!
ReplyDeleteA minor correction: Czechoslovakia did NOT produce T-62. That is a fairly persistent myth originated in Western sources that claims between 1,500 and 2,700 tanks were license made by Czechoslovakia (occasionally even Poland is mentioned) between 1975 and 1978 for export on Soviet order, but there is no domestic or Soviet source to back that up.
Only Warsaw Pact nation using T-62 was Bulgaria.
And t(h)ank you for your insights! I will be making the necessary corrections immediately.
DeleteAbsolutely love the series, Tiles.
ReplyDeleteA point on ballistics, though: "the 3BM3 has markedly inferior performance compared to the British 120mm L15 APDS." From what I've seen on these two rounds, I suspect this is incorrect. I believe Janes is responsible for the often-quoted 355/340mm @1/2km values, but it seems these are either for some magical later round or just plain wild overestimates. The UK's initial requirements for the round were said to be ~240mm @2km (120mm @60 degrees @2km to be precise). This is more plausible, and a couple of other sources suggest that the service round was not far off from that. Based on that, plus some ballistics math I'd say we're looking in round numbers at:
[Round: Mean penetration @1km/2km]
BM3: 325/290
L15: 300/255
Two corrections to my comment above:
Delete1) Since this is APDS, I shouldn't imply that 120mm @ 60 degrees translates into ~240 for perpendicular plate (APDS tending to be poor vs. sloped armor).
2) the 300mm @1km figure is from a 1965 MoD document, but it may come from a pre-production APDS round for the L11 gun, so it's possible the production L15 had better performance.
To be completely honest with you, I have no idea where these figures come from. I just lift them from various websites like Andrei Tarasenko's BTVT Narod and Steven Kotsch's site and forums like Tanknet, and I often just take a forumgoer's word for it when they say they "have a report/firing table", though I do of course check their reputation first. I am very happy that whenever someone proves me wrong!
DeleteI am aware that Janes' is an unreliable source, and I will be using the figures you've given in today's update. Thanks!
Your article has inspired me to do some more research on this generation of tank rounds. I'll let you know if I find anything of substance. (So far lots of clarification on British 105mm rounds, but not much for the 120mm).
ReplyDeletePlease stick to fact rather than Soviet Era propaganda. Statements like "then surely the Soviets would have never achieved the level of armoured superiority and technological excellence as they did in the late 60's, 70's and early 80's" are factually false. Any Soviet superiority was based on quantity not quality or technology.
ReplyDeleteHow "factual" such facts are is partially subjective, but what is clear is that they had an undisputed qualitative and quantitative advantage on the ground during the aforementioned periods. In tank technology, the T-64 and T-72 were the best in the world in all respects, even if you compared them to the next-gen NATO models like the Leopard 2 and M1 Abrams, which gained numerical significance in the early 80's. Even with the advent of the newer super-thick arrays on these tanks, the T-72B was equally good in terms of armour protection with the introduction and mandatory installation of Kontakt-1. Even when the M1A1HA came out, the T-72B obr. 1989 was competitive with the addition of Kontakt-5. However, by that time, the economic situation was so bleak that that was no longer relevant, but it should give you an idea of the situation on the European front.
DeleteExactly. Inferiority of soviet tanks is just a myth. T-64, and later models were amongst the best tanks in the world. T-62, while indeed mediocre, was actually not inferior to M-60 at all, and was quite superior to the Leopard-1 in every aspect except mobility! In other areas, soviets were also amongst the best: Small arms, artillery, anti aircraft weapons, and several categories of armored vehicles. The only exception was aircrafts. They were ok, (but not particularly good) till the 60s, but after that, they got more and more inferior as years passed, to the point that in the 80s, they were absolutely no match to NATO types. Even the brand new MiG-29 and Su-27 were already totally obsolete! All thanks to their extremely poor electronics.
DeleteNice article. A minor note, though: the LRF on the M60A3 wasn't mounted above the gun tube. It was in the turret under armor, and the exit window used the right-hand armored "blister" originally used by the coincidence rangefinder M17A1. An armored flap was added to the blister to protect the exit window when not in use.
ReplyDeleteI'll take your word for it. You're the expert on that!
Deleteyeah i agree so nice,
ReplyDeletei recommand it to my friends and i,ll be back again and again visit dies and mould manufacturers in india for more info.
Among those posts I've seen, this is the most particular one, and I think the blogger must have spent lots of time on it, thank you so much!
ReplyDeletehumidity chamber manufacturer
Gawd this is such a wonderful site.. And I've always been absolutely in love with the T-62
ReplyDeleteThanks so much!
Thank you! I enjoyed writing as much as you enjoyed reading it (I hope ;) I'm sure you've also noticed a few typos and the odd unfinished sentence here and there. I'll try to get that fixed soon.
Delete