Last week I wrote a post detailing my experience with CUDAMat, Deep Belief Networks, and Python using my MacBook Pro.
The post is fairly long and full of screenshots to document my experience.
But the gist of it is this: Even after installing the NVIDIA Cuda SDK and configuring CUDAMat, my CPU was training my Deep Belief Network (implemented by nolearn) faster than my GPU. As you can imagine, I was left scratching my head.
However, since the post went live last week I’ve gotten a ton of valuable feedback.
I’ve been told that my network isn’t big enough for the GPU speedup to be fully realized. I’ve also been told that I should be using Theano rather than nolearn as their GPU support is more advanced. It’s even been suggested that I should explore some compile time options of CUDAMat. And finally, I was told that I shouldn’t be using my MacBook Pro’s GPU.
All of this was great feedback and it’s helped me a ton — but I wasn’t satisfied.
After reading Markus Beissinger’s fantastic post on installing Theano on an Amazon EC2 GPU instance, I decided to give it a try myself.
But instead of using Theano, I wanted to use nolearn — mainly to see if I could replicate the problems I was having on my MacBook Pro on the Amazon cloud. And if I could replicate my results then I could conclude that the issues lies with the nolearn library rather than the GPU of my MacBook Pro.
So anyway, just like last post, this post is full of screenshots as I document my way through setting up an Amazon EC2 GPU instance to train a Deep Belief Network using Python and nolearn.
Deep Learning on the Amazon EC2 GPU using Python and nolearn
If you don’t already know, Amazon offers an EC2 instance that provides access to the GPU for computation purposes.
The name of this instance is g2.2xlarge and costs roughly $0.65 cents per hour. However, as Markus points out, by using Spot Instances you can get this cost down to as low as roughly $0.07 per hour (provided that you can handle interrupts in your computation, of course).
Inspired by Markus’ posts I decided to fire up a g2.2xlarge playground of my own and have some fun.
If you’re following along with this post, I’ll assume that you already have an Amazon AWS account and can setup an EC2 instance:

The first thing you’ll need to do is select an Operating System for your instance. I went ahead and selected Ubuntu 14.04 LTS (64-bit) (ami-3d50120d).
From there, you’ll need to select which instance you need. Amazon provides many different tiers of instances, each geared towards the type of computation you are looking to perform. You have General Purpose instances which are great for web servers, high-memory servers which are good for manipulating lots of data, and high-CPU availability for faster throughout.
In our case, we are interested in utilizing the GPU:
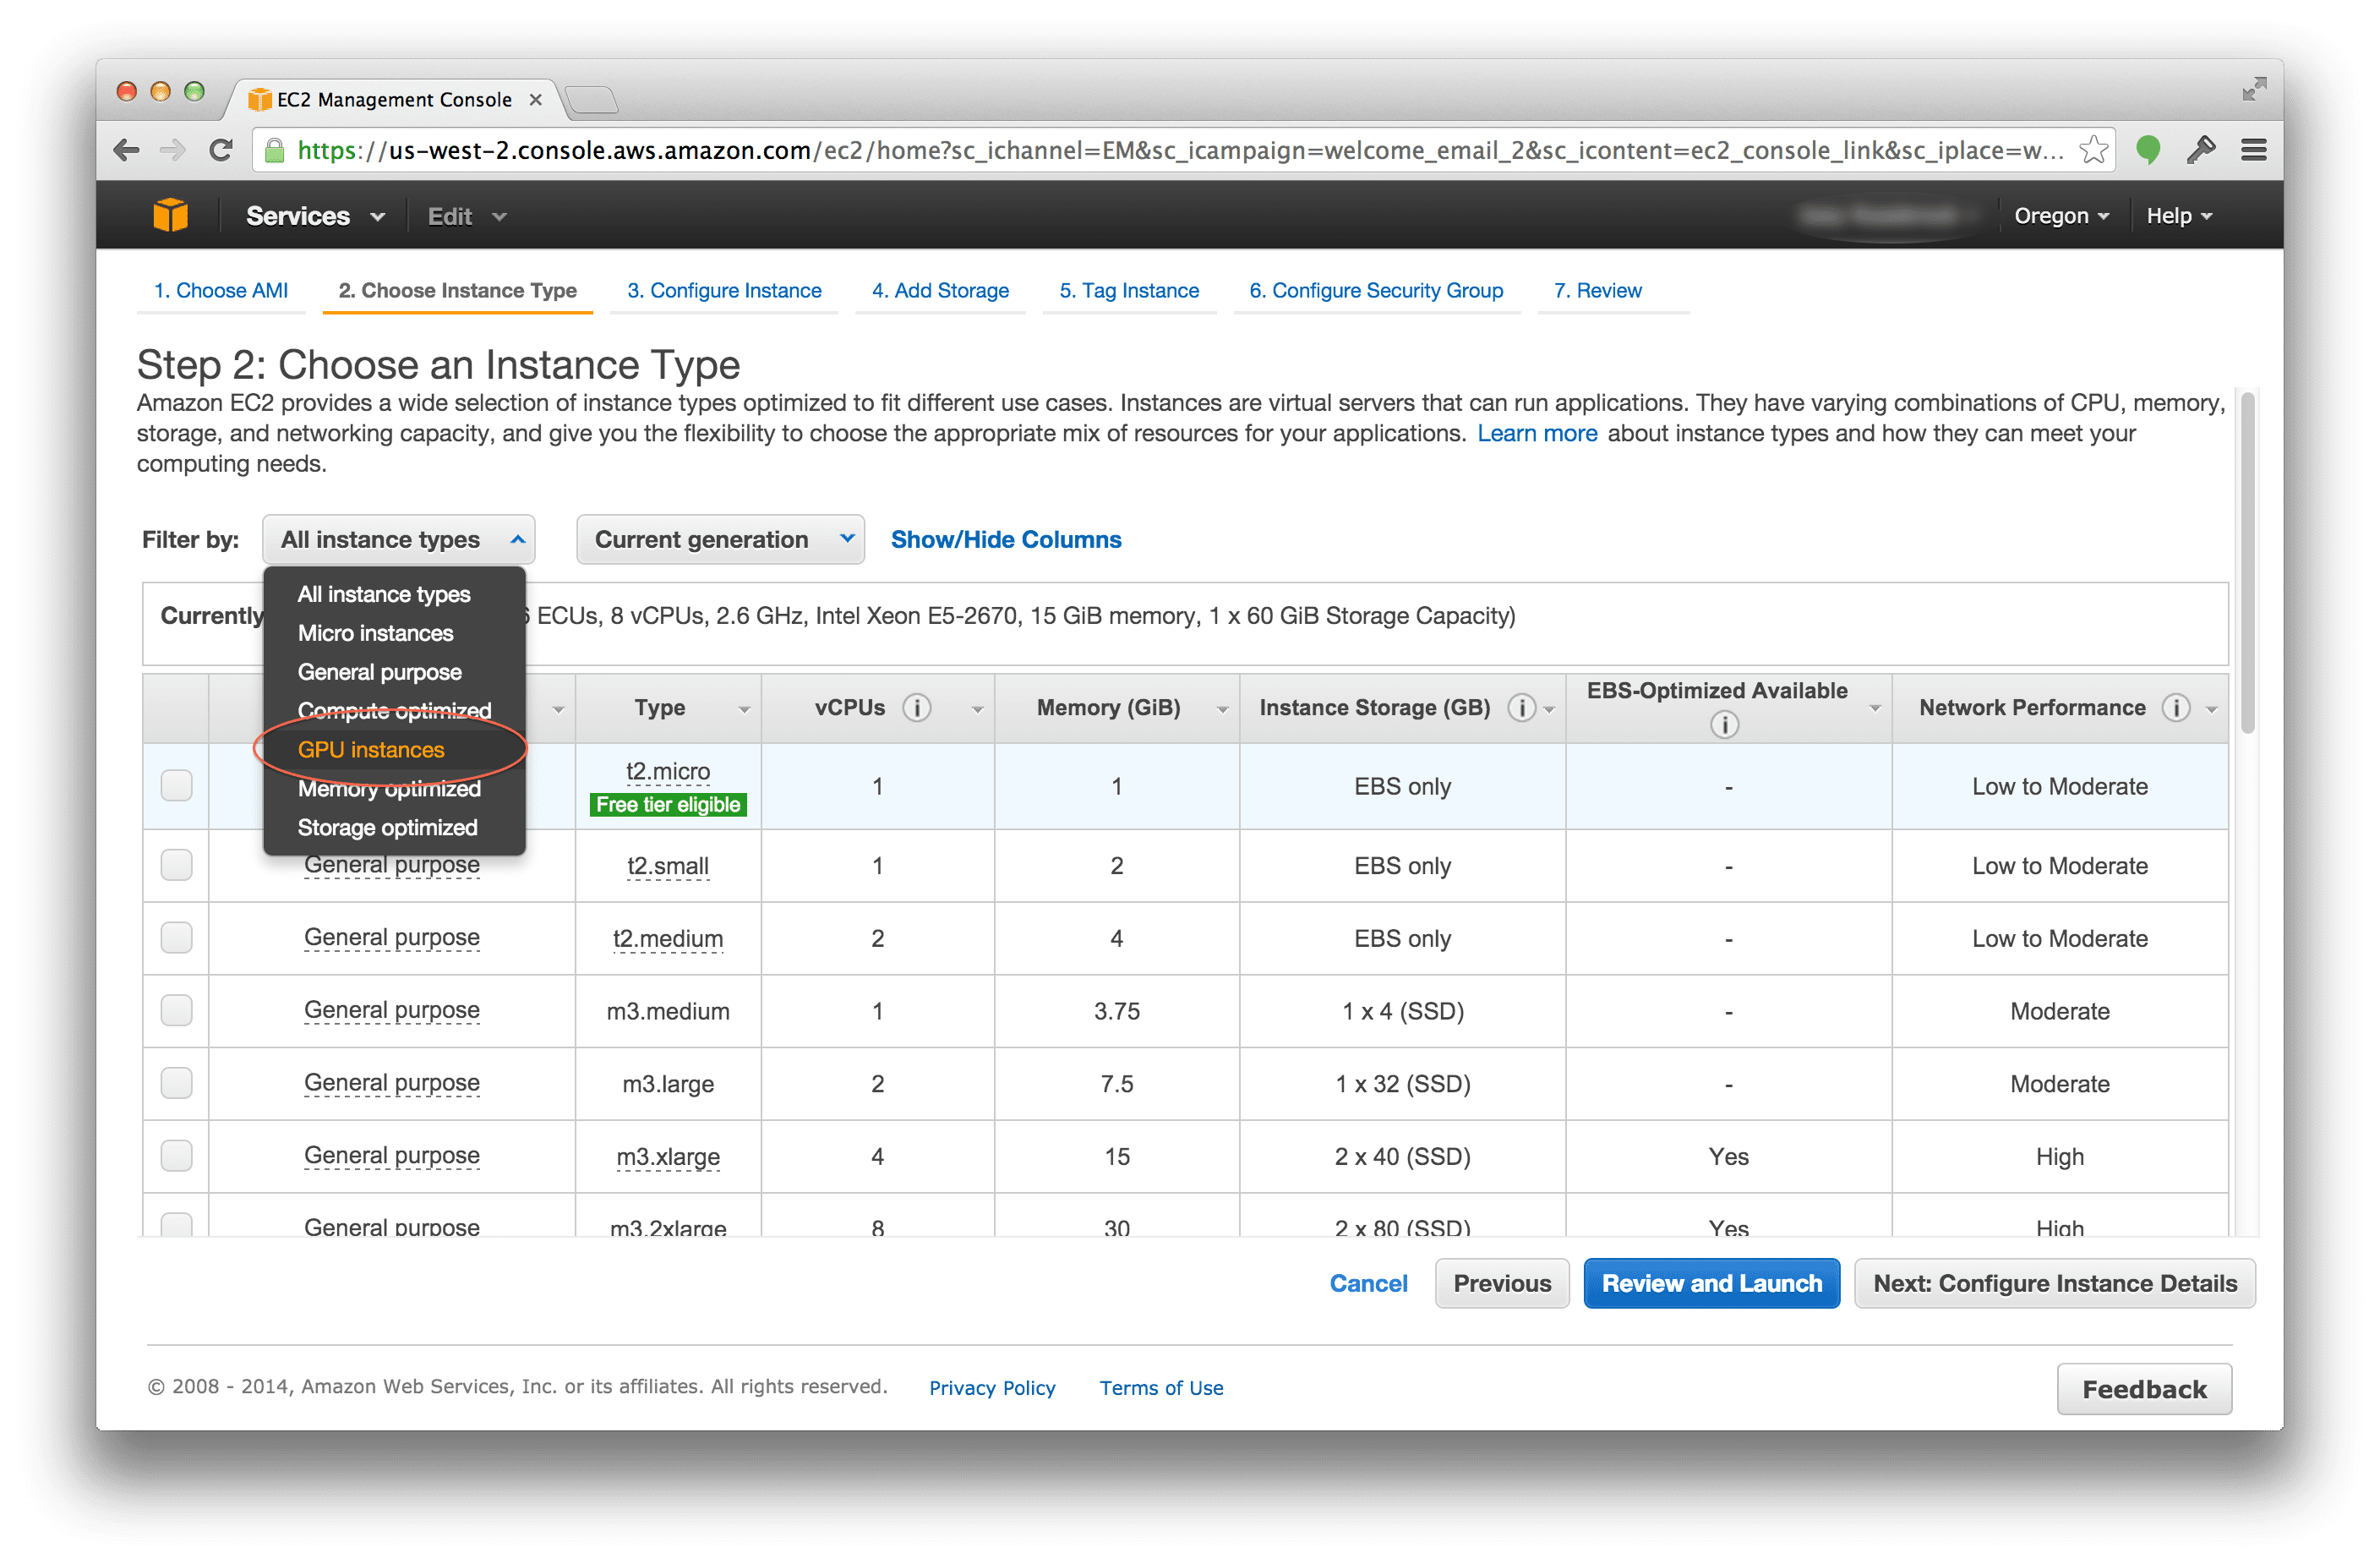
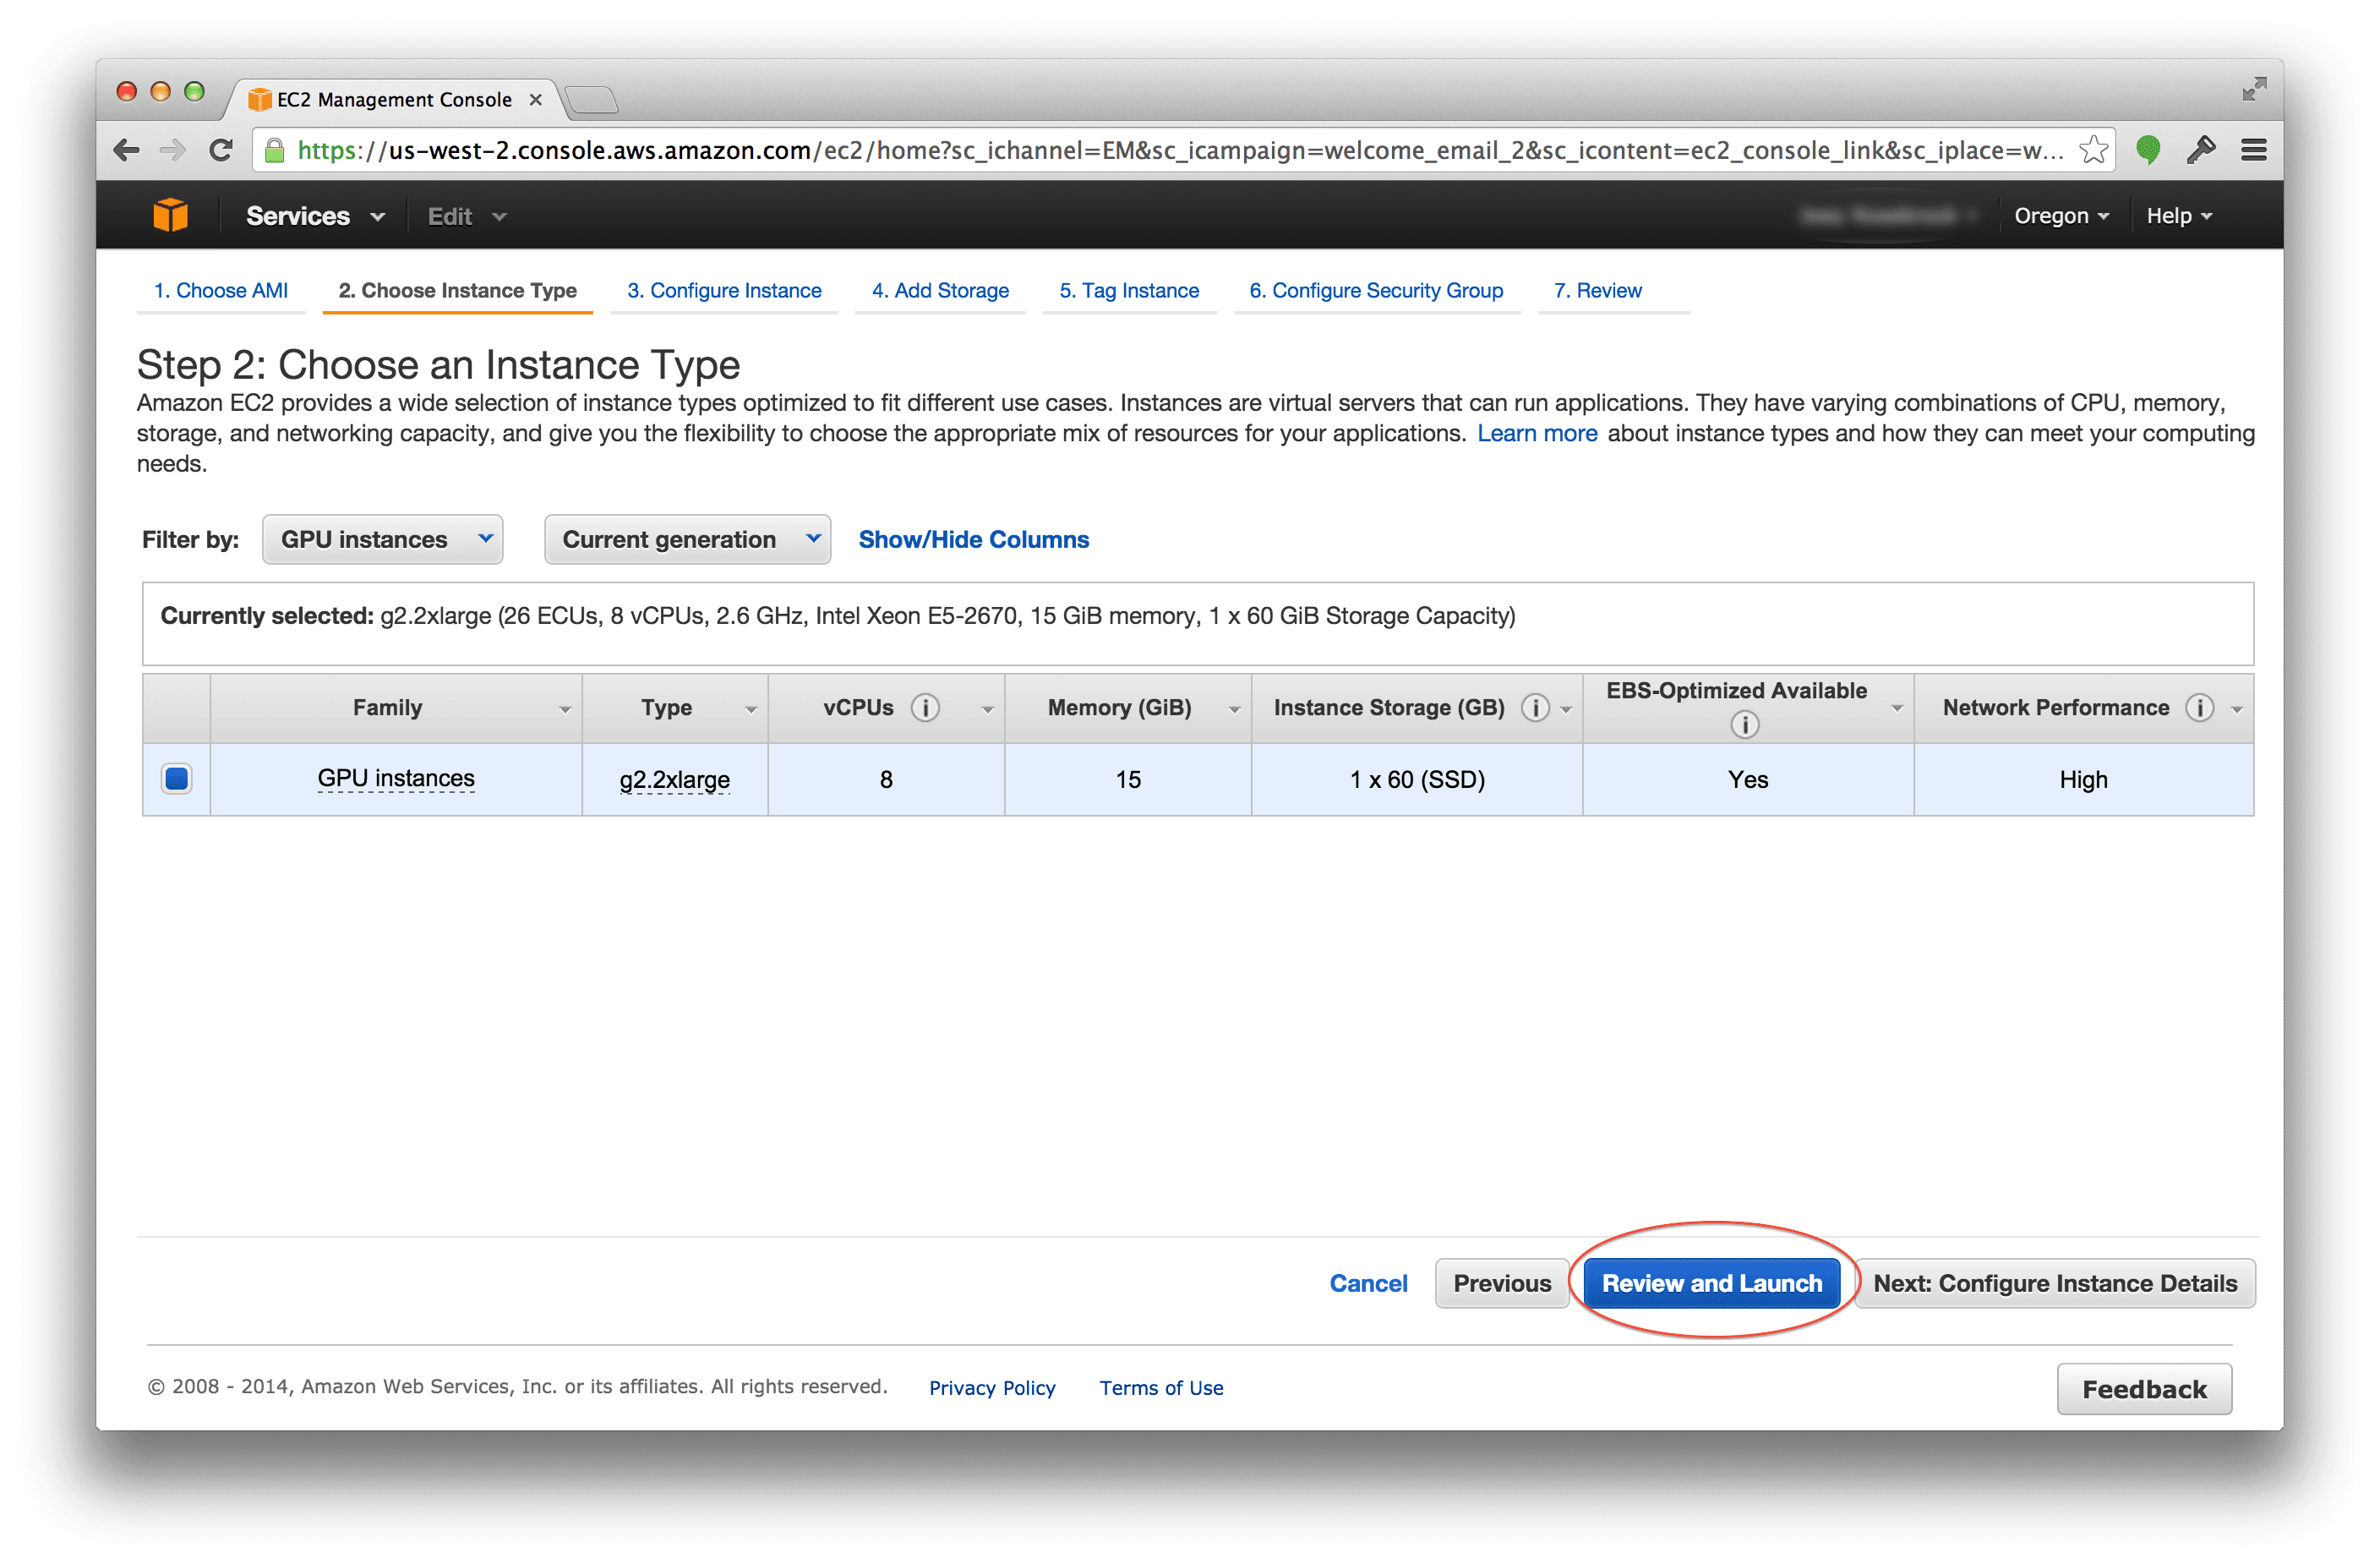
Be sure to select “GPU instances” to filter only the available GPU instances that Amazon provides.
Your next screen should look something like this:
The next step to getting your g2.2xlarge instance up and running is to configure your Security Groups to prevent outside access:
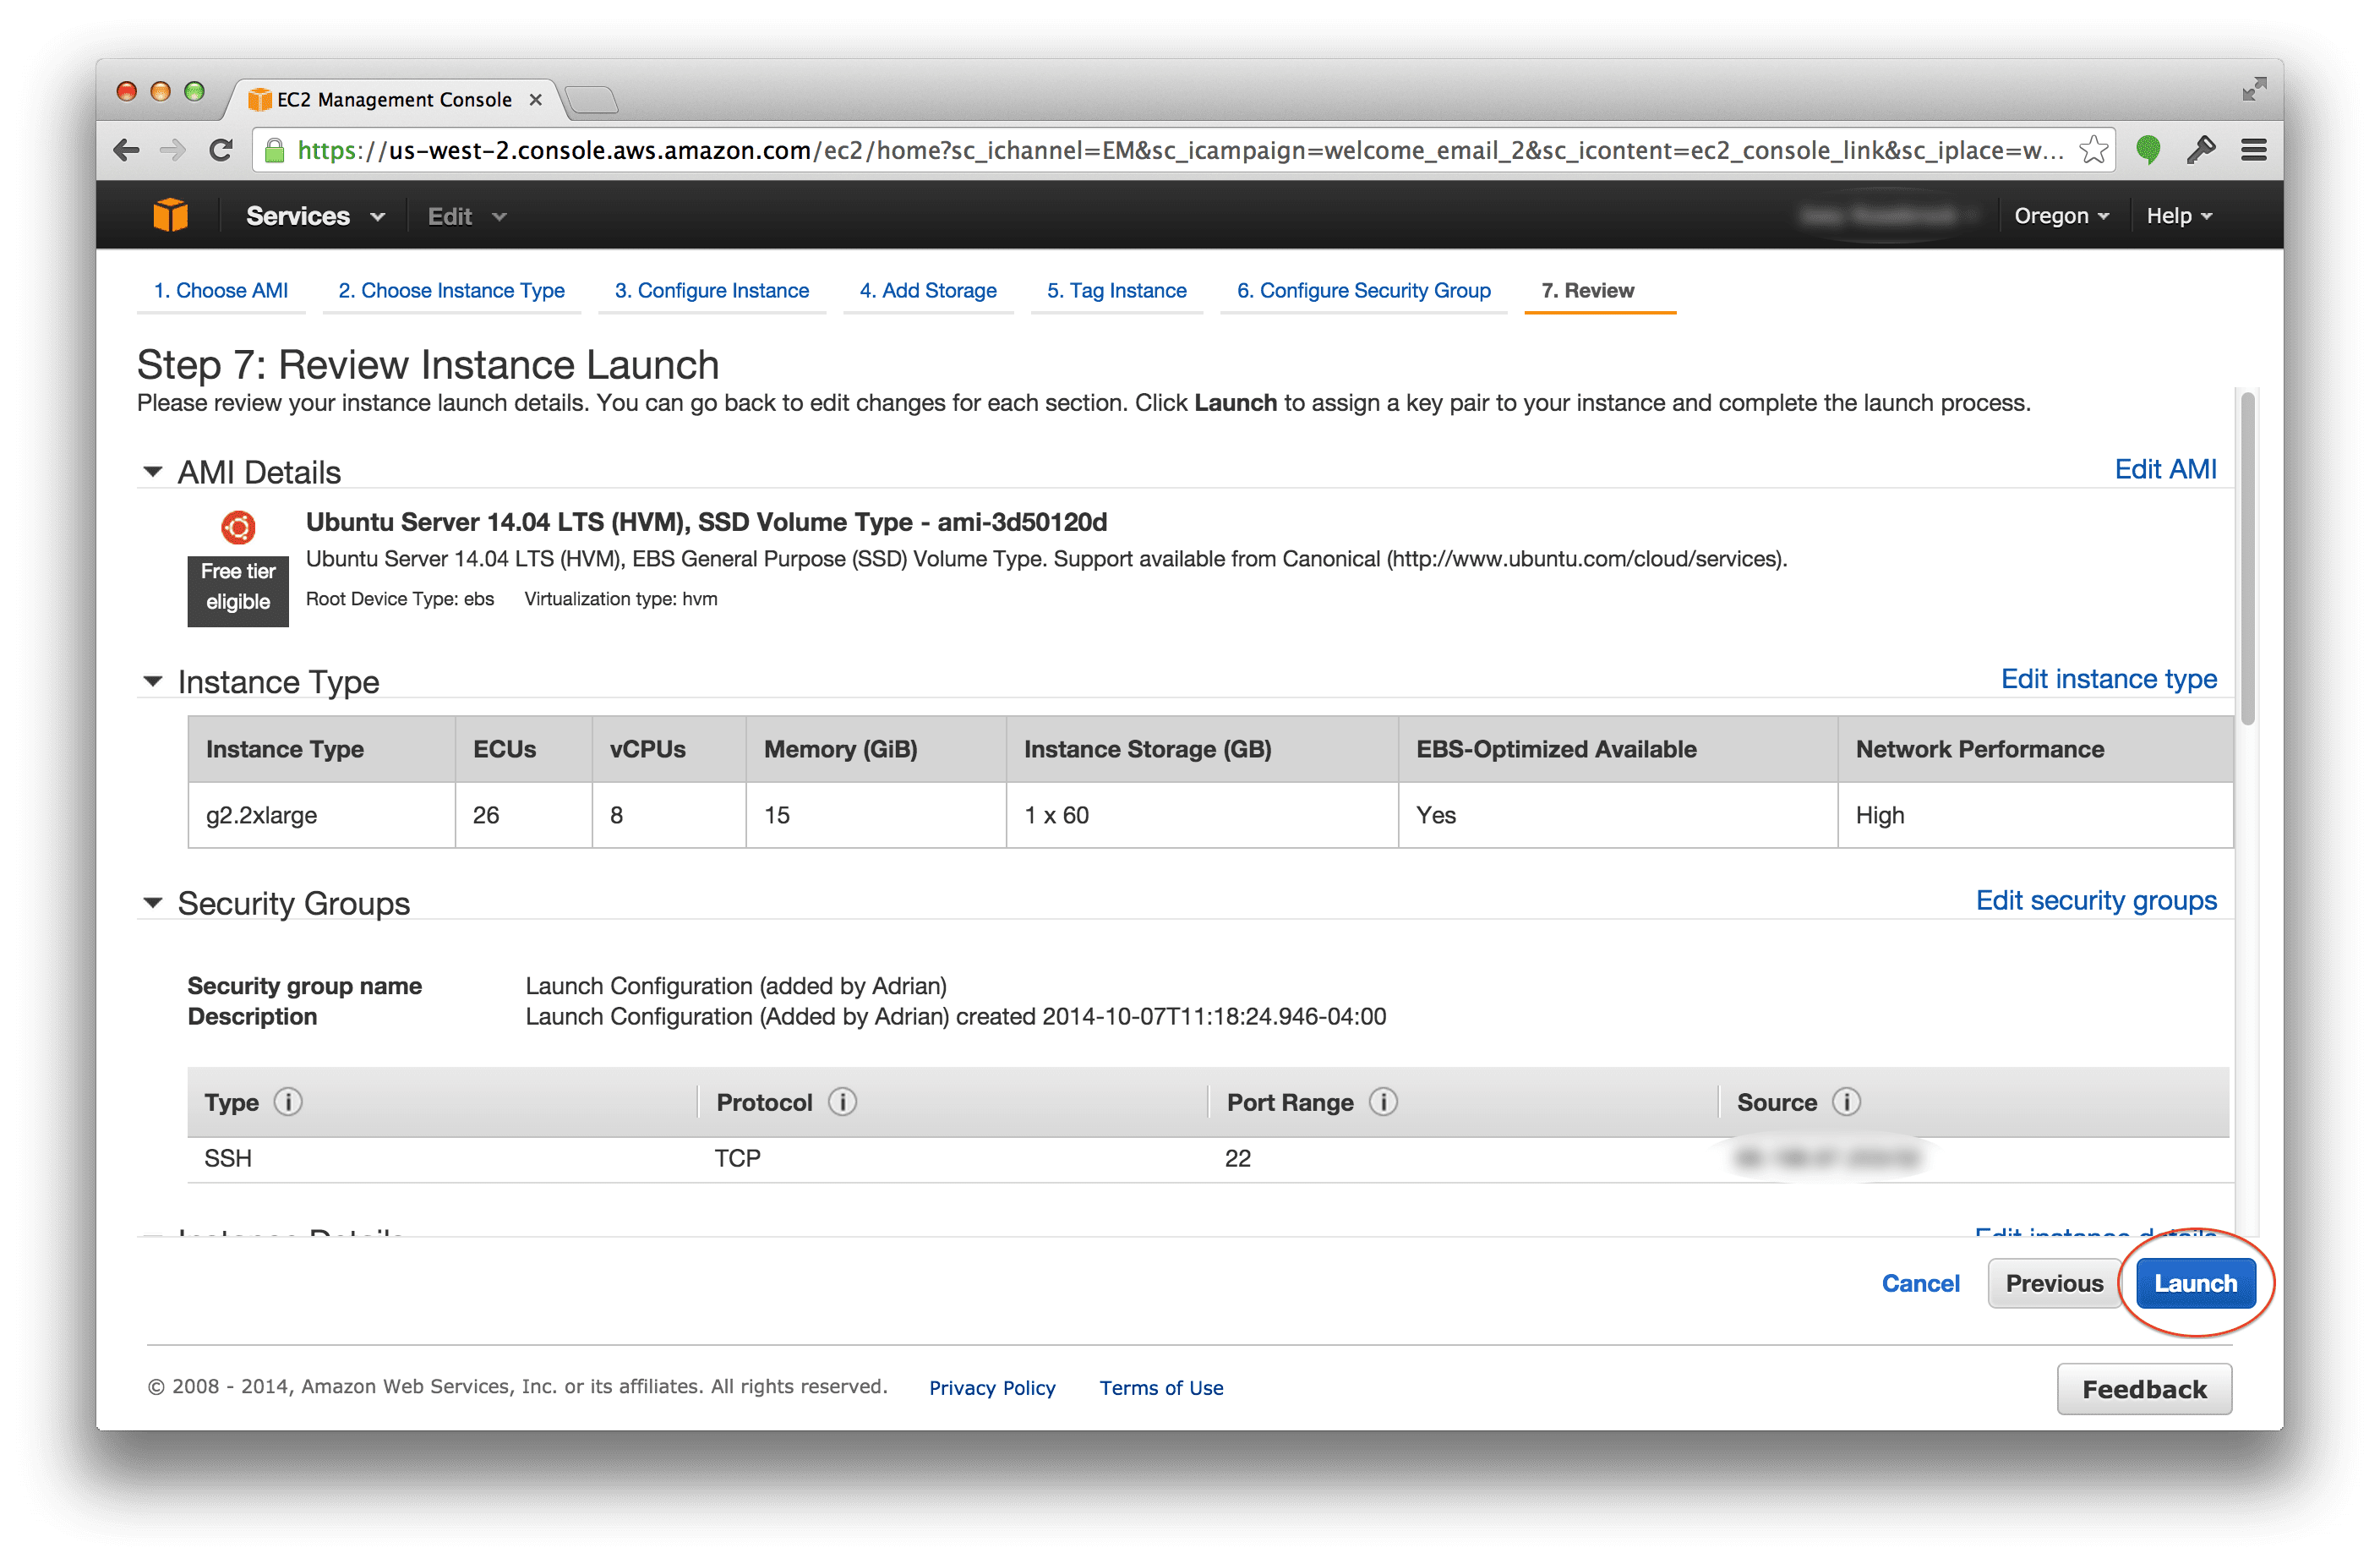
Hit the “Launch” button and wait for your instance to start up.
You’ll be prompted to download your Key Pair so that you can SSH into your server. Download the Key Pair and store it in a safe location:
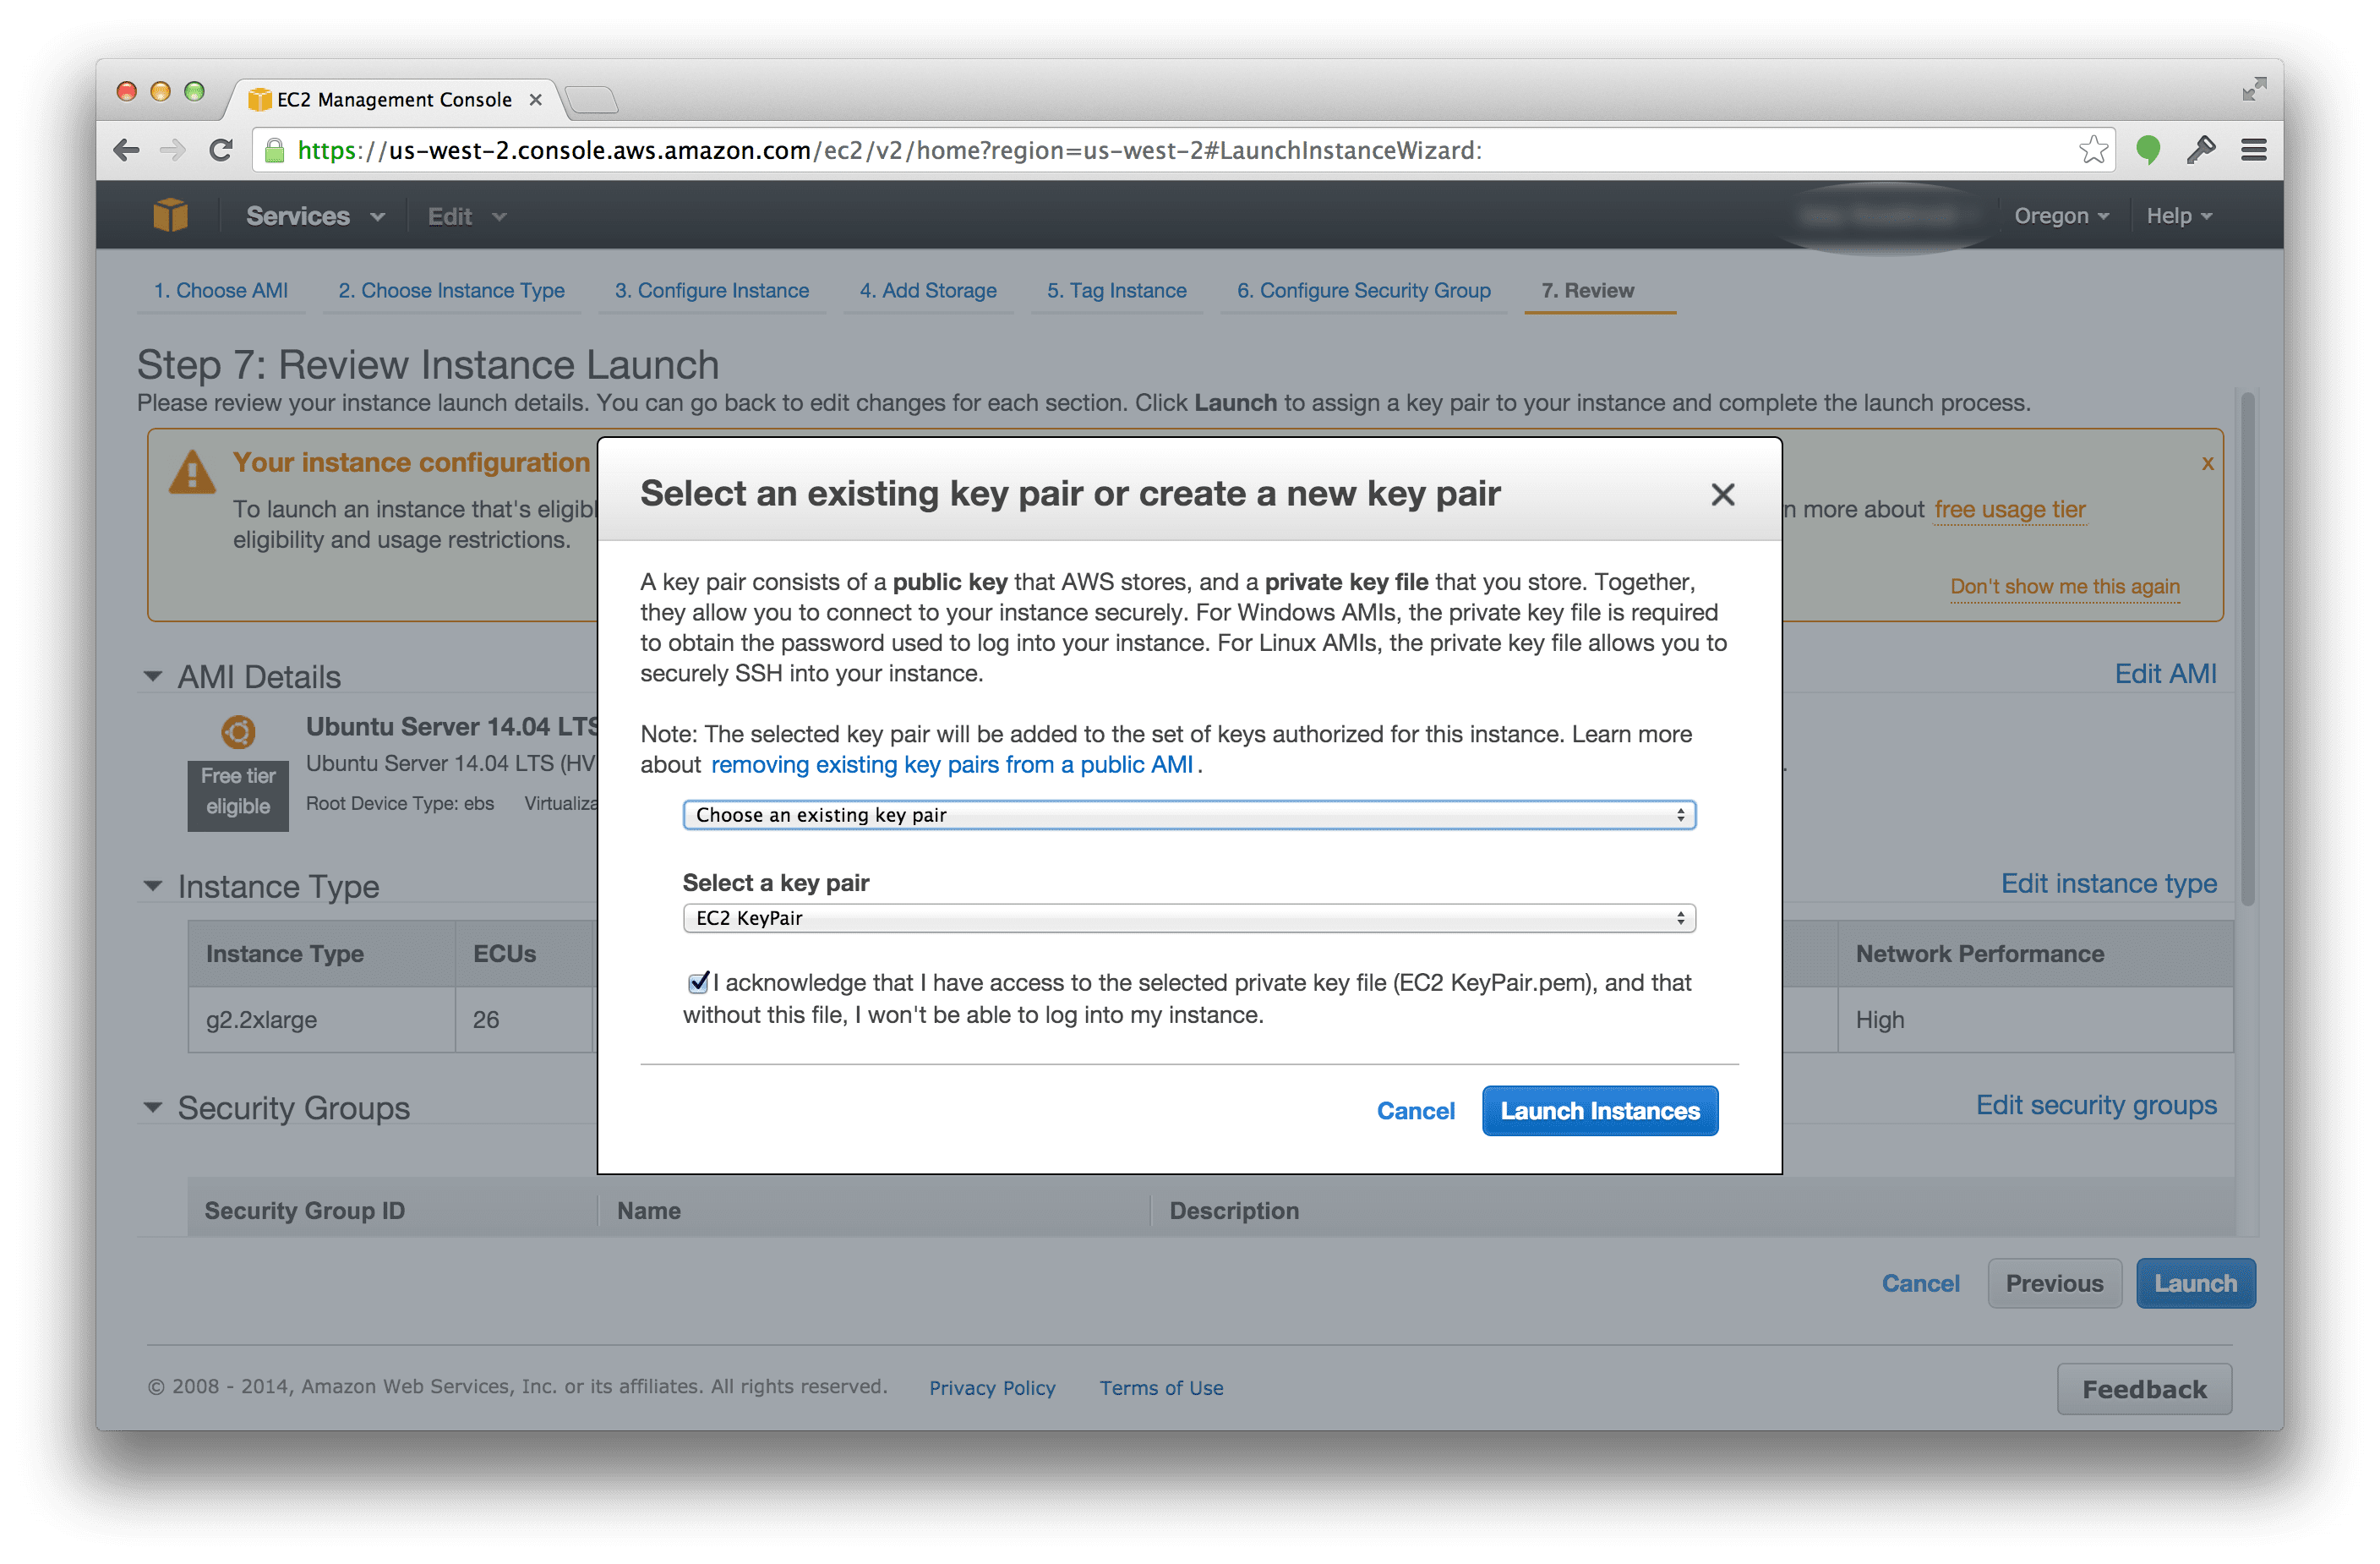
Wait a few minutes for your instance to startup.
Once it has, you’ll be able to SSH into it. Your SSH command should look something like this:
|
1 |
$ ssh -i EC2KeyPair.pem ubuntu@<your instance ip address> |
If all goes well, you should now be logged into your g2.2xlarge instance. Here is an example of what my instance looks like:

In order to prepare your system to utilize the GPU, you’ll need to install some packages and libraries. Below I am simply re-producing the steps by Markus, as well as adding in a few of my own:
Update the default packages:
|
1 |
$ sudo apt-get update |
Install any Ubuntu updates:
|
1 |
$ sudo apt-get -y dist-upgrade |
Install dependencies:
|
1 |
$ sudo apt-get install -y gcc g++ gfortran build-essential git wget linux-image-generic libopenblas-dev python-dev python-pip python-nose python-numpy python-scipy |
Install LAPACK:
|
1 |
$ sudo apt-get install -y liblapack-dev |
Install BLAS:
|
1 |
$ sudo apt-get install -y libblas-dev |
Grab the latest version of the CUDA Toolkit:
|
1 |
$ wget http://developer.download.nvidia.com/compute/cuda/repos/ubuntu1404/x86_64/cuda-repo-ubuntu1404_6.5-14_amd64.deb |
Depackage the toolkit:
|
1 |
$ sudo dpkg -i cuda-repo-ubuntu1404_6.5-14_amd64.deb |
Add the CUDA Toolkit:
|
1 |
$ sudo apt-get update |
Install the CUDA Toolkit:
|
1 |
$ sudo apt-get install -y cuda |
Update your PATH :
|
1 2 3 |
$ echo "export PATH=/usr/local/cuda-6.5/bin:$PATH" >> .bashrc $ echo "export LD_LIBRARY_PATH=/usr/local/cuda-6.5/lib64:$LD_LIBRARY_PATH" >> .bashrc $ source ~./bashrc |
Install virtualenv and virtualenvwrapper:
|
1 |
$ pip install virtualenv virtualenvwrapper |
Configure virtualenv and virtualenvwrapper:
|
1 2 3 4 |
$ mkdir ~/.virtualenvs $ export WORKON_HOME=~/.virtualenvs $ echo ". /usr/local/bin/virtualenvwrapper.sh" >> ~/.bashrc $ source ~/.bashrc |
Create your Deep Learning environment:
|
1 |
$ mkvirtualenv deeplearning |
Install Python packages:
|
1 |
$ pip install numpy scipy scikit-learn nolearn |
Compile CUDAMat:
|
1 2 3 |
$ git clone https://github.com/cudamat/cudamat $ cd cudamat $ make |
I know. It looks like a lot of steps. But it honestly wasn’t bad and it didn’t take me more than 10 minutes.
As a sanity check, I decided to run deviceQuery to ensure that my GPU was being picked up:

Sure enough, it was!
So now let’s train a Deep Belief Network. Open up a new file, name it dbn.py , and add the following code:
|
1 2 3 4 5 6 7 8 9 10 11 12 13 14 15 16 17 18 19 20 21 22 23 24 25 26 27 28 29 30 31 32 33 34 |
# import the necessary packages from sklearn.cross_validation import train_test_split from sklearn.metrics import classification_report from sklearn import datasets from nolearn.dbn import DBN import numpy as np # grab the MNIST dataset (if this is the first time you are running # this script, this make take a minute -- the 55mb MNIST digit dataset # will be downloaded) print "[X] downloading data..." dataset = datasets.fetch_mldata("MNIST Original") # scale the data to the range [0, 1] and then construct the training # and testing splits (trainX, testX, trainY, testY) = train_test_split( dataset.data / 255.0, dataset.target.astype("int0"), test_size = 0.33) # train the Deep Belief Network with 784 input units (the flattened, # 28x28 grayscale image), 800 hidden units in the 1st hidden layer, # 800 hidden nodes in the 2nd hidden layer, and 10 output units (one # for each possible output classification, which are the digits 1-10) dbn = DBN( [trainX.shape[1], 800, 800, 10], learn_rates = 0.3, learn_rate_decays = 0.9, epochs = 10, verbose = 1) dbn.fit(trainX, trainY) # compute the predictions for the test data and show a classification # report preds = dbn.predict(testX) print classification_report(testY, preds) |
Take note of Line 12. This line is downloading and caching the MNIST dataset for handwritten digit recognition to your EC2 instance. Subsequent calls to this function will be substantially faster (since you won’t have to download the data again). I mention this because if you are monitoring your training time and you haven’t already cached the MNIST dataset, you will have unreliable results.
My previous post on Deep Belief Networks utilized a very tiny DBN — an input layer of 784 inputs, a hidden layer of 300 nodes, and an output layer of 10 nodes, one for each of the possible digits 1-9.
It has been brought to my attention that the speedup in GPU training vs. CPU training is not fully realized until much larger networks are trained.
So instead of training a tiny network, I’m going to train a substantially larger one (but still “small” in comparison to the state-of-the-art networks we see today).
This time I’ll use an input layer of 784 inputs, a hidden layer of 800 nodes, a second hidden layer of 800 nodes, and finally an output layer of 10 nodes. I’ll allow my network to train for 10 epochs.
When I trained my Deep Belief Network on my CPU I got the following results:
|
1 2 3 4 5 6 7 8 9 10 11 12 13 14 15 16 17 18 19 20 21 22 23 24 25 26 27 28 29 30 31 32 33 34 35 36 37 38 39 40 41 42 43 44 45 46 47 48 49 50 51 52 53 54 55 56 57 58 59 60 61 62 63 64 65 66 67 68 69 70 71 72 73 74 75 |
(deeplearning)ubuntu@ip-xxx:~/deep-belief-network-gpu$ time python dbn.py gnumpy: failed to import cudamat. Using npmat instead. No GPU will be used. [X] downloading data... [DBN] fitting X.shape=(46900, 784) [DBN] layers [784, 800, 800, 10] [DBN] Fine-tune... 100% Epoch 1: loss 0.554249416375 err 0.139429644809 (0:00:25) 100% Epoch 2: loss 0.285018297291 err 0.071956113388 (0:00:25) 100% Epoch 3: loss 0.216535961656 err 0.0562884221311 (0:00:25) 100% Epoch 4: loss 0.1733764816 err 0.0465975068306 (0:00:25) 100% Epoch 5: loss 0.145248167361 err 0.0397242144809 (0:00:25) 100% Epoch 6: loss 0.118301114211 err 0.0330430327869 (0:00:24) 100% Epoch 7: loss 0.0983925512707 err 0.0277279713115 (0:00:24) 100% Epoch 8: loss 0.0761229886239 err 0.0223702185792 (0:00:24) 100% Epoch 9: loss 0.0661320222977 err 0.0195099043716 (0:00:24) 100% Epoch 10: loss 0.0540665843727 err 0.0165215163934 (0:00:24) precision recall f1-score support 0 0.99 0.98 0.99 2274 1 0.98 0.99 0.99 2587 2 0.97 0.96 0.97 2408 3 0.96 0.95 0.96 2337 4 0.95 0.97 0.96 2220 5 0.97 0.95 0.96 2132 6 0.96 0.99 0.97 2204 7 0.97 0.98 0.98 2382 8 0.96 0.96 0.96 2271 9 0.96 0.95 0.96 2285 avg / total 0.97 0.97 0.97 23100 real 4m48.487s user 9m51.390s sys 28m24.093s |
Almost 5 minutes to train and evaluate on the CPU — that’s a good starting point.
Now, to train the Deep Belief Network, I moved my compiled cudamat directory into the same directory as dbn.py . Alternatively, you could add the cudamat directory to your PATH .
|
1 2 3 4 5 6 7 8 9 10 11 12 13 14 15 16 17 18 19 20 21 22 23 24 25 26 27 28 29 30 31 32 33 34 35 36 37 38 39 40 41 42 43 44 45 46 47 48 49 50 51 52 53 54 55 56 57 58 59 60 61 62 63 64 65 66 67 68 69 70 71 72 73 74 |
(deeplearning)ubuntu@ip-xxx:~/deep-belief-network-gpu$ time python dbn.py[X] downloading data... [DBN] fitting X.shape=(46900, 784) [DBN] layers [784, 800, 800, 10] gnumpy: failed to use gpu_lock. Using board #0 without knowing whether it is in use or not. [DBN] Fine-tune... 100% Epoch 1: loss 0.37499609756 err 0.102971311475 (0:00:08) 100% Epoch 2: loss 0.223706473163 err 0.0572703210383 (0:00:08) 100% Epoch 3: loss 0.176561286027 err 0.0470671106557 (0:00:08) 100% Epoch 4: loss 0.131326457655 err 0.036031420765 (0:00:08) 100% Epoch 5: loss 0.095808146489 err 0.0266606898907 (0:00:08) 100% Epoch 6: loss 0.075324679088 err 0.0217511953552 (0:00:08) 100% Epoch 7: loss 0.0538377553038 err 0.0162653688525 (0:00:08) 100% Epoch 8: loss 0.0431808142149 err 0.0129567964481 (0:00:08) 100% Epoch 9: loss 0.0353603169236 err 0.010843579235 (0:00:08) 100% Epoch 10: loss 0.0275717724744 err 0.00823941256831 (0:00:08) precision recall f1-score support 0 0.99 0.98 0.98 2223 1 0.99 0.99 0.99 2639 2 0.96 0.98 0.97 2285 3 0.97 0.97 0.97 2354 4 0.99 0.97 0.98 2234 5 0.98 0.97 0.97 2085 6 0.98 0.99 0.99 2248 7 0.99 0.97 0.98 2467 8 0.97 0.97 0.97 2217 9 0.96 0.97 0.96 2348 avg / total 0.98 0.98 0.98 23100 real 2m20.350s user 2m5.786s sys 0m15.155s |
Training on the g2.2xlarge GPU I was able to cut training and evaluation time from 4 minutes, 48 seconds to 2 minutes, 20 seconds.
That’s a HUGE improvement. And certainly better than the results that I was getting on my MacBook Pro.
Furthermore, the difference between the GPU and CPU training times will become even more dramatic as the size of the network increases.
Summary
Inspired by Markus Beissinger’s post on installing an Amazon EC2 g2.2xlarge instance for Deep Learning using Theano, I decided I would do the same for the nolearn Python package.
Furthermore, this post serves as a “redemption” of sorts after I tried to train a Deep Belief Network on my MacBook Pro’s GPU and obtained poor results.
In general, I’ve found the following takeaways to be important:
- Your GPU matters. A Lot. The GPUs included in most notebooks are optimized for power efficiency and not necessarily computational efficiency.
- More importantly: The size of your network matters. If your network isn’t large enough, you won’t notice a significant improvement in training time between your CPU and GPU.
- There is an overhead cost transferring data to the GPU. If the amount of data being transferred is too small, then the CPU will perform more efficiently (since you’ll be wasting all your time transferring rather than computing).
- Amazon’s g2.2xlarge instance is a lot of fun to play around with. It does cost money (trade an afternoon of fun for less than a cup of coffee, it’s a no-brainer), but if you don’t want to spend the money buying a new system dedicated to Deep Learning, it’s well worth the cost.
Now that had to be treacherous to get there!
It was a good experience. And it only takes setting the environment up once. From there you are good to go to run any experiments. So I think the time-tradeoff for setting it all up was worth it.
Well Yes it is worth it for sure. Working on cloud stuff itself is pretty cool. I you putup machine learning there, it gets even better. It is a very nice tutorial all together
Very cool post; thanks for sharing.
It might be interesting to see if you can have multiple EC2 instances that are parallelizing the training of DBN networks to start to get very large neural networks. I’m not sure if Theano gives this out of the box or its something that has to be built manually.
It’s interesting to note that while GPUs given the fastest training time, many large enterprise companies and government organizations interested in data mining or machine learning are utilizing large clusters of systems. These systems are obviously CPU based. Therefore, I think in the next 2-5 years you’ll see more and more Deep Learning implementations developed with Hadoop in mind. These large organizations, after spending so much money creating their clusters, will not be jumping at the chance to buy even more hardware. And more than likely, these clusters already run Hadoop. I’m definitely looking forward to seeing how it works out.