Creating Energy Spheres in Photoshop
For this tutorial you’ll want to find a photo of someone doing something that looks a bit larger than life. I used this photo that I found at the stock photo website Stock Exchange. For this tutorial you’ll need a photo that you want to manipulate and some special brush sets which I downloaded from here.
This will be the final result.
- 1. Download the brush set and install it.
- 2. Now I’ll show how to take a child with a big imagination and turn him into the powerful being he imagine himself to be.
- 3. We’ll start by creating a new layer on top of our original and filling it with black. Next we want to select Filter >> Render >> Lighting Effects >> Lens Flare
- 4. Use the 105mm Prime with the Brightness setting of your choice.
- 5. This will create a bright flash. Move it to the point where you want the ‘energy ball’ to appear.
- 6. You may notice that when you move it, you can see the edges of the layer. To rectify this, select the layer and add a ‘Layer Mask’.
- 7. Select default colors (white and black). With the layer mask selected, use the Gradient Tool >> Radial Gradient >> Reverse and drag from the center outwards. This will mask everything in a sphere around the center.
- 8. Set both of these layers to the ‘Hard Light’ setting.
- 9. I like to use the Image >> Adjustments >> Photo Filter to make the colors “pop”. I also used this setting to make the lens flare a bluish color. There are other ways to do this so experiment with your options.
- 10. Using the Brush set we installed earlier we want to apply them to the energy balls. I used the color black, with the layer’s Blend Options set to ‘Overlay’.
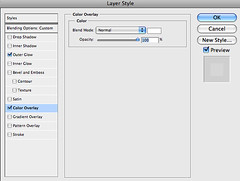
- 11. With this layer selected, set the Layer Style settings like so:
- 12. Using the same technique that we used in Step 7, we want to mask the edges of our brush layers.
- 13. To create the ‘arc of light’ we’ll use paths. Select the ‘Ellipse Tool’ and change it from ‘Shape layers’ to ‘Paths’. Now, draw a large circle or ellipse that includes both energy flares.
- 14. Once the arc is drawn we want to stroke it (no jokes please). Select a brush that’s very small, maybe about a brush with a 5px diameter and use the color white. Go to ‘Paths’ right click on the selected path, and select ‘Stroke Path’. Check the ’simulate pressure’ option, this will give the ring a bit of perspective with a heavier stroke on one side and a lighter stroke on the opposite side.
- 15. Repeat this step twice. Each time use a different brush setting that is bigger than the one before it. I started with the 5px brush, then I used a 45px brush followed by a 100px brush. Each time use a different color. The topmost (bigger) arc should be set to ‘Linear Dodge (Add)’ with an opacity of 35%. The middle layer should be set to ‘Overlay’ and the original (the white one) should be set to ‘Linear Dodge (Add)’.
- 16. I grouped these together then, using the technique from Step 7 again, I use layer masking to block one half of the sphere I created.
- 17. To create the energy ‘tendrils’ that are leaping from the arc. Duplicate the grouped folder from Step 16. Then merge the group or folder into one layer. Select Filter >> Liquify and distort the arc to look like it should for your image. Secondly, we’ll select Filter >> Distort >> Ripple and tweak it to look a bit more like electricity.
- 18. Now we’re done. Outside of some techniques that I used to make the image more polished, this completes the tutorial.
If you liked this tutorial you might want to check these out:
Tags: manipulation, photo, photoshop, photoshop energy spheres, photoshop tutorial, ps energy beams
April 15th, 2008 at 2:10 pm
[...] tutorial shows you how to create a pretty cool energy beam effect using Photoshop. read more | digg [...]
April 18th, 2008 at 10:06 am
Nice. Dugg it.
April 26th, 2008 at 4:55 pm
GOOD… pretty effect!
May 21st, 2008 at 2:58 pm
Simple, and Very Funny
May 28th, 2008 at 3:28 am
Can you pls upload a video. Couldnt follow. Masking is my problem, I dont get it.
May 28th, 2008 at 4:19 am
Couldnt make it properly. Step 8 and soon are the difficult to understand
May 29th, 2008 at 1:48 pm
@Rookie, Ive been thinking about doing video tutorials maybe in a few weeks. Where are you having the most trouble?
May 30th, 2008 at 3:45 am
I’m getting confused in steps. I’m not that good at understanding english XD
Better if you make one soon. I’m Sure People Will be Glad to see it! Your work is the first thing I’ve ever see! Perfect!
July 10th, 2008 at 3:08 pm
When you say, download the brushes here, is that..all of the brush sets on that page or a specific set?
July 12th, 2008 at 4:33 pm
photoshopped!
That’s obviously fake, look at the lighting!
July 13th, 2008 at 6:24 am
[...] Creating Energy Spheres [...]
July 13th, 2008 at 6:42 am
@fairycake There are specific sets that I used but really any of them will work for this tutorial. Just experiment, your work will be a lot better that way.
@Anon Funny, but this tut is about making the spheres, not making the spheres look real.
July 13th, 2008 at 9:36 am
I too am having trouble with the mask step. I have said layer selected, I go to mask, and I see 4 options. “reveal all. hide all, reveal selection, hide selection. with delete and apply further down the list unselectable.
I want to just use the screen effect. But Doing so only messes things up for the next step and so on.
July 17th, 2008 at 3:14 pm
I’m asking a question that has been asked before… Which brushes should I download on the site you’re linking to? one specific or all?
July 20th, 2008 at 2:14 am
I have figured out the steps for the mask in the Adobe for windows version: [ADOBE CS3 used here so layout might be different]
1. Create a new layer and fill it with black
2. Go to Filter >> Render >> Lens Flare and follow the instructions he gives you
3. Left click on the layer with the lens flare and then (At the top of the screen) click on the Layer >> Layer Mask >> Reveal All
4. This should make a new box appear in the layer tab with the lens flare. (On the side bar with the layers tab, you should have 2 layers one says background and another should say either layer1 or whatever you named it-)
5. Click on this new box and then go to the Gradient tool.
6. On the top bar on the LEFT side of “Mode:” there are 5 different buttons, the second one in the line is the radial gradient button (Kinda looks like an orb) click this.
7.On the RIGHT side of the “Opacity:” selector is a check box for “Reverse” click this.
8. Now click on the middle of the lens flare and drag away from the middle in any direction.
9. On the layers tab (NOT the thing at the top of the screen but on the side bar [RIGHT SIDE OF THE SCREEN NEAR OR WITH THE HISTORY TAB/NAVIGATOR TAB/CHANNELS TAB) click the thing that says “Normal” and choose from the drop down menu “Hard Light”
10. Goto the top Layer >> Layer Mask >> Apply
11. Continue with the tutorial.
If you do not understand, get a better grasp of English or find out how to do it yourself. Don’t run and ask every time you get stuck…. fool around try and figure out what your not doing right, that is how I found out what to do when I was stuck with this tutorial!
Curiosity may have killed the cat, but it also gave us all the luxuries we have today!!!!
July 20th, 2008 at 9:42 pm
@Josh
You, sir, are my hero. Sorry, guys, but when you write as much as I do sometimes it’s a pain to revisit the past. Anyways, I don’t feel as pressured to post a follow-up now because he hit the nail on the head.
July 20th, 2008 at 10:59 pm
Will this technique work with Gimp or am I gonna have to fiddle with it?
July 21st, 2008 at 11:20 pm
Man this looks cool and all this tutorial is ju7st to freakin hard to follow and i dont think my photoshop has all these elements nice looks though man
July 22nd, 2008 at 3:15 pm
BRUSHES: For those who want ot know which brushes to download, you can download them all, but if you want to that will help, try;
1st row, first set of the 3 [in the first row] (has orange/rust and blue in the colour)
2nd row, third set of the 3 [in the second row] (has green and and aqua/light blue colour to it)
The best way to find out if it works from GIMP is to try it out (also you may want to have the GIMP that looks as close as possible to Photoshop [I forget the name but there is a GIMP relese like this]
Most photoshops 7 and up can follow this… I assumed That Duded didn’t read my post and if he did I only said I used CS3, not to say that it HAS to be CS3, it could be PS7 for all I care!
July 22nd, 2008 at 5:06 pm
Oh JonGos… here was my finished result…. it’s very flat and there is no depth to the actual energy ball…
http://thedirtysanchez.deviantart.com/art/Casting-a-Spell-Enchantress-92487881
July 22nd, 2008 at 6:08 pm
Nvm i basically got it now i had to play with sum stuff i little and upgrade from PS6 to PS8 and yes joshua i did read your post and it helped a great deal, my picutre didnt need an arc in my pic so i had to work with the liquify to make the sphere look better but pretty good thanks a bunch for that
August 20th, 2008 at 2:41 am
The tutorial is good, except there seems to be a couple of steps that are hard to follow and some things that are just missed out. I can make the energy balls ok (no where near as good in the image though, and they dont look very energy/plasma like, like in yours) but when I try to make the beam, it just looks retarded. A video tutorial would be extremely helpful. Please consider doing one.
oh and im using CS3, but all of the tools and options and stuff you say to do are there. So CS3 users should be fine.
August 27th, 2008 at 2:47 pm
awesome.. could you post how you did the other effects to make the image more polished? thanks
August 29th, 2008 at 1:15 am
Hey ahhh… this looks heaps good, and I wanna do it. But I’m having trouble at the start… downloading the fonts. The site is in German and I dunno where the download button is… or if there even is. I don’t know where the brushes are.


 Please help?
August 29th, 2008 at 11:52 am
nice tutorial … thanks
here’s what i did with it … http://jococoj.deviantart.com/art/summoning-96398130
September 3rd, 2008 at 2:26 am
Hey JonGos could you put a tutorial on how you made them realistic?
September 8th, 2008 at 3:47 am
JococoJ, I checked out that deviant art image you suggested on August 29th…WICKED COOL!! makes me want to learn how to use photoshop a bit more. And many thanks to the author of this article, too!
September 22nd, 2008 at 8:26 pm
Hello. I’m having a tough time locating the brushes on the link you provided here. Once I click the link, I get to a site talking about “blackhat” and all that, plus some music. Could you please post the direct link to the file here, or direct me to where on that site, the link to the brushes you spoke of.
Thank you.
-Brian.
September 23rd, 2008 at 7:28 pm
very vague instructions…. how to create layer mask? needs WORKING link to the brushes, how do you want the gradient applied? as a new layer or on the current, and either way under what effect, cuz without one it covers everything over, not wanted. i was able to make the effect on my own, but this tut wasnt much help, and after going as closely to the tut as i could (improvising only when needed) i had a very fake and fairly low quality orb, not what is pictured.
September 25th, 2008 at 2:19 am
i cant download the brushes, pls give another link
September 27th, 2008 at 7:25 am
brushes arent working, plz upload or give new link
September 27th, 2008 at 8:54 pm
I need a better webite for those brushes. The link takes me to apage in another language that says nothing besides happy birthday google on it
October 9th, 2008 at 1:28 pm
Plz fix the link to the brushes. I realy would like to try this out
October 9th, 2008 at 9:46 pm
I Cant download te brush
October 10th, 2008 at 12:50 pm
Yeh pls upload the link to brush it not working
October 22nd, 2008 at 10:15 pm
The directions are a little hard to read, and the brush link totally doesn’t work. . .BUT, this gives the basic steps for a really cool edit. Here is my version.
http://farm4.static.flickr.com/3162/2962518327_edf1327e28_o.jpg
October 23rd, 2008 at 5:44 am
Sorry, didn’t see that the link went to the same source as the JonGos
October 23rd, 2008 at 6:03 am
This time i think i found the brush sets.
http://www.brusheezy.com/brushes?page=9
October 28th, 2008 at 3:30 am
Good tutorial, but not great. The steps really aren’t fleshed out well, and often I found myself saying, “huh?” I also found myself often attempting something only to find it wouldn’t work unless I specifically selected parts of a layer, merged, and what not.
December 25th, 2008 at 2:04 pm
I have a problem with the layer mask… What should I do, to make the rest of the picture visible, instead of this annoying layer mask squared pattern?
I’m very angry about this and feel helpless…
this is where i’ve stopped: http://niko.blox.pl/resource/Obrazek_4.jpg
it would be nice, if you would mail me about this: mikolaj.mierzejewski(nospam)gmail.com
December 27th, 2008 at 11:38 pm
Ahh thank you for posting this.
I tried it at first and had a hard time doing it and the result wasn’t that good… I re-read everything again and also thanks to JOshua Houston for the info on the brushes and on the steps for the windows version.
Really great help!
December 29th, 2008 at 8:27 am
By the way this is my version.. I messed with the colors though:
http://i25.photobucket.com/albums/c98/Devil956/PC260377copy.jpg
January 6th, 2009 at 10:30 pm
The page for the brushes returns a 404 (
(
January 12th, 2009 at 9:17 pm
OK so, I’ve got to step 9 no problem but I’m confused at step 10 do i need to create a new layer, or duplicate it. I’m confused some plz help.
January 12th, 2009 at 11:49 pm
One Thing i forgot to ask, how did you get the electricity trills so good. like what were the exact steps.
January 25th, 2009 at 7:14 pm
please fix asap. i really want the brushes =[
January 27th, 2009 at 7:57 am
need a video tutorial. hard to follow. cannot do lol
February 1st, 2009 at 10:02 pm
I will appreciate if you provide more details on this. Thanks.
February 2nd, 2009 at 4:01 pm
I cant download the brushed something is happening with the link. Could someone tell me how to get the brush set, please?
February 11th, 2009 at 9:59 pm
well here’s my attempt. i found some trouble using the brushes, so i kinda improvized xD.
http://www.facebook.com/photo.php?pid=1909291&l=10bba&id=512181625
have a look, i’d love to know what you guys think
February 12th, 2009 at 8:52 am
dude the link of your brush are down…
February 13th, 2009 at 11:26 am
Awesome! Anyone know if a similar filters work with After Effects. I’d love to use this on video!
February 15th, 2009 at 4:50 am
The brush set link gives 404 error!
March 1st, 2009 at 4:35 pm
Sweet tutorial man. I honestly had no problems following the instructions, it’s straight forward if you’re not a complete noob. Keep postin! Thanks
March 4th, 2009 at 1:05 pm
uhm…yeah…site given for brushes doesnt exist..or say it gives an error..-_-
March 7th, 2009 at 4:57 am
I have just done the tut and I am disappointed that you haven’t shown how to make the middle – most coolest – sphere…
Thanks anyway
March 10th, 2009 at 4:31 pm
yup, would u be so kind to upload them on a dl site maybe or post a new link with them. thnx in advance
March 14th, 2009 at 1:36 am
heyy bro.. i was wondering exactly what brush set you used here because the link that you included now comes up with an error… thanks
March 19th, 2009 at 9:34 pm
Nice Effect!
Bad Tutorial.
March 20th, 2009 at 10:06 am
Wow..its just to hard, the explanation is to simple (a noob will lost his way) the differences version of photoshop added up the complexity.
=_= I think i need to go to sleep now, continue this things tomorrow, i’m half way of finishing this effect.
And by the way, to whoever managed to apply this effect on photoshop cs2, help me please, i need guidance.
March 25th, 2009 at 3:37 pm
The link to the brush set does not work. Please provide alternate sauce.
March 27th, 2009 at 4:34 am
A really nice effect, I think you could add a few more steps in your tutorial to make it easier to follow
March 30th, 2009 at 11:37 am
Hi All,
I’m stuck with step 6. Here’s what i did:
1. opened the photo that i wanted to manipulate. This automatically became my background.
2. I created a new layer and filled it with black.
3. Selecting the background layer (which is the photo), i put the les flare.
After that, i cannot proceed on creating the ‘layer mask’ with the background layer selected as the layer mask option is grayed out.
Please help!
April 3rd, 2009 at 7:28 am
error message on the brush link… can you provide another link, or at least tell us what brush do we need? thanks
April 5th, 2009 at 12:44 am
i cant download the brush
April 7th, 2009 at 5:40 am
A really great effect. I managed to follow it OK, but this is a really REALLY badly written tutorial.
You really need to polish up your writing skills if you are going to continue making tutorials. The instructions are extremely lacking in places. You make too many assumptions about the skill level of your readers. If they knew all the bits of information you are leaving out, then they would be at a skill level where they wouldnt need tutorials to know how to make effects like this!
April 13th, 2009 at 1:07 am
The link he posted for the brushes does not work any more, but this link:
http://r0man.de/free_photoshop_brushes.html
has brush sets by the same maker as the original, you can pick out of any of them, whichever suits your tastes.
Here’s my creation:
http://screencast.com/t/AaDmcTvA
I didn’t follow the tutorial to the letter, especially involving the trail, but I quite liked the outcome.
Thanks for the great tutorial!
April 14th, 2009 at 4:40 am
Anyone got the name of the brush set as the link is now broken?
April 17th, 2009 at 5:17 am
Well, here’s mine:
http://sirgraphik.deviantart.com/art/A-storm-is-brewing-119437177
Didn’t think I did too bad
April 22nd, 2009 at 11:56 pm
Here’s what I ended up with.
http://i196.photobucket.com/albums/aa313/xlinkedx/Bryce.jpg
April 24th, 2009 at 2:00 am
@ Bryce, I really like yours a lot
August 15th, 2009 at 3:15 am
wow mine sucked i guess i just got to play with it more
but i still dont get step 15-17
August 15th, 2009 at 6:02 am
actually i got stuck at step 7 down. it just doesent look right and the tutorial is kinda hard to follow
August 20th, 2009 at 10:22 pm
I was trying to follow it but the masking step threw me off, therefore I couldn’t finish it.
I really tried. Maybe if there were more pictures to show examples of what you mean. Sometimes you just don’t get things when they are put in words. But it’s a really neat final product.
August 21st, 2009 at 11:37 am
Hey guys!
That’s the link: http://r0man.de/free_photoshop_brushes.html
Thanks
September 26th, 2009 at 9:04 pm
Hi! I have CS4, this is a new beast for me. I followed yours and the other poster’s steps. However when I perform the masking step, my orb vanishes. It just isnt there anymore! All I have left are two tiny lens flare bits that now cover up my subjects face. Im not sure what I have messed up.
January 5th, 2010 at 2:32 am
Here’s my new version i just finished. http://i49.tinypic.com/5cxhlk.jpg