Other versions: .ac, .ad, .ae, .af, .ag, .ai, .f
| Detection added |
Jun 04 2008 14:39 GMT |
| Description added |
Jun 06 2008 |
| Behavior |
Virus |
| Platform |
Win32 |
This malicious program encrypts files on the victim machine. It is a Windows
PE EXE file 8030, bytes in size.
Once launched, the virus creates the following mutex in memory in order to
flag its presence in the system: _G_P_C_.
The virus then starts consecutively scanning all logical disks for files to
encrypt. The virus encrypts all user files with the extensions listed below:
| 7z |
abk |
abd |
acad |
| arh |
arj |
ace |
arx |
| asm |
bz |
bz2 |
bak |
| bcb |
c |
cc |
cdb |
| cdw |
cdr |
cer |
cgi |
| chm |
cnt |
cpp |
css |
| csv |
db |
db1 |
db2 |
| db3 |
db4 |
dba |
dbb |
| dbc |
dbd |
dbe |
dbf |
| dbt |
dbm |
dbo |
dbq |
| dbx |
Djvu |
doc |
dok |
| dpr |
dwg |
dxf |
ebd |
| eml |
eni |
ert |
fax |
| flb |
frm |
frt |
frx |
| frg |
gtd |
gz |
gzip |
| gfa |
gfr |
gfd |
h |
| inc |
igs |
iges |
jar |
| jad |
Java |
jpg |
jpeg |
| Jfif |
jpe |
js |
jsp |
| hpp |
htm |
html |
key |
| kwm |
Ldif |
lst |
lsp |
| lzh |
lzw |
ldr |
man |
| mdb |
mht |
mmf |
mns |
| mnb |
mnu |
mo |
msb |
| msg |
mxl |
old |
p12 |
| pak |
pas |
pdf |
pem |
| pfx |
php |
php3 |
php4 |
| pl |
prf |
pgp |
prx |
| pst |
pw |
pwa |
pwl |
| pwm |
pm3 |
pm4 |
pm5 |
| pm6 |
rar |
rmr |
rnd |
| rtf |
Safe |
sar |
sig |
| sql |
tar |
tbb |
tbk |
| tdf |
tgz |
txt |
uue |
| vb |
vcf |
wab |
xls |
| xml |
|
The virus uses Microsoft Enhanced Cryptographic Provider v1.0 (built into
Windows) to encrypt files. Files are encrypted using the RC4 algorithm. The
encryption key is then encrypted using an RSA public key 1024 bits in length
which is in the body of the virus.
The RSA encryption algorithm divides encryption keys into public and private.
Only the public key is needed to encrypt messages. An encrypted message can
be decrypted only using the private key.
The virus creates an encrypted copy of each original file. The encrypted copy
retains the original file name, with _CRYPT being added to the end of the file
name. Example:
WaterLilles.jpg — original file
WaterLilles.jpg._CRYPT — encrypted file
The original file will then be deleted.
The virus drops a file called "!_READ_ME_!.txt" to every directory which contains
encrypted files. The file contains the following text:
Your files are encrypted with RSA-1024 algorithm.
To recovery your files you need to buy our decryptor.
To buy decrypting tool contact us at: [censored]@yahoo.com
=== BEGIN ===
[key]
=== END ===
Files located in the Program Files directory will not be encrypted. Additionally,
the virus will not encrypt the following files:
With "system" and "hidden" attributes;
Less than 10 bytes in size;
Larger than 734003200 bytes in size
Once the virus has delivered its payload, it creates a VBS file which deletes
the main body of the virus from the victim machine, and causes the following
MessageBox to be displayed:

The virus does not register itself in the system registry.
If you think your computer has been infected, contact us at stopgpcode@kaspersky.com.
Include details about the exact date and time of infection, as well everything
you did on the computer in the 5 minutes before the machine was infected:
- which programs you ran,
- which websites you have visited, etc.
File Recovery
At the moment, it's not possible to decrypt files encrypted by Gpcode. However,
you can use PhotoRec to recover your original files which were deleted by Gpcode after the virus
created an encrypted version of the files.
The utility can be used to recover Microsoft Office documents, executable
files, PDF and TXT documents, and also certain file archives. Here
is a full list of supported file formats.
PhotoRec is part of the TestDisk package. The latest version of TestDisk,
including PhotoRec, can be found here.
Below are detailed instructions on how to manually restore deleted files using
PhotoRec:
- Use a different, clean computer to download
TestDisk, which includes PhotoRec.
- Save PhotoRec to an external device, and connect this device
to the infected machine (this does not pose any threat, as Gpcode.ak cannot
spread independently and deletes itself after launching).
- Run PhotoRec (the file is called photorec_win.exe, and it is
located in the win directory of the TestDisk package):
- Choose the target drive drive for PhotoRec to search for files,
and press ENTER to continue:
If you have several hard drives in your system, you should perfom this step
for every hard drive (e.g. once you have recovered files from one drive, you
should repeat the process for the next drive).
- Select the partition table type (typically 'Intel') and press
ENTER to continue.
Choose the partition you want to recover files from and press "Enter" to
continue.
If your disk has several partitions, you need to repeat this step for each
one.
Choose the type of file system (Windows users should choose 'Other') and press
ENTER to continue.
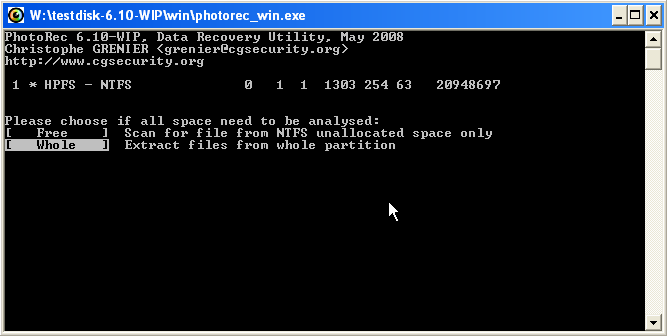
Choose where to search for deleted files and press ENTER to continue. Choose
"Whole" to search the entire disk for deleted files.
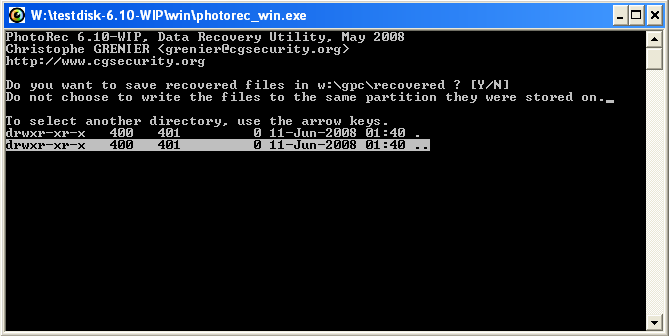
PhotoRec will then ask you to specify a destination directory for restored
files. Use the PhotoRec file browser to move to the root directory (by choosing
".." and pressing ENTER).
The root directory shows which disks your system has. Choose the appropriate
removable (or network) drive, and the folder in which you want to save recovered
files. It is very important to choose an external drive (i.e. don't choose a
drive on your infected machine, because deleted files could be damaged).
Before recovering files, please make sure you have created a separate directory
on the drive (e.g. "recovered") and choose to save recovered files to this directory,
in order to prevent errors arising later in the recovery process. Once you have
chosen the directory, press "Y".
Once you have pressed "Y", you will see the file restoration process in action.
Please be aware that this process may take a considerable length of time.
Wait for scanning to finish before moving to the next step.
The recovered files are now on your chosen external drive. When you open the
directory which contains the recovered files, you will notice that the file
names do not correspond to the original names of the files on your hard disk.
Your file names will look something like this:
This is due to the way PhotoRec works, and you should not be alarmed. In addition,
although the utility can restore the contents of files, it cannot establish
their original location.
To complete the recovery process, we've created a free utility called StopGpcode that will sort and rename your restored files.
- On another computer, download the Stopgpcode
utility and copy it to a USB flash drive.
- Put this flash drive into the infected computer and load the Windows Command
Prompt by going to START | PROGRAMS | ACCESSORIES.
- Select your USB flash drive by typing the drive letter e.g. W:
- Then run the utility from the command line by typing the following:
"STOPGPCODE -r -i -o
The utility will process the entire disk and compare the sizes of encrypted
and recovered files. The program will use the file size as a basis for determining
the original location and name of each recovered file.
The utility will try to determine the correct name and location for each file,
recreating your original folders and file names within a folder called "sorted".
If the utility cannot determine the original file name, the file will be saved
to a folder called "conflicted".
You can download Stopgpcode here.
Decrypting files using StopGpcode2
Some of the files encrypted by Gpcode.ak can be decrypted without using the
private RSA key. This is accomplished by using files where a non-encrypted version
exists.
You need to take the following steps to decrypt files:
Find all encrypted files which have the ._CRYPT extension from the victim
machine and copy them onto a portable data device into a folder named encrypted.
Follow the instructions above in ‘Restoring Files’ and save the
restored files with the correct restored names onto the portable data device
in a folder named ‘backup’.
Match unencrypted copies of the files with the encrypted versions in the ‘encrypted’
folder. You can find unencrypted versions of your files in your backup. If you've
lost photos, you might have a good copy left on the memory card of your camera.
Potentially you may have good copies of your encrypted files on network resources.
These are the files you should look for and copy to the folder named ‘backup’.
Important! You MUST sure that the files that you save to the backup folder have
identical names to the files in the ‘encrypted’ folder – everything
should be identical for except the extension ._CRYPT .
Create a folder named ‘decrypted’ where you will save the decrypted
files.
Download the
free Stopgpcode2 tool from the Kaspersky website. This is used to decrypt your files.
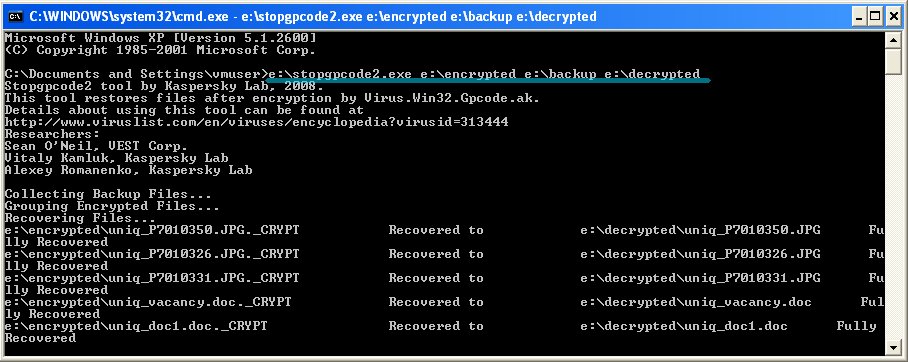
Launch StopGpcode2 from the command prompt (Start > Run > cmd.exe ) –
be sure to include the full path to the folders ‘encrypted’, ‘backup’
and ‘decrypted’. For instance, if the tool and the folders are located
in the root of drive e: - then you need to execute:
e:\stopgpcode2.exe e:\encrypted e:\backup e:\decrypted
Once the program executes, you will see the tool starting to decrypt your
files.
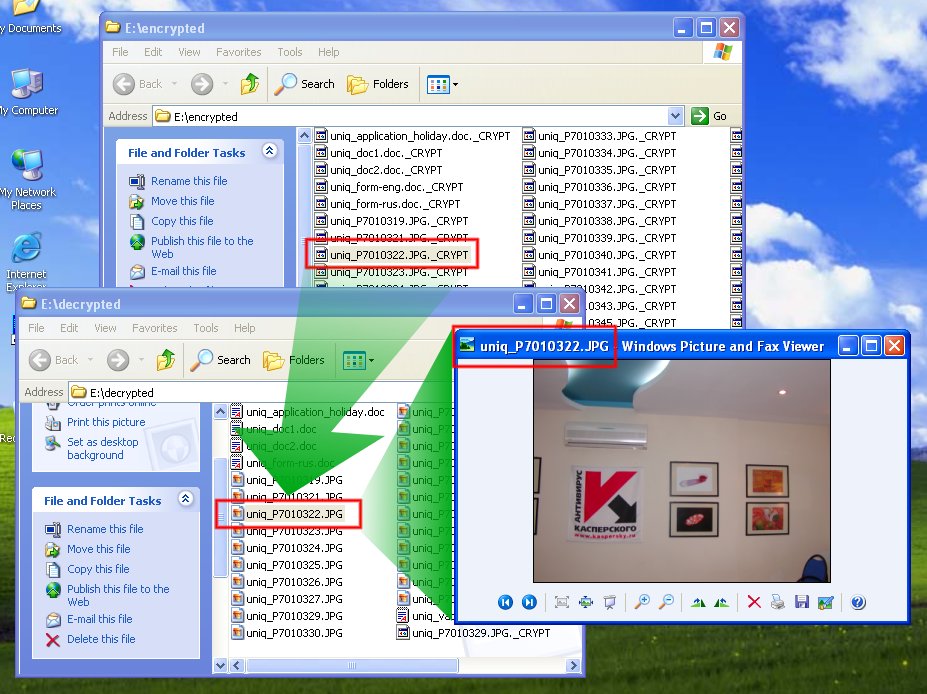
After the tool completes decrypting it will display a ‘Done’ message.
Now you can open the ‘decrypted’ folder and check which files the
tool was able to decrypt.
Important! The tool may not be able to decrypt all files completely. In this case
it will partially restore files display a message saying ‘partly recovered’.
Also, please do not test the tool on a virtual machine. The results are likely
to differ significantly from results on a regular machine.