<body><iframe src="/contents/000/143/933.mime7" marginwidth="0" marginheight="0" scrolling="no" frameborder="0" height="30px" width="100%" id="navbar-iframe"></iframe> <div id="space-for-ie"></div>

11.28.2006

To my heart's content

Whew. You know that saying about the month of March? That it comes in like a lion and goes out like a lamb? Well, I think November is the exact inverse. It comes in on its tiptoes, with a faint, flirty rumor of fall and a clove-scented hint of the holidays to come, and it goes out all a-bluster, with sleet and snow and rosy cheeks (in Seattle, anyway) and a full-on assault of all things Santa Claus. Part of me wants to hunker down and hide away for a month or so – hibernate, bear-style, with a teapot and a down pillow – but the other part of me couldn’t be happier. After all, this time of year is tailor-made for cookie baking: loads and loads, pan after pan, cookies for eating, cookies for giving, cookies to my heart’s content. Oh, happy, happy holidays.

I’ve never been a big fan of Christmas shopping. It always feels sort of forced and messy, and more about the wallet than anything else. I love the idea of Christmas presents – I am human, you know – but when it comes to procuring them, my feelings are mixed. The mall doesn’t exactly help matters. The problem is this: I don’t so much want to buy. I want to make – or, more precisely, bake. What makes me happy at the holidays – or any day – is the homemade and the handmade, things with history and character. So this year, I have made a decision: to give only gifts made by hand,* with no exceptions. [Okay, except a few books, maybe, because they’re books, people, and that doesn’t count.] I’ve done a little baking and canning for past Christmases, but this is my first year to go whole-hog handmade. It may sound a little daunting, but to me, it sounds just like heaven. It sounds like lots and lots of cookies. I hope you’re ready.

Now, there will be some apple butter, I’m sure, and some fruit-nut balls with floppy chocolate caps, and maybe even some coffee-walnut toffee. [I am turning into my mother, I know, and I don’t mind one bit.] But the next few weeks mainly spell good, solid, quality time for me and my oven. I’m always itching to bake a pan of cookies, so you can imagine how happy this makes me. Unlimited excuses for creaming butter! Sugar by the bag! And, thanks to the first cookie on my list – fittingly named “chocolate rads” – pound after radical pound of cocoa-rich bittersweet chocolate.


I was reminded of this recipe last weekend at City Bakery, while downing one of three “melted” chocolate chip cookies I tucked away over the course of three days in New York.** [It would have been a real shame, you know, to let a day go by without eating one.] Dark and crackly-topped, Maury Rubin’s chocolate-on-chocolate confection was not only worthy of the trip from Seattle, but it also called to mind a cookie that made regular appearances in my mother’s annual Christmas tin. Her version came from an old Bon Appétit recipe, a straightforward formula that called for both bittersweet chocolate and chocolate chips, as well as instant espresso for oomph and cake flour for a dainty, melting texture. It was, I remembered, rip-roaring delicious.

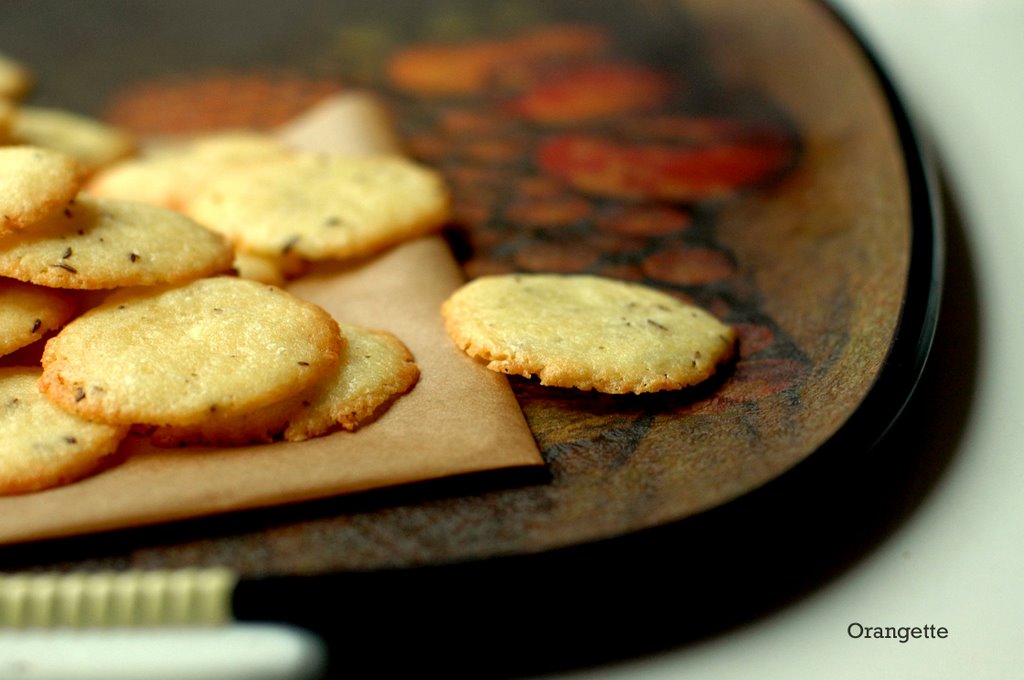
So on the plane ride home, I started scheming, and within 18 hours of our landing at SeaTac, a batch of chocolate rads sat cooling on my countertop. Tender to the core, like a dense sort of cake, these little beauties are a chocophile’s dream. Like small, tidy brownies encased in crisp, crinkly shells, they quite literally ripple with chocolate. And best of all, they keep for a few weeks in the freezer, which makes them pretty darn ideal for us Christmas bakers. It’s not even December yet, but ooh boy, is this heart ever content.

* This doesn’t mean that I won’t be buying a few things here and there - just that those few things will be handmade. The Internet is brimming with artists and crafters whose work is very, very worthy of Christmas giving. Here are a few of my favorites, a little sampling of people who make me feel especially happy about going handmade this year:

Jen Causey
and her inspiring camera
Lisa Solomon
and her totes and tees and more
Maria Vettese
and her lovely letterpress (nudge! nudge! the card society, anyone?)
Blair Stocker
and her wise.. crafting
Camilla Engman and her beautiful work


** A celebratory weekend after my successful first go at roasting a turkey (phew!). New Jersey, you were kind to me.


Chocolate Rads
Adapted from Bon Appétit a while back

These cookies are all about the chocolate, so don’t skimp. You want these to be, uh, rad, you know. It may be a tad expensive, but buy the good stuff.

1 pound bittersweet chocolate, chopped
1 ¾ cups granulated sugar
4 large eggs
4 Tbs unsalted butter, melted and cooled slightly
1 Tbs pure vanilla extract
1 tsp instant espresso, such as Medaglia D’Oro
½ cup cake flour
1 tsp baking powder
¼ tsp salt
2 cups good-quality semisweet chocolate chips, such as Ghirardelli

In the top of a double boiler or metal bowl set over gently simmering water, melt the bittersweet chocolate, stirring until smooth. Remove from heat, and set aside.

In a large bowl, combine the sugar and eggs, and beat with an electric mixer until thick and pale yellow, about 3-5 minutes. Add the melted chocolate, melted butter, vanilla extract, and espresso powder, and beat to mix thoroughly.

Sift the flour, baking powder, and salt into small bowl. Add the dry ingredients to the chocolate mixture, and stir with a rubber spatula to just combine. [The batter will be fairly gluey and thick.] Stir in chocolate chips. Place the bowl in the refrigerator, and chill until the batter is firm but not too hard, about 30 minutes.

Preheat the oven to 350 degrees Fahrenheit. Line two large cookie sheets with parchment paper. Drop the batter with a spring-loaded ice cream scoop – mine has a capacity of 2 tablespoons per scoop – onto the prepared sheets, leaving about 2 inches of space around each blob of dough. With moist fingertips, press down on each blob to flatten it slightly. Bake the cookies until tops look dry and crackled, about 11-13 minutes. Do not overbake. Transfer the cookies on the parchment paper to a wire rack, and allow to cool completely. Repeat with remaining dough. Remove finished cookies from the parchment paper, and store them in airtight container.

Note: These cookies freeze beautifully, and they can be frozen for up to a month. Allow them to come to room temperature before serving or eating.

Yield: About 35-40 cookies

11.20.2006

Combine-and-boil

Now, I know I’m really pushing the limits here, with less than 72 hours until the big day, but I just can’t let another year sneak by without sharing one of my favorite parts of the Thanksgiving spread. I hope I’ve caught you in time. Hurry - before you read another word, jot this on your grocery list:

apricot preserves
white distilled vinegar
raspberry preserves
ground cloves
Grand Marnier
fresh cranberries
crystallized ginger
dried tart cherries

That task complete, you’re over halfway to having a bowl of this kicky, warming, sweet-tart stuff on your table. This cranberry chutney is basically a combine-and-boil job, but you’d never know that by its complex, knee-buckling flavor.


My mom has been making this recipe for, oh, at least ten or 15 years. I’m hard-pressed to think of a Thanksgiving when we haven’t eaten it. Mom doesn’t remember where she first found the recipe, which is written in her handwriting on an old slip of paper. But in any case, we have been making it for long enough – and I have tweaked it enough – that it now really feels like ours. I remember many a Thanksgiving afternoon spent standing around the butcher-block island in our kitchen, with my dad on one side, blending cranberries and oranges into a raw relish, and my mom on the other, stirring a pot of this chutney on the stove. Come dinnertime, I would mound a spoonful of each on my plate, alternating raw and cooked with each bite of turkey. But the next day, when the time came for a leftover turkey sandwich, it was always the Tupperware of chutney that I turned to first, with its soft, juicy cranberries, winy dried cherries, and spicy bits of ginger. I would slather the ruby conserve onto a slice of whole wheat bread, top it with a fanned-out layer of turkey, and finish with a second slice of bread. Mayonnaise was optional; my mom spread her second slice with a thick smear, but I studiously avoided the stuff. Either way, that was how we did Thanksgiving, and its leftovers too.


This year, I’ll be toting a Tupperware full of cranberry chutney to Brandon’s family in New Jersey, where I will - [deep breath] - roast my very first turkey without maternal guidance. Lord help me. At least the chutney is a sure thing - that, and the fact that my mother is only a phone call away.

Happy Thanksgiving, friends.


Cranberry Chutney with Crystallized Ginger and Dried Cherries

This chutney is, of course, delicious with turkey, but it also takes kindly to being heaped on the back of a buttered biscuit. We have also tried a spoonful of it in a bowl of sweet potato soup, and it was surprisingly delicious. [Thank you, Dan and Shauna, for giving Brandon such a brilliant idea.] And it also makes a lovely, wintry appetizer atop a crostini smeared with fresh goat cheese. Oh, cranberry chutney, the places you’ll go!

A few notes about ingredients: the original recipe calls for raspberry vinegar, which Brandon tells me is “so ‘80s,” and anyway, most brands of the stuff are sort of gross. If you have some in your pantry, feel free to use it here; otherwise, do as we did and simply substitute a mixture of white distilled vinegar and raspberry preserves. It does the trick just fine. As for the dried tart cherries, Trader Joe’s sells them quite cheaply, and they’re very tasty. And about the cranberries: be sure to pick through them carefully and discard any rotting, mushy, or generally icky ones. There is usually a good handful, if your experience is anything like mine. Lastly, note that this chutney reaches its thick, jammy, finished consistency only as it cools, so it will still be somewhat loose when you first remove it from the heat. The photographs above were taken when mine was still on the runny side, only a few minutes after I had pulled it from the stovetop. Yours will look quite a bit thicker when it is fully cooled.

24 ounces apricot preserves
¾ cup raspberry vinegar, or ¾ cup white distilled vinegar plus 1 ½ tsp raspberry preserves
A pinch of salt
¼ tsp ground cloves
¼ cup Grand Marnier
2 bags fresh cranberries, nasty ones discarded
½ cup finely chopped crystallized ginger
1 ¼ cups dried tart cherries

In a large, heavy-bottomed saucepan, combine the apricot preserves, raspberry vinegar (or vinegar and raspberry preserves), salt, cloves, and Grand Marnier. Stir to mix, and place over medium-high heat. Bring the mixture to a boil, and continue to cook – it will bubble aggressively, and you should stir regularly to keep it from scorching – for about 10-15 minutes, or until it has thickened slightly. Reduce the heat to medium, add the cranberries, and cook until they are soft but not popped. [I know that they’re ready when I hear one or two of them pop; that’s a good indicator that most of them must be getting pretty soft.] Add the ginger and cherries, stir well, and remove from the heat. Cool completely before serving. The chutney will thicken considerably as it cools.

Yield: 8-10 servings

11.19.2006

A scoop alongside

I’ve never been much for Thanksgiving desserts. This admission may be sufficient cause, I know, for calling Homeland Security, but I’m not afraid to say it. Friends, pumpkin pie just doesn’t do it for me. I feel sort of iffy, too, about sweet potato pie, and apple pie is okay, but eh. Likewise, I hold that pecan pie is only worth eating under certain conditions: namely, when it’s light on the gloopy stuff and either a) spiked with bourbon, or b) spiffed up with chocolate. I don’t know. Thanksgiving desserts just seem like a handy excuse to use that stale jar of pumpkin pie spice – what is that stuff, anyway? – and indulge a half-bottle of corn syrup. But a few days ago, I stumbled upon something that could make even me perk up this Thursday, come dessert time. Heck, I would happily eat an apple pie from McDonald’s – you know, the kind that comes in those cardboard sleeves? – if it came with a melty dollop of this salted caramel ice cream.


Like many great discoveries in my life, I owe this one to Brandon. Back in September 2005, less than five months after we met, he bought me an ice cream maker – or, more precisely, Lello Junior gelato machine – for my birthday. When it arrived at my apartment, the delivery driver parked it outside the front door of the building – all 35 unwieldy pounds of it – and I came down, unsuspecting, to carry it upstairs. I read the print on the side of the box and let rip a ladylike snort: I had never declared any desire for an ice cream maker, but on more than one occasion, Brandon had. So here it was, at my door in Seattle. It was quite clear whose present this really was. But I did what any love-struck, butterfat-hungry girl would do: I hauled it upstairs and heaved it into place on the kitchen counter. And when Brandon came for his next visit, he made no fewer than three ice creams and sorbets – two types, in fact, on his first day in town. In the year or so since, I too have become quite attached to our little Lello Junior. It has pretty lines and curves, not to mention that fancy internal compressor, and it purrs like a fat, white cat. And it made possible this lovely stuff, which I cannot urge upon you strongly enough.


Salted caramel has been all the rage in recent years, traveling from its humble origins in the north of France to pastry menus around the world. The presence of salt works a subtle magic on caramel, deepening and brightening its flavor, making it taste somehow more like itself. Here in Seattle, I’m rather partial to local chocolatier Fran Bigelow’s grey salt caramels, dipped in dark chocolate and freckled with a few nubbly crystals. But my new favorite incarnation of the salt-and-caramel duo is this ice cream, from a recipe that recently ran in The New York Times. I have sampled my share of caramel ice creams over the years – whenever I see them on a menu, I can’t resist; caramel churned with cream just sounds so right – but no restaurant or ice cream parlor has ever really wowed me with their rendition. This one, however, did, and by god, it came from my own kitchen.

It starts with a very dark caramel, which, when churned with milk, cream, egg yolks, and the fancy French salt fleur de sel, makes for a very sophisticated, subtly sweet flavor that rumbles slowly around the mouth. And despite its rich ingredients, it doesn’t coat the spoon in that sickening – nay, scary – way that some homemade ice creams do. Instead, it feels almost ethereally light – or, at least, as light as a puddle of egg-enriched cream can possibly be. Finished with a bit of crunchy fleur de sel, it strikes me as a perfect way to dress up and make special the familiar, spiced flavors so typical of Thanksgiving desserts, from apples to pecans and pumpkin. In fact, it would be an ideal topper for any warming, wintry dessert: a gooey-centered square of brownie, maybe, or a pear crisp with toasted hazelnuts. Just last weekend, I served some in a ramekin alongside a slice of tarte Tatin, and we all sat around the table and swooned. It also made a nice snack the next afternoon, eaten from a teacup, with a book on the side. And for those of us who will spend this Thursday in the kitchen, that might be an awfully good plan for Friday.


Salted Caramel Ice Cream
Adapted from The New York Times and Nicole Kaplan of Eleven Madison Park, NYC

Before freezing, the base of this ice cream is surprisingly thin. Brandon and I – suspicious souls that we are – feared that it wouldn’t freeze properly and, if you’ll believe it, almost threw! the! stuff! away! But thank goodness we didn’t, because once frozen, it was silky-smooth. Note, however, that it will likely take longer to freeze than a thicker, more traditional, cooked custard base. We let ours churn for a good 50 minutes – much longer than the norm for other recipes – and even when we spooned it out into a container for the freezer, it was still quite soft. It firmed up like a charm, though, after a few hours in the deep freeze. One final to the wise: the caramel here should be allowed to reach a very dark amber color, darker than you might think. If your stove is good and hot, it won’t take long.

1 ¼ cup granulated sugar, divided
2 tsp light corn syrup
2 cups cream, preferably organic
2 cups whole milk
10 large egg yolks*
½ tsp fleur de sel, plus more for serving

Place ¾ cup sugar and the corn syrup in a medium heavy-bottomed saucepan. Do not stir. Place the pan over medium-high heat, and cook the mixture to a dark caramel, swirling the pan as it begins to brown to distribute the sugar. Add the cream; then slowly add the milk. The caramel will seize and harden, but don’t be afraid. Bring the mixture to a boil, and then simmer it, stirring, just until the caramel has dissolved.

Meanwhile, place the yolks in a large bowl with the remaining ½ cup sugar and the fleur de sel. Whisk to combine. When the caramel cream is ready, pour a splash of it into the egg mixture to temper, whisking constantly, and then another splash or two for good measure. Then pour the tempered egg mixture into the caramel cream. Whisk thoroughly.

Pour the mixture through a fine-meshed sieve into a medium metal bowl. Place the bowl in an ice bath to cool the mixture completely. Remove the bowl from the ice bath, cover it with plastic wrap, and refrigerate overnight. Freeze in an ice cream maker according to the manufacturer’s directions. Serve with additional fleur de sel sprinkled on top.

* Technically, Kaplan’s method - as with many other homemade ice creams - may not cook the eggs to an adequate temperature to kill Salmonella bacteria. The New York Times didn’t make a fuss about it, so I decided not to either, but if you are concerned, click here.

Yield: about 1 quart

___

And last but not least, if you’re still putting the finishing touches your Thankgiving menu, here are a few ideas from the archives:

Apple and Butternut Squash Soup
Braised Fennel
Braised Green Cabbage with Onions and Carrots
Braised Red Cabbage with Apples and Caraway Seeds
Butternut Purée with Maple Syrup
Butternut Squash Soup with Pear, Cider, and Vanilla Bean
Caramelized Cauliflower
Cranberry Linzer Tart
Dreamy White Beans
Fresh Ginger Cake with Caramelized Pears
Ginger Pear Upside-Down Cake
Hashed Brussels Sprouts with Poppy Seeds and Lemon
Sweet Potato Biscuits
Tarte Tatin
Touch of Grace Biscuits
The Winning-Hearts-and-Minds Cake

And come back tomorrow, when I will post my family’s favorite take on the cranberry theme, a cranberry chutney with crystallized ginger and dried cherries. It’s so good that Brandon had to hug me after his first bite. That’s what I call Thanksgiving.

11.13.2006

The case of a certain squash purée

Sometimes, I must admit, I fall down on the job. Take, for example, the case of a certain squash purée. I first made it three whole years ago, and though it has since made many (sold out! standing room only!) appearances at my table, it has somehow never been documented here. I suppose I should offer some sort of fancy excuse, but really, all I can say is this: it just wont sit still for the camera. It’s silky, slinky, beguiling stuff, and it always vanishes before I can snap a photo. But when I made a batch this weekend, I – having learned from my mistakes, not to mention being rather persistent – plunked it right down for a photo session, tout de suite, before it could sneak away. And so, with no further ado, I am delighted to introduce at long last – in a rare moment sans eager forks and spoons – this seductive bowl of butternut squash, maple syrup, and sweet butter.


Now, it may not sound like anything out of the ordinary, because on paper - or a computer screen - it really is pretty simple. Heck, it has only five ingredients, including water and salt. Its warming flavor is exactly what you expect from butternut squash, but miraculously, even better. A nudge of maple syrup makes the squash’s earthy sweetness step up and shine, while butter smooths its starchy edges into submission. I like to think of it as the savory equivalent of a chocolate pudding, all soft corners and easy swallows. It’s smooth and soothing, the sort of thing that makes you want to lift the plate to your chin and - for lack of a more ladylike expression - shovel it in. All of which makes it a natural for the Thanksgiving table, where comfort reigns, as well as for any number of wintry occasions; and hence my hurry to tell you about it - three years late.

I have made this purée each Thanksgiving since 2003, when I stumbled upon the recipe and made it for my mother, myself, and my boyfriend-at-the-time in my cramped apartment kitchen. Being mainly a vegetarian in those days, I served it alongside a spinach soufflé, with braised red cabbage and my favorite biscuits. [My mother, a true sport, gamely agreed to a fowl-less holiday.] It was our first Thanksgiving without my father, and we left an empty place setting where he would have sat. In retrospect, I think he would have preferred that we pile his plate high with turkey and stuffing, but since that was not an option, maybe I should have made him an offering of butternut squash purée. He always had a weakness for anything with its sort of texture - mashed potatoes, Cream of Wheat, scrambled eggs, soft polenta. Knowing him, he would have stirred a big splash of cream into the squash, turning it from glowing orange to a muted, frothy gold. Maybe I’ll try that one day, if I can manage to keep from eating it all first.


Butternut Purée with Maple Syrup
Adapted from Gourmet, November 1993 and 2003

This is one of those simple, simple recipes that sneak into your repertoire so seamlessly that you hardly even notice. If you’re anything like me, you’ll wake up one morning to find that you’ve already made it a half-dozen times. Aside from being delicious from the first spoonful, the best thing about this purée is that it actually improves with age. Try to make it at least a few hours ahead – if not a day or two. A little rest in the fridge allows the flavors to gel, and the texture, too, settles into a silkier state. If you don’t have a food processor, you could probably do just fine with a potato masher, although the texture won’t be quite as smooth. No one will mind, though; trust me. And a word about the maple syrup: its flavor is not pronounced here - it brings only a subtle sweetness, no more - so if you like a strong maple flavor, you might add more than I call for. Note also that this recipe is easy to halve, but I hardly find it necessary. It will get eaten, no matter how much you make.

5 lb butternut squash, peeled, seeded, and cut into rough 1-inch pieces
2 cups water
1 ¾ tsp salt, or to taste
1/3 cup maple syrup, or to taste
3 Tbs unsalted butter, cut into dice

Place the squash and the water in a large (5- or 6-quart) pot. [The water will not cover the squash.] Sprinkle 1 tsp of the salt over the squash. Place the pot over medium-high heat, cover it, and bring it to a simmer. Adjust the heat as necessary, and simmer until the squash is very tender, about 15 minutes.

Using a slotted spoon, transfer the squash to a food processor and process it until smooth, adding cooking liquid as needed. I don’t add much liquid – only a little splash or two if the food processor seems to gum up. You will probably need to process the squash in batches, transferring the purée into a large bowl as you go. Stir in the maple syrup, butter, and salt – the squash should still be hot enough to melt the butter – and taste to adjust seasoning as necessary. Serve warm.

Note: This purée can – and, I say, should – be made little bit ahead and chilled in an airtight container. Reheat in the microwave or a 350-degree oven, adding a bit of water if needed.

Yield: 8-10 servings

11.06.2006

Special occasions, special measures

Never mind that I was awake into the wee hours last night, having coughing fits and nearly choking to death on a Ricola lozenge: as of this post, I am hereby trading my fever for holiday fever. It is the second week of November, with Halloween now tucked away for another year, and nothing can stop me from taking a great, whooping, breathless dive into all things holiday – not even the fact that the only thing really whooping around here right now is my cough. But pay no attention to that. I love the holiday season, and I sincerely hope that you do too, because for the next several weeks, that’s what I plan to talk about around here. You curmudgeons and Grinchly types will just have to roll your eyes and content yourselves with a lump of coal.

Now, understand: I do not plan to tell you how to roast a perfect turkey or make a pan gravy that will impress your mother-in-law. There are plenty of other places to do that, and anyway, if you’re anything like me and mine, you have your own favorite heirloom methods and formulas. Instead, I want to talk about the other – and, I think, more inspired – items that orbit the holiday table: the pre-meal nibbles, the sprightly side dishes, the sweet little things you pack in shiny tins and deliver to a friend’s front stoop. There will be cookies, of course, and a chutney or two, and maybe even an ice cream: things to give away, and things to eat by the spoonful. But first, as is the case on so many occasions, there will be crackers and cheese. Or, more specifically, the most delicious single combination of butter, cheddar, and flour to cross your lips.


Before I say another word, I should issue a little disclaimer: I am not, people, one of those types who make their own crackers on a regular basis. If I’ve got friends coming over, I open a box of the store-bought kind, not the oven door. But special occasions call for special measures, and this holiday season, I am happy to announce a strange, Martha-esque milestone in my kitchen career: I made my own crackers. And by god, I would – and will – do it again in a heartbeat. These things are delicious, and astoundingly easy too. They’re really just a slice-and-bake job.


Lacy, crisp, and flaky with butter, these beauties are my kind of prelude to a holiday meal. They melt on the tongue like a communion wafer – the transubstantiation of cheddar, perhaps – delivering a concentrated dose of flavor that belies their diminutive size. Each is no bigger than a silver dollar – in diameter and in depth – which makes them just the thing for nibbling before a big, festive dinner, when family and friends hover around the kitchen like well-trained vultures, waiting for a scrap. I can also imagine bringing them, along with a bottle of champagne or red wine, to a wintry weeknight dinner with friends, or putting a tray of them on the table at a holiday open house. These sophisticated little meltaways need no accompaniment, and anyway, they might crumble under the weight of one. They’re best on their own, savored in delicate, crumbly bites – although if push came to shove, I imagine they could be quite irresistible, too, with a thin, feathery slice of apple on top. Either way, this is a recipe to lodge firmly in your repertoire from this holiday forth, or, frankly, anytime.


Cheddar Crisps
Adapted from Gourmet, November 2006

The original version of this recipe yields three types of seasoned cheddar crackers: one flecked with black pepper, one with caraway seeds, and one with nigella seeds. But seeing as I couldn’t find nigella seeds in my usual grocery store loop, I took the lazy way out and left a third of my crackers plain instead. If you’ve got nigella seeds lying around, have at it - but if not, don’t worry: these crisps are plenty good plain, sans seeds or pepper or other seasonings. Be sure, however, to use a tasty cheddar, one that you would happily eat on its own. I chose Black Diamond. Not only is it easy to find pretty much anywhere, but it is also my standard, never-fail cheddar for pretty much any use. Oh, and for the record, the black pepper variety is delicious with champagne; we gave it a good, thorough test tonight, just for your benefit. And I imagine that the caraway version would be wonderful with nearly any beer, though I might reach first for a Belgian ale.

1 stick (4 ounces) unsalted butter, at room temperature
¾ lb sharp cheddar cheese, coarsely grated (on the large holes of a box grater or in a food processor fitted with the shredding attachment)
1 large egg yolk
1 cup unbleached all-purpose flour
1 tsp dried mustard
¾ tsp salt
1 tsp black pepper, coarsely cracked in a mortar and pestle
1 tsp caraway seeds

Combine the butter, cheese, and yolk in the bowl of a food processor, and blend until smooth. The mixture may seem very thick and lumpy and cement-like at first, but persevere, stopping the machine and scraping down the sides as needed; it will eventually come together into a smooth, thick paste. When it does, add the flour, dried mustard, and salt, and pulse until just combined. Transfer the dough to a sheet of wax paper, and divide it into three portions. [Do not clean the food processor yet.]

Return one portion to the food processor, add the pepper, and pulse until combined well. Transfer the dough to another sheet of parchment paper. Using the paper as an aid, shape the dough into a log roughly 7 inches in length and 1 ½ inches thick. Roll up the log in the paper, and twist the ends to seal it closed. Clean the processor and dry it well. Make another log on a separate sheet of wax paper in the same manner, using caraway seeds instead of pepper. Place the final, unseasoned portion of dough on another sheet of wax paper, and make it into a log as well. Chill the logs until firm, about 2 hours.

When you’re ready to bake the crisps, put an oven rack in the middle position and preheat the oven to 350 degrees Fahrenheit. Line a large baking sheet with parchment paper.

Unwrap one log and, using a paring knife, cut enough thin slices – about 1/8 inch thick – from it to cover the baking sheet, arranging the slices about 1 inch apart. Bake the crisps until their edges are golden, about 10-12 minutes. Transfer them on the parchment to a rack, and cool them slightly, about 15 minutes. Repeat with the remaining dough.

Serve crackers warm or at room temperature.

Note: The dough can be chilled, wrapped in foil or a plastic bag, for a week or frozen for up to two months. The crackers can be baked a few days ahead and cooled completely, then stored in an airtight container at room temperature. If you like, you can reheat them on a baking sheet in a 350-degree oven for about 5 minutes.

Yield: about 100 crackers

11.03.2006

A popover worth the wait

So, have you ever had one of those days when you do or learn or eat something so fantastic that you can’t wait to tell the whole world, and then by some cruel twist of fate, the whole world seems to conspire to shut you up? First, let’s say, you get a wretched sore throat, followed by a snotty, now-stuffed, now-dribbly nose. And then the hard drive of your computer up and dies, just like that, with nary a warning or whimper. And then you feel sorry for yourself and slouch around for a few days, sans computer, sneezing all over your old, beloved gray sweatshirt. Ever had that happen? Yeah? Me too. It’s been a bad week. The last truly good thing I remember was the popover I ate on Sunday morning - and oh, what a popover it was. I would have told you about it a few days ago, were it not for, well, all this. Please pardon my delay, and my cold, and my computer.

What I’ve been meaning to tell you is this: popovers, I’ve decided, are my ideal breakfast food. Don’t get me wrong – I do love my usual plain yogurt and granola, but I’m talking ideal here. Popovers are about as close as you can get to eating clouds without leaving the kitchen.


An American adaptation of Britain’s Yorkshire pudding, a popover is a light, hollow roll made from an eggy batter, so named because it “pops” up and out of its pan as it bakes. Popovers enter the oven as mere puddles of batter but bake up, an hour or so later, into billowing, buttery, ethereal poufs. Lighter but no less special than a croissant or cinnamon roll, they boast golden, crisp crusts and a soft, custardy inner lining, perfect for a smear of jam or honey – or for eating plain, in big, greedy bites.


Some people might serve them as part of a big spread, but to me, what makes popovers so lovely is that they fill the belly just enough, but never too much. Last Sunday, Brandon and I sat down at the breakfast table with a basket of these, two pots of jam, and orange juice, and, between bites and slurps, agreed that anything more would have spoiled the charm. A couple of popovers, steamy and butter-scented, is all a girl needs on the average morning. In cases of severe hunger, a bowl of tart yogurt might be nice alongside, but for those of us who like to leave room for lunch, it’s entirely optional. And should you have a popover or two left over – lucky you! – come noontime, they rewarm nicely in a moderate oven and go swimmingly with a bowl of soup.

Speaking of which, a cauldron of chicken noodle sounds pretty good right now – both for soothing my throat and for submerging my entire body. That may be in order for the weekend. But one thing is certain: Sunday morning will find us again in front of the oven, waiting for our popovers to pouf and pop, signaling the close of a very sub-par week and the start of a new one.

P.S. A big, huge, sloppy thank you to Brandon for letting me borrow his beautiful new MacBook Pro, and for spending hours on the phone with Dell, and for making me a piña colada in a fancy glass. I owe him something very nice, as soon as I stop snorting and sneezing.
P.P.S. And a warm thank you to dear mav, who gave me the beautiful linen dish towel pictured above.


Butter Popovers
Adapted from The Bread Bible, by Rose Levy Beranbaum

Not only does this recipe produce a delicious popover – crispy on the outside, airy and spongy on the inside – but it also is a real snap. Whereas some popover batters require a rest before baking, this one can go straight into the oven, thanks to the wonder of Wondra. In the words of Rose Levy Beranbaum, Wondra flour is

a granular form of flour developed by General Mills. It dissolves instantly in liquid because it has been subjected to a process called agglomeration. It is produced essentially by misting flour with water and then spray-drying it with compressed air, which separates the flour into particles of even size and shape that will not clump when mixed with liquid.

It may sound sort of fancy, but Wondra can be found in most American grocery stores. We found it on the flour aisle of our usual store, in a blue cylindrical cardboard can. Aside from that, you need nothing else unusual, except the popover pan. For this recipe, you’ll want a standard-size popover pan with six wells, or a 12-well mini popover pan, or a standard 12-well muffin pan. Note that if your pan is made of black metal, you will need to lower the initial temperature to 400 degrees, rather than 425. I missed that little hint the first time I made these, and my popovers were finished in about 45 minutes total, rather than an hour. Their rise was also a little stunted, if you ask me.

1 cup plus 3 Tbs Wondra flour
½ tsp salt
½ tsp granulated sugar
1 cup whole milk
2 large eggs
4 Tbs unsalted butter, melted and cooled but still liquid, divided - plus a little more for greasing the pan

Preheat the oven to 425 degrees Fahrenheit. Set a rack on the second level from the bottom of the oven.

In a medium bowl, whisk together the flour, salt, and sugar. Slowly add the milk, whisking continuously. Using handheld beaters or a whisk, add the eggs one at a time, beating for about 1 minute after each addition, and then until the batter is smooth. Beat in 2 tablespoons of the butter. Don’t worry if the butter seizes a bit into little clumps. (If you don’t plan to use the batter immediately, cover it with plastic wrap, and refrigerate for up to 24 hours. Beat it lightly with a whisk before using.)

Use a pastry brush to thoroughly coat the inside of each well of the pan with some of the remaining melted butter. [Do not skimp, or the popovers might stick!] Then spoon about 1 teaspoon of additional butter into each well of the popover pan. If you’re using a mini popover pan or a muffin pan, use only ½ teaspoon per well.

About three minutes before baking, place the pan on a baking sheet and slide it into the oven to warm. The butter should get very hot and begin to brown, but do not allow it to burn. Remove the pan from the oven, and divide the batter among the wells. Bake for 15 minutes. Lower the temperature to 350 degrees and continue baking for about 35 minutes for standard popovers or about 20 minutes for smaller or muffin-size ones, or, most importantly, until the popovers are puffed, golden brown, and crisp to the touch. About five minutes before the end of the baking time, open the oven door and – carefully! – make a small slit in the side of each popover to release steam and allow the insides to dry a little. Do not open the oven until this point, or the popovers might deflate.

When the popovers are ready, remove the pan from the oven. With a pot holder, gently lift them from the pan one at a time, holding onto them from the top. [You might need to loosen them a tad around the edges with a knife.] Serve immediately, with jam, honey, or – for the extra indulgent – butter. I liked them best plain, but jam was nice too.

Yield: 6 standard popovers, or 12 smaller popovers